| |
| |||||||
 |
| | LinkBack | Thread Tools | Display Modes |
 02-26-2013, 03:52 PM
| #1 |
| Newbie Join Date: Feb 2013 Location: Janesville
Posts: 20
|
Some of you may have seen my post in the newbies forum a couple days ago, basically I was testing the waters on crawlers trying to figure out whats out there to build. Build, that's what I really wanted to do and I figured a crawler of some sort would be a good project. I found the SCX10 Dingo kit and that looks really awesome but I just couldn't spend the cash on it at the moment. So instead of buying a kit to assemble, I looked at more and more crawlers and thought "hey, I could probably make a chassis and use a lot of the parts from my Slash to build one." So...that's what I started. I tore the Slash down and grabbed the shocks, steering & camber links, the trans, the XL-5, and the receiver. I started measuring stuff and pulled up Photoshop on my laptop and started drawing out a design. After I made my first design, I went downstairs, grabbed some old cardboard boxes, a razor blade, a black sharpie, and a 2ft metal ruler. I printed my chassis design out and laid it out on the cardboard and started cutting it out. I just used some scotch tape to hold it together in 3D to make sure everything fit and that I liked how it looked in person. The problem? I didn't like it. It was too big, in my opinion. The first design was 9" across the top, dropped down 2 inches, then angled down to the bottom portion that was 3", and was 3.5" across. If you don't have a mental picture already that's fine, I've included visual aids  . The design seemed ok (very simple, but I don't have any fancy tools to make this) it just seemed too big to allow room for the suspension to move properly, so I decided I could scale it down if I made a separate mount for the battery that would bolt to the chassis. Now it measures out at 4.75" across the top, drops down 1", angles in to the bottom which is 3" across, still 3.5" wide. So then I built that out of cardboard, and it seemed much more compact, which I think will be good for mounting suspension parts and bodies, less chassis to interfere. . The design seemed ok (very simple, but I don't have any fancy tools to make this) it just seemed too big to allow room for the suspension to move properly, so I decided I could scale it down if I made a separate mount for the battery that would bolt to the chassis. Now it measures out at 4.75" across the top, drops down 1", angles in to the bottom which is 3" across, still 3.5" wide. So then I built that out of cardboard, and it seemed much more compact, which I think will be good for mounting suspension parts and bodies, less chassis to interfere.Here is a picture of the basic chassis layout.  It's modeled as 1/4" pieces of metal. I think I will make the the sides and bottom motor mount out of 1/4", not sure about the top portion. I plan to mount the receiver and XL-5 on top, but I could probably make a lighter "tray" to hold them and use thicker material to brace the two sides at the top on each end(where it shows the screw holes). I'm thinking I should either add some sort of cage to the top to protect the electronics or if a body plus body mounts will be good enough. I also accidentally ordered some .024" stainless from mcmaster instead of .25" so I was also considering doing a custom "body" with the cage and stainless panels. So please, tell me what you think so far(cause I can still change it if it sucks! lol) and let me know if you have any advice or ideas, I appreciate them all since I jumped into this with very little knowledge about RC crawlers (I pretty much knew they looked cool). Things I have to address still... 1. I'm sure there is a name for the type of chassis I've built, I've seen many that are similar. I should probably figure out what it is so I can refer to it correctly. 2. I need axles. I literally have no idea what the pros and cons of the different axles available are. I have no idea what ones are wider or taller, which ones have hexes available that will fit the slash wheels and tires(for now, once it's further along and I know what the chassis and suspension is capable of I will worry about decent tires), or which ones have a input shaft that will work with whatever driveshaft ends up between the traxxas trans and the axle. If that wasn't enough, I'd love to be able to keep the cost down on this. I'd rather not spend $100 for a pair of axles when I could buy a whole Dingo kit for $250. 3. How exactly I will mount the suspension links to the chassis. I've got an idea in my head and I will use the 3D modeling to help me see how it will work. 4. I'm sure there is lots more but I've typed enough for this post and I can't come up with anything more at the moment. If I do I'll post again. |

|  |
| Sponsored Links | |
| | |
|
02-26-2013, 04:33 PM
| #2 |
| Quarry Creeper Join Date: Jan 2013 Location: Benicia/Vallejo
Posts: 490
|
1/4" is overkill. I usually draw my design free hand before making any blueprints or anything.
|
|
| |
|
02-26-2013, 05:15 PM
| #3 |
| Pebble Pounder Join Date: Oct 2012 Location: Graham WA
Posts: 184
|
For a crawler, you'd want to keep weight down, both in actual rig weight, and installing things as low as possible, or on the axles. It seems you jumped in quite a bit, but have knack for it. I'd suggest just combing through the forums, build threads, and just soaking some things up. BTW. 100 bucks for axles is around correct. Wrong RC style to get into if you want to be cheap. These are nothing but money pits. |
|
| |
|
02-26-2013, 05:25 PM
| #4 |
| I wanna be Dave Join Date: Oct 2010 Location: Caldwell ID.
Posts: 4,328
|
1}Your chassis is called a T.V.P. (Twin Vertical Plate) chassis. It looks good. 2} Axles, (axial)ax/scx axles are incredibly strong and have unlimited upgrades. Same with Wraith/Ridgecrest. The diferance is the ax axles are about 2" narrower. 3}You can make a center skid with mounts or mount them to ea side of the chassis rails... ;) |
|
| |
|
02-26-2013, 05:43 PM
| #5 | ||
| Newbie Join Date: Feb 2013 Location: Janesville
Posts: 20
| Quote:
Quote:
Yeah I realize I jumped into the deep end with this idea, now I gotta see if I can swim back out. I've been going through this forum and others looking at others builds and trying to learn what I can from them but its hard to to pick some of this stuff up since I'm pretty new to it. That's why I posted this thread, figured I could show what I was doing and if it looked off to you guys I'm sure you'd correct me. I appreciate it! It's kinda a bummer about the axles though. I was hoping I could find something that was maybe a bit outdated but would work out ok with this build. Maybe pick something up used off ebay or something, who knows. I'll have to keep my eyes open. | ||
|
| |
|
02-26-2013, 08:23 PM
| #6 | |||
| Newbie Join Date: Feb 2013 Location: Janesville
Posts: 20
| Quote:
Quote:
Quote:
2. EDIT: Nevermind, found my answer searching the forum. 3. Well yeah ;) Just not sure the best way to do that to minimize binding and to have the proper "angles" for the links. I honestly don't know much about 4 link suspension, I've never worked with it before (in 1:1 or RC) so I'm trying to learn what I can from pics and whatever info I can find in posts. Right now I've got the mounts for the lower link on the lower four corners of the chassis but I don't think this will give me much "triangulation" of the lower links due to where they will likely attach to the axle. Now, like I said I'm not a 4 link expert so I don't know if triangulation is all that important or not, but it seems like it is from what I've seen so far. Last edited by Maverick52; 02-26-2013 at 09:03 PM. | |||
|
| |
|
02-26-2013, 08:25 PM
| #7 | |
| Newbie Join Date: Feb 2013 Location: Janesville
Posts: 20
| Quote:
| |
|
| |
|
02-26-2013, 09:57 PM
| #8 |
| Newbie Join Date: Feb 2013 Location: Janesville
Posts: 20
|
Thought I'd share the changes so far. I've learned a few new tricks in Sketchup doing this and I really enjoy using this program, it's so easy to use and logical. 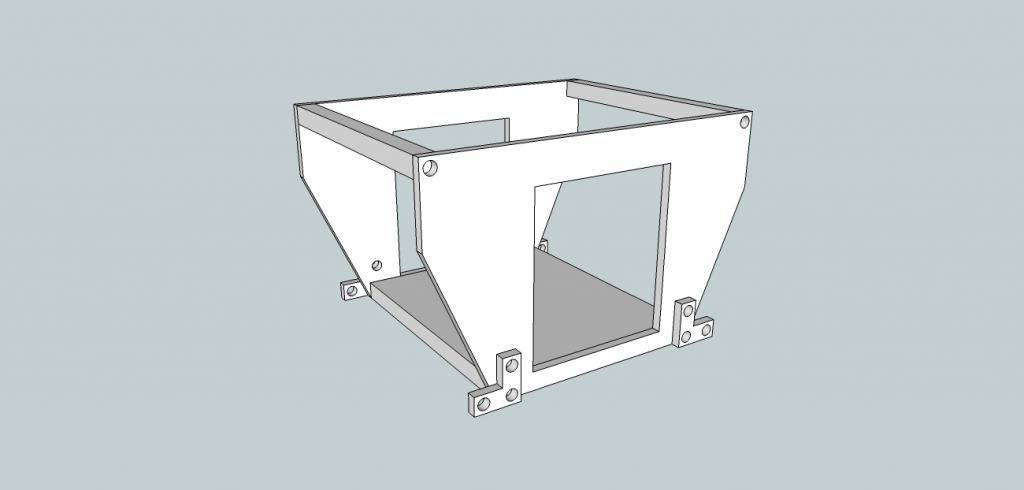 I added the L brackets on the bottom to mount my lower links. The reason I didn't just have them mount to the chassis is I think they will hit or bind on the chassis bottom plate when the suspension is flexing. Putting them like this should give them a little room to breathe from the chassis and they wont be lower than the bottom, so they shouldn't get hung up on anything either. I'm probably going to use the L bracket design to mount the shocks, the upper links, and the front battery tray. Just have to figure out where I want to place them. I'm going to watch a few more Sketchup tutorials and see about spacing holes along the edge of the chassis that would allow me to move the L brackets if need be. I know the program can do it, just not sure how. Also, in case anyone is wondering why the big ugly square hole is cut in the center, it's to help the trans fit. 3.5" is just a bit too tight for it(without shaving it down |
|
| |
|
02-26-2013, 10:17 PM
| #9 |
| www.ottsix.com Join Date: Mar 2011 Location: Albuquerque, New Mexico USA
Posts: 2,050
|
You're a true hobbyist! Always nice to see |
|
| |
|
02-26-2013, 11:32 PM
| #10 |
| I wanna be Dave Join Date: Oct 2010 Location: Caldwell ID.
Posts: 4,328
|
I will be watching, you can check out the ax10 section for some ideas for your tvp. Let me know if you have any questions. Last edited by lonleycreeper; 02-26-2013 at 11:41 PM. |
|
| |
|
02-27-2013, 08:50 AM
| #11 |
| Newbie Join Date: Feb 2013 Location: Janesville
Posts: 20
|
Woke up early this morning to deal with the snow, decided to do some modeling before I got ready for work. Added "brackets" for the upper links, and the shock "brackets". The one is longer because I'm going to use it to also hold the battery. I'd like to get it lower but I think it will interfere with the suspension, and I think it's too big to strap to the axle like I've seen others do. It's a Flightmax 4000mah hardcase lipo so it's kinda big for this. The upper link brackets I made another hole on top and on bottom of where the bracket is placed currently so I can adjust as needed. Bracket can always be flipped too. Was going to add another adjustment hole for the shock brackets to move down but that hole was awfully close to the top upper link hole, I'm pretty sure you couldn't have the shock brackets all the way down and the upper link bracket all the way up, they'd hit. So I left it out of the model for now. I might add it back in just because I'd like to have it as an option. The hole being there wont cause any problems by itself, I would just have one scenario where the brackets would conflict. I might also be able to mount the upper link brackets on the inside to resolve the conflict, just not sure if the screw heads/nuts would hit or not. Might have to get a new battery for my calipers and start measuring some hardware I'm also thinking of adding more holes to the battery/shock bracket and using the same length bracket in the rear. More options for shock placement then, and if I switch to a smaller battery I might be able to make them more useful.  EDIT: Forgot to mention, the more I design this chassis the more I realize how big of an influence Erector sets were on me as a kid, lol. |
|
| |
|
02-27-2013, 07:14 PM
| #12 |
| www.ottsix.com Join Date: Mar 2011 Location: Albuquerque, New Mexico USA
Posts: 2,050
|
Are you going to use a cnc or cut this some other way?
|
|
| |
|
02-27-2013, 09:05 PM
| #13 | |
| Newbie Join Date: Feb 2013 Location: Janesville
Posts: 20
| Quote:
I've thought about contacting the local tech school and seeing if any of the students would want to cut this out in class for me, but I doubt it. The other option I thought about is there are some guys I know on another forum I visit that have mills and/or cnc machines in their home shops. I might be able to trade them some stuff to cut these. I looked at the rack of metal at work today. I'm debating about going with 1/8" aluminum or 1/16". We only had thin, long strips of aluminum at work. The 1/8" was pretty rigid, the 1/16" "wiggled" pretty easy. On the other hand, the 16 gauge sheet metal (roughly 1/16") was pretty rigid also. Might just be steel vs. aluminum there but I'm wondering if a sheet of 1/16" aluminum would be less "wiggly", I kinda doubt it though. Last edited by Maverick52; 02-27-2013 at 09:12 PM. | |
|
| |
|
02-27-2013, 10:29 PM
| #14 |
| I wanna be Dave Join Date: Oct 2010 Location: Caldwell ID.
Posts: 4,328
|
my recomedation is go 1/8" aluminum. It is alot easier to drill than the steel. Cutting is about the same, plus you will need less cross bracing.
|
|
| |
|
02-28-2013, 08:30 PM
| #15 |
| Newbie Join Date: Feb 2013 Location: Janesville
Posts: 20
|
Did a bit of thinking on how exactly I planed to attach the Slash trans to the bottom of the chassis. I originally had designed this 1/4" and because of that I had enough thickness to drill 4mm holes into the bottom plate to attach both vertical plates. I could then drill through the bottom of the plate to screw the trans down. Once I moved away from the 1/4" material I had to come up with something else. I thought I could just use the thinner material and have "tabs" come up to attach the bottom plate to the sides, but making the tabs I would either have to cut them out in one piece with the bottom square with the intention of bending the tabs up, or I would have to weld tabs on. The problem with this is a) bending the tabs would be a PITA and I would probably screw at least one up b) I don't have a welder capable of welding aluminum and c) tabs+lock nut+screw end would interfere with the driveshafts on one side. The solution was built into the trans already. As I stared at it I realized the "wings" on the side (where the A arms bolt to for the Slash) would make good mounts. I had already redesigned the top portion of the chassis to be braced with two 16mm hexagonal standoffs, with M4 threaded rod between them to make up the rest of the 3.5". I could use the same setup on the bottom and have the threaded rod go through the holes on the "wings". I'll need to use a smaller standoff, or possibly just drop the standoffs on that side and use a nut on either side of the vertical plates so that the trans will still fit between the plates. The cool part of using the standoffs on each side and threaded rod between is that I can adjust the chassis width if I need to. I'm not sure how often I'd need to do something like that but hey, options are good, right? Here is a picture of the traxxas transmission if anyone is unfamiliar.  I also added in the battery/shock brackets. Those are the long L brackets at the top of the chassis. The red box represents the battery I currently have, it's a little under 5.5" long. I was originally worried that mounting it like this would cause the overall length to be a bit large, but after searching through the site I see that lots of people are running crawlers with 15-16" wheelbases. Mine wont be that long so that reassured me that I wouldn't have to mount my battery sideways(which I was worried would make it too wide, so that a body wouldn't fit). I didn't model any extra holes on these brackets yet as it would be a little time consuming to put holes the entire length and pointless since I haven't completely figured out what wheelbase I want. Once I have a better idea of where the axles will sit under that bracket I will be able to figure out where to put several holes in so I can have some options for what angle I want the shocks to lay at. I think I said this before, but I really like the L bracket design. It gives another configuration option just by flipping the bracket. For instance, if I don't want the battery to sit on top of those standoffs, I can flip the L brackets and hang it from them. They (along with the threaded rod between standoffs) allows me to move them from the outside of the chassis to the inside also if I want. I've also decided that I'm going to use a stock E-Maxx body since it's going to be pretty heavy on Traxxas parts, I thought it would be fitting. The main reason I picked it is because it's long enough to cover the entire chassis + shock brackets and narrower than the axles(I think I should go with Wraith axles since they're offset, I'm afraid if I use AX10 axles my driveshafts will bind too much).  |
|
| |
|
02-28-2013, 09:50 PM
| #16 |
| I wanna be Dave Join Date: Oct 2010 Location: Caldwell ID.
Posts: 4,328
|
Alot of crawlers use a thick 1/4" piece for the skid/lower and 1/8" for the side plates. Walmart cutting board makes a great skid plate. Slippery strong and easy to cut, easier than aluminum. I like your trans mount. Instead of L shaped brackets you could just drill your mounting holes on the side plates. Also consider moving your battery lower, on a side plate or upper links maybe. As it sits now your center of gravity(cog) will be really high. Last edited by lonleycreeper; 02-28-2013 at 10:04 PM. |
|
| |
|
03-01-2013, 11:43 AM
| #17 | |
| Newbie Join Date: Feb 2013 Location: Janesville
Posts: 20
| Quote:
The reason I made the L brackets is because I felt from my mock up that the rod ends would be hitting/binding on the vertical plates if they were just bolted to them. The L brackets gave me a little distance between the chassis plates and the mounting holes so that should in theory give me less problems. Honestly I would much rather NOT make the L brackets, since they're going to be a PITA to cut out and drill. I'm just not sure if the rod ends will work without them. What I plan on doing to test this is make the vertical plates out of some plastic sheet I have laying around. This will give me a more rigid and accurate mock up than the cardboard. The cardboard was just quick way to visualize what I was thinking, and it worked good for that. I've got some velcro straps in my toolbox that have no home so i planned to attach the battery to the bracket with those, maybe some zip ties to keep them in place. This should let me move the battery from on top where its shown to underneath. I don't know if it will fit quite yet since I haven't mocked up or modeled the suspension. I appreciate the tip for using the cutting board, that should work out pretty good. | |
|
| |
|
03-02-2013, 10:44 AM
| #18 |
| Newbie Join Date: Feb 2013 Location: Janesville
Posts: 20
|
So overall I think I'm pretty happy with the design how I have it now. So now that I know what I'll need I've started shopping for the materials & hardware. I'll list it out in case anyone is curious what this will take to go together. These part #'s and prices will be from McMaster Carr, it's a pretty awesome website for finding exactly the hardware or material you need. 95947A048 Metric Female Threaded Hex Standoffs Aluminum 6mm Hex Size M3 threads 16mm long Qty 1-9 $0.86, Qty 10-up $0.72 (needed 16, $11.52) 98861A040 Metric Low-Strength Steel Threaded Rod Class 4.6 Plain Steel M3 threads 1m long - $1.39 or 90024A040 Metric Stainless Steel Threaded Rod 18-8 Stainless Steel M3 threads 1m long - $4.27 (I'm thinking stainless so I don't have to worry about any rust, but you could go with the cheaper rod also. This is for in between the standoffs.) 91292A027 Metric Socket Head Cap Screw 18-8 Stainless Steel M3 threads 14mm long Qty 100 - $3.26 (wont need 100, but this is the qty they come in) 93625A100 Metric Nylon-Insert Hex Locknuts 18-8 Stainless Steel M3 threads Qty 100 - $5.31 (again, don't need 100 but thats how they come) 98861A050 Metric Low-Strength Steel Threaded Rod Class 4.6 Plain Steel M4 threads 1m long $1.05 (this is for the suspension links, will be covered with brake line probably) I plan to pick up the 1/8" aluminum from somewhere else. What I really need is a 6" x 12" sheet to keep wasted metal to a minimum, however the closest McMaster has a is a 12" x 12" @ $28.02. I found a company called Speedy Metals who has a warehouse about a hour from me that sells a 12" x 12" sheet (unfortunately they don't have 6" x 12" either) for $12.56. My wife travels a lot for work and will be nearby their warehouse on a pretty frequent basis, according to their website she should be able to pick it up there when I place my order. I'm also going to check the Fastenall and Ace in town to see if they have the hardware I need for a similar price. If I can avoid the added cost of shipping this project will be that much cheaper! My wife also said I can pick up one of the white Poly cutting boards at the dollar store for cheaper than Walmart ($10). Here is the newest pic of the model. 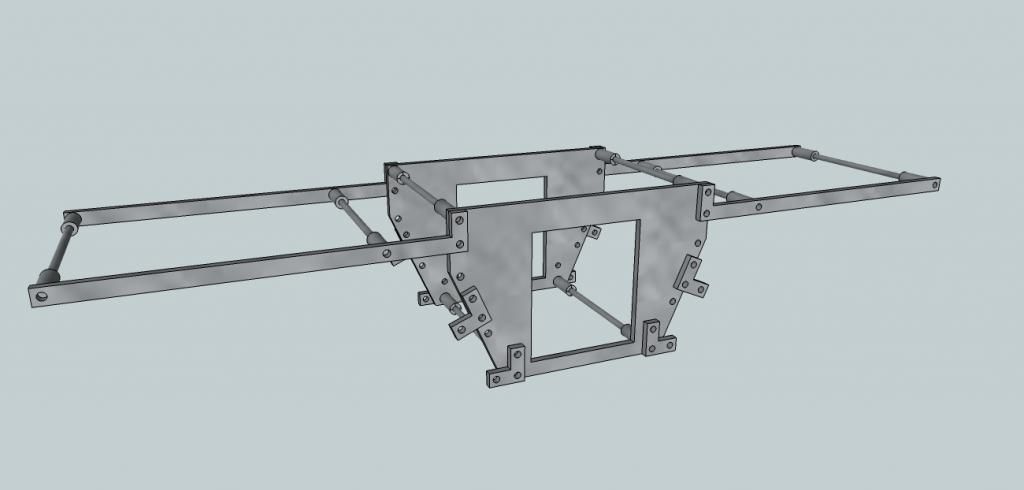 Not much changed from before. I changed the holes from originally using M4 hardware to using M3 hardware. I did this because the holes on the transmission for the Slash's A-arms use M3 hardware, and I'd rather not drill out the holes in case I want to rebuild the Slash at some point. Also the holes for the rod ends were M3 not M4 so it just made sense to switch everything over. The reason I had to switch in the first place is because when I decided to start designing this my digital calipers were at work so I just guessed at what size the screws were, I brought them home after I started this and did the measuring I needed to do to be accurate and then I made the adjustments in the model. My next step will probably be cutting a plastic mock up before I spend the cash on the materials, just to make sure it will work out ok. I have this weekend off work so I'm going to dig around the basement and garage and see what I can find to use in my mock up |
|
| |
|
03-02-2013, 04:28 PM
| #19 |
| Newbie Join Date: Feb 2013 Location: Janesville
Posts: 20
|
Did a separate 2d model in Sketchup today. I could of used the 3d model to make templates for printing, but it was easier (IMO) to do it as a separate 2d model and arrange the pieces to fit on one sheet of paper. When I did this I did change the dimensions of the shock bracket/battery bracket slightly. Here are the dimensions in case anyone has been wonder exactly what size this is. 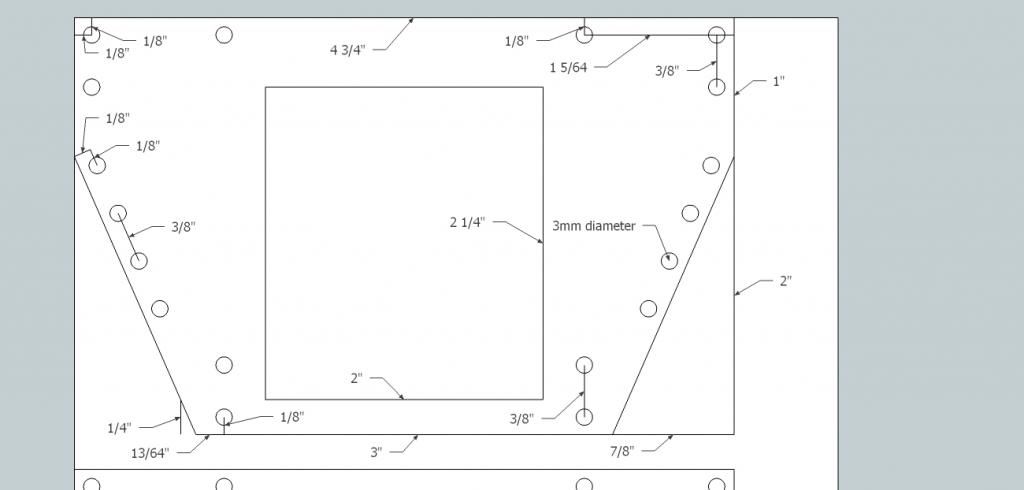 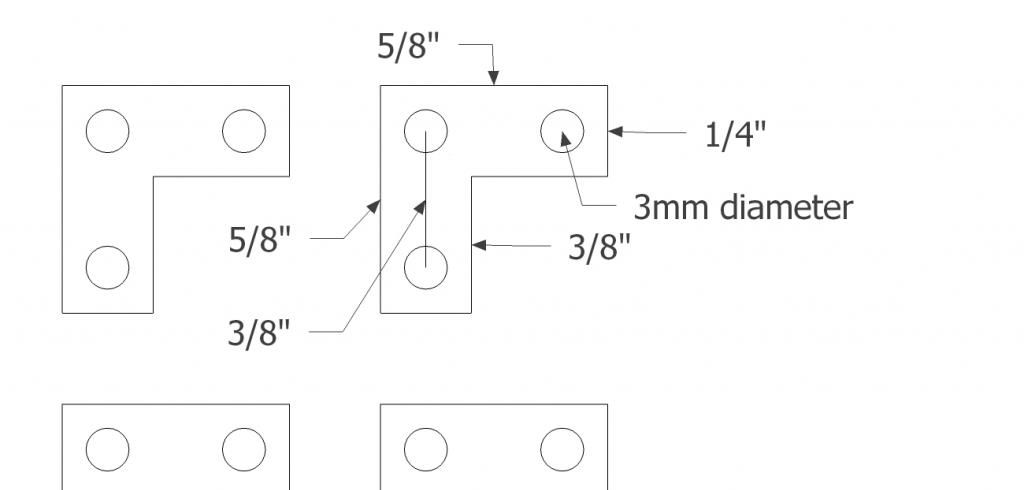 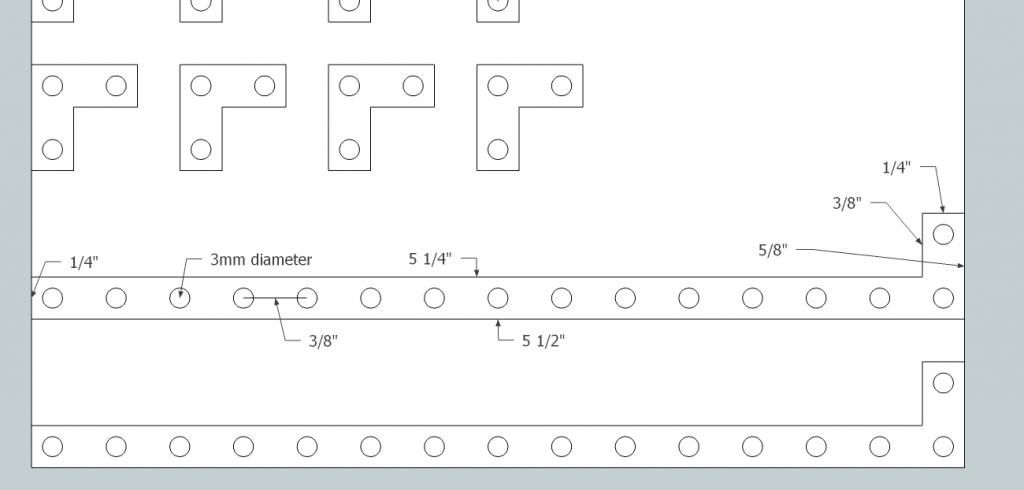 Once I had this made up and printed out(without the labels) all I needed was some material to put the templates on and cut them out. So I went downstairs and I found some school supplies packed up in a box. A generic plastic 3 ring binder from Staples and some #2 pencils. The binder is exactly 1/8" and pretty rigid, plus there is plenty of material to make all the pieces. The pencils measure out at 7mm, the hex standoffs I plan to use are 6mm, that's close enough for this mock up. I got the outlines of the vertical plates cut out of the binder today and the pencils were measured out and ready to cut. I just used a regular razor knife to cut the binder, took a lot more effort than I thought it would, which is why I didn't get any further than I did. Tomorrow I might get the rest of the vertical plate cut and the pencils, then I can get at least the main chassis pieces together. |
|
| |
|
03-02-2013, 10:56 PM
| #20 |
| www.ottsix.com Join Date: Mar 2011 Location: Albuquerque, New Mexico USA
Posts: 2,050
|
God bless Google! I use Sketchup when I'm on the run and have some crazy thought dart around between my ears...Google Drive, the best thing that's ever happened to the internet! Cutting and drilling this is going to be hella fun without a mill of some sort. |
|
| |
|
 Decided to build my 1st crawler - Similar Threads
 | ||||
| Thread | Thread Starter | Forum | Replies | Last Post |
| Crawler King....My 1st crawler build | wyd | HPI Wheely King | 71 | 12-19-2014 09:05 AM |
| 1st crawler build from parts I've collected. | mr_manny | General Crawlers | 30 | 08-23-2008 09:54 PM |
| 1st tlt crawler build | eyerace | Newbie General | 5 | 08-06-2006 08:51 PM |
| 1st Crawler build ever | aussie_N_B | Tamiya Txt-1 and Juggernaut | 3 | 07-04-2006 02:15 AM |
| |


 Linear Mode


