| |
| |||||||
 |
| | LinkBack | Thread Tools | Display Modes |
 05-01-2014, 09:24 PM
| #1 |
| Quarry Creeper   Join Date: Nov 2013 Location: Huntsville
Posts: 222
|
I thought I'd write up a tutorial on the subject of finding local crawling spots by using freely available resources and applications. Whether scouting for rock climbing/bouldering spots, for winding mountain roads to rail on my supermoto, or for clusters of boulders for RC crawling, I've come to rely on a refined set of tools and techniques. My primary tool is Google Earth. If you haven't downloaded it, you need to. If you haven't upgraded your current version in a while, then you need to do that too. I won't go into a lot of detail regarding the use of Google Earth's user interface. However, there are some useful features that will make your life much easier. By right-clicking and dragging up or down, you can zoom in/out on the mouse pointer's location on the map. This makes it extremely easy to zoom in tightly on an object or location without having to do the pan-zoom-pan-repeat drill with your scroll wheel. Also, by holding the Shift key down while left-clicking and dragging, you can pan and tilt for 3D views of the terrain. This is very useful when looking for ridge lines, bluffs, etc. To restore the overhead view, press the "U" key on your keyboard. To re-orient the map so that North is up, press the "N" key. You can use the search bar in the upper left corner of the display to search for addresses, locations (e.g. state/national parks), and to locate geodetic coordinates. 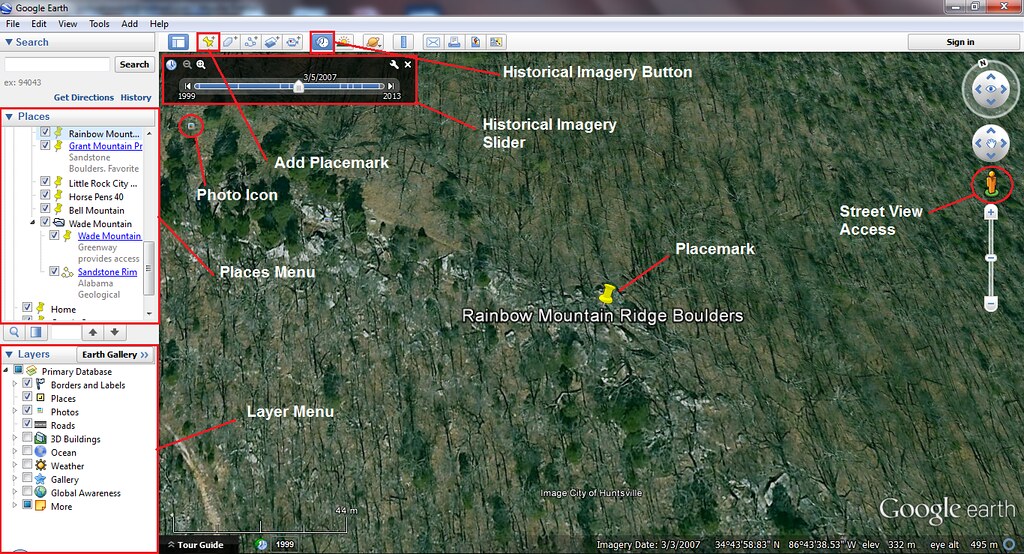 FIGURE 1: Google Earth Display When searching for crawling spots, you are primarily scanning for exposed boulders, bluff lines, and outcroppings. At tighter zoom-levels, you will be viewing aerial photography. Depending upon the time of year at which the imagery was generated, the foliage on deciduous trees and shrubs may or may not obscure some of these terrain features. Fortunately, Google Earth provides you with a variety of imagery sets that were captured during various seasons/years. You can access these imagery sets via the Historical Imagery slider, which can be accessed by clicking the button with the clock icon in the toolbar at the top of the display (See Figure 1.) You can load various imagery sets by clicking on the vertical bars in the Historical Imagery slider, dragging the slider itself, or by using the arrow buttons at either end of the slider bar. As you load an imagery set, the date for the set will be displayed above the selected bar on the slider. What you are looking for are high-resolution imagery sets from the winter months when the trees are bare (e.g., November through April for the northern hemisphere.) Note that the variety and quality of the imagery sets will vary from region to region. In the North Alabama area (my stomping ground), there are good aerial photography sets that were acquired on 3/5/2007 and on 11/28/2013. Often, though not always, more recent imagery sets are of higher quality and resolution. The best way to learn to spot boulder fields and outcroppings is to zoom to a preexisting spot that you are already familiar with. If you have a good set of aerial photos for the area, you should be able to spot the rocks and trails. This will give you an idea of what to scan for as you begin to search for new spots. By panning and tilting for a 3D perspective, you can quickly identify higher elevations (i.e. hilltops and ridge lines) where there are higher probabilities of finding boulder fields and outcroppings. Mark potential spots using the yellow pushpins (Placemarks) that can be inserted and labeled via the Placemark button in the tool bar at the top of the display (See Figure 1.) As you begin marking potential spots, you may start to identify trends and patterns. For example, you may notice that the placemarks follow a ridge line or other topographical feature. These trends will help you focus your search on more productive areas. But always be willing to take a closer look at some unlikely areas too. I've discovered some great spots in areas that I never thought I would have. There are some areas and terrain features that are particularly easy to scan and will give you a glimpse of the geology of an entire hill or mountain; in particular, clear-cut areas under rows of power line towers. These are often hundreds of feet wide and stretch for miles over hills, mountains, and valleys. When they cross hills and mountains, they will often reveal boulder fields and sections of ridge lines. In addition, these clear-cuts will often offer access to remote crawling locations that would be difficult to reach via trail blazing or trespassing on private property. I'll discuss access issues in more detail below. Another useful feature that Google Earth offers is its Layer set. Layers include things like state/national park boundaries and trails and street/road names that can be overlaid on the map. Layers can be selected in the Layer menu, which is located in the sidebar on the left side of the display. The sidebar can be toggled by pressing ctrl+alt+B (See Figure 1.) One such Layer is the Photo layer. This layer populates the map with icons that represent user-uploaded photos that were taken at various spots on the map. Each photograph can be viewed by left-clicking on the associated icon on the map (See Figure 2.) Sometimes these photos can be useful for identifying potential crawling spots. This is particularly true of photos that are taken in state and national parks. In these cases, photos that have boulders in the fore or background can help confirm or dismiss a candidate crawling spot. 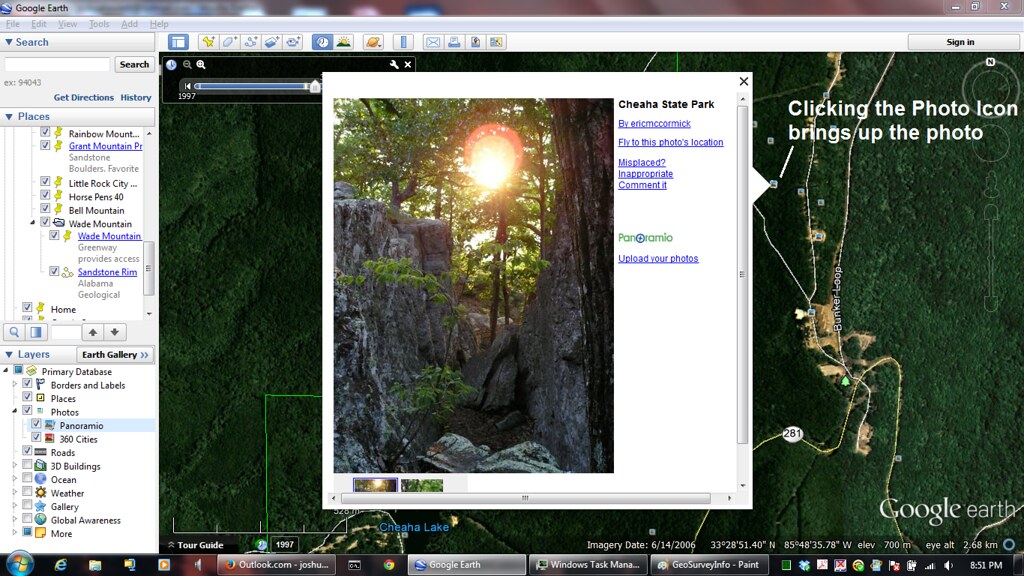 FIGURE 2: Google Earth Photo Layer. As you search for new crawling locations, you should always be taking the subject of access into consideration. A boulder field that is located 12 miles from the nearest road will not be a very good spot regardless of the quality of the rock or the number of exciting lines. A set of boulders that is in or near someone's backyard or is on posted private property will probably not make a good choice. Parking is another thing to consider. Parking your car in front of a house in a hoity-toity neighborhood can attract the authorities; or, even worse, a tow-truck. Look for public parking lots or a quiet cul-de-sac in an undeveloped part of a subdivision; or, better yet, a wide and stable shoulder on a lonely stretch of road. Beware of relying too heavily on a specific set of aerial imagery. Sometimes outdated imagery sets can be misleading. There have been numerous instances where I've spotted a conveniently located access road that looks nice and navigable only to switch to a more recent imagery set and find that it has become an overgrown, impassable, creek bed that is not even visible from the main road. This is where one of Google Earth's most striking features proves especially useful. I'm talking about Street View (See Figure 3.) 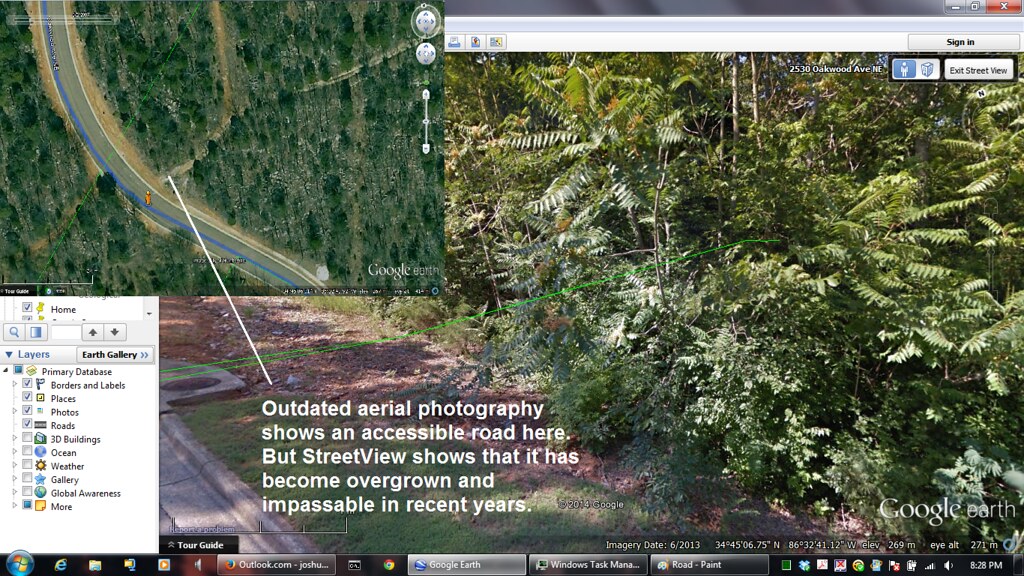 FIGURE 3: Google Earth Street View. Where available, Street View allows you to descend to street level for stunning panoramic views. While in Street View, you can "drive" down nearly any street and pan around through an almost spherical field of view. In the upper right corner of the display near the compass rose, there is a little orange gingerbread-man-looking dude (See Figures 1 and 3.) Once you've identified the road and/or location that you want to take a closer look at, you can left-click on the orange stick figure and drag it over the road you want to explore. If there is Street View imagery available for the road, it will be highlighted in blue. Release the left mouse button to enter street view at your chosen location. Once in Street View, you can left-click and drag to look around and you can scroll with the scroll-wheel to move forward or backward along the road. In most cases, Street View imagery is relatively up to date and provides a reliable means of assessing the condition and suitability of various access points. Aside: Sometimes, the imagery in Google Earth may leave something to be desired; or perhaps you just want a closer look. In such cases, I use Bing Maps. Bing Maps is a web app that can be accessed here: Bing Maps. At first glance, it appears to be an inferior version of Google Maps. However, Bing Maps offers a "Bird's Eye" imagery layer that provides higher resolutions and tighter zoom levels than Google Earth's aerial photography layers. In addition, Bird's Eye view is shot side-on from multiple directions, which allows you to pan around a feature or area and view it from multiple directions. Once you begin identifying and marking potential crawling spots, you can organize them in folders in your "Places" menu, which is located in the sidebar on the left side of the display in Google Earth. It is best to create these folders inside your "My Places" folder in order to ensure that they are saved when you exit Google Earth. As your collection of crawling spots grows, you may want to share it with others. This is easy to do. You can right click on any of your folders and save it as a kml or kmz file that you can email to others. Kml and kmz files can be loaded into Google Earth from your file system via the "Open..." option in Google Earths File Menu. More to come... |

|  |
| Sponsored Links | |
| | |
|
05-01-2014, 09:24 PM
| #2 |
| Quarry Creeper Join Date: Nov 2013 Location: Huntsville
Posts: 222
|
As you explore, you will find that it is often difficult or even impossible to determine the types and qualities of the rocks at candidate locations. On-the-ground experience and familiarity with local geology may enable you to predict (to a limited extent) what types of rocks appear at various elevations, etc. If you are like me, you prefer certain types of rock and loath others. It helps to be able to identify the type(s) of rock(s) at a candidate location before you invest the time and effort to explore it physically. Or, you may be interested in finding boulder fields that are composed of your favorite type of rock. As of the writing of this article, Google Earth does not offer much capability to aid in this task. What is needed here is a geological survey map, preferably, a digital one with interactive features. Many states/provinces provide a state/province-wide digital geological survey map that can be downloaded for free from their websites. Many of these, particularly the interactive ones, require a specialized viewing application, e.g., ArcReader, etc. Geological survey maps depict fault lines and other geological features. They also display the distributions of upper-level rock types that are on or near the earth's surface (See Figure 4.) These are rendered in a color-coded format that is deciphered using an elaborate (and often confusing) legend. The higher quality digital maps offer an identification tool that enables you to instantly bring up the geological information for the rock at a specific point when you click on the map (See Figure 5.) 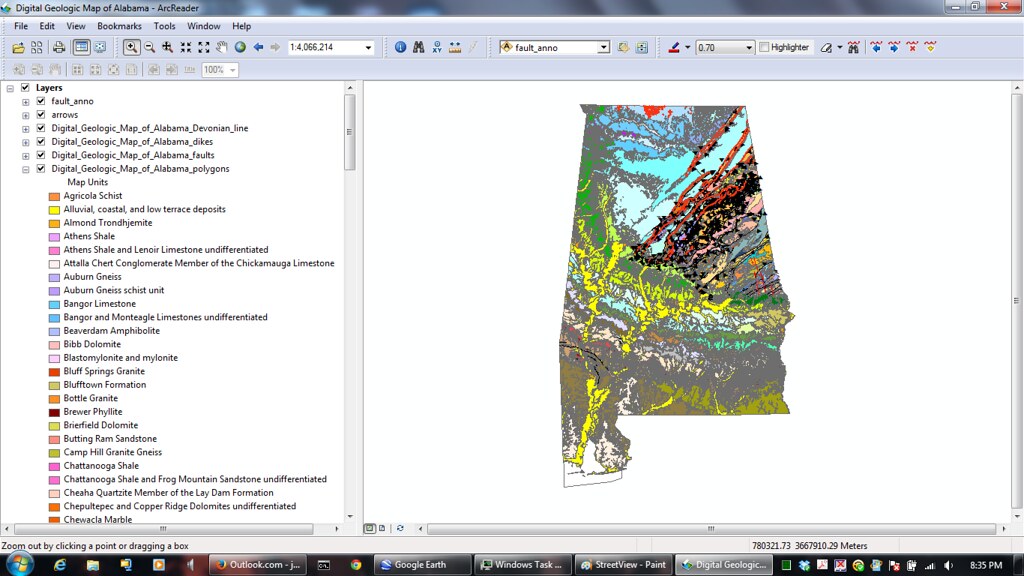 FIGURE 4: Digital Geological Survey Map. 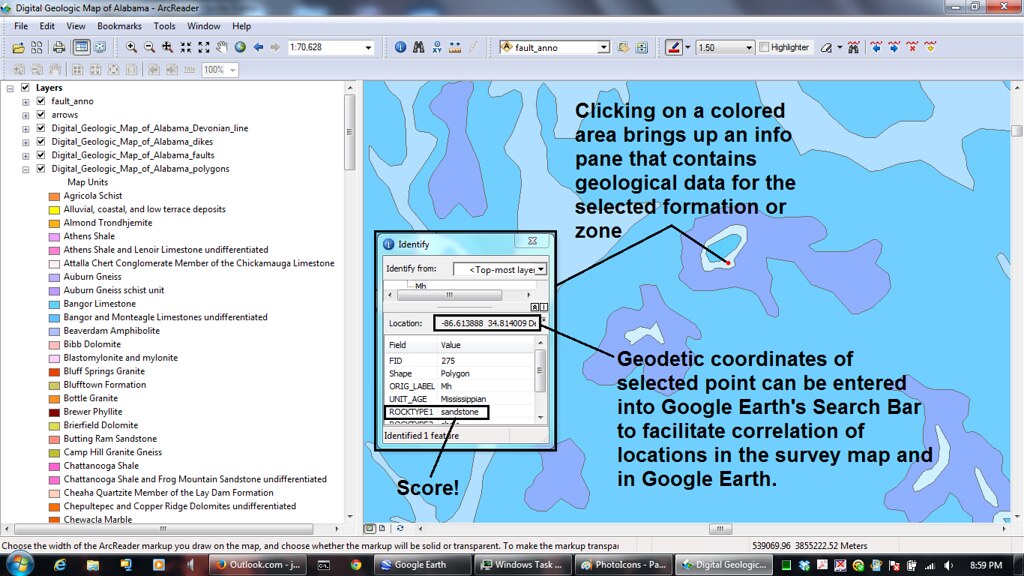 FIGURE 5: Identification Tool. Some geological survey maps do not include recognizable features like road/street overlays and place names. This can make it difficult to draw correlations between formations in the survey map and features and locations in the Google Earth map. There are a couple of ways to address this setback. One way is to look for geological/geographical features that are visible in Google Earth and on the survey map. An example would be a large river with distinct bends. These are often unshaded on survey maps. You can then zoom to approximately the same levels in both Google Earth and on the survey map, at which point you should be able to eyeball where a particular location is on the survey map and query it with your identification tool. Another way to correlate between maps is to use the geodetic coordinates that appear in the info pane in the survey map. These coordinates indicate where you clicked in the survey map and can be entered into Google Earth's search bar to locate the corresponding point on the Google Earth map (See Figure 5.) Note that some applications express geodetic coordinates as longitude and latitude instead of latitude and longitude. You may need to rearrange the coordinates for Google Earth, which requires latitude to be listed first. At any rate, once you become comfortable using the survey map, you will be able to quickly determine the types of rock that exist at candidate crawling spots. You will also be able to find new spots with rock of a preferred type. Once you have identified some promising spots, you will want to investigate them physically. Obviously, the best time of year to do this is in late Fall (and Winter in temperate climates) and in early Spring when temperatures are comfortable and when insects and poisonous snakes are not as active. In the Southeastern United States, exploration of new spots can be very difficult and unproductive in warmer months when the terrain is concealed beneath thick foliage. Add to this the clouds of wasps, bees, gnats, flies, and mosquitoes; the hordes of snakes, deer ticks, and extremely poisonous spiders; humidity levels that are so high that you have to chew the air before swallowing it into your lungs; and poisonous plants that can swell your eyes shut; and you have the essential ingredients for something like hell on earth. Regardless of whether you are exploring a spot that is located on public or private property, your ability to tread lightly so-to-speak will weigh heavily on your prospects of continued access. If you bulldoze your way onto the scene, kick up a lot of dust, uproot a lot of trees and shrubs, displace wild life, and leave piles of Redbull cans and cigarette butts in your wake, you will likely be forcibly expelled from the area and/or even prosecuted. That said, always exercise the "Boy Scout Rule" and try to leave as little evidence of your presence as possible. When I visit a new spot, I carry a fold-up rake, an assortment of wire and plastic-bristled brushes, and a pair of small pruning shears. The brushes are handy for clearing dirt, moss, and lichens from the rocks. The shears are useful for getting rid of briars and pruning those annoying vines that wrap around your axles. In warmer months, I will carry a trekking pole to beat the bushes and alert and rout any snakes that might be lurking. I also carry insect repellent to keep tics away and to keep gnats and mosquitoes out of my face. Last edited by supermoturd; 05-05-2014 at 09:40 AM. |
|
| |
|
05-01-2014, 09:24 PM
| #3 |
| Quarry Creeper Join Date: Nov 2013 Location: Huntsville
Posts: 222
|
Reserved 2
|
|
| |
|
05-02-2014, 10:22 AM
| #4 |
| Rock Crawler Join Date: May 2008 Location: The Beautiful South
Posts: 617
|
Done did been doin' that but thanks for all the program tutorials. I havent delved that far into it and thats awesome tutorial!
|
|
| |
|
05-14-2014, 08:53 AM
| #5 |
| Newbie Join Date: May 2014 Location: Idaho
Posts: 30
|
This is a very useful thread! I have been using google earth for a while, but after reading this I know how to use it even better! Thanks supermoturd!
|
|
| |
|
05-14-2014, 09:17 AM
| #6 |
| Quarry Creeper Join Date: Nov 2013 Location: Huntsville
Posts: 222
|
Thanks, Numbchuck. And you are very welcome. I hope it serves you well.
|
|
| |
|
08-04-2015, 02:38 PM
| #7 |
| Quarry Creeper Join Date: May 2014 Location: United States
Posts: 375
|
thanks for this! i live in alabama and i have a hard time finding crawl spots the best place ive found is logan martin damn rock rock and more rocks when the water is down its even better its a sweet spot, me and my buddy crawl there often |
|
| |
|
08-05-2015, 09:22 AM
| #8 | |
| Quarry Creeper Join Date: Nov 2013 Location: Huntsville
Posts: 222
| Quote:
| |
|
| |
|
 How To Find New Crawling Spots From The Comfort Of Your Home - Similar Threads
 | ||||
| Thread | Thread Starter | Forum | Replies | Last Post |
| newb tryin to find crawlin spots | jcsaxial | Axial SCX-10 | 1 | 08-09-2011 06:24 PM |
| T.S.C......Ohio Indiana Kentucky.......lets find some new spots | AdamF | Indiana | 54 | 09-03-2008 08:38 AM |
| Came home from work and what did I find? | Tonsa | Chit Chat | 17 | 04-18-2006 09:09 PM |
| Thread Tools | |
| Display Modes | |
| |


 Linear Mode


