| |
| |||||||
 |
| | LinkBack | Thread Tools | Display Modes |
 09-15-2011, 03:02 AM
| #1 |
| Rock Crawler Join Date: Oct 2010 Location: Abbotsford BC
Posts: 522
|
Having just finished my first styrene project, a basic interior and fender liners for my 4-runner, I decided to jump right into a scratch build body. This thread will be more of a blog of my experiences than a how-to, but hopefully it will convince others that it's not so scary and entice them to try their own projects. First step for me was deciding what vehicle to copy. I wanted something with simple lines like a Jeep or a Rover, and there are lots of rover bodies out there but I have never seen a Military Jeep body in a scale that fits a stock SCX10 Honcho. On top of that I am a Jeep nut, and a while back I found a design for a punch-paper Jeep that will help with panel templates. Now that I had my vehicle choosen it was time to collect design info. The paper Jeep sheets are an invaluable source of info and measurements:  Tamiya makes a model flatty in 1/35 scale that I am using to help get the dimensions to look right. 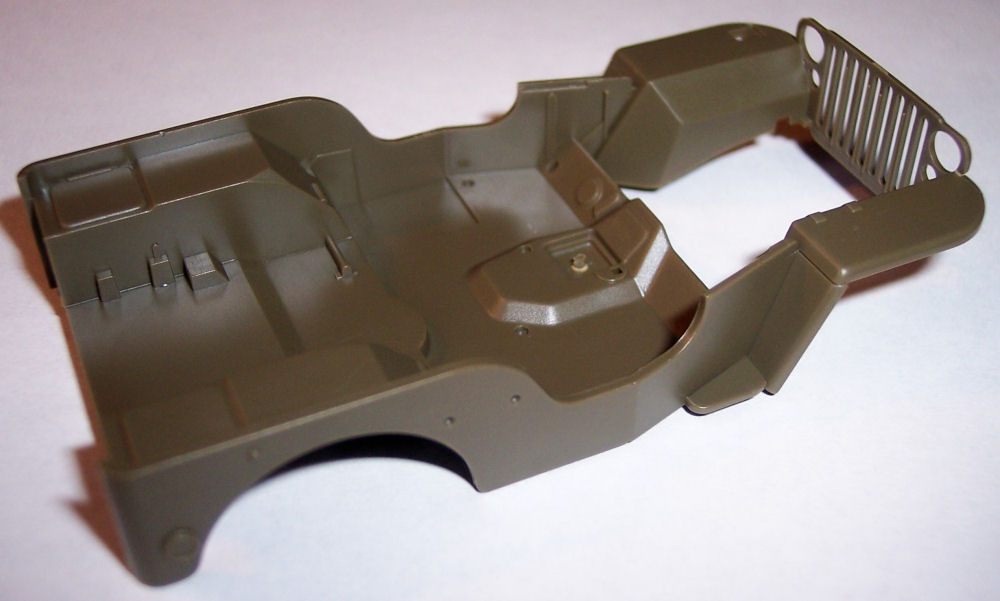 And a trip to a local car show gave me the chance to take a zillion photographs of the real thing:  |

|  |
| Sponsored Links | |
| | |
|
09-15-2011, 03:06 AM
| #2 |
| Rock Crawler Join Date: Oct 2010 Location: Abbotsford BC
Posts: 522
|
Templates made from the paper model were helpful in testing changes to the rear fenders in order to fit them to the SCX frame  Once I had the dimensions adjusted using the paper templates I transfered the design to styrene and started assemby:  |
|
| |
|
09-15-2011, 09:49 AM
| #3 | |
| I wanna be Dave  Join Date: Oct 2006 Location: Martinsburg WV
Posts: 2,781
| Quote:
That looks like a damned good start! Subscribin' to this one... | |
|
| |
|
09-15-2011, 11:39 AM
| #4 |
| Quarry Creeper  Join Date: May 2010 Location: Flooriduh
Posts: 349
|
Can't wait to see this one.
|
|
| |
|
09-15-2011, 01:52 PM
| #5 |
| Rock Crawler Join Date: Aug 2011 Location: Baton Rouge
Posts: 965
|
Nice start ! Definately subscribing to this thread to watch your progress.  |
|
| |
|
09-15-2011, 04:09 PM
| #6 |
| Rock Crawler Join Date: Oct 2010 Location: Abbotsford BC
Posts: 522
|
Thanks guys. that was actually the easy part, since the rear just needed "tubbed". Now comes the challenge of making the front fenders work with the front shock towers. I am thinking the inner fenders will have to be seperate pieces from the rest of the body in order to mount them between the shock and the shock tower. Eventually I will have to decide if it gets military paint, aftermarket paint, or what. I'm tempted to do an ex-army hybrid where it looks like the army decals were there but have been sprayed over with green tremclad. If I do that then the licence will read "crated". If you know Jeeps then that plate makes sense to you. |
|
| |
|
09-17-2011, 01:46 PM
| #7 |
| Rock Crawler Join Date: Oct 2010 Location: Abbotsford BC
Posts: 522
|
Got a bit more work done. Some ribbing to reinforce the rear corners and give them shape:  I glued in strips of styrene over the ribs to approximate the curved shape, then used small strips to fill gaps and reinforce between strips.  It is theoretically possible to form the styrene to a corner like this, but after 4 tries that all didn't look right I gave up and used the simpler but more time consuming method of building up the curve from flat strips and then using filller and sanding to get a smooth surface. |
|
| |
|
09-17-2011, 02:53 PM
| #8 |
| I wanna be Dave Join Date: Mar 2008 Location: Wayne county. PA
Posts: 2,507
|
yeah this build thread is subscribed for sure, always wanted a jeep that was bigger to fit axial axles .........bob.... |
|
| |
|
09-17-2011, 03:46 PM
| #9 |
| Rock Crawler Join Date: Oct 2010 Location: Abbotsford BC
Posts: 522
|
Speaking of size, I don't think I mentioned that while it is going on a 1/10 frame, since the willys is such a small vehicle the body actually works out to 1/8 scale.
|
|
| |
|
09-18-2011, 10:41 AM
| #10 |
| Rock Crawler Join Date: Oct 2010 Location: Abbotsford BC
Posts: 522
|
Got some corner building tips from guys with more experience. One of the ways that I had tried to do the curves was to score lines to help the piece bend, but it kept snapping into strips on me anyway. Turns out I wasn't scoring quite deep enough so the joint was snapping instead of flexing. Second corner came out much cleaner:  I had thought that using a slightly thinner plastic than the sides were made from might make it more forgiving for alignment, but having finished two corners I'm actually wishing I had used thicker plastic and just sanded down any that stuck out. Last edited by Mud Puppy; 09-18-2011 at 10:43 AM. |
|
| |
|
09-18-2011, 06:46 PM
| #11 |
| Pebble Pounder Join Date: Mar 2011 Location: SLC
Posts: 181
|
That's a good way to do the corners....I have just been using a larger, full piece of styrene, or gluing pieces together then sanding the corner in. It adds more weight. Your way is a little nicer in that it doesn't add that extra weight. Looking good, your cuts are nice and straight,and alignment looks great. I wish mine looked like that...oh well, that's what filler is for right.  |
|
| |
|
09-18-2011, 09:25 PM
| #12 | |
| Rock Crawler Join Date: Oct 2010 Location: Abbotsford BC
Posts: 522
| Quote:
most of it is straight and aligned right, but the two rear inner fenders are different height by about 3 mm. Not tragic but enough that I had to adjust other dimensions as I worked back so the inner fenders on both sides lined up the same at the rear of the body. You really only notice it when you look at the body from below. | |
|
| |
|
09-19-2011, 04:28 PM
| #13 |
| Rock Crawler Join Date: Oct 2010 Location: Abbotsford BC
Posts: 522
|
tires for it arived today. S.D.I. Trail Doctor XLs. I doubt they wil perform the greatest since they seem like a firm rubber compound, but they are 5mm narrower than the flat-irons so they will stuff better, the tread suits the vehicle, and the price was right. Trail Docs beside a flat-iron.   |
|
| |
|
09-19-2011, 07:11 PM
| #14 |
| I joined the Band! Join Date: May 2009 Location: lake county ,florida
Posts: 1,237
|
o yea this is looking great.
|
|
| |
|
09-19-2011, 09:22 PM
| #15 |
| RCC Addict  Join Date: May 2010 Location: Midwest
Posts: 1,917
|
nice work.. this is gonna be cool |
|
| |
|
09-20-2011, 04:11 AM
| #16 |
| Rock Crawler Join Date: Jul 2008 Location: Williamston
Posts: 941
|
Great start. You doing great a first start. |
|
| |
|
09-20-2011, 09:28 PM
| #17 |
| Rock Crawler Join Date: Oct 2010 Location: Abbotsford BC
Posts: 522
|
Just a bit of progress today. Front of tub up to the firewall is done.  Also ordered a new Honcho RTR to strip for the chassis. I figure that I should be able to sell the body, wheels, tires, radio, and small parts I don't need for around $100 all together, so then I'll only be into the rest for $150. It's hard to find a roller for much less than that. |
|
| |
|
09-23-2011, 09:12 PM
| #18 |
| Rock Crawler Join Date: Oct 2010 Location: Abbotsford BC
Posts: 522
|
Here's the first test fitting on the frame. I need to do a small trim and slide the body back about 2mm for it to be a perfect fit.   I wish I had the $$$ to do it up on a leaf spring chassis, but that's not going to happen any time soon, so in the spirit of scaleness I need an excuse why it's not a stock suspension. Yeah I could just say "it's custom", but where's the fun in that?  |
|
| |
|
09-23-2011, 09:46 PM
| #19 |
| www.ottsix.com Join Date: Mar 2011 Location: Albuquerque, New Mexico USA
Posts: 2,050
|
If you really are a noob builder, then you're some sort of prodigy |
|
| |
|
09-23-2011, 11:30 PM
| #20 | |
| Suck it up!   Join Date: Mar 2008 Location: Arkansas
Posts: 11,652
|
Subscribed! This'll be fun to watch. Quote:
Of course it makes it so much easier when you've got patterns to work with. | |
|
| |
|
| |


 Linear Mode


