| |
 07-13-2013, 01:34 AM
| #1 |
| I wanna be Dave Join Date: Jun 2008 Location: Sin City
Posts: 3,628
|
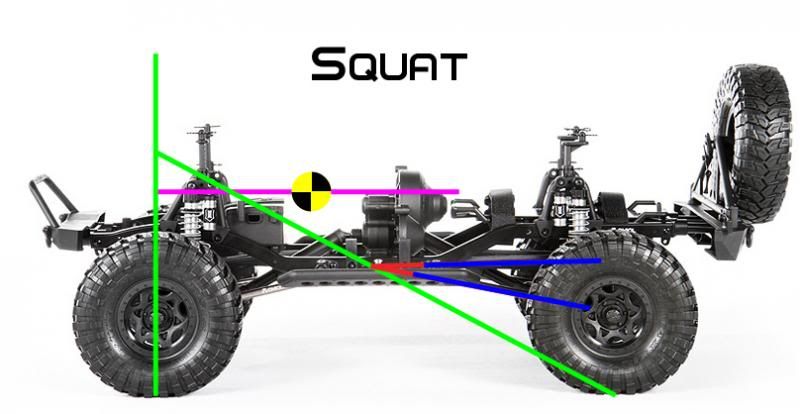
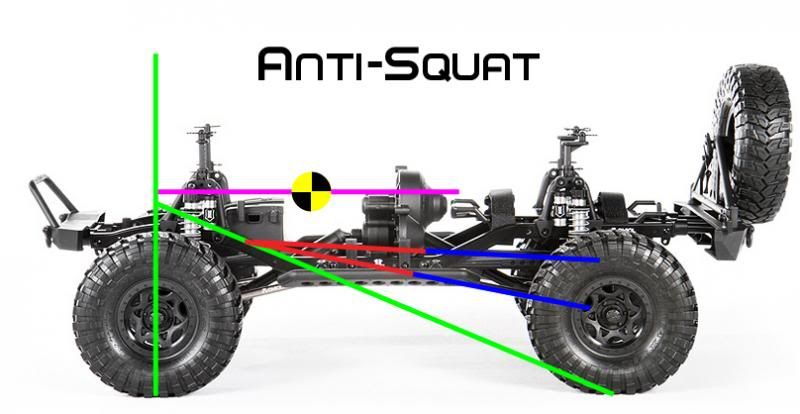
I have been wanting todo this for awhile - There has been the same thing for 1:1s over on Pirate4x4 for a while, but it would be nice to discuss the differences from 1:1s to RCs. I believe there are a few but thats just my 2cents. But for starters lets get a little general info going. I am going to pull from the 1:1 guys and a few here to get this started. I have done hours upon hours into researching this subject but my hillbilly wording only goes so far. |

|  |
| Sponsored Links | |
| | |
|
07-13-2013, 01:36 AM
| #2 | |
| I wanna be Dave Join Date: Jun 2008 Location: Sin City
Posts: 3,628
|
Alittle about 3link and panhard set ups and rear 4links from MonkeyRacer in Die-Laughings Class2 U4 build. Quote:
Last edited by doublej; 07-13-2013 at 01:42 AM. | |
|
| |
|
07-13-2013, 03:15 AM
| #3 |
| RCC Addict Join Date: Aug 2010 Location: wherever paypal sais.
Posts: 1,740
|
I noticed on the wraith that axial raised the skid upper link mount significantly verses scx skid upper link location giving the links more seperation. I also realized that that's probly why wraiths can damn near climb straight up. I've seen wraiths go up some really steep stuff when setup properly. Currently my custom setup in my scaler is set to extreme squat in reguards to the quoted message from monkey, and front end lifts like crazy on steep controlled climbs. To remedy this I did the same as the picture. I took my own photo.. drew the line for my lower link all the way to the front of the truck. Then started a line at the axle side of the upper link and just "placed" it to where the lines intersect as low and as far fwd as possible. And got them to interect just above the front tire. All I need to do is rais my chassis side link mount 11/16 to get better geometry. I'm having somone make some temp aluminum mounts I can bolt up to test out n see if it works better b4 I go and start brazing in new mounts. I'm so glad this thread got started. Its crazy how the is a "crawler" forum and not a single DEDICATED thread for discusions about it. Here is my current link setup. Which I'm not happy with.  Hers what I want and can achieve it by raising the xhassis side upper link mount 11/16ths  |
|
| |
|
07-13-2013, 06:25 AM
| #4 |
| I wanna be Dave Join Date: Oct 2008 Location: Golden
Posts: 2,588
|
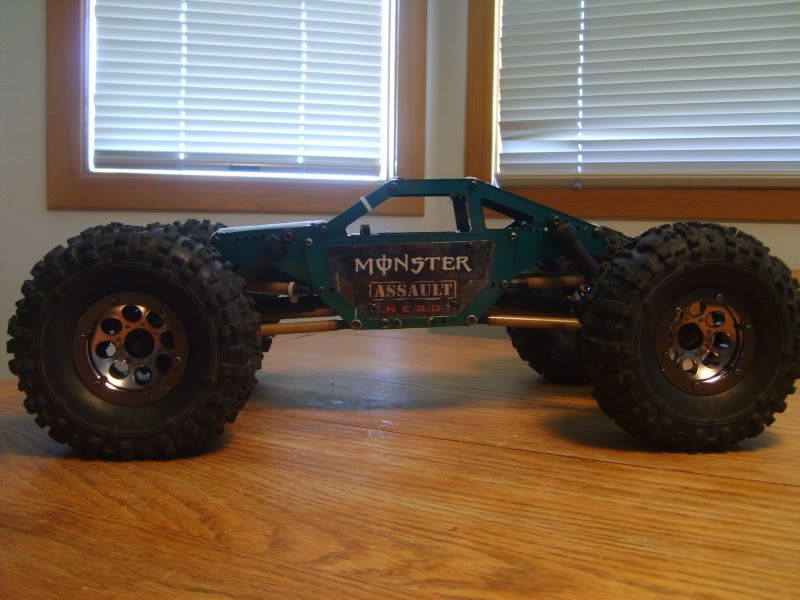
I have been in this discussion since 2009 when I built the green bodiless crawler in the picture above. Droop was looked down upon, because of the tendency to unload the front on a steep climb and topple over if you don't use internal springs. If you look at the stock chassis from axial for the AX10, the chassis side of the links are pretty well separated (as are the XR10 chassis side points) and I am not sure why they have gone to the type of geometry in the SCX10 or Wraith. I've got my SCX10 set up with stock mounting points simply for the convenience of not having to fabricate anything, but I've never liked the geometry. I've become used to the way the SCX drives, and as a crutch placed a lot of weight in the wheels to counteract a lot of the geometry issues. Again, a lot of the geometry depends on your rig's center of gravity and as the suspension cycles, it affects the location of the intersection point. I'm interested to see what people think about the stock SCX10 set up. Have you driven a rig with different geometry to compare it to? |
|
| |
|
07-13-2013, 07:03 AM
| #5 |
| I wanna be Dave Join Date: Oct 2008 Location: Golden
Posts: 2,588
|
Here's my wraith set-up. I haven't changed anything with the geometry of the rear links, but the second picture shows what I plan to do with the chassis side rear upper link point. By only raising this point about 10mm it changes the intersection point pretty dramatically (about 2" lower at the front axle). Stock Wraith Geometry: 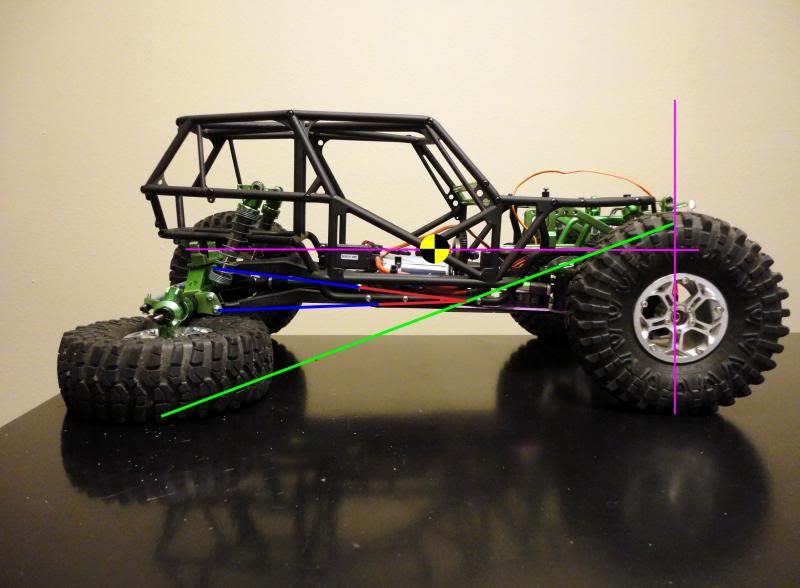 Revised link Geometry: 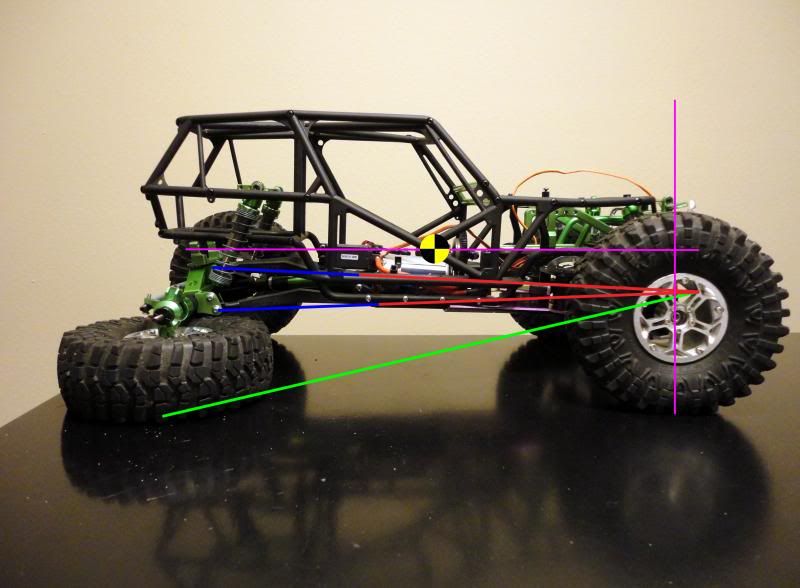 This will be pretty easy to achieve by just drilling a hole on the chassis and mounting the link there. On the SCX10, it will require some kind of bracket to get the links more separated. |
|
| |
|
07-13-2013, 10:06 AM
| #6 |
| RCC Addict Join Date: Aug 2010 Location: wherever paypal sais.
Posts: 1,740
|
Looking back I've had 3 diff rear link setups: stock scx, my jeep tj which had shorter upper links and mounted higher up on the chassis itself (in the middle of where the chassis angles up the rear) it drove really well never paid attn as to why tho, but looking back I know why now., and this current crap in the pic and I don't like it at all. I'm gonna move it up and hopefully its better. Let us know how the wraith mod works out for ya. Being a wraith and not an scx isn't really a factor as per the disscusion were having because the same concepts are gonna be applied no matter the case. My pics are with truck sitting at almost full compression. So my intersection line only goes up from that point so need it as low as possible. |
|
| |
|
07-13-2013, 10:13 AM
| #7 |
| RCC Addict Join Date: Aug 2010 Location: wherever paypal sais.
Posts: 1,740
|
For a stock scx10 utilizing an r2j 4 link truss with the links mounted under the plate gives you seperation without modding anything by lowering the uppers at the axle. I wonder if anyone's noticed a solid gain by this simple mod?
|
|
| |
|
07-13-2013, 10:40 AM
| #8 |
| I wanna be Dave Join Date: Aug 2004 Location: central VT
Posts: 2,300
|
I feel that it's not just the amount of separation on the frame side that effects the performance, it is the amount of vertical separation at the axle compared to the vertical separation at the frame. The more axle side vertical separation, the more frame side separation is needed. In 1:1 rigs the rule is you need about 25% of your tire height as your axle side vertical separation, but this has more to due with how the rod ends are stressed than about perfect geometry. In the R/C realm, you can get away with much less if space constraints require it. The most stable rigs I have seen all have the following in common: Upper links that are flat, or slightly sloped down to the chassis at ride height. Upper links mount wider on the chassis than the lower links. Upper links that are close to (within %20) the length of the lowers. There is way more to a capable crawler than just the "anti-squat" value. Things like roll center, axle steer, and the flexibility of the links all come into play. Most important IMO is maintaining a low COG. If you have to high of a COG then it doesn't matter what you do to the links, you still won't be able to climb or sidehill very well. The stock SCX geometry isn't terrible, especially when compared to a stock AX-10. Most people who think the SCX geometry sucks have jacked up the ride height, which increases the angle of the links and ruins the intended geometry. I run my SCX with the upper links level, a very gently slope to the lowers, ride height about 50% of the shocks travel and feel that it is adequate for my intended use. Wheelbase of 11.7 inches with 2.25" of belly clearance on 1.9 Pitbulls. Yes, I wish the skid had more options for mounting the upper link, and that the 4-link truss had a couple more holes as well. This is more due to my tinkeritis than any glaring shortcomings of the stock setup. Another thing most people don't consider is that as you rock the rear pinion up the keep the driveshaft out of the rocks you essentially raise the lower links mounting point above the centerline of the axle. This effects how the housing distributes the push/pull on the links. Even changing your pinion angle 5* will greatly effect the performance of the suspension. Only pics I have giving you and idea of the, IMO, proper ride height. The front is a tad high here for some reason, it rest a tad lower with the body on and in motion. Old pics, don't mind the tires.  Keep in mind, the links are only half of your susenion package, the other being your shocks. |
|
| |
|
07-13-2013, 11:52 AM
| #9 | ||
| I wanna be Dave Join Date: Oct 2008 Location: Golden
Posts: 2,588
| Quote:
Quote:
You are on to something about the pinion angle that I think a lot of people don't realize. When you point the pinion that high, not only is it extra stress on the driveshaft, but it changes the link geometry as well. I don't like your shocks in the pics you posted though. The angle they are at reduces the effectiveness of the spring rate. It probably does work for you, but it's basically a comp crawler with a rail frame and a body at that point. I'm not trying to dog on your set-up, but as an informational tech thread, it's not what most people reading this are going to do. Most scale rigs are going to have near vertical shocks since that is what a 1:1 will have. One thing I want to point out is that there is no PERFECT set-up and what works for one vehicle may not work for another. Center of gravity, wheelbase, shock set up, vehicle weight, tire size, track width, scale realistic intentions, driving style, and so on all affect how you set up your suspension. Hopefully this thread gives some definitive rules-of-thumb to help get it set up for how it will work for you. I wanted to add that I think that all the rod ends should be mounted with the screw horizontal. As much as I love R2J's work, the truss he sells (and others like it) has the rod ends mounting vertically. As the suspension cycles, you lead to binding and stress on the links and rod ends. Short travel cycles won't see this as much, but allowing the links to travel naturally will prevent any issues there. | ||
|
| |
|
07-13-2013, 04:29 PM
| #10 |
| RCC Addict Join Date: Aug 2010 Location: wherever paypal sais.
Posts: 1,740
|
Ok so by re positioning my upper chassis side link mounts up 11/16ths, I actually gained 8 degrees of climbing angle.via the bubble level app in the play store. I was able to go up 56degrees, stop, and continue up. Doesnt wanna flip over as bad as b4. Heres the new temp setup b4 I braze in permanent mounts. The lower screw was where the link used to be mounted.  I can't do anything about the axle end but the now closer to parallel links work much better. So much good info in here. I alsobrun sway bars in rear to help with torque twist and still be able to run a soft susp like I prefer. Last edited by kaneohecrawler; 07-13-2013 at 04:31 PM. |
|
| |
|
07-13-2013, 08:06 PM
| #11 |
| I wanna be Dave  Join Date: Dec 2009 Location: Outside DC
Posts: 2,997
|
Subscribed! I love all the pretty lines!  |
|
| |
|
07-13-2013, 11:12 PM
| #12 | ||
| I wanna be Dave Join Date: Jun 2008 Location: Sin City
Posts: 3,628
|
Go out for a day of crawling and this thread has poped off just as I hoped - Thanks guys.  Quote:
Many many ways around all this, which I have gotten into the habbit of, front axle winch, more front weight, lower ride height, ect ect. But all these have other bad effects that I think we could live without. Its all a question of learn the rig as is and have fun - or spent countless hours chasing the "perfect setup". Ill keep doing both because I love tinkering, toying, and building. | ||
|
| |
|
07-15-2013, 11:12 PM
| #13 | |
| I wanna be Dave Join Date: Jun 2008 Location: Sin City
Posts: 3,628
|
Since this is title "3/4 Link for Dummies" I wanted to throw down some terminology. But no one would understand my wording - so I stole someone else's. Quote:
| |
|
| |
|
07-16-2013, 11:26 AM
| #14 |
| RCC Addict Join Date: Aug 2010 Location: wherever paypal sais.
Posts: 1,740
|
This thread is really gonna come in handy on my up coming build. I think the topic of panhard setups needs to be addressed. As there certainly seems to be a lot of people that don't know how to set them up or why to even use one. I find them extremely benificial and all 4 of my most recent builds have them. I also set up a few for some friends when I was in hawaii. I'm gonn throw down my .02 but it'll have to wait as I'm off to work soon. I'd like to post corrosponding pictures as well so people can get the know-how if they want it. |
|
| |
|
07-16-2013, 09:02 PM
| #15 |
| I wanna be Dave Join Date: Oct 2008 Location: Golden
Posts: 2,588
|
Here's my input on panhard setups: Panhard link - a lateral stabilizing suspension link that allows the axle to swing to one side in relation to the chassis to prevent bump steer. Use with a single upper link. For suspension, in general, the lower links locate the axle forward to backward (determines wheelbase) and the upper links set the rotation of the axle (determines pinion angle). Triangulating links (other than determining roll center) stabilize the axle laterally. When you have an axle mounted servo, the drag link is not affected by the suspension travel. If you move the servo to the chassis, the drag link will push and pull on the steering knuckle as the suspension cycles leading to bump steer. To prevent this, you will need a panhard link. In terms of geometry, a panhard link should be the same length as and parallel to the steering drag link throughout the suspension cycle. Here's a pic of my SCX10 JK set up: 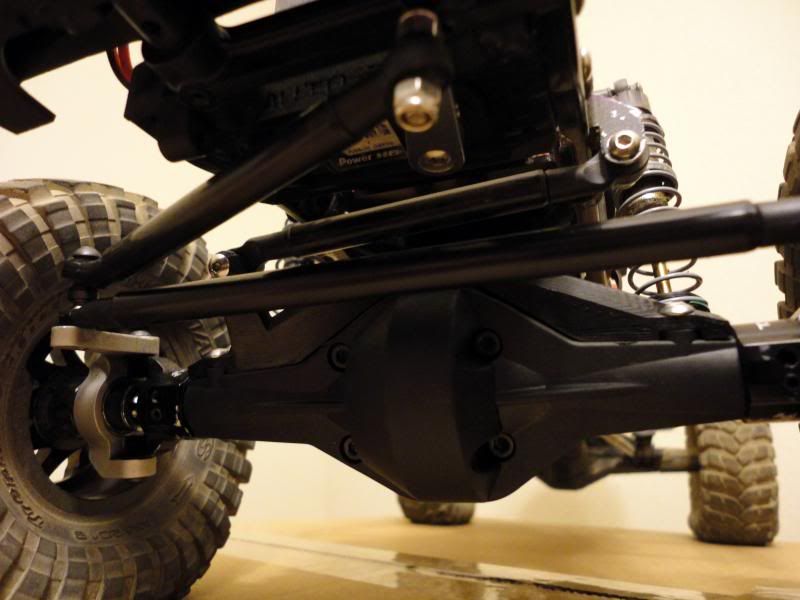 This pic you can see the drag link (connects knuckle to servo), tie rod (connects both knuckles together) and the panhard bar (connects the axle to the chassis). From this angle, it is hard to tell that it is parallel and about the same length. 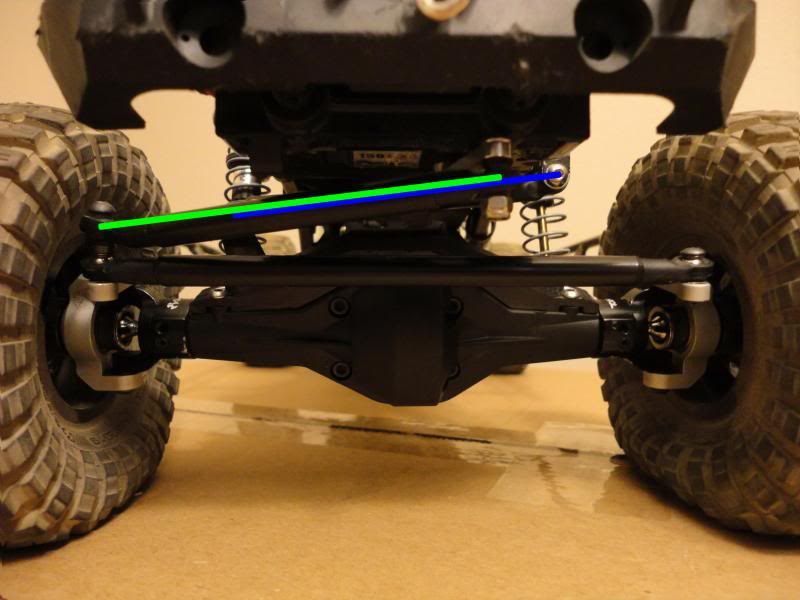 The links are almost perfectly parallel, and about the same length (92mm drag link, 87mm panhard) and at a fairly shallow angle. As the suspension cycles, the panhard link pushes the axle to one side or the other to counteract the bump steer that would have been caused without a panhard. Here's a more extreme example from a rig I built 4 years ago: 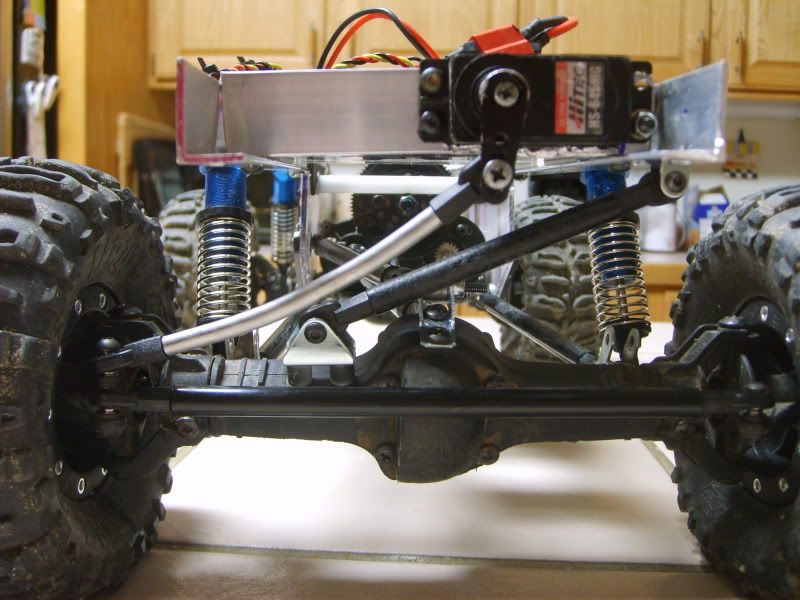 Note that the chassis is much higher above the axle compared to the JK, however, the links are pretty close to parallel: 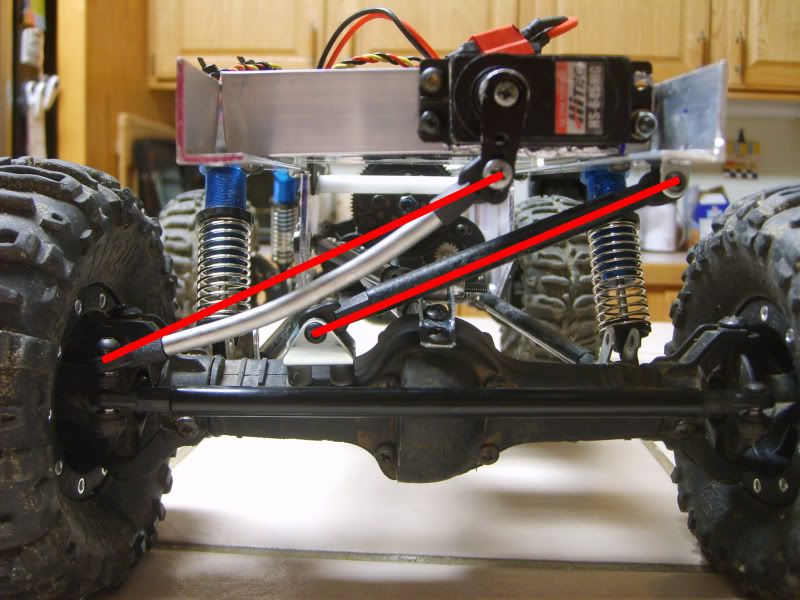 One side effect of a panhard is something called axle swing or axle sway. In the above pictures, the axle is roughly centered compared to the chassis. As the suspension compresses, the axle moves (swings) to the right of the chassis:  When the suspension droops, the axle moves to the left of the chassis: 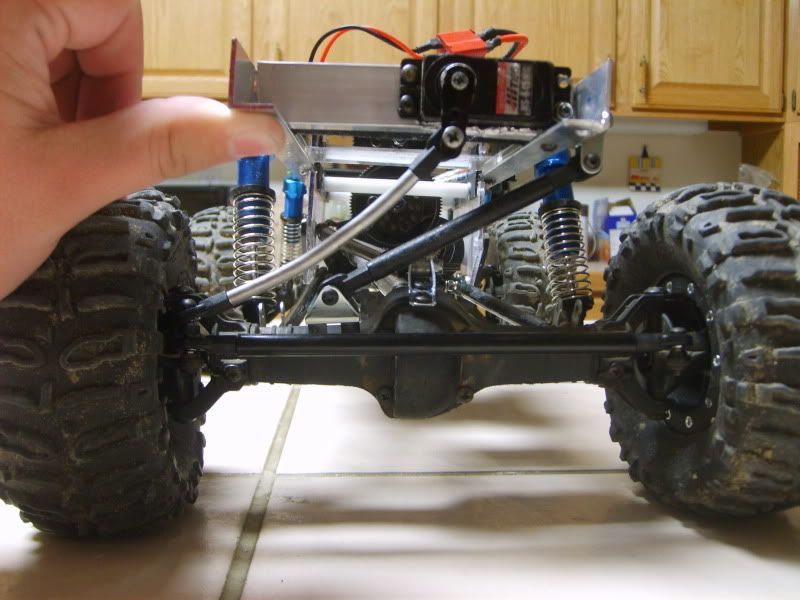 As you can see, the more angle you have on these links will cause a larger amount of sway. When you install a panhard, you need to remove an upper link so that there are two lower links, one upper and a panhard (still 4 links total). If your panhard mounts to the right side of the chassis, you need an upper link connecting to the left side chassis, and vice versa:  It can be a little hard to tell what is what in the above picture since a lot of my links are black delrin, but hopefully it helps show what links you need with a panhard set up. You can still use a 4 link with a chassis mounted servo, but you will experience bump steer. A panhard setup will prevent that. Last edited by monkeyracer; 07-16-2013 at 09:05 PM. |
|
| |
|
07-16-2013, 09:20 PM
| #16 |
| MODERATOR   Join Date: Jul 2004 Location: Ohio
Posts: 18,928
|
Here's more: Anti Squat and Suspension Tech |
|
| |
|
07-16-2013, 09:55 PM
| #17 |
| I wanna be Dave Join Date: Jun 2008 Location: Sin City
Posts: 3,628
|
To piggy back off of MonkeyRacer - Here is my 2cents on panhard setups: First lets talk about the perfect setup. I do believe you can get a perfect panhard setup, but I will not say it is better than a proper 4link. They both have pros and cons. And I will attempt to explain...... First the panhard and draglink must be the exact length and exactly parallel to each other. We also require this combo to sit parallel to the ground at ride height. As stated above - this is will give you zero bump steer. bump steer is when your suspension cycles your tires will turn slightly left or right. it is usally easy to see on the work bench but if your links are not perfect, it could still be there and you wont see it till at extremes on the rocks. Lastly I stated you want your links flat at ride height...... MonkeyRacer explained axle swing dead on. It is something that most will debate you can not tune out. But you can be smart about it being there. With the links starting flat it will be pretty close to center of the arch of travel. Can most people design a 3link this way - No. Will you notice minor imperfections in the RC world - No. Is there A LOT more to a perfect 3link - Yes. I think people try to relate everything in the scaler world to 1:1s but don't realize there math is off. Even the travel of most 2:2 rigs are no where near the amount a Ultra4 buggy has. Less travel means less extremes and more wiggle room for things that should bind, never make it that far in their axle travel. |
|
| |
|
07-16-2013, 10:03 PM
| #18 |
| I wanna be Dave Join Date: Jun 2008 Location: Sin City
Posts: 3,628
|
Another subject that has come out 100times and people get all pissy about: parallel 4link and panhard bar There is nothing wrong with this setup. Stock Jeeps come from the factory with it. And removing the front swaybar on a stock jeep with net a lot of decent travel. But I don't think it is a great idea on a RC. both upper and lower links need to be parallel. With that you have nothing fighting torque twist. Another thing to note about this setup is the difference in length between the uppers and lowers plays a big part. Your 4link is going to try to counter act your panhard bar. Having the axle in the middle of its arch cycle will keep binding at bay. 1:1s fight this issue with rubber bushings that give even more wiggle room. Best solution - set up your links how your chassis allows and see what it does, things don't change or move as much as most people think and its always fun to say "what if" and see what happens right then and there. |
|
| |
|
07-17-2013, 06:40 AM
| #19 |
| I wanna be Dave Join Date: Dec 2006 Location: Goin broke losing weight.....
Posts: 2,262
|
Excellent thread, glad you started it up. Ive been thinking about rear upper link placement for a while now for my G6 rig, just looking for that extra edge |
|
| |
|
07-19-2013, 10:51 AM
| #20 |
| Rock Crawler Join Date: Oct 2011 Location: Canada
Posts: 593
|
I am happy for the clear definition of removing a link with a panhard. All the guys in our area that run CMS with panhard havn't removed a link, which I always thought was odd. Great thread, subscribed!
|
|
| |
 |
 3/4 Link for Dummies - Similar Threads
 | ||||
| Thread | Thread Starter | Forum | Replies | Last Post |
| Posting Pics For Dummies | Robb | Comments, Suggestions, and Help | 8 | 03-10-2020 08:17 PM |
| rc motors for dummies (like myself). lol | KR15 | Redcat Crawlers | 10 | 04-14-2013 09:22 AM |
| Lipo charger/s for DUMMIES | BeeRC | Electronics | 16 | 06-23-2008 03:22 PM |
| Nomadio for dummies | jl_907 | Electronics | 0 | 03-25-2008 10:33 PM |
| machining for dummies literature? | cstmp8r | Tools, and Procedures | 5 | 06-19-2005 12:59 AM |
| |


 Linear Mode


