| |
| |||||||
 |
| | LinkBack | Thread Tools | Display Modes |
 03-13-2013, 08:37 PM
| #1 |
| Quarry Creeper Join Date: Jul 2007 Location: Mac
Posts: 377
|
I've had this 5x8 enclosed trailer for about 10 years, used primarily as a storeroom for most of my camping crap. It has sat beside the barn for the last 6ish years, out of sight, out of mind, except when I needed a piece of gear. A few months back, something triggered a desire to bring the aging trailer back from the dead, and give it new life as a hobby room on wheels. Plans for the build include a few deep cycle batts in a tongue box for field power, interior and exterior lighting, multiple power ports to plug in lipo chargers, stereo system, folding roof rack that will double as a sleeping platform, and some sort of camp kitchen with a mandatory 12v beer fridge. Here's the roof rack design, unfolded:  It's in the process of being built, I need to stop by the weld shop some time for progress pics. While waiting on the roof rack, I have gutted the trailer, converted all of the running lights to led, insulated the interior with 1" Styrofoam, put down some linoleum, and covered the walls and roof with prepainted masonite panels. When I went to add panels to the rear doors, I discovered some bad news... the lower part of the doors suffered from some water damage. What should have been a simple job turned into completely rebuilding new doors. Enough jabbering, here's a few progress pics:   Here's the new door blanks, glued and clamped: 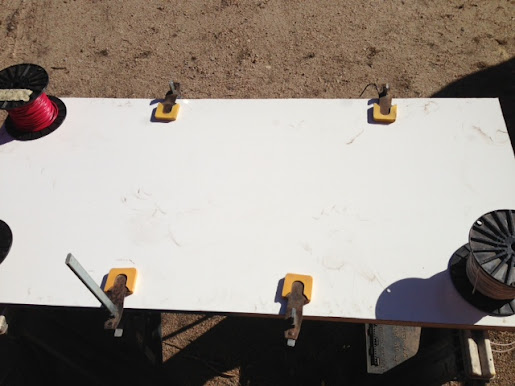 Inside wired and insulated, ready for flooring and wall covering: 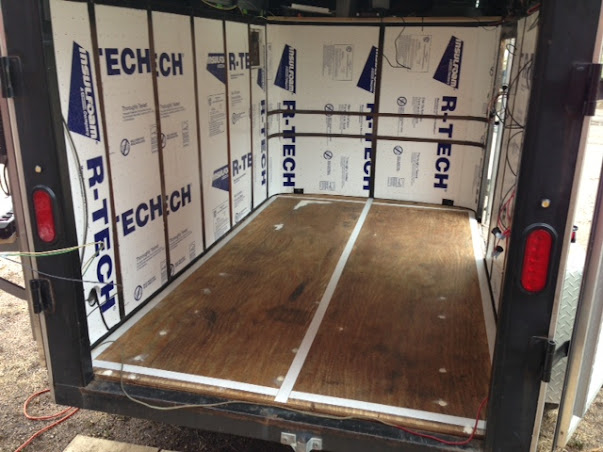 Flooring and most of the panels in place, along with some interior led lighting. Ratchet straps are to stow the ez-up, camp chairs, etc:  New rear door, compared to old front door (still need to rebuild it to match the rear doors):  Tongue mounted battery box, with shore power connection for charging system. Considering adding some solar panels for extended outings. Oh yeah, also added a vent on the side of the trailer, with some cpu fans to move some air if needed:  Inside shot of the vent and fans:  More progress soon, waiting on USPS to deliver some switches and other goodies. Hoping to have it road worthy for the Goat Hill GTG in Kansas City. |

|  |
| Sponsored Links | |
| | |
|
03-13-2013, 10:08 PM
| #2 |
| Pebble Pounder Join Date: Jan 2012 Location: McPherson
Posts: 165
|
Looks good Billy. If you need any help with it, just hollar.
|
|
| |
|
03-14-2013, 07:06 AM
| #3 |
| Quarry Creeper Join Date: Jul 2007 Location: Mac
Posts: 377
|
Thanks, will do!
|
|
| |
|
03-14-2013, 07:44 AM
| #4 |
| RCC Addict Join Date: Jun 2011 Location: Lindsborg
Posts: 1,708
|
pretty kick ass, yeah holler if you need help with like holding stuff........or drinking beer.........wasting time........you know, whatever ;)
|
|
| |
|
03-14-2013, 07:54 AM
| #5 |
| Rock Crawler Join Date: Jan 2009 Location: Boise
Posts: 604
|
Nice work so far man can't wait to see it all finished up. Sent from my Xoom using Tapatalk 2 |
|
| |
|
03-14-2013, 09:33 AM
| #6 |
| RCC Addict Join Date: Nov 2005 Location: Kansas
Posts: 1,280
|
Lookin good Billy! All of my rigs should be done by Goat Hill, will your trailer? I too don't mind helpin any way I can, now that there's some nice weather |
|
| |
|
03-14-2013, 09:49 AM
| #7 |
| Quarry Creeper Join Date: Jul 2007 Location: Mac
Posts: 377
|
Thanks guys, I'm hoping to have it done for the Cinco de Mayo crawl at Coronado for its maiden run, then work out any bugs for Goat Hill the following weekend. The wife picked up some cool beanbag chairs so we can wrench in comfort! Other additions in the works: onboard air, portapotty, onboard water, solar charging, solar shower... the list goes on. This trailer will serve double duty as a bugout trailer if the need ever arises.
|
|
| |
|
03-14-2013, 12:16 PM
| #8 | |
| RCC Addict Join Date: Nov 2005 Location: Kansas
Posts: 1,280
| Quote:
I'm pretty interested in seeing where the solar charging setup goes | |
|
| |
|
03-14-2013, 07:16 PM
| #10 |
| Quarry Creeper Join Date: Jul 2007 Location: Mac
Posts: 377
|
I would need 120 of those to keep up with my power usage! I have 3 60w panels, and am researching Max Power Point Tracking (MPPT) charge controllers. The ones from Morningstar come highly recommended, but have a hefty price tag.
|
|
| |
|
03-14-2013, 07:43 PM
| #11 |
| RCC Addict Join Date: Jun 2011 Location: Lindsborg
Posts: 1,708
|
Arduino board, photo cell and servos. Sent from my RM-845_nam_vzw_100 using Board Express |
|
| |
|
03-14-2013, 07:50 PM
| #12 |
| Quarry Creeper Join Date: Jul 2007 Location: Mac
Posts: 377
|
Yep, great solution for solar tracking, but I'll be using power seat motors instead of servos due to the size of the panels. MPPT varies the current draw from the pv panels to maximize power output. This can also be done using an Arduino and some high current FETs, but I already have enough Arduino projects on the drawing board! Don't tempt me... dammit, too late... what's one more sketch to start writing!!! LOL
|
|
| |
|
03-15-2013, 10:14 AM
| #13 |
| Newbie  Join Date: Sep 2012 Location: salina
Posts: 24
|
Thats turning out pretty good Billy. lots of good ideas, can't wait to see it. goodluck!
|
|
| |
|
03-15-2013, 06:24 PM
| #14 |
| Quarry Creeper Join Date: Jul 2007 Location: Mac
Posts: 377
|
Thanks! The rest of my switches arrived, so I no longer have an excuse to just hang out in it and drink beer. Now that the wall panels are in, Kori has named the trailer 'Pearl.' Alotta white in the interior, might need some color in there. Also thinkin' maybe I should put a dimmer on the led light strips on the ceiling... or I could just leave it as in and drink more beer!
|
|
| |
|
03-15-2013, 08:07 PM
| #15 |
| RCC Addict Join Date: Jun 2011 Location: Lindsborg
Posts: 1,708
|
Dimmer ;) Sent from my RM-845_nam_vzw_100 using Board Express |
|
| |
|
03-20-2013, 08:51 PM
| #16 |
| Pebble Pounder Join Date: Nov 2011 Location: Central Kansas
Posts: 149
|
Love the checkerboard floor! I've seen that in a couple of racing trailers. Your plans are top shelf! Nice work. Can't wait to see it at Goat Hill.
|
|
| |
|
03-23-2013, 06:24 PM
| #17 |
| Quarry Creeper Join Date: Jul 2007 Location: Mac
Posts: 377
|
Thanks G! Got a little more done. The ez-up, folding chairs, folding tables, tent, etc. have been strapped in place up front. 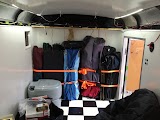  The all-important porta-potty has been set up front, but not sure if it'll stay there. The mandatory beanbag will just be shoved wherever it will fit once all the shelving is in place. Got tired of sitting the house today, so I went out and started working on the beer fridge rack. The fridge will store against the driver's wall, then swing out into the position shown below to be accessible from the back of the trailer. 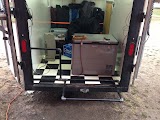  I still need to tweak it a little then weld it up solid and bolt it in place. Slow progress, but it's progress! |
|
| |
|
03-23-2013, 06:28 PM
| #18 |
| Quarry Creeper Join Date: Jul 2007 Location: Mac
Posts: 377
|
Link to larger pics: https://plus.google.com/photos/10920...P7gg8vC0r3_4wE |
|
| |
|
03-24-2013, 02:16 PM
| #19 |
| RCC Addict Join Date: Nov 2005 Location: Kansas
Posts: 1,280
|
Trailer is coming along nice! What are ya planning for the ceiling?
|
|
| |
|
03-24-2013, 04:33 PM
| #20 |
| Quarry Creeper Join Date: Jul 2007 Location: Mac
Posts: 377
|
The majority of the ceiling will be covered in 1/8" white masonite, and I'm planning on using 1/16" pvc shower panels in the tight radius corners. Still need to run a few cables front to rear, then the corners will be insulated and covered. My 'to do' list on this thing keeps growing! I get one thing done, and add three more. I made some headway on the beer fridge support today, just need to cut and thread two more pipe nipples tomorrow at work, then weld it up and bolt it in. Then I can finish up the task lighting on the rear doors, and then I can run the ground wire for the batts up front, and then work on the work bench, and then, and then... LOL |
|
| |
|
 Hobby Trailer: the rebuild... - Similar Threads
 | ||||
| Thread | Thread Starter | Forum | Replies | Last Post |
| Worst hobby shop in town! Franks Hobby hell hole | bolibruch1 | Arizona | 26 | 10-07-2014 06:46 PM |
| Trailer Trash. Dinky R/C Woodsman Trailer | tozrovr | Scale Accessories | 25 | 05-29-2014 02:48 PM |
| Thread Tools | |
| Display Modes | |
| |


 Linear Mode


