| |
 10-20-2010, 06:38 PM
| #1 |
| RCC Addict Join Date: Jun 2006 Location: Maryland
Posts: 1,255
|
This all started with a super I built for Motorama last year. It was kinda fun while it lasted, but it only lasted half way through course 2 and that was the end of that (broke AX tranny gears). So I parted it out and kept my XTM X-FACTOR axles. 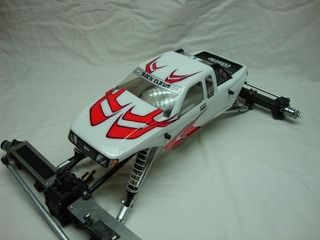 Bye bye short lived super career, hello large scale!!! The first thing that really got me excited for a large scale build for me was RC4WD releasing the RokLox' in 40 series. They are perfect for 1:4. They scale out to be a 35" tire on a 16" rim. Here's one of mine on a narrowed Axial 40 BL next to a 1.9 flatiron.  Next, I knew it had to be an old jeep because it would be easier to build the body (mostly flat panels), and I love old jeeps! Printed out a photo of a M38 grill from the interwebs and scaled it down to reproduce.  With a little bit of manual mill work, and a bunch of hand work with a dremel, heres my 1:4 scale CJ3A grill. it is made from a plastic that is a little softer than delrin .125 thick. Still needs the marker light holes. 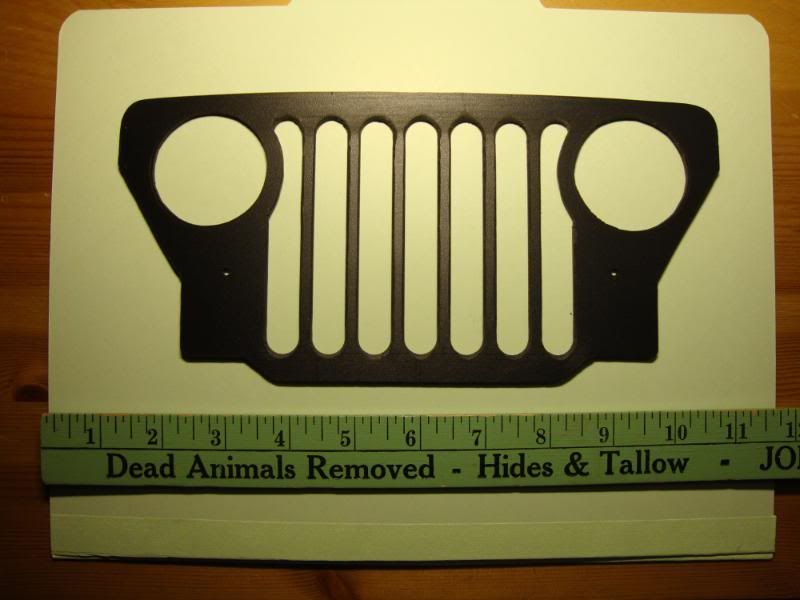 Really wanted to use these M5 steely RC4WD rod ends on my lower links, but they dont have enough travel, so Im using them for the uppers links/axle side, and rear axle lockouts.  Scored a set of Losi LST shocks out of the wanted section. They are BIG and the springs might be a little stiff. the spring diameter is close to a 540 can. 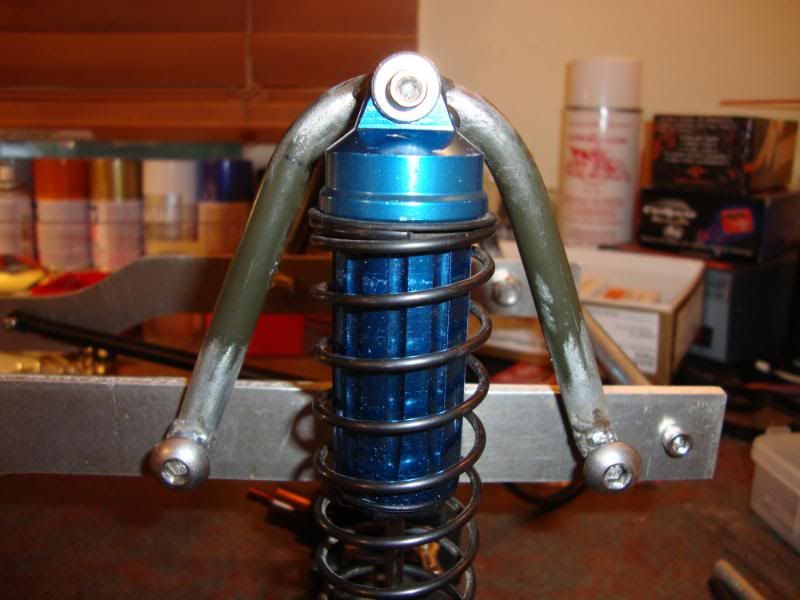 And here it is as a roller. I cut the frame out on a band saw and cleaned it up with a drum sander. Skid and sliders are out of 3/8 thick delrin. Lower links are 3/8" delrin with revo rod ends on 10-32 allthread, uppers are 5/16" dia. Just a little note, M5 bolts thread right into a 10-32 hole. 22" wheelbase. (x4 = 88". just about perfect for a flatty on 35's.) Frame is 29 1/4" long, 6" wide. 17" track width 5 3/4" underbelly. 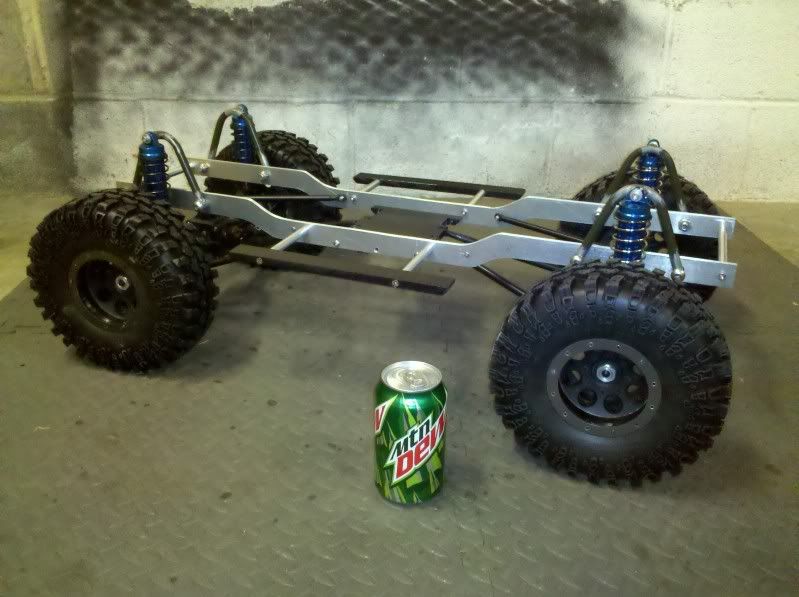  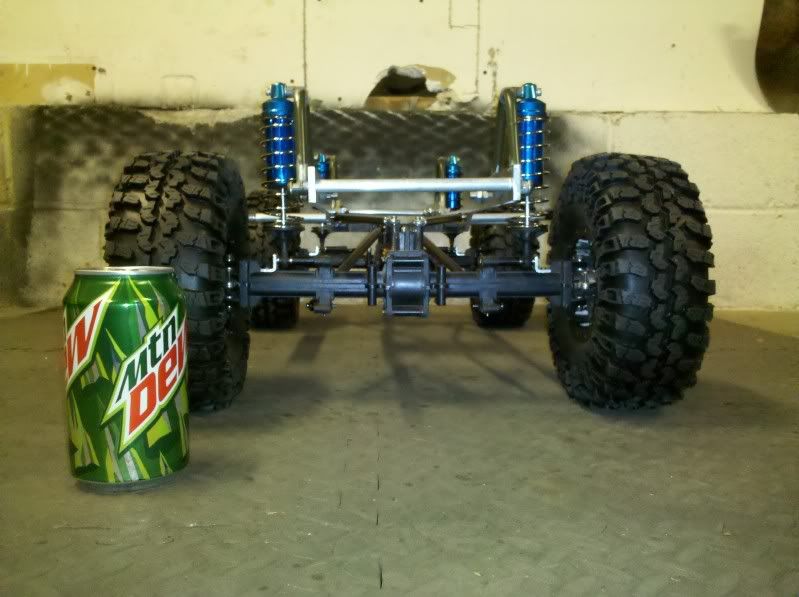 -Brian |

|  |
| Sponsored Links | |
| | |
|
10-20-2010, 07:28 PM
| #2 |
| RCC Addict Join Date: Apr 2009 Location: United States of the Offended
Posts: 1,184
|
Holy sheep sh!t batman!!!!!! Subscribed!!!  |

| |
|
10-20-2010, 08:52 PM
| #3 | |
| Rock Crawler Join Date: Dec 2008 Location: Marengo, Ohio
Posts: 980
| Quote:
That is massive, i thought my 1:6 Titan monster was big with TXTs and Clod Slingers. | |
|
| |
|
10-20-2010, 11:11 PM
| #4 |
| I wanna be Dave Join Date: Jun 2006 Location: Here
Posts: 2,319
|
Looks Awesome. I still need to build my Giant Mog I got from someone on here. I'll be using Mad force axles and 40's crushers though.
|
|
| |
|
10-21-2010, 08:42 AM
| #5 |
| I wanna be Dave Join Date: Dec 2009 Location: .
Posts: 7,967
|
Dude that thing is awesome, can't wait to see the progress from here. |
|
| |
|
10-21-2010, 10:13 AM
| #6 |
| Rock Stacker Join Date: Jun 2009 Location: Russia, Ural
Posts: 75
|
Subscribed!! |
|
| |
|
10-21-2010, 10:21 AM
| #7 |
| Newbie Join Date: Aug 2008 Location: hoosick falls
Posts: 39
|
that things fawking HUGE!!! what are you gonna power that beast with??
|
|
| |
|
10-21-2010, 10:46 AM
| #8 |
| Rock Crawler Join Date: Mar 2005 Location: Murrieta
Posts: 806
|
That looks sweet so far man. |
|
| |
|
10-21-2010, 07:13 PM
| #9 |
| RCC Addict Join Date: Jun 2006 Location: Maryland
Posts: 1,255
|
Thanks guys. Here are a couple pics I've been using for ideas and dimensions.  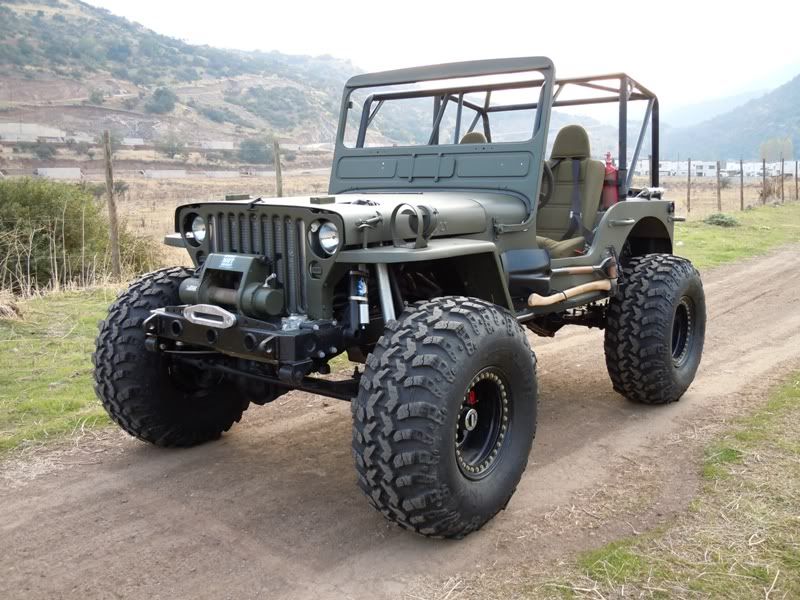 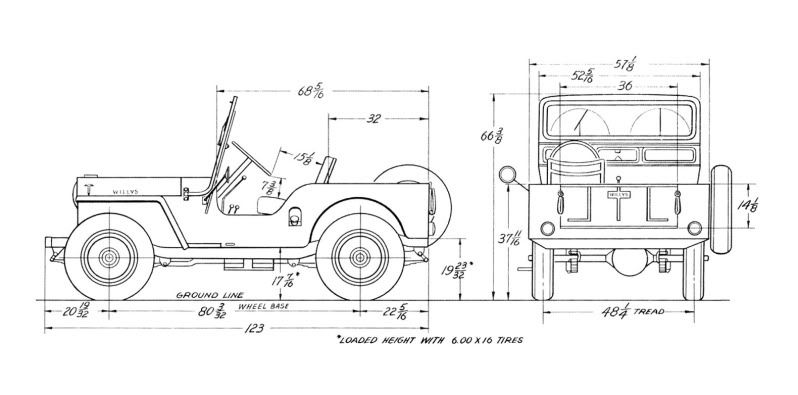 And here is my 2D cad drawing I'm using to locate everything. I actually printed the shock hoops at 1:1 and used it as a template when bending. 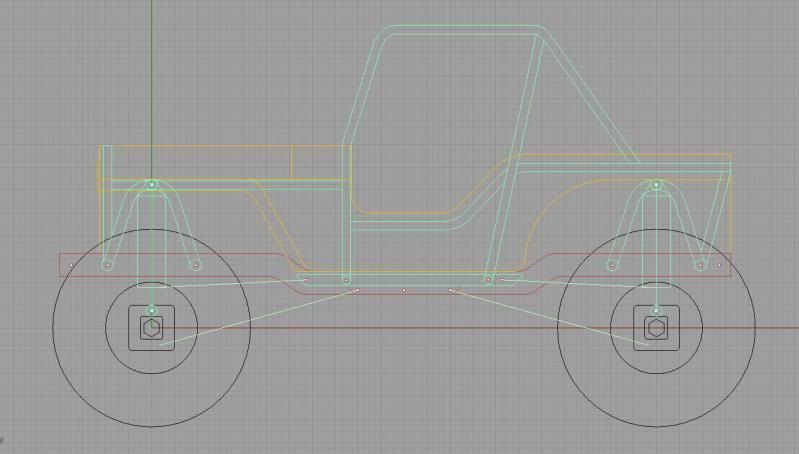 |
|
| |
|
10-21-2010, 07:27 PM
| #10 |
| RCC Addict Join Date: May 2010 Location: So. Charleston. Wv
Posts: 1,221
|
Im ready for mooore pics |
|
| |
|
10-21-2010, 07:33 PM
| #11 |
| I wanna be Dave  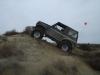 Join Date: Apr 2005 Location: Eastern WA
Posts: 2,489
|
Is that rhino3d............? I like that program alot. The build is looking shweet man! |
|
| |
|
10-21-2010, 08:13 PM
| #12 |
| Rock Crawler Join Date: Aug 2009 Location: milton,wv
Posts: 558
|
looking amazing,keep posting for us
|
|
| |
|
10-22-2010, 06:19 PM
| #13 | |
| RCC Addict Join Date: Jun 2006 Location: Maryland
Posts: 1,255
| Quote:
Here's my bulldog Berkeley helping me measure a CJ hood I had out in the garage.  This is a test piece I made for all of the body panels. It is .070 thick lexan that I put in the oven for five minutes @ 250°. It becomes very soft and I pushed it over my little 2x4 scrap with my hands in gloves. It returned to original hardness in about 30 seconds. Very happy with the test results!  | |
|
| |
|
10-22-2010, 06:51 PM
| #14 |
| I wanna be Dave Join Date: Apr 2005 Location: Eastern WA
Posts: 2,489
|
Very neat build man. I had a 1/6 scale TXT, and it was cool. I think I'll do a big scaler. They are awesome. Electronics aren't cheap.
|
|
| |
|
10-22-2010, 08:44 PM
| #15 |
| Newbie Join Date: Oct 2007 Location: Santiago-Chile
Posts: 1
|
very nice build. suscribed |
|
| |
|
10-25-2010, 11:06 AM
| #16 |
| RCC Addict Join Date: Nov 2008 Location: Frederick
Posts: 1,286
|
Looking good Poter. The Lexan bent nice a hell. So when are you going the get a steel geared E-Max trany with dual 7t pullers? |
|
| |
|
10-25-2010, 12:08 PM
| #17 |
| I wanna be Dave Join Date: May 2008 Location: Baltimore
Posts: 4,442
|
You should be able to drag the 'Tractor' around with this beast! You bringing the pooch to Bobrocks?
|
|
| |
|
10-25-2010, 09:17 PM
| #18 |
| I wanna be Dave Join Date: Dec 2009 Location: Outside DC
Posts: 2,997
|
Awesome build!!!! Subscribed!!! The pics and build are perfect. Keep up the great work! The inspiration is SICK!!!! Tuned in for sure!!!
|
|
| |
|
10-26-2010, 05:48 PM
| #19 | |||
| RCC Addict Join Date: Jun 2006 Location: Maryland
Posts: 1,255
| Quote:
Quote:
Quote:
 Might bring the 1:4 CJ roller for you guys to check out though, I want to see it next to a 1:6 GI Joe Jeep. Might bring the 1:4 CJ roller for you guys to check out though, I want to see it next to a 1:6 GI Joe Jeep.Just a random reference shot. 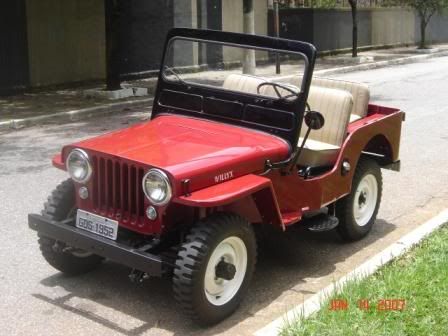 Here are the molds I made for the hood and cowl. The blue tape under the lexan on the cowl mold is some filler for my fawk up of removing too much material on the front radius... Basically I cut the molds to exact size and cut the lexan with extra. After forming the lexan over the mold, I use a band saw & disc sander to remove the excess lexan and finish the panel to size(using the wooden mold as a template).  And here are my first 3 body panels together with a standard size bic lighter for size reference. The dark spots in the corner of the cowl piece are lumpy high spots from the blue tape, that I sanded down after foming. 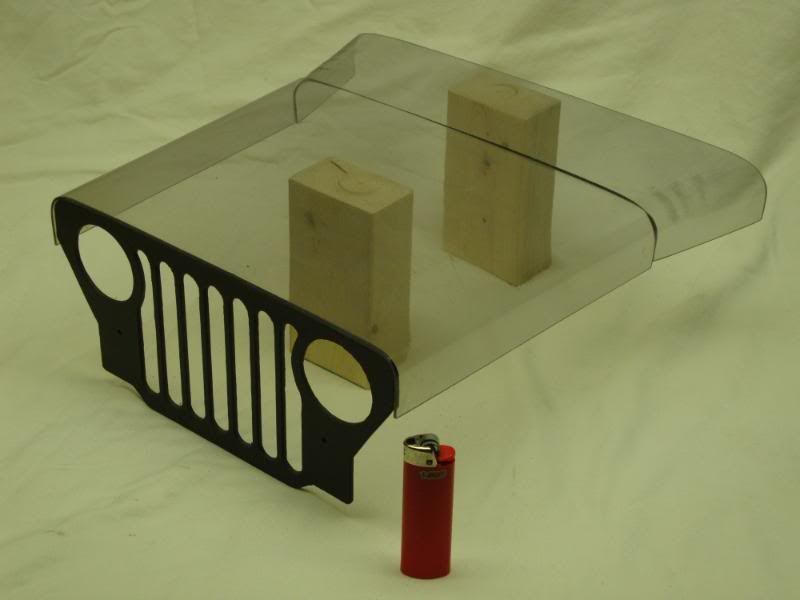 Next is bend some more brake line to create the framework for these body panels. -Brian | |||
|
| |
|
10-26-2010, 06:11 PM
| #20 |
| cherry bomb   Join Date: Jul 2006 Location: Nanaimo, BC, Canada
Posts: 1,598
|
wow looks great, nice chassis/running gear setup I like it, body start looks top notch aswell, cant wait to see it more complete, with the clear acrylic pannels you could paint the inside silver and if you were to scratch the paint it would reveal the "steel"
|
|
| |
 |
| Thread Tools | |
| Display Modes | |
| |


 Linear Mode


