| |
 01-20-2012, 08:49 AM
| #41 | |
| I wanna be Dave Join Date: May 2008 Location: Baltimore
Posts: 4,442
| Quote:
| |

|  |
| Sponsored Links | |
| | |
|
01-21-2012, 09:27 PM
| #42 |
| I wanna be Dave Join Date: May 2008 Location: Baltimore
Posts: 4,442
|
Yesterday I got some new tooling for the lathe, I ordered a steady rest from Mylittlemachineshop.com, I just got the el-cheapo model and added the bearings to the fingers myself, it only took a bit of work and about $8 in parts to do the conversion. This tool allowed me to chuck up the Wraith axle housing into the head and then center and support the axle tube that I needed to counterbore. It worked out pretty well. 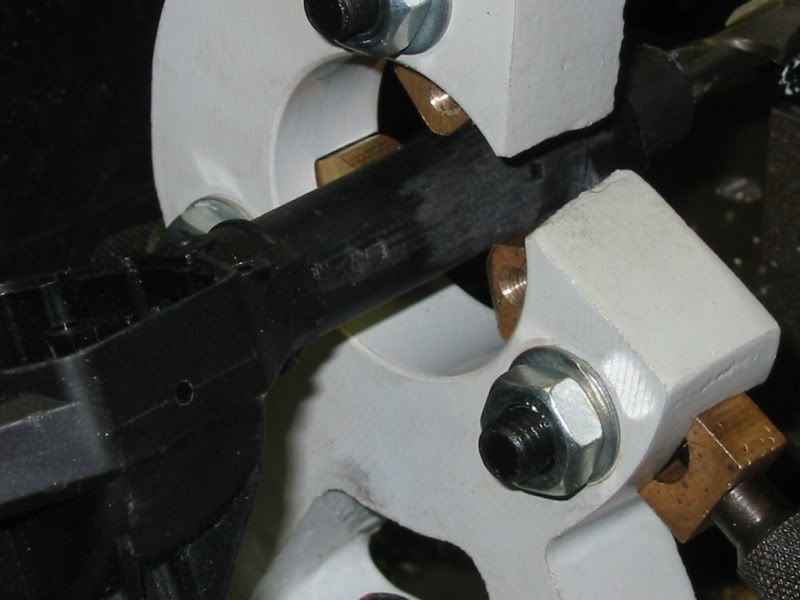 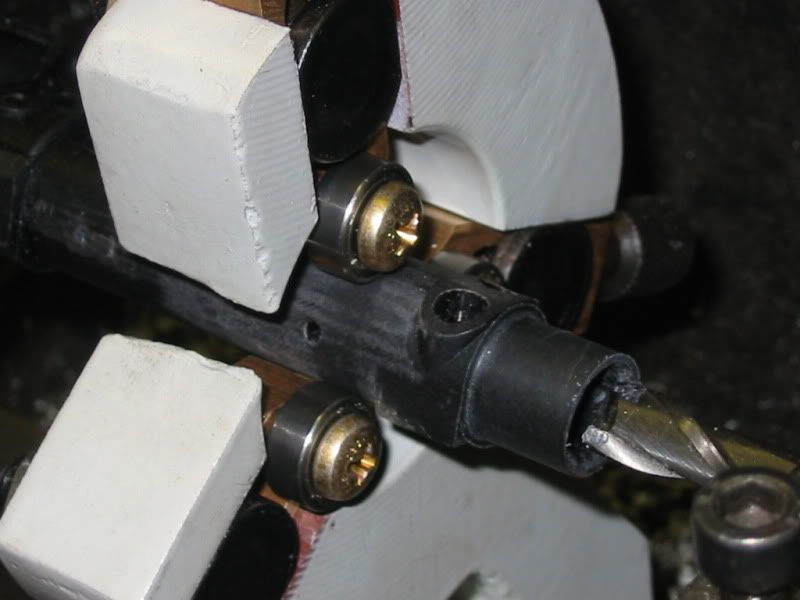 The new pockets for the bearings turned out good, now that I know that I can do the pockets I can narrow the axle housing even more if I have to, I'm not completely sold on the track width yet. 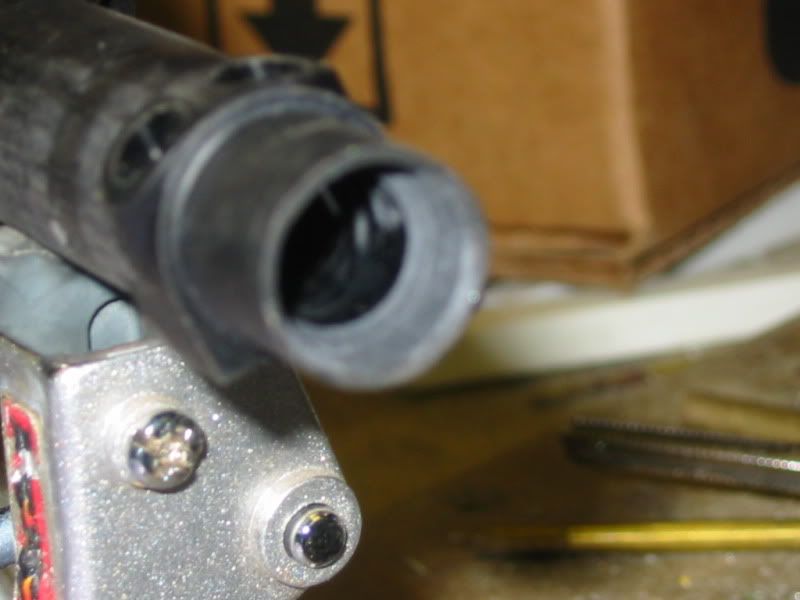 ( I know, the camera doesn't have the best macro close up abilities...) This shows the tweeked design for the spring plates, I've left enough material on one end to do a slight turn down, then I'll solder on a brass stud for a shock mount. You can also see that I re-tempered the u-bolts, the blue color isn't a chemcal coating, it's the steel that has changed its temper. 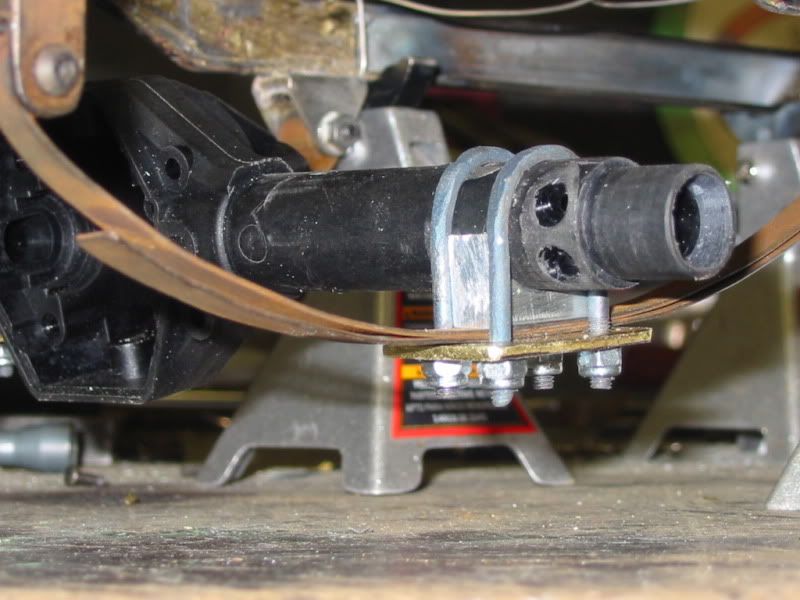 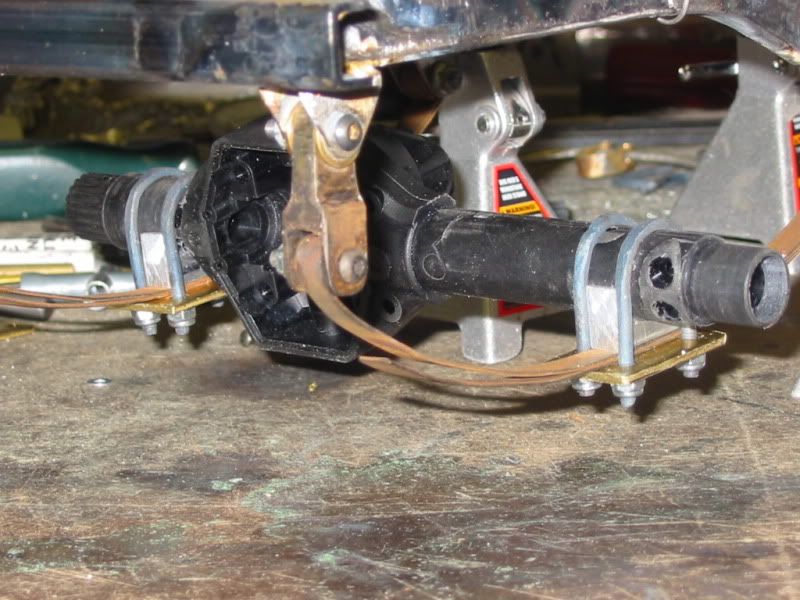 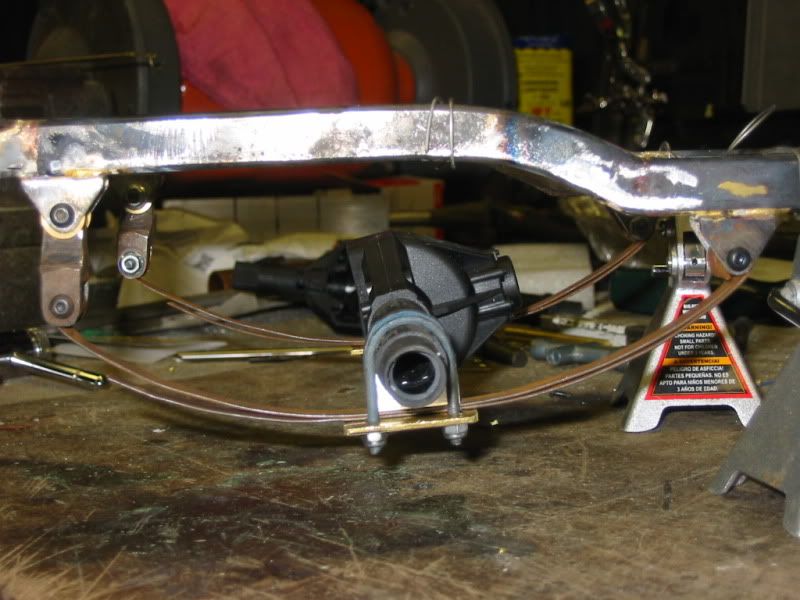 Just for laughs, here is my low-dollar boring bar substitution. I use a 3/8" shank 2 flute end mill, it fits in the boring bar holder very well and it's a hell of lot sharper than the carbide tipped boring bar that I have, plus it's chaeper. I have 2 cutting edges on each end, X2 ends. I get a lot of mileage out of this set up.  |
|
| |
|
01-22-2012, 07:29 PM
| #43 |
| I wanna be Dave Join Date: May 2008 Location: Baltimore
Posts: 4,442
|
I got some spring plates made up so I decided to mount up the axles to see how well everything fits together. I wasn't too happy with the overall width, the tires stick out a bit too far for my personal tastes. I had about 10mm to play with on the short tube side so I shifted everything over just to see how it looked. 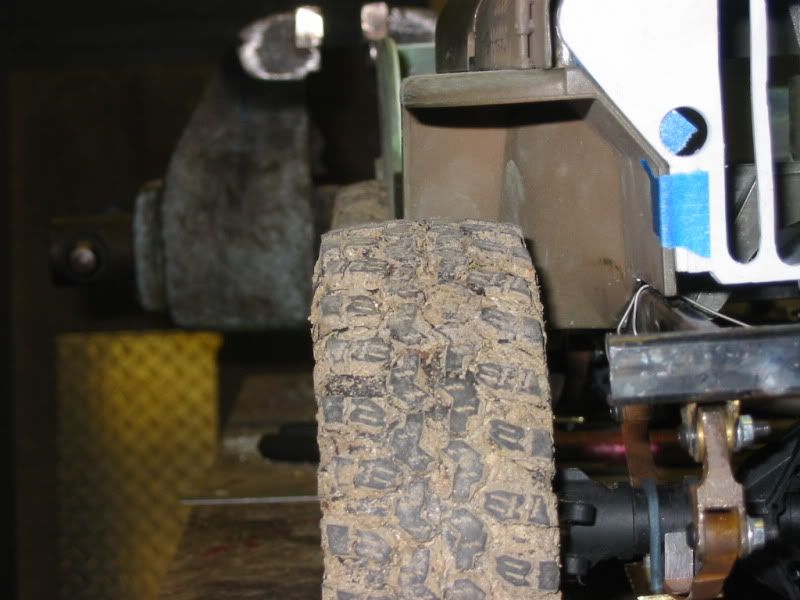 This put about 50% of the tire inside of the wheel wells but then it really cuts down on a turning radius, the front tires just hit the springs really badly so I'm just going to have to leave the width the way it is. The tires stick out about as far as they do w/ the AXR-10 hybrid axles, I was just hoping to make things look a bit more cleaner. It's too late to unbraze the chassis and pinch the front section to gain some tire clearance, it's not worth the effort to me. I also tried mounting up one of the modified Tamiya HummV wheels ( the ones I made into 2.2 wheels) too see how they fit, they gained a bit of clearance so maybe at some point down the road it might be an option to mess around with. 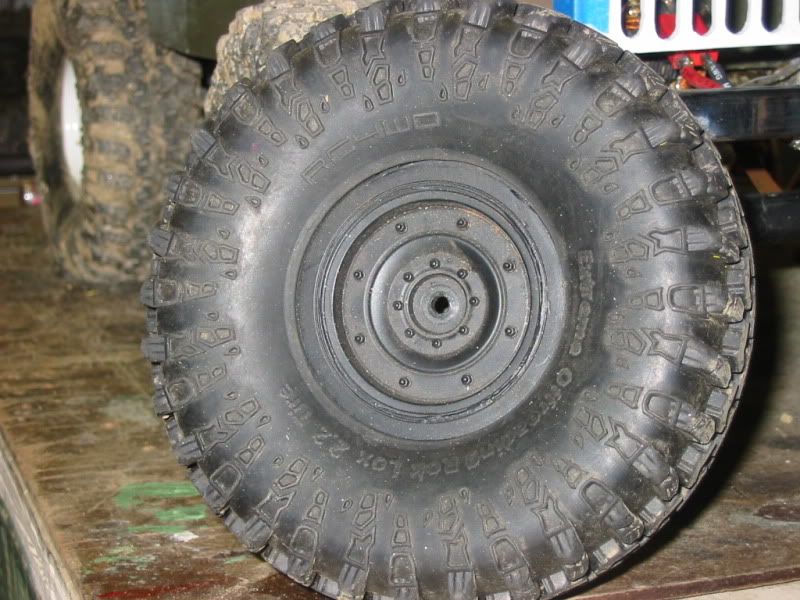 That's all I worked on this weekend, I wasn't in the mood to spend too much time on this project rght now. Last edited by BigSki; 01-22-2012 at 07:32 PM. |
|
| |
|
01-26-2012, 07:46 AM
| #44 |
| I wanna be Dave  Join Date: Oct 2006 Location: Martinsburg WV
Posts: 2,781
|
I'm startin' to think we're watching the birth of "the next level" in 1/6th Jeep builds? The detail and realism factors are really ramping up. Driving this one is going to be an experience, with full leafs just like the real thing. I need a live center like that for my lathe. Nice... |
|
| |
|
01-26-2012, 08:28 AM
| #45 | |
| I wanna be Dave Join Date: May 2008 Location: Baltimore
Posts: 4,442
| Quote:
I've been happy w/ the steady rest, it was cheaper than the custom ground counter bore tool that I needed and it's much more versatile so it was money well spent. Dd you see the VA scalers club is having a boulder run on April 1st? They only have room for 1/10th scale vehicles but I may take the 'Jero for the 1.9 class and take the orange Jeep just for fun. Last edited by BigSki; 01-27-2012 at 10:03 AM. | |
|
| |
|
01-26-2012, 08:34 AM
| #46 |
| I wanna be Dave Join Date: May 2008 Location: Baltimore
Posts: 4,442
|
Here are some highlights for a cage I'm building for someone else, I think it's much more involved than most folks realize. I'm using 1/4 brake line for the cage. Each joint is mitered for a snug fit, then I use gap filling CA glue to "tack" everything into place long enough for me to get it moved to the brazing plate and get it jigged up. Jigging has to be the most time consuming part of any fabrication job, everything needs to be locked into place very well, you can't stop w/ a torch in your hand to make adjustments. 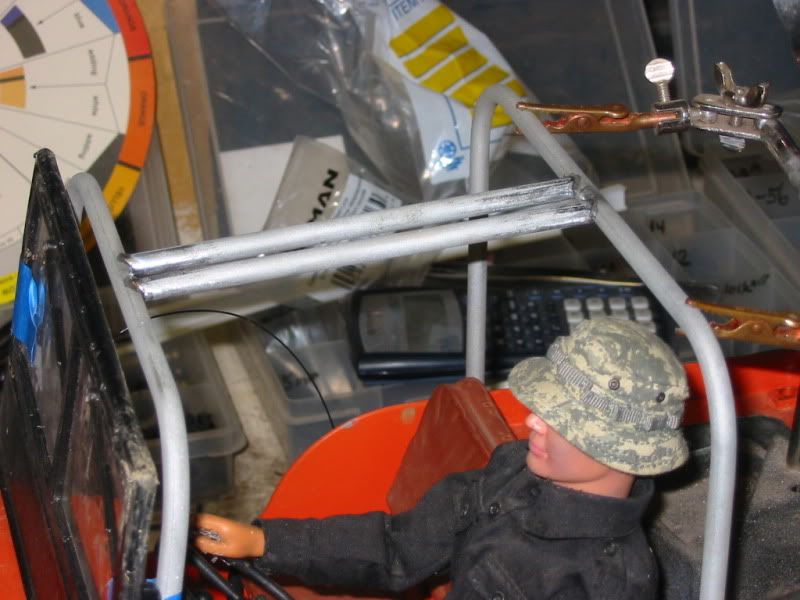 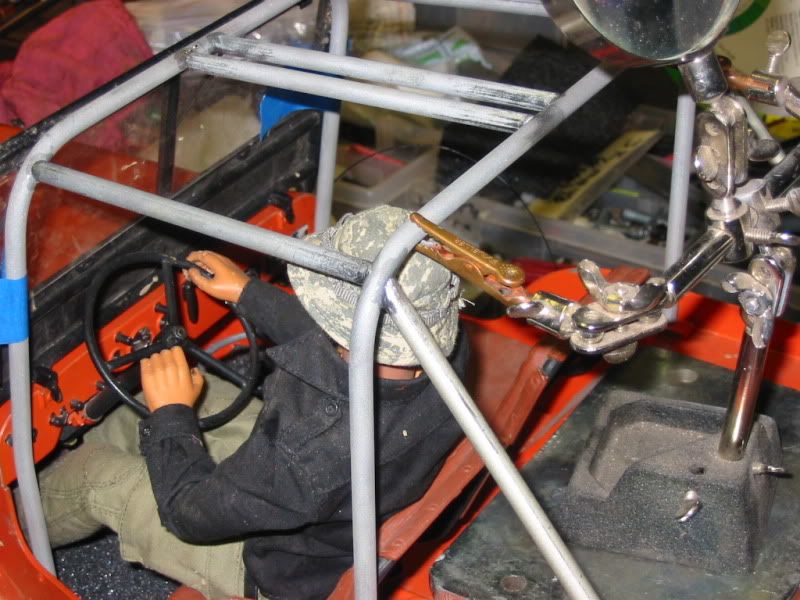 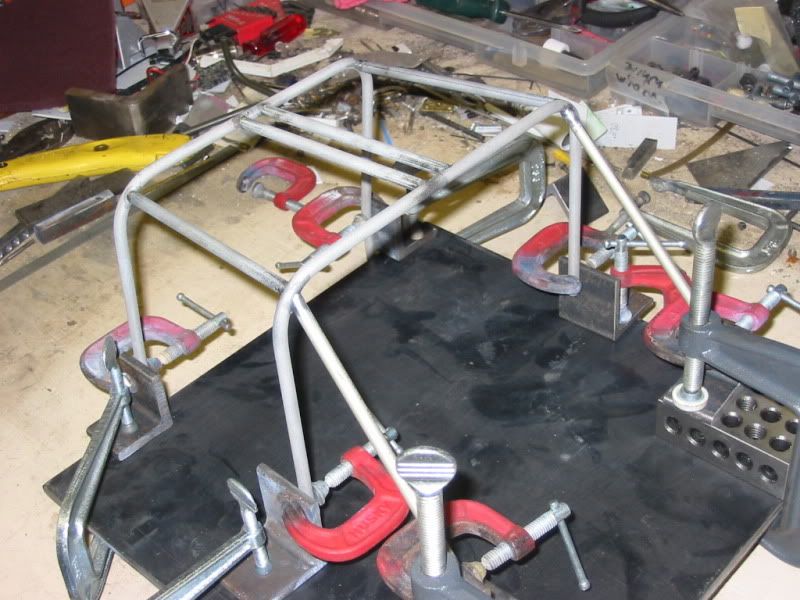 My brazing is getting better, I'm finally not ashamed to show off my joints before cosmetic touch ups. 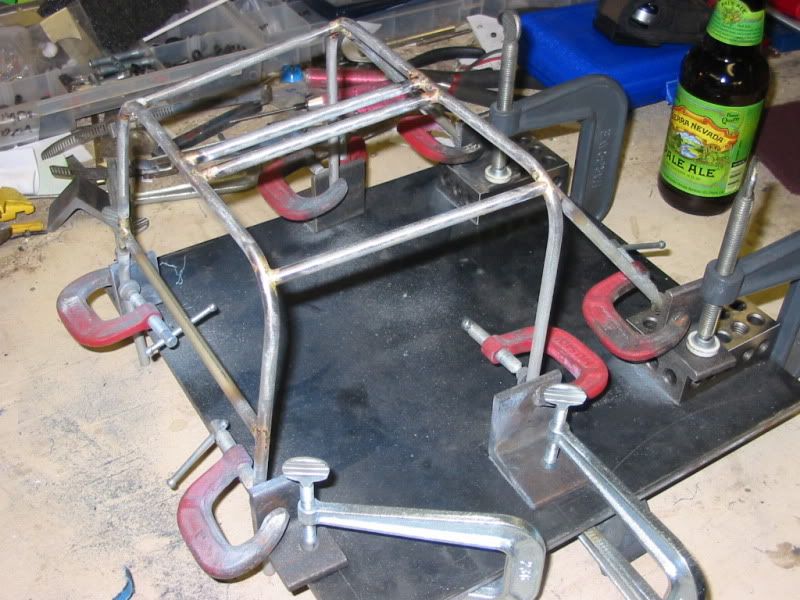 I am embarrassed with this scrap pile! *I had a hard time remembering how to layout the offset on my bender, I wasted about 3' of tubing before it all came back to me. 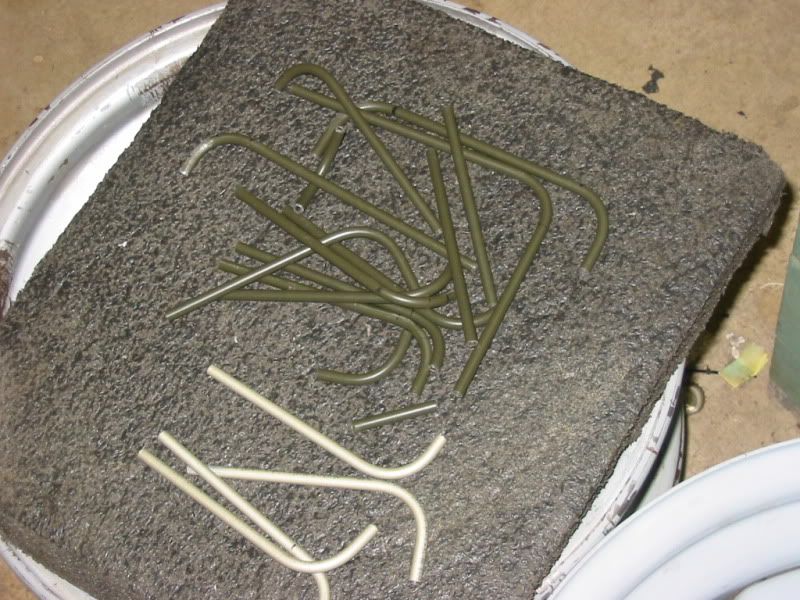 |
|
| |
|
01-27-2012, 09:18 AM
| #47 | |
| I wanna be Dave Join Date: Oct 2006 Location: Martinsburg WV
Posts: 2,781
|
CA tacking is really helpful. Just watch those fumes when you braze! Quote:
I usually end up with a scrap pile like that! Sometimes the piece you need is already in the scrap pile though, you just have to remember. Yes, let's hit the April thing with 1/6th Jeeps. Just for the wow factor. If that's who I'm thinking it is, I've run with some of them before. They're good people. Damned Pale Ale made me thirsty!! Is it lunchtime yet? Last edited by Big Mike; 01-27-2012 at 09:22 AM. | |
|
| |
|
01-27-2012, 10:06 AM
| #48 | |
| I wanna be Dave Join Date: May 2008 Location: Baltimore
Posts: 4,442
| Quote:
 | |
|
| |
|
02-07-2012, 09:53 PM
| #49 |
| I wanna be Dave Join Date: May 2008 Location: Baltimore
Posts: 4,442
|
I finally got back to working on the body of the CJ-3A. I made a tail gate for it, but not in the usual way. I didn't want to cut out an opening then glue something back into place, that seems like a waste of effort so what I did was to make 2 'appliques', basically an outer and inner shell that has the details of the tail gate but they simply get glued into place. The inner panel has reliefs cut out to give the look of depth, like the stamped metal of the real tail gate. The outer skin has the dimensional details that you would expect to see. 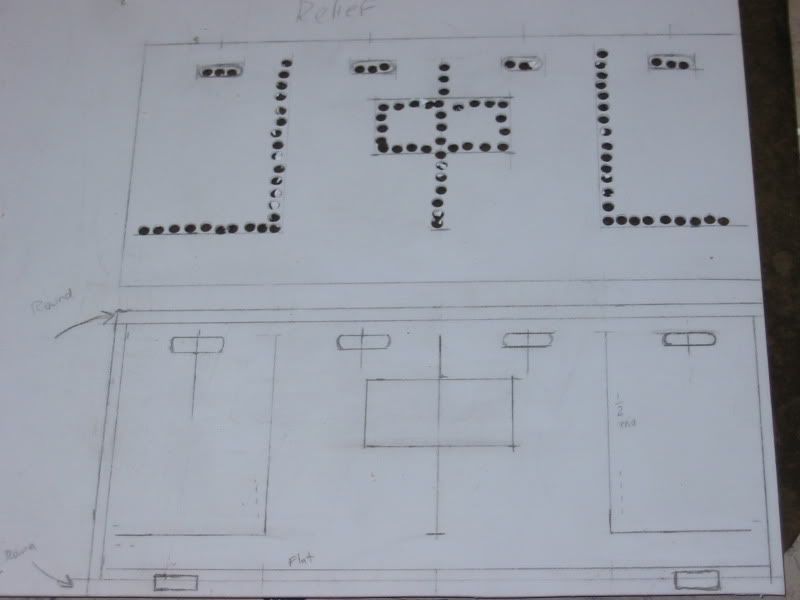  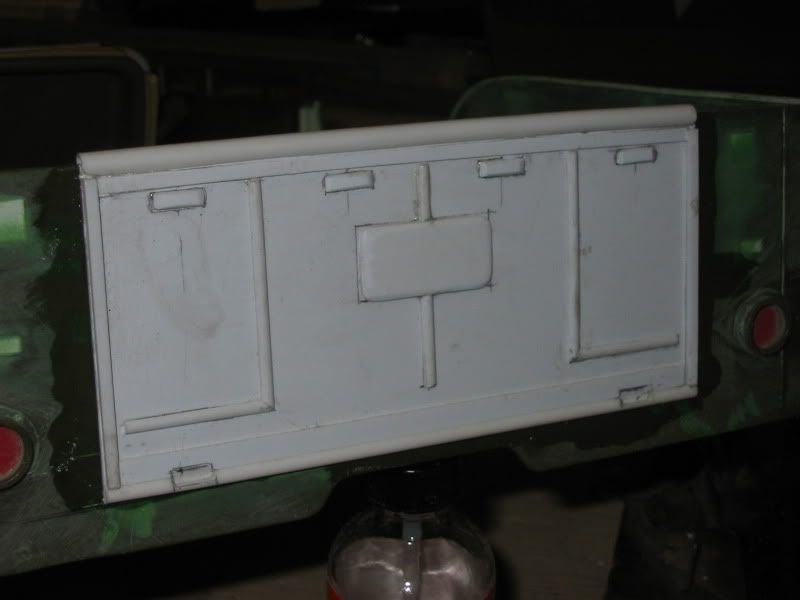 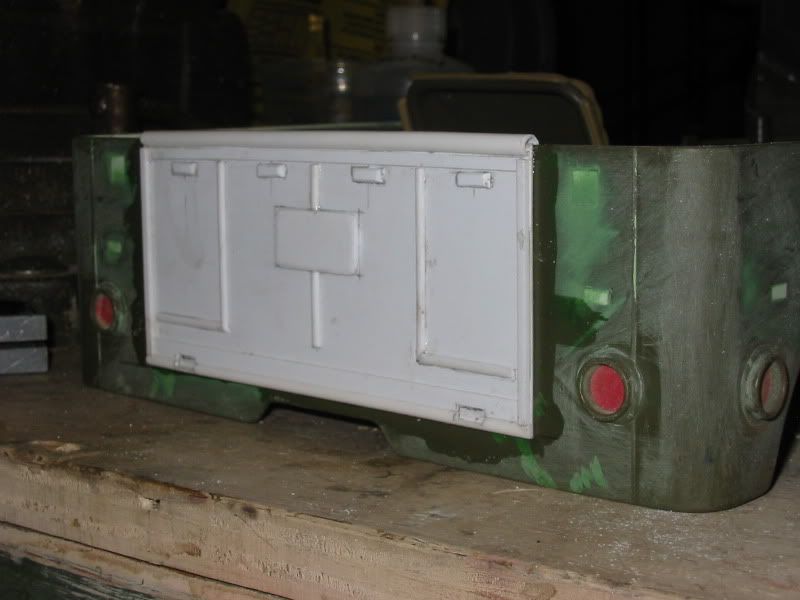 I still need to make the little latches that the tailgate chain hooks to, but that won't take very long. There's 3 projects left on the body then I can finally hit it with primer. I need to finish the tool box under the passenger seat, I need to make a windshield frame and I need to make a grill. It's getting there....... |
|
| |
|
02-08-2012, 04:11 PM
| #50 | |
| Rock Crawler Join Date: Jul 2009 Location: Victoria Australia
Posts: 891
| Quote:
Last edited by greenjk; 02-08-2012 at 06:54 PM. | |
|
| |
|
02-08-2012, 05:11 PM
| #51 | |
| I wanna be Dave Join Date: May 2008 Location: Baltimore
Posts: 4,442
| Quote:
| |
|
| |
|
02-12-2012, 10:13 PM
| #52 |
| I wanna be Dave Join Date: May 2008 Location: Baltimore
Posts: 4,442
|
I got super lucky and scored a set of the Wraith universal axle shafts last week, so I got busy with the drivetrain again today. After all of the effort to shorten both axle shafts ( for the front and rear) I put the front shaft back into the lathe to clean up a bit of bronze that got on the bearing seat surface. Some how the stub end came loose from the chuck that I was using to just keep it out of the way, the stinking thing spun around and smacked the tool post and bent one of the u-joint ears. I tried so ever carefully to bend it back into shape and I got *this* close when the damn thing cracked on me. I was able to get it aligned back into position and I hit it with the torch to braze it back together but I have my doubts that it will last very long once I get power going through the axles. Damn it!!!! There are no more of those axle shafts to be found anywhere, they are on back order through mid March at the earliest. I might have to get some XR-10 shafts and modify one of those to become a replacement. Oh well, here's the pics from today. At least I can bolt on tires for the first time. Here's how I shortened the front axle shaft. I cut the shaft right behind the thick part of the long side of the shaft just behind the u-joint, then counter bored a 1/8" hole. 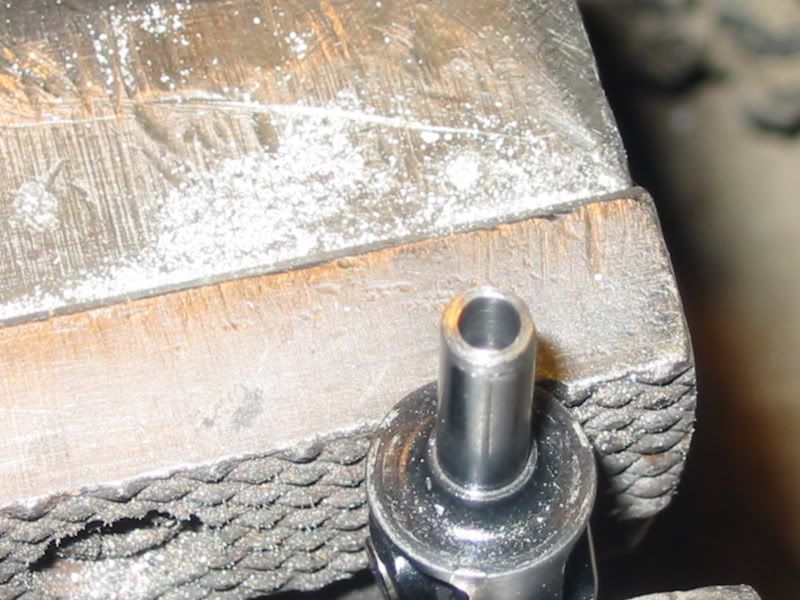 After I removed 16mm from the shaft length I counter bored with a 1/8" hole. 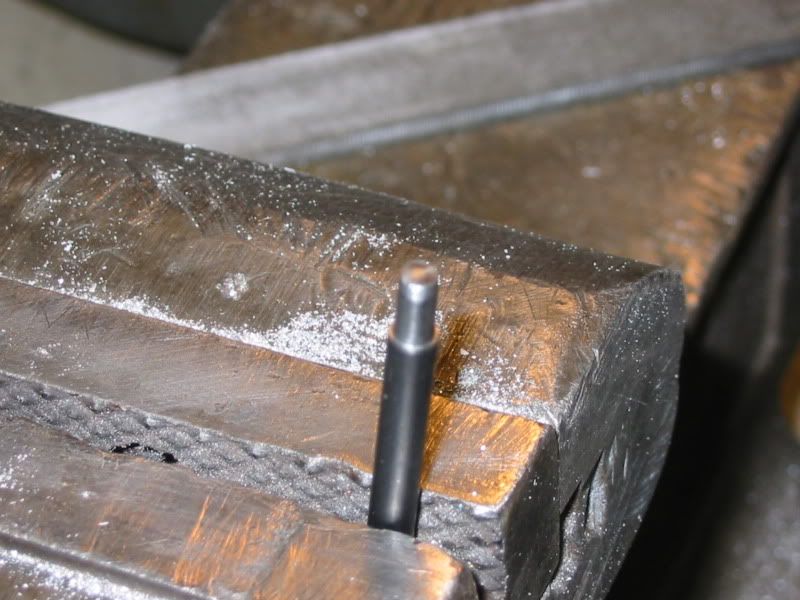 I made a simple dowel pin to hold and align the 2 halves then pressed them together.  I did the rear shaft differently, I basically cut it in the middle, removed 16mm from one side, made a sleeve from 1/8" steel bar stock, pressed them together. I used the lathe to hold everything in alignment while I brazed the shafts together, I was sure to cover everything with fire proof material. Here's the end result. 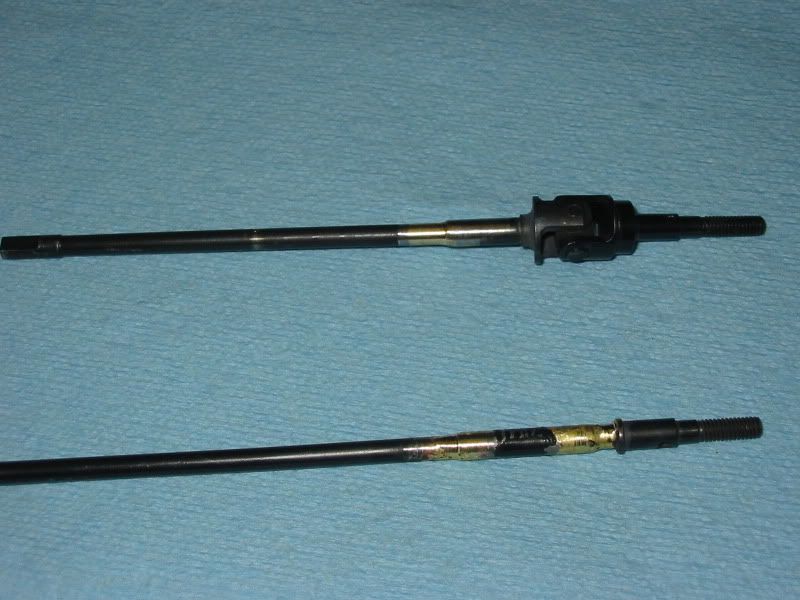 It was right after that pic when I messed up the front shaft, I was so pissed off I didn't bother to get a pic of the fix. Here's a few drive train shots. Nothing exciting, I was just geeked out to have it finally sitting on 4 tires for the first time. 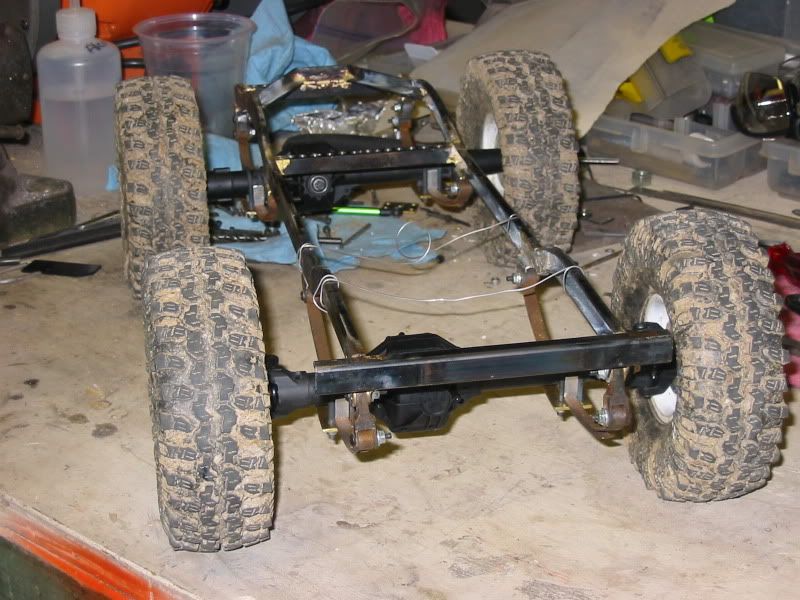 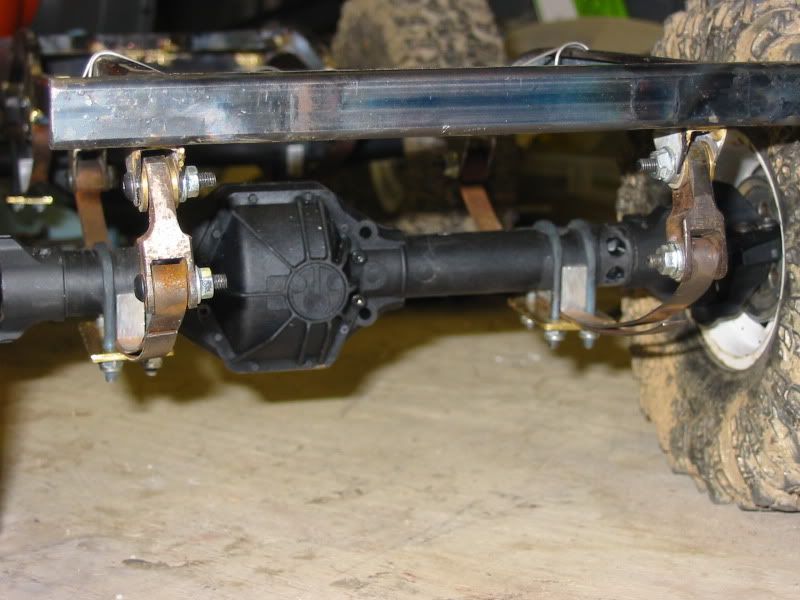 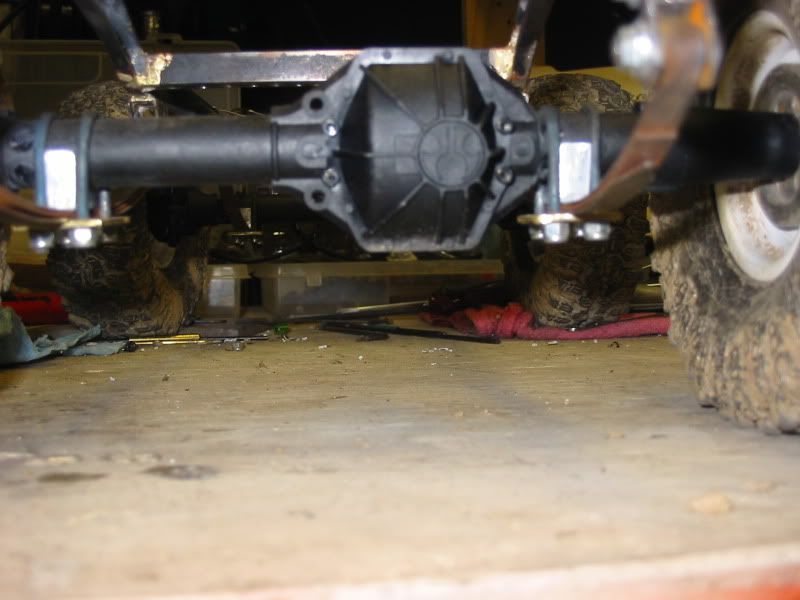 I would have never thought that I'd have so much time tied up into getting this far. I'm almost burnt out on building RC vehicles, I just want to finish this one and have fun driving it. |
|
| |
|
02-14-2012, 10:25 AM
| #53 | ||
| I wanna be Dave Join Date: Oct 2006 Location: Martinsburg WV
Posts: 2,781
| Quote:
Quote:
| ||
|
| |
|
02-14-2012, 03:53 PM
| #54 |
| Pebble Pounder Join Date: Nov 2010 Location: Northern NJ
Posts: 157
|
Keep working through the frustration. It is looking great !!!
|
|
| |
|
02-14-2012, 04:54 PM
| #55 | ||
| I wanna be Dave Join Date: May 2008 Location: Baltimore
Posts: 4,442
| Quote:
Quote:
| ||
|
| |
|
02-15-2012, 05:35 PM
| #56 |
| Nobody   Join Date: Sep 2008 Location: Maine
Posts: 966
|
Really been enjoying following this build. Keep up the good work bud.
|
|
| |
|
02-15-2012, 07:12 PM
| #57 | |
| I wanna be Dave Join Date: May 2008 Location: Baltimore
Posts: 4,442
| Quote:
| |
|
| |
|
02-15-2012, 11:50 PM
| #58 |
| Rock Crawler Join Date: Jan 2008 Location: Lincoln
Posts: 740
|
definetly got my eye on this thread, great work!
|
|
| |
|
02-21-2012, 07:10 PM
| #59 |
| I wanna be Dave Join Date: May 2008 Location: Baltimore
Posts: 4,442
|
Does anyone have access to a 1:1 Willys? I'm trying to figure out if the 'WILLYS' that is stamped in the tailgate is the same size ( height and length) as the 'WILLYS' that is stamped into the sides of the hood.
|
|
| |
|
02-22-2012, 11:03 AM
| #60 |
| RCC Addict Join Date: Feb 2008 Location: tauranga north island new zealand
Posts: 1,786
|
Enjoying this build, loving the creativity.
|
|
| |
 |
| |


 Linear Mode


