| |
 08-29-2014, 10:18 PM
| #1 |
| RCC Addict  Join Date: Aug 2005 Location: New Oxford PA
Posts: 1,290
|
Well my buddy Joe was feeling sellers remorse when i traded what was left of his Willy's at last years ECSC. here was the build for reference: Joe's flatty The revival! We chatted about what to get for a while and he decided he wanted something different but really had no preference. Then while crusing E-bay he stumbled upon exactly what he was looking for.  It was in pretty good shape and the right price. he is already making "vroom vroom" noises.  it looks like a good solid foundation to start with.  The reason we got it for so cheep is the missing drive train  But that's ok. we have a plan for that. The first order of business was to get the old axles and wheels out.  then he raided my scrap pile for some tires and axles.  then we jacked it up and slid them under for a look-see   it looks ok but he wasn't quite happy. the narrow axles made him nervous about tipping it.  I felt bad for the guy so i went to my stash of good axles and let him use my set of built WK axles.   now he is happy!  Yah Yah, we get it... Vroom Vroom  now for the drivetrain? I have something planned   |

|  |
| Sponsored Links | |
| | |
|
09-03-2014, 02:27 PM
| #2 |
| Pebble Pounder Join Date: Feb 2009 Location: Augusta
Posts: 101
|
Attaboy. Something new and different for the 1:6 scale boys.
|
|
| |
|
09-03-2014, 03:36 PM
| #3 |
| PapaGriz Yo   Join Date: Apr 2004 Location: In the garage building the wife a crawler
Posts: 13,137
|
Looking forward to this. I had one of those Tonka's as a kid; mom and dad gave it away without me knowing. |
|
| |
|
10-11-2014, 10:37 PM
| #4 |
| RCC Addict Join Date: Aug 2005 Location: New Oxford PA
Posts: 1,290
|
Thanks guys. Well we brought Joe's project over to my place. he doesn't have any tools as you could probably tell in the last pics. plus he's cheap and likes to use my stuff. what are friends for right? anyways since i'm supplying the tools i got Joe to start with the disassembly.   then i handed him the grinder while i got a drink  He works pretty fast and had the floor and grill off in no time.  I think i can use the skin pretty much as it is but i need to get those tabs off.  That's better  next i had Joe make up some cribbing to get an idea of ride height ans wheel base  then we bent up some frame rails and sat them in place  "We are putting the 2 speed in right?!" "I don't know Joe, it is pretty big"  We needed some cross-members for the chassis so i had Joe whip some up.  then i tacked them in place because Joe can't weld worth crap!  Going to need a lot of trimming but i have a feeling this is going to work out real well.  More later |
|
| |
|
10-11-2014, 10:58 PM
| #5 |
| Rock Crawler Join Date: Jan 2013 Location: Australia
Posts: 607
|
nice work! all looking good!
|
|
| |
|
10-12-2014, 11:33 AM
| #6 |
| Rock Stacker Join Date: Apr 2010 Location: Port Orford, Or
Posts: 75
|
Man I wish I had fabricating skills. Need to search Craigslist and find some tools. And scrap metal.... hahhaha. Love your work.
|
|
| |
|
10-14-2014, 11:05 AM
| #7 |
| RCC Addict Join Date: Aug 2005 Location: New Oxford PA
Posts: 1,290
|
thanks guys. Here is a bit more progress. I got Joe to start hacking the interior to clear the chassis and clean up the wheel wells    the frame now fit but wasn't completely flush with the floor  plus it hit the front bumper  and the rear tail pan  hacking ensued   now it fits like it should   then to attach the body I grabbed some scrap frame sections, drilled them and used the original body screws to hold them in place while I tacked them   Joe was happy with the results  for the front I added some simple straps to attach to the old rivet holes that held the bumper on place  now the body is good and secure to the chassis  suspension is next! |
|
| |
|
10-14-2014, 11:46 AM
| #8 |
| Pebble Pounder Join Date: Feb 2009 Location: Augusta
Posts: 101
|
Nice work, man.
|
|
| |
|
10-15-2014, 11:02 AM
| #9 |
| RCC Addict Join Date: Aug 2005 Location: New Oxford PA
Posts: 1,290
|
Thanks! Here's more. with the chassis in place it was time to check the fit of the drivetrain. I started with the rear axle. I really liked this dropped section of the floor as it looks like a gas tank.  but unfortunately it interferes with the axle.  so out came the Dremel and clearance was made.  then I wanted to open the area where the tranny will go and decided to turn it into a firewall with a little heat.  then Joe checked to make sure he still had room to drive.  Next we placed the front axle  the lower linkage came from my Class 3 Toyota, the uppers are random pieces I had lying around.  thinking I was just going to attach the lowers to the frame rails I added an inner plate.   but once I placed the links I realized the geometry is going to suck.  so I decided to attach the links to the skid. the first parts were the link mounts.  the position looks much better  then I cut more plates for the skid  practiced my welding  then Joe helped my drill and tap holes to match the ones I already had in the chassis.  works for me  next I welded the link mounts to the skid  then cut clearance for the rod ends  then to finish the rear I added upper link mounts and finished the welds on the body mounts.  The rear is done!  |
|
| |
|
10-16-2014, 10:56 AM
| #10 |
| RCC Addict Join Date: Aug 2005 Location: New Oxford PA
Posts: 1,290
|
I wanted to get the rear completely done before I moved to the front so I rummaged through my parts bin and found some random shocks I had lying around.  A quick test fit and I knew I had more cutting to do.  out came the saw and more space was made  then I whipped up some simple shock hoops  and tacked them to the chassis  they fit in there nice and snug  I threw the body back on just as Joe stopped by to see the progress  here it is fully compressed  and fully extended.  I think it's pretty good for a trail truck More later |
|
| |
|
10-16-2014, 07:53 PM
| #11 |
| Rock Crawler  Join Date: Apr 2014 Location: Portland
Posts: 835
|
Looking good. nice welds. |
|
| |
|
10-19-2014, 10:50 PM
| #12 |
| RCC Addict Join Date: Aug 2005 Location: New Oxford PA
Posts: 1,290
|
Thanks! Here is a bit more progress. with the rear suspension sorted, i started on the front. I decided to do a 3 link to help with bump steer and provide more room for the tranny. To begin i pulled the front truss and de-brazed the upper link mount.  then re-brazed it on the next support to the left to lower it and put it in a better position for the upper link  then put the axle back together and positioned the chassis mount  next i made the track bar using an old AX10 bent lower and fabbed some mounts  then tacked it in  clearance is tight at full compression   next i added the front hoops same as the rear  it was now officially standing on it's own!  of course i had to flex it out.  oh and here you can see why i used the bent link, so i could clear the axle  next i grabbed some scrap and made the servo mount  the tie rod is a bit low but remember this is at full compression.  then i threw the servo in and the tub back on to check for clearances.  the servo fit ok but i had to cut into the floorboards to clear the upper link  Then it was time for the tranny. At this point Joe showed up... "Suspension looks good! Lets get that tranny in!" "Joe, I don't think it's going to fit" "Whadya mean?! it'll be fine!"  "No seriously, it's too big" "Nonsense! You just gotta... push it a little...maybe this way..."  "Come on Joe" "Wait! if you just...turn it sideways maybe..."  "AH STUPID @#!@$ PIECE OF &#@#$%@ SON OF A #@#$%$!!!!!!!!"  "Ok Joe, if your done throwing a hissy fit, why don't you go take a look in my tranny bin and see if you find anything that would work" "Fine"  "Whoops!"  "You ok Joe" "Yah. Hay, what about this?"  "looks good to me Joe. It should fit a lot better in the truck" "Oops!"  "DANGIT JOE! be careful! that's the only one i have" "Sorry. Hay, i think this just might work!"  "Your right Joe but i think we need to do a little work on it first" More on that later |
|
| |
|
10-19-2014, 11:02 PM
| #13 |
| RCC Addict Join Date: Aug 2005 Location: New Oxford PA
Posts: 1,290
|
Double posted
Last edited by Metal Masher; 10-19-2014 at 11:03 PM. Reason: I'm an idiot! |
|
| |
|
10-20-2014, 11:07 AM
| #14 |
| SuperShafty.com Join Date: Jan 2008 Location: Visalia CA
Posts: 2,902
|
wow. can't say i havent thought of using this truck for this. this one even looks like the one i saw on ebay a few months back. gonna be pretty awesome to see this thing bouncing around the trails too. |
|
| |
|
10-20-2014, 10:21 PM
| #15 |
| I wanna be Dave Join Date: May 2008 Location: Baltimore
Posts: 4,442
|
Great work buddy! You gonna let Atti drive this one?
|
|
| |
|
10-21-2014, 07:33 AM
| #16 |
| Rock Crawler Join Date: Jul 2013 Location: Kansas City
Posts: 760
|
Ahh man! this is way to cool. Very nice..
|
|
| |
|
10-22-2014, 09:57 PM
| #17 | |||
| RCC Addict Join Date: Aug 2005 Location: New Oxford PA
Posts: 1,290
| Quote:
Quote:
Quote:
The reason Joe was so adamant on trying to get the power of 2 motors and the wheel speed of the 2 speed. I felt bad for the guy so i decided to help get him some power and a little wheel speed. To do that i grabbed the 4300 KV motor i had in my class 3 truck and pressed on the pinion from the drill motor.  one cool feature about this particular gear box is the hardened steel gears.  Also if you look in the case there are a series of holes, some with pins. on other gear boxes these are used in conjunction with steel balls, springs and the triangular shaped tabs on the gear ring in the background, to make the torque setting work on the drill. Thankfully this tranny has pins to lock everything in place. Now i needed a way to attach the drive shaft. With the other tranny i cut the end of the output shaft completly and connected it directly to the T-case. in this case i had room to run a prop shaft so i decided to add a shaft to the output of this one. I first removed the output from the gear box.  then i grabbed a piece of broken TLT axle shaft that will be the new output. I always keep my broken shafts as they are the same diameter as most tranny and T-case outputs.  I noticed the hole in the center was pretty shallow so i drilled it deeper.  Then i hacked off the threaded end  Then the hard part. I didn't have a 5MM drill so the hole was a little undersized. to get the shaft in place i threw the shaft in the freezer then heated the output with a torch. after a little tapping it went right in place  Then to make sure it stayed put i burned it in.  Then i cut and filed the new output shaft  now i needed a mount. i made a template and transferred that to some aluminum  after some cutting, filing and drilling i had what i needed.  i also had to bend the ends to get a little angle on it.  next i made mounts for the T-case and secured it in place.  A bit more about the T-case, this is where i hope to get a little more wheel speed. a while back i had plans for using this gear box and knew how low geared it was so i intentionally bought this T-case which is geared up not down. i think it's something like .5-.7 to 1 but i can't quite remember. With the T-case locked down i could make the final position of the tranny.  happy i made some simple tabs  then tacked them to the shock hoops  now it was locked in  The prop shafts look pretty good as well  the next step was to fit the body and after a little trimming it went right in place  I had to cut more of the floor but eventually it will get covered with a tranny tunnel  then i screwed the body back on, slapped in the electronics and Joe took it for a test run.     the tires do get into the body but the inner fenders are smooth enough that it doesn't hinder function.  I told him to take it easy as some of the parts are just tacked but it actually works really well considering how heavy overall it is and how much weight is up top. it ain't no rock crawler but should make for one fun trail truck! Also right now it's running a 2S so if i ever want a lot of wheel speed i can always run a 3S or 4S pack. Here is video of the first test drive. https://www.youtube.com/watch?v=A7gB...ature=youtu.be | |||
|
| |
|
10-22-2014, 10:06 PM
| #18 |
| SuperShafty.com Join Date: Jan 2008 Location: Visalia CA
Posts: 2,902
|
Just bring it Sunday and there won't be any issues
|
|
| |
|
10-23-2014, 08:13 AM
| #19 |
| Gold Star Baby!  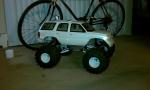 Join Date: Jul 2011 Location: Warren, MI
Posts: 269
|
I've got a couple Tonka trucks laying around. Now you got my head spinning thanks lol.
|
|
| |
|
10-23-2014, 08:32 AM
| #20 |
| Oppan Gangnam Style  Join Date: Jun 2005 Location: Shingle Springs
Posts: 5,164
|
Nice! That looks like a fun big truck. Makes me want to get my Willys going.
|
|
| |
 |
 Joe's Bronka - Similar Threads
 | ||||
| Thread | Thread Starter | Forum | Replies | Last Post |
| Joe's Dynamite JK | CoreyHall | 2.2 Scale Rigs | 13 | 04-14-2013 11:07 PM |
| Joe's flatty The revival! | Metal Masher | 2.2 Scale Rigs | 125 | 12-18-2012 08:48 PM |
| Joe's Flatty | Metal Masher | Videos! | 11 | 03-14-2009 12:51 PM |
| Joe's Re-Build | Slow_Joe | Axial AX-10 Scorpion | 12 | 09-22-2008 09:24 AM |
| |


 Linear Mode


