| |
| |||||||
 |
| | LinkBack | Thread Tools | Display Modes |
 04-20-2010, 07:58 AM
| #1 |
| Quarry Creeper Join Date: Jan 2008 Location: SW of Cleveland
Posts: 228
|
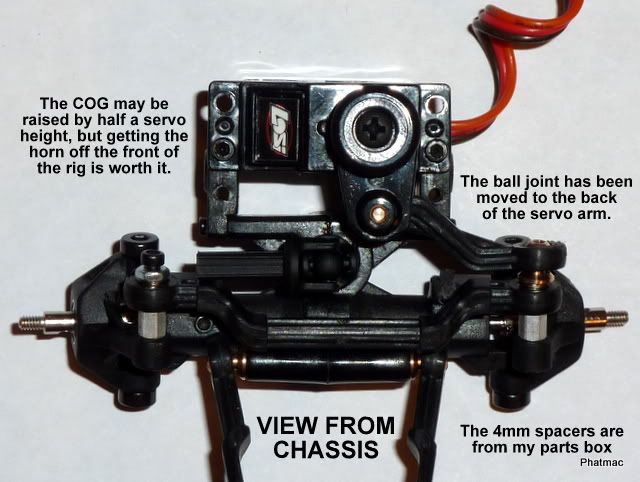
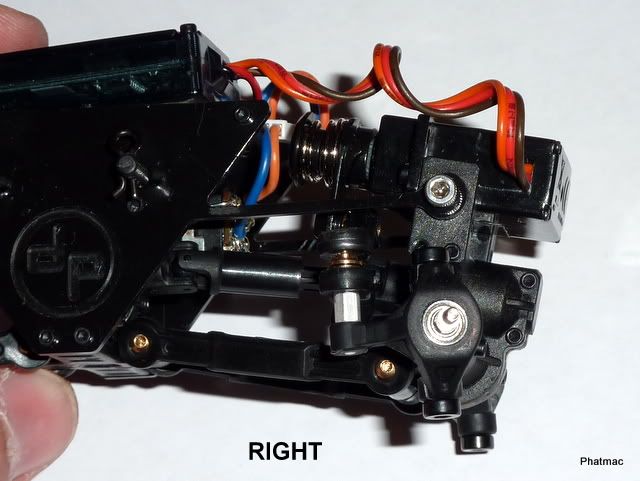
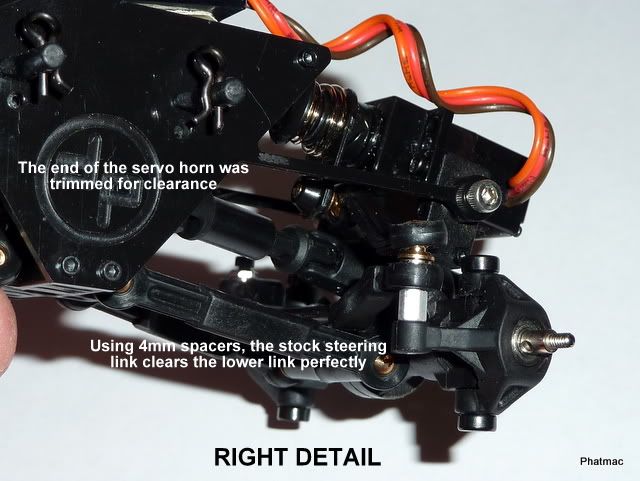
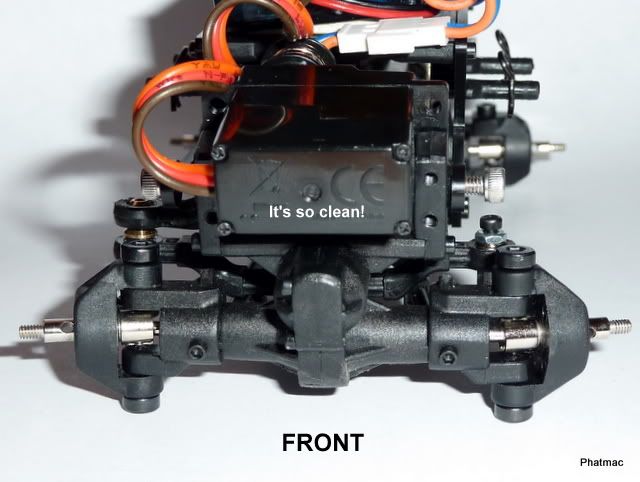
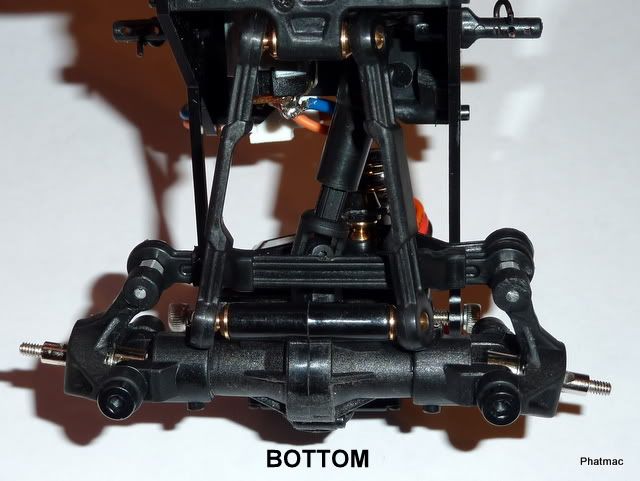
While taking pictures of the DP torsion chassis, the light bulb went off, and in 10 minutes I had the BTA mocked up, and a half hour later it was together. Thanks to Papa Snachez and his TBit2 build, for showing BTA with an aftermarket servo and custom steering links. This set-up was possible because the DP chassis allowed me to remove the front shock mounts. It may be possible to move the servo up and make a custom link to run BTA with shocks. YMMV. The spacers I used came from a helicopter hardware set I bought at my local Hobbytown. Here is the specs from the package: Align, www.align.com.tw, AGNH1150, Hardware Set, #H2027T, $3.99 The steps: 1. Cut off the shock mounts (I used wire cutters) 2. Remove the servo and steering link 3. Trim the bottom of servo horn 4. Reorient steerng link so it faces down and right 5. Attach steering link to back of servo horn 6. Rotate servo 180 and reattach one hole up 7. Flip knuckles 8. Add spacers between knuckle and steering link 9. Reatach stering link (the hardest part, I needed to file the one hole slightly larger to get it to pop onto the ball on the knuckle. 10. Enjoy how great it crawls And on to the pictures! (next post) Last edited by Phatmac; 04-20-2010 at 12:50 PM. Reason: Additional Info |

|  |
| Sponsored Links | |
| | |
|
04-20-2010, 08:05 AM
| #2 |
| Quarry Creeper Join Date: Jan 2008 Location: SW of Cleveland
Posts: 228
|      |
|
| |
|
04-20-2010, 10:26 AM
| #3 |
| Quarry Creeper Join Date: Mar 2010 Location: miami
Posts: 359
|
nice, how does it crawl?
|
|
| |
|
04-20-2010, 12:40 PM
| #4 | |
| Quarry Creeper Join Date: Jan 2008 Location: SW of Cleveland
Posts: 228
| Quote:
I wish that my 2.2 would run as well with a $25 investment (chassis, hardware, and shipping). Last edited by Phatmac; 04-20-2010 at 12:41 PM. Reason: spelling | |
|
| |
|
04-20-2010, 01:56 PM
| #5 |
| Quarry Creeper Join Date: Mar 2010 Location: miami
Posts: 359
|
well this is why I think this rc micro crawler is the best , cuz so ship to do things to it and you dont have to get out of the house, you can do this in the roon and have fun... lol
|
|
| |
|
04-22-2010, 04:53 AM
| #6 |
| Quarry Creeper Join Date: Jan 2010 Location: Floyds Knobs, IN
Posts: 286
|
im gonna have to disassemble my new torsion chassis to put this in? |
|
| |
|
04-22-2010, 06:22 AM
| #7 | |
| Rock Stacker Join Date: Mar 2010 Location: Norway
Posts: 98
|
Thanks for taking the time to post how to do this! I've been thinking of shaving the screw off the rear axle too. Have you noticed any weakening of the axle without the screw? Quote:
| |
|
| |
|
04-22-2010, 06:27 AM
| #8 | |
| Quarry Creeper Join Date: Jan 2008 Location: SW of Cleveland
Posts: 228
| Quote:
| |
|
| |
|
04-22-2010, 06:31 AM
| #9 | |
| Quarry Creeper Join Date: Jan 2008 Location: SW of Cleveland
Posts: 228
| Quote:
IMHO, it's very worthwhile to shave the axle housing to make it slide over terrain easier. | |
|
| |
|
04-22-2010, 06:33 AM
| #10 | |
| Rock Stacker Join Date: Mar 2010 Location: Norway
Posts: 98
| Quote:
| |
|
| |
|
04-29-2010, 07:05 PM
| #11 |
| Quarry Creeper Join Date: Jan 2010 Location: Floyds Knobs, IN
Posts: 286
|
i just attempted this...... how the heck did you get the screw on the back of the servo horn?!
|
|
| |
|
04-30-2010, 08:39 AM
| #12 | |
| Rock Crawler  Join Date: Mar 2009 Location: West of Eugene, OR
Posts: 942
| Quote:
| |
|
| |
|
04-30-2010, 01:56 PM
| #13 | |
| Quarry Creeper Join Date: Jan 2008 Location: SW of Cleveland
Posts: 228
| Quote:
| |
|
| |
|
05-12-2010, 07:58 AM
| #14 |
| Rock Stacker Join Date: May 2010 Location: Olympia
Posts: 90
|
The spacers I used came from a helicopter hardware set I bought at my local Hobbytown. Here is the specs from the package: Align, www.align.com.tw, AGNH1150, Hardware Set, #H2027T, $3.99 Ive searched for the hardware set online and in all the pics of the products i see im not ID-ing the spacers you used. can you help me out with this? |
|
| |
|
| |


 Linear Mode


