| |
| |||||||
 |
| | LinkBack | Thread Tools | Display Modes |
 01-10-2011, 06:45 PM
| #21 |
| Pebble Pounder Join Date: Jan 2010 Location: Roswell
Posts: 177
|
I got the trans,motor,servo and reciever/speed control installed. So far so good.     |

|  |
| Sponsored Links | |
| | |
|
01-10-2011, 07:26 PM
| #22 |
| Quarry Creeper Join Date: Oct 2010 Location: TX Coast
Posts: 196
|
The front bumper on my Micro semi-scaler is styrene joined with superglue. Its attached to the truck body by superglue as well. I've run it into rocks while crawling (its a bumper-that's what it's for), I've flipped it numerous times (need to learn to drive, I guess), & I have barrel rolled it down a steep incline about 4' high. I've picked the rig up by the bumper, dropped the body a time or two, & have generally abused this poor little SOB. The bumper has never come apart, nor has it come loose from the truck. I seriously doubt that tuber chassis is coming apart very easily. Truth of the matter is that if that chassis does break from a fall, its going to absorb the impact that would otherwise most likely break an axle or the like. I'd rather have to do a little chassis repair than shell out coin for replacement parts. Oh, & nice work, man. Really looks sweet! |
|
| |
|
01-10-2011, 09:27 PM
| #23 |
| Rock Crawler Join Date: Nov 2010 Location: roanoke
Posts: 865
|
That is freakin sweet!
|
|
| |
|
01-11-2011, 01:16 PM
| #24 |
| I wanna be Dave Join Date: Jan 2009 Location: By a lake in Thornton
Posts: 2,218
|
You are going to be running the QLO tires with this right? if not, you're shorting yourself a lot of compliments when its all done. |
|
| |
|
01-11-2011, 03:26 PM
| #25 |
| Quarry Creeper Join Date: Nov 2010 Location: Canada
Posts: 383
|
"F'ing A, Cotton!!" That looks really good. I am worried about COG. Maybe some less bars here or there. Looks like lots of tubes. I would drive that off a cliff if it was metal and 1:1. Looks beefy. |
|
| |
|
01-12-2011, 12:42 AM
| #26 | ||
| Pebble Pounder Join Date: Jan 2010 Location: Roswell
Posts: 177
| Quote:
Quote:
| ||
|
| |
|
01-12-2011, 06:32 AM
| #27 | |
| Rock Crawler Join Date: Dec 2005 Location: houston
Posts: 650
| Quote:
Where's the finished pics?? | |
|
| |
|
01-22-2011, 02:55 PM
| #28 |
| Newbie Join Date: Jan 2011 Location: Ontario, Canada
Posts: 6
|
very nice work!! that looks awesome!! i want to see finished pictures. what are your plans for shocks? POST NEW PICS!!!! any advice for someone starting out with styrene and super glue? i love what you built and would really like to give it a shot myself. |
|
| |
|
01-22-2011, 05:13 PM
| #29 | |
| I wanna be Dave Join Date: May 2007 Location: Taylors Falls just hanging with the MNRCRC crew.
Posts: 7,843
| Quote:
| |
|
| |
|
01-22-2011, 05:36 PM
| #30 | |
| Quarry Creeper Join Date: Sep 2008 Location: Oakley
Posts: 280
| Quote:
Lets see what she looks like on her feet. | |
|
| |
|
01-23-2011, 01:16 PM
| #31 | |
| Pebble Pounder Join Date: Jan 2010 Location: Roswell
Posts: 177
| Quote:
I am using these shocks I made for my Micro Monster build, they have .75" of travel and alot less play than the LMC shocks. anybody have any idea how to make longer shocks? My advice is to be patient and take your time planninig and designing. Also you need to plan ahead a few steps or more. I used an X-ACTO and a Dremel with the large cut-off wheel and bit #9903 to "fishmouth" the joints(make them concave for a better fit). I prefer Loctite Precision Max super glue and I put it on a old x-acto blade in tight spots. There are more tips on page 1 of this thread. | |
|
| |
|
01-24-2011, 07:30 AM
| #32 | |
| Newbie Join Date: Jan 2011 Location: Ontario, Canada
Posts: 6
| Quote:
Just another quick question... How did you go about bending the styrene rod? Can't wait for finished pics! | |
|
| |
|
01-24-2011, 01:12 PM
| #33 | |
| Pebble Pounder Join Date: Jan 2010 Location: Roswell
Posts: 177
| Quote:
| |
|
| |
|
01-25-2011, 11:06 AM
| #34 |
| Pebble Pounder Join Date: Jan 2010 Location: Roswell
Posts: 177
|
I'm mostly done. It's alot bigger but only 30 grams heavier than stock.The skid plate on the bottom is .032 aluminum and the sides and roof panels are really thin stainless flashing. The gas tank and door panels are .090 lexan and the driver is hollowed out to keep weight down. The wheelbase is 5.25" and there is .75" of shock travel. The ride height is easy to adjust by moving the fuel tubing on the shock body. I wanted to use Micro T front and rear springs on each shock for a dual rate setup but I don't want to spend $25 on springs. I also made a rear steer lock-out that takes about 1 minute to swap out. This is the rock racer set-up              |
|
| |
|
01-25-2011, 11:18 AM
| #35 |
| Adilynsdad too!   Join Date: May 2004 Location: G ville
Posts: 8,844
|
That is un-freakin-real
|
|
| |
|
01-25-2011, 11:38 AM
| #36 |
| Newbie Join Date: Feb 2009 Location: huron
Posts: 16
|
i'll second that x2
|
|
| |
|
01-25-2011, 11:53 AM
| #37 |
| Quarry Creeper Join Date: Sep 2005 Location: LRAFB
Posts: 398
| sweet |
|
| |
|
01-25-2011, 12:08 PM
| #38 |
| I wanna be Dave Join Date: Jan 2009 Location: By a lake in Thornton
Posts: 2,218
|
Again, only to reiterate, that is one sick fawkin micro!!! Qlo's are gonna really make that thing super cool. |
|
| |
|
01-25-2011, 04:32 PM
| #39 |
| Rock Crawler  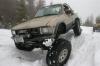 Join Date: Dec 2010 Location: Madison Co.,Ms.
Posts: 711
|
Top shelf job there! That winch line you got would work really well to keep your suspension from drooping out during climbs. Works really well on 1:1 buggies.
|
|
| |
|
01-25-2011, 04:39 PM
| #40 |
| Rock Stacker Join Date: Aug 2010 Location: in my house
Posts: 97
|
Wow is all i can muster. That is a masterpiece!! |
|
| |
|
| |


 Linear Mode


