| |
 01-29-2011, 12:51 AM
| #1 |
| Quarry Creeper Join Date: Oct 2010 Location: Newport, South Wales
Posts: 257
| NEW VERSION POST 20 So after I finished up making my aluminium body for my pinch chassis I realized I have a fair amount of derlin left over. I decided to make use of it so a design came to mind for a chassis and I decided to try and see if I could make it work. So far I have the chassis plates cut out, still need to cut out the windows and drill the holes. Make the hood, roof, and side plates from aluminium, and make the cross members. I will update this thread as I make progress. Oh yea it is white delrin and I plan to dye it red once I know it all fits. Here is the pic of one of the chassis plates next to my drawing, let me know what you think. Sorry for the blurry pic.  Last edited by dockman; 01-31-2011 at 08:43 PM. |

|  |
| Sponsored Links | |
| | |
|
01-29-2011, 06:58 AM
| #2 | |
| Pebble Pounder Join Date: Jan 2011 Location: Warwickshire ( UK )
Posts: 143
| Quote:
where did you buy your material from ? | |
|
| |
|
01-29-2011, 07:53 AM
| #3 | |
| RCC Addict Join Date: Oct 2008 Location: Plainfield, IL.
Posts: 1,297
| Quote:
| |
|
| |
|
01-29-2011, 08:26 AM
| #4 |
| Quarry Creeper Join Date: Oct 2010 Location: Newport, South Wales
Posts: 257
|
Snagged my delrin cheap off of ebay. Putting the finishing touches on the side plates, just 2 more windows to cut out and onto the cross members. As long as I don't fall asleep I should have this finished to the point I can test it.
|
|
| |
|
01-29-2011, 09:49 AM
| #5 |
| Rock Crawler Join Date: Dec 2005 Location: houston
Posts: 650
|
Looks like a great start, looks small and compact. Ill be watching this one to see how it comes out. Its great what you can do with just handtools on these small crawlers, and pretty cheap too!
|
|
| |
|
01-29-2011, 09:58 AM
| #6 |
| Rock Crawler  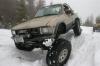 Join Date: Dec 2010 Location: Madison Co.,Ms.
Posts: 711
|
Dockman, will you be narrowing this chassis too? About 1/4" - 3/8" of an inch is obtainable. Just seems like a good mod to try since you'll be making new x-members, etc.
|
|
| |
|
01-29-2011, 10:19 AM
| #7 |
| Rock Stacker Join Date: Apr 2007 Location: Nor Cal
Posts: 87
|
I dyed my DP Torsion red, looks sick.
|
|
| |
|
01-29-2011, 10:57 AM
| #8 |
| Pebble Pounder Join Date: Nov 2010 Location: centereach
Posts: 99
|
I think the layout is great and the length is short and compact. I like it. I will be checking back on it.
|
|
| |
|
01-29-2011, 01:07 PM
| #9 |
| Quarry Creeper Join Date: Oct 2010 Location: Newport, South Wales
Posts: 257
|
Ok so I have made some progress, got the panels mostly done and it all assembled. I still have a few tweaks to make to finish it up, trim up the front and drill a few holes in the back. I had to move the suspension mounting point due to clearance and height.  |
|
| |
|
01-29-2011, 01:22 PM
| #10 |
| Quarry Creeper Join Date: Sep 2008 Location: Oakley
Posts: 280
| Looks great! Will be awesome when you get it all finished up. |
|
| |
|
01-29-2011, 02:37 PM
| #11 |
| Rock Crawler Join Date: Feb 2009 Location: Milwaukee
Posts: 609
|
Another great job "Dockman" your gonna have to slow down a bit... Isn't this like the 2nd chassis this week?? I see a new Avatar picture coming. |
|
| |
|
01-29-2011, 03:08 PM
| #12 |
| Quarry Creeper Join Date: Oct 2010 Location: Newport, South Wales
Posts: 257
|
Heh, cant make the stuff fast enough to get the ideas out my head. More work has been done, I had to trim the front some for clearance. Not exactly how I wanted it to look but works for me. Also did a little work to the rear of the chassis plates so there wasn't so much blank space. Made a roof already and am about to make a hood. Once I got everything made it is time to buy some red dye and make it all perdy. Here are a few pics for now as it stands atm.   |
|
| |
|
01-29-2011, 04:07 PM
| #13 |
| Quarry Creeper Join Date: Oct 2010 Location: Newport, South Wales
Posts: 257
|
Just about done, got the hood finished if it can be called that lol. Also decided to see about reusing the side panels off of my last chassis adventure so I trimmed them to fit. Over all I am pretty happy with the results, just need to put some screws into the hood and roof to keep them in their place then it is time for dye!  |
|
| |
|
01-29-2011, 05:25 PM
| #14 |
| Pebble Pounder Join Date: Jan 2011 Location: Warwickshire ( UK )
Posts: 143
|
do you have a link to where your got your derlin from ebay thanks looking mint, if you dont want your other chassis then remember that i am willing to have them lol |
|
| |
|
01-29-2011, 07:54 PM
| #15 |
| Quarry Creeper Join Date: Oct 2010 Location: Newport, South Wales
Posts: 257
|
Got the delrin here http://cgi.ebay.co.uk/ws/eBayISAPI.d...=STRK:MEWNX:IT I bought 3mm thickness since I originally was just planning to use it as cross members. Worked pretty good as chassis plates but 2mm would prob be a more suitable thickness, I just went with what I had on hand since it was my first go at making a chassis from scratch. I managed to get it all buttoned up and ready for some testing, ended up making new side plates just so they fit better. As long as it works as good as I am hoping it will I will be heading to town to buy some red dye. Here are a few pics of it all done and ready to be tested.    |
|
| |
|
01-29-2011, 07:56 PM
| #16 |
| Quarry Creeper Join Date: Sep 2008 Location: Oakley
Posts: 280
| That turned out great. I'm glad to see someone using the exact same software that I use. Good old pencil and paper. |
|
| |
|
01-30-2011, 11:53 AM
| #17 |
| Quarry Creeper Join Date: Oct 2010 Location: Newport, South Wales
Posts: 257
|
Thanks TruckerBrad. I have always done all my design work the old fashioned way, I have CAD but got used to paper and pencil back in the day when I took drafting courses. I did some testing and it does great, good flex and goes over stuff with ease. Overall I am pretty satisfied with the results and look forward to getting it all dyed red. I will obviously put some new pics up once its done. |
|
| |
|
01-31-2011, 11:08 AM
| #18 |
| Quarry Creeper Join Date: Oct 2010 Location: Newport, South Wales
Posts: 257
|
Well last night I had the great idea to perfect my design a little bit so I ended up making some new chassis plates. Changed the suspension mounting points a little bit, lengthened the front a hair, and shortened the rear a smidge. Once I have it all finished up new pics will be up.
|
|
| |
|
01-31-2011, 12:53 PM
| #19 | |
| Pebble Pounder Join Date: Jan 2011 Location: Warwickshire ( UK )
Posts: 143
| Quote:
waiting on the pictures :P | |
|
| |
|
01-31-2011, 08:23 PM
| #20 |
| Quarry Creeper Join Date: Oct 2010 Location: Newport, South Wales
Posts: 257
|
Alright, so I finally finished up the new chassis parts. I changed the spot the suspension mounted to, lengthened the front a little bit, and shortened the rear. Also made the windows different and like them better now. Overall vast improvement over version 1, slightly lower CG from lower it in general, the change in the suspension made a nice difference also, a little smoother. Looks wise I think it is better proportioned front to rear, version 1 was to short in front and to long out back. I am extremely pleased with version 2 and I don't feel the need to change anything on it other than its colour. On with the pics!   |
|
| |
 |
| |


 Linear Mode


