Go Back   RCCrawler Forums > RCCrawler Brand Specific Tech > Heritage Crawlers > Losi Micro-Rock Crawler
Loading

Notices

Thread: T-buck's RidgeBack Topless

Reply
 
LinkBack Thread Tools Display Modes
Old 07-10-2011, 05:14 PM   #21
Quarry Creeper
 
BLADE's Avatar
 
Join Date: Jun 2004
Location: Utah
Posts: 458
Default

Quote:
Originally Posted by Evilinside View Post
I've done a LOT to mine, pretty much documented everything that I've done in the thread in my sig. This chassis does not compare to the Blade TMC. The Blade TMC is a far superior design.

Now, Blade has a setup where they've totally re-drilled the uppermount locations and have a radically different upper link setup. That may make this thing compete with the Blade TMC. But currently no matter what I do or what I try, the Blade TMC has a far superior articulation. However I know some people will not want to re-drill things, so that may cause an issue with some.

And without negative comments and criticisms, nothing in our world would be were it is currently at. No one was rude, just giving their opinion, which they are entitled to. And we have been talking about this chassis for some time and in some length in other threads.
I appreciate the input I will definatly take it into consideration. I am working on some parts that will make it easier for the Ridge back to be used for its optimum preformance. Thanks again for your feedback.

Blade
BLADE is offline   Reply With Quote
Sponsored Links
Old 07-24-2011, 04:01 PM   #22
Rock Crawler
 
Join Date: Feb 2009
Location: Milwaukee
Posts: 609
Default

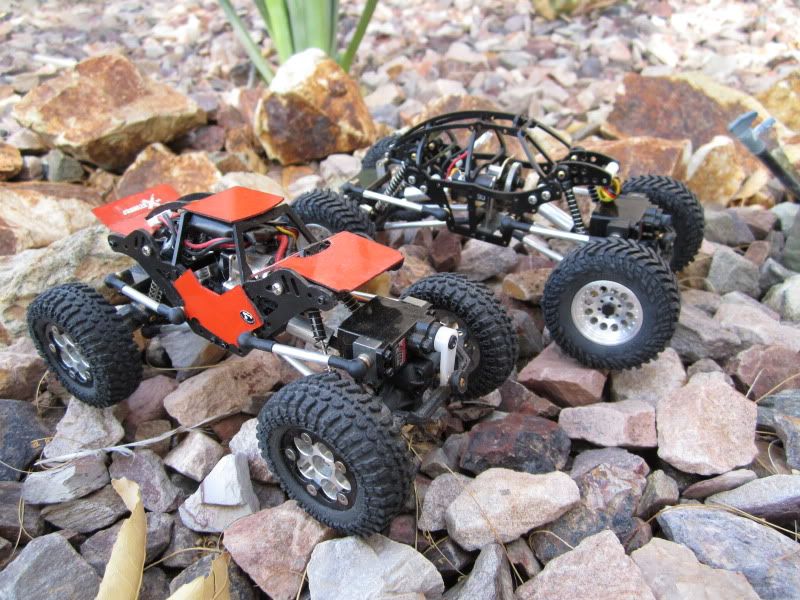
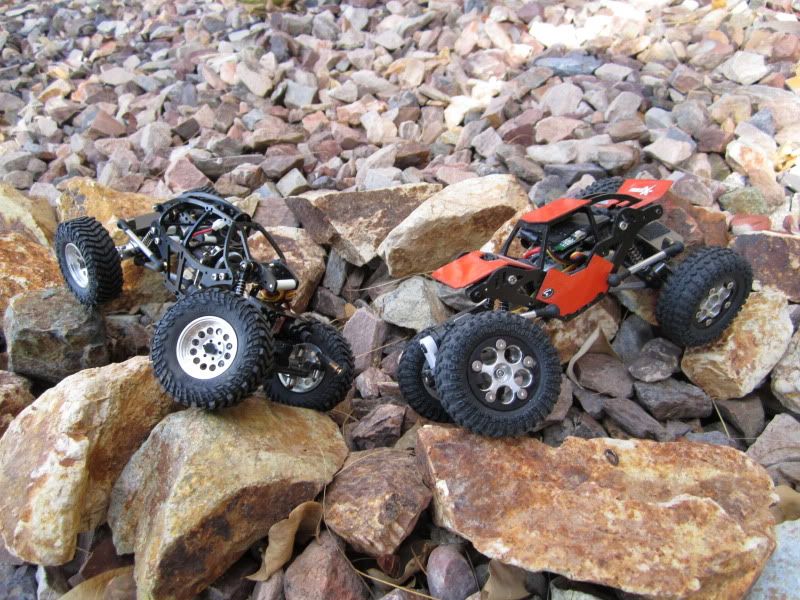
After reading some folks were having trouble w/the set-up on thier rigs w/the Ridgeback I wanted to find the time to see what problems anyone could run into.

I will have some things to talk about for the build & will also be finishing up w/panels. I have good flex w/o any binding.

I really like the Mickey Thompson tires for this chassis.


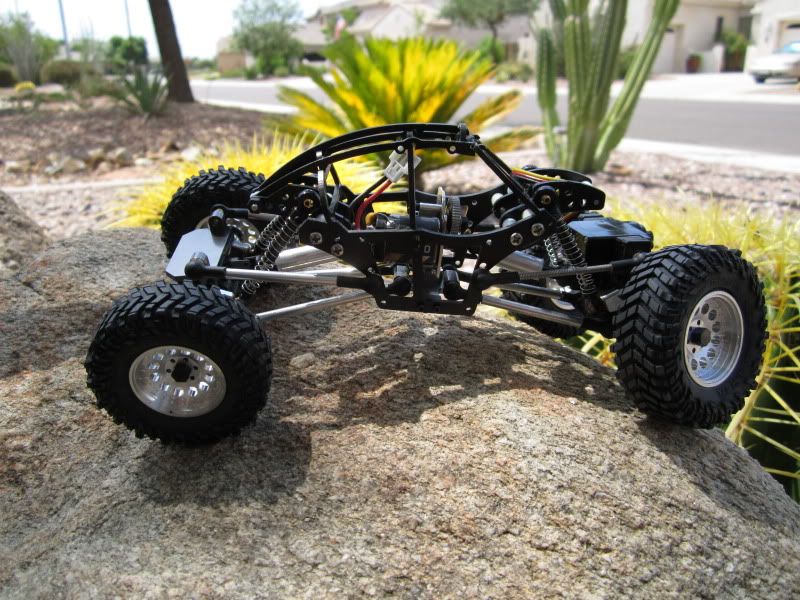
Getbent's Famous Powerhouse 90t


T-buck is offline   Reply With Quote
Old 
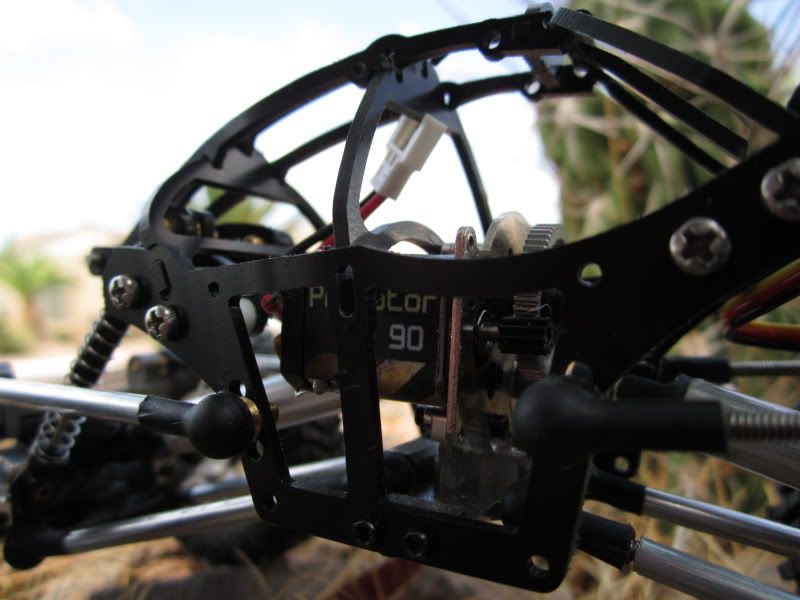
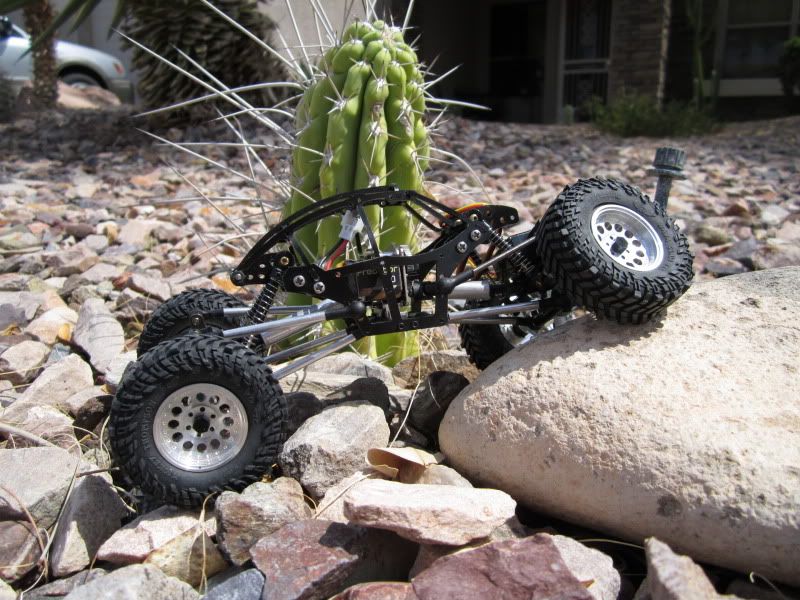
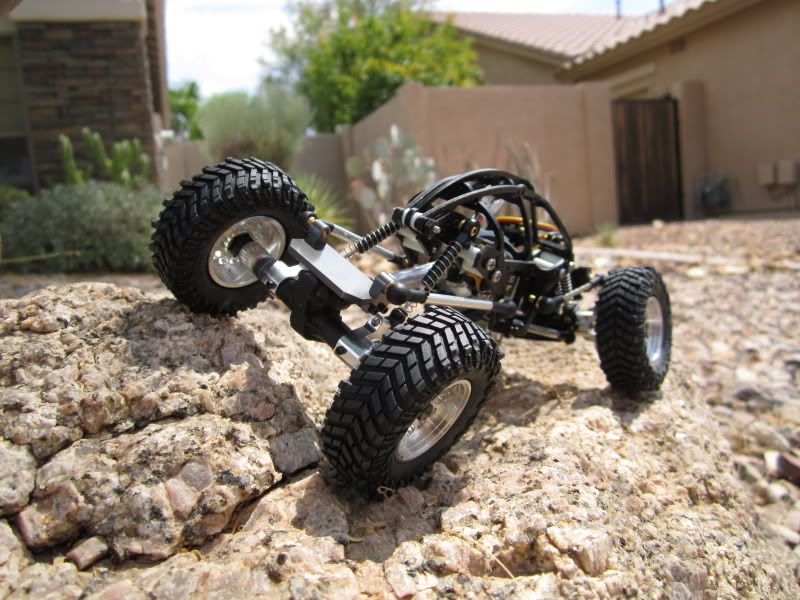
07-24-2011, 04:16 PM   #23
Quarry Creeper
 
Join Date: May 2011
Location: USA
Posts: 384
Default

Is that almost a six inch wheel base?
Evilinside is offline   Reply With Quote
Old 07-24-2011, 04:18 PM   #24
Rock Crawler
 
Join Date: Feb 2009
Location: Milwaukee
Posts: 609
Default

5.5 on the head.
T-buck is offline   Reply With Quote
Old 07-24-2011, 04:19 PM   #25
Quarry Creeper
 
BLADE's Avatar
 
Join Date: Jun 2004
Location: Utah
Posts: 458
Default

t buck

Truck looks awesome

Blade
BLADE is offline   Reply With Quote
Old 07-24-2011, 08:29 PM   #26
Rock Crawler
 
Join Date: Dec 2005
Location: houston
Posts: 650
Default

Looks good T-buck, I finally got around to putting mine together too. No binding problems at all with mine, I didnt do anything special, just bolted it together with no issues at all. I think BLADE did great with this chassis! Cant wait to see what you come up with for the panels!
getbent is offline   Reply With Quote
Old 07-24-2011, 09:26 PM   #27
Quarry Creeper
 
Join Date: May 2011
Location: USA
Posts: 384
Default

Grr...

I like hearing that things are good with some peeps builds, but I would really like the success story to be coupled with a how to, or a step by step, or something to give indication so those of us that utterly failed with this chassis can help us figure out what to do right. As it stands, those of us that have failed at this chassis are still in the dark, like getting it to work is a part of the Colonel's 7 secret herbs and spices or something and only a certain few are previe to the knowledge... lol.

So I am really looking forward to a build design/review from here, and hopefully T-buck is able to take some time to do so.
Evilinside is offline   Reply With Quote
Old 07-25-2011, 03:03 AM   #28
Quarry Creeper
 
Join Date: Oct 2010
Location: Newport, South Wales
Posts: 257
Default

It is pretty straight forward to get this working right, stretch the wheel base out to 5.5" or more. If you try to run the stock links you will have nothing but issues with binding. There are several threads and posts in the micro mod bible thread on how to make your own links and to stretch the drive shaft's.
dockman is offline   Reply With Quote
Old 07-25-2011, 03:13 AM   #29
Quarry Creeper
 
Join Date: May 2011
Location: USA
Posts: 384
Default

Quote:
Originally Posted by dockman View Post
It is pretty straight forward to get this working right, stretch the wheel base out to 5.5" or more. If you try to run the stock links you will have nothing but issues with binding. There are several threads and posts in the micro mod bible thread on how to make your own links and to stretch the drive shaft's.
When I strecthed the links past 5.25, the front and rear were unstable, to much wobble. Again, what is straight forward for one, may not be for another.

OR

This just isn't as good as the Blade TMC, which I'm using as comparison, and I have no desire to go down in performance, even a little. So maybe I have gotten it right a few times but the Blade TMC still out performs it... which could be to I guess. No one has done a comparison yet.
Evilinside is offline   Reply With Quote
Old 07-25-2011, 04:37 AM   #30
Quarry Creeper
 
Join Date: Oct 2010
Location: Newport, South Wales
Posts: 257
Default

If you are getting a lot of side to side wobble then something isn't right with yours. I have maybe 2mm total of side to side wobble on mine and it is very stable.

Here are my measurements for reference, for the link measurements they are center to center.

Lower links (front and rear): 55mm
Front upper links: 55mm
Rear upper links: 50mm
Tube for extending front drive shaft: 25mm long
Tube for extending rear drive shaft: 28mm long
Mounting spot for front link: middle hole on chassis
Mounting spot for rear link: top hole on chassis
Mounting spot for front and rear shocks: top hole closest to chassis

It has a 5.375" WB with no binding, prefect amount of flex, and climbs like a champ. The difference for the upper link lengths is a matter preference, for servo clearance, and retain certain drive line angles.

Last edited by dockman; 07-25-2011 at 04:40 AM.
dockman is offline   Reply With Quote
Old 07-25-2011, 05:51 PM   #31
Rock Crawler
 
Join Date: Feb 2009
Location: Milwaukee
Posts: 609
Default

Quote:
Originally Posted by getbent View Post
Looks good T-buck.
Motor is awesome as usual... Thanks for the compliments.

Quote:
Originally Posted by Evilinside View Post
So I am really looking forward to a build design/review from here, and hopefully T-buck is able to take some time to do so.
I will do my best to show exactly what I've done... I am just starting to get back in the swing of things & I am 2000 miles away from my normal work space.

Quote:
Originally Posted by dockman View Post
It is pretty straight forward to get this working right, stretch the wheel base out to 5.5" or more.
Hit the nail on the head... This chassis likes a longer W.B.


Quote:
Originally Posted by dockman View Post
If you are getting a lot of side to side wobble then something isn't right with yours. I have maybe 2mm total of side to side wobble on mine and it is very stable.
Here are my measurements for reference, for the link measurements they are center to center.
Lower links (front and rear): 55mm
Front upper links: 55mm
Rear upper links: 50mm
Tube for extending front drive shaft: 25mm long
Tube for extending rear drive shaft: 28mm long
Mounting spot for front link: middle hole on chassis
Mounting spot for rear link: top hole on chassis
Mounting spot for front and rear shocks: top hole closest to chassis

It has a 5.375" WB with no binding, prefect amount of flex, and climbs like a champ. The difference for the upper link lengths is a matter preference, for servo clearance, and retain certain drive line angles.
great Info.

Quote:
Originally Posted by Evilinside View Post
No one has done a comparison yet.
The only comparison is a couple photo's


T-buck is offline   Reply With Quote
Old 07-25-2011, 05:56 PM   #32
rik
RCC Addict
 
Join Date: Oct 2009
Location: In the mancave...
Posts: 1,038
Default

Quote:
Originally Posted by dockman View Post
If you are getting a lot of side to side wobble then something isn't right with yours. I have maybe 2mm total of side to side wobble on mine and it is very stable.

Here are my measurements for reference, for the link measurements they are center to center.

Lower links (front and rear): 55mm
Front upper links: 55mm
Rear upper links: 50mm
Tube for extending front drive shaft: 25mm long
Tube for extending rear drive shaft: 28mm long
Mounting spot for front link: middle hole on chassis
Mounting spot for rear link: top hole on chassis
Mounting spot for front and rear shocks: top hole closest to chassis

It has a 5.375" WB with no binding, prefect amount of flex, and climbs like a champ. The difference for the upper link lengths is a matter preference, for servo clearance, and retain certain drive line angles.
That's a good amount of info. Thanks dockman

T-buck, the rig looks great. Based on this build thread and dockmans info, I had the wife order a ridgeback for my micro for my birthday.
rik is offline   Reply With Quote
Old 07-25-2011, 10:56 PM   #33
Newbie
 
Join Date: Mar 2010
Location: Rancho Cucamonga
Posts: 33
Default

T Buck... Looks awesome! I really love mine! I did not stretch mine out as far and still find it to work good. I have been running it and me TMC together on my home track and they both work better than I expected...

I do not see that you used the upper link part that Blade had created. Are you still working on that part or did it not work? I am very interested in your body panels. I have not started that yet.
Cucamonga Crawler is offline   Reply With Quote
Old 07-26-2011, 12:23 AM   #34
Quarry Creeper
 
Join Date: May 2011
Location: USA
Posts: 384
Default

Quote:
Originally Posted by dockman View Post
If you are getting a lot of side to side wobble then something isn't right with yours. I have maybe 2mm total of side to side wobble on mine and it is very stable.

Here are my measurements for reference, for the link measurements they are center to center.

Lower links (front and rear): 55mm
Front upper links: 55mm
Rear upper links: 50mm
Tube for extending front drive shaft: 25mm long
Tube for extending rear drive shaft: 28mm long
Mounting spot for front link: middle hole on chassis
Mounting spot for rear link: top hole on chassis
Mounting spot for front and rear shocks: top hole closest to chassis

It has a 5.375" WB with no binding, prefect amount of flex, and climbs like a champ. The difference for the upper link lengths is a matter preference, for servo clearance, and retain certain drive line angles.
Thank you for those details! I'll order up some new links, I blew through all mine trying to get everything to work perfect.
Evilinside is offline   Reply With Quote
Old 07-26-2011, 09:16 PM   #35
Quarry Creeper
 
BLADE's Avatar
 
Join Date: Jun 2004
Location: Utah
Posts: 458
Default

Thanks for posting info Guys and the truck is looking awesome T-Buck, I will do my
best to get some of my build info up a soon as I can I do apologize for the lack of build info just not
enough time in the day to get everything done plus my Crawler addiction lol.

Thanks
Blade
BLADE is offline   Reply With Quote
Old 07-27-2011, 10:42 AM   #36
Rock Crawler
 
Join Date: Feb 2009
Location: Milwaukee
Posts: 609
Default

Quote:
Originally Posted by rik View Post
T-buck, the rig looks great. Based on this build thread and dockmans info, I had the wife order a ridgeback for my micro for my birthday.
I am sure you will like it, Make sure to use dockmans measurements for reference.

Quote:
Originally Posted by Cucamonga Crawler View Post
T Buck... Looks awesome! I really love mine! I did not stretch mine out as far and still find it to work good. I have been running it and me TMC together on my home track and they both work better than I expected...

I do not see that you used the upper link part that Blade had created. Are you still working on that part or did it not work? I am very interested in your body panels. I have not started that yet.
To be honest I wanted to see what I could do w/o anything "special" for the build. I think it should work good I just didn't use it on this one.

Quote:
Originally Posted by Evilinside View Post
Thank you for those details! I'll order up some new links, I blew through all mine trying to get everything to work perfect.
Don't bother trying to do bent links, Stick w/going straight.

Quote:
Originally Posted by BLADE View Post
Thanks for posting info Guys and the truck is looking awesome T-Buck.
Blade
Little more to do yet.
T-buck is offline   Reply With Quote
Old 07-27-2011, 08:43 PM   #37
Quarry Creeper
 
Join Date: Oct 2010
Location: Newport, South Wales
Posts: 257
Default

For those that use my measurements for reference the difference in the front upper link length is so at full compression of the suspension the servo does not hit the front of the chassis. This will only work with certain servos, myself I use a HS-65MG.

You can of course extend the links a little more or change the mounting points for the shocks to gain clearance so that nothing interferes with the servo when the suspension does its thing. Just make sure all changes in link length are proportional so the suspension geometry remains intact.

I will see about posting some close up pics of my rig so you can see how everything sits with my setup.
dockman is offline   Reply With Quote
Old 08-30-2011, 11:07 PM   #38
Newbie
 
Join Date: Dec 2010
Location: In my tow truck..
Posts: 44
Default

sweet build, pics????
blackfabguy is offline   Reply With Quote
Reply


Posting Rules
You may not post new threads
You may not post replies
You may not post attachments
You may not edit your posts

BB code is On
Smilies are On
[IMG] code is On
HTML code is On
Trackbacks are On
Pingbacks are On
Refbacks are On


All times are GMT -6. The time now is 08:14 AM.


Powered by vBulletin® Version 3.8.7
Copyright ©2000 - 2024, vBulletin Solutions, Inc.
Content Relevant URLs by vBSEO ©2011, Crawlability, Inc.
Copyright 2004-2014 RCCrawler.com