| |
| |||||||
 |
| | LinkBack | Thread Tools | Display Modes |
 01-02-2009, 09:05 AM
| #1 |
| Quarry Creeper Join Date: Oct 2008 Location: Jamestown
Posts: 357
| So I was so pleased with my DNA CFX chassis kit for my AX-10 I had to get one of these for my MRC. This mini was a huge pain in the butt to build J not due to the kit mind you. It was just one of those builds that fought me all the way lol. (I broke so much stuff…sigh) The kit itself is a great kit. The only problems I had with it were the delrin rods were not drilled and tapped straight which bothered me but when the rod ends were tightened down everything straightened fine. The 2mm threads in teh skid plate weren't threaded all the way through but that was easily fixed with a tap. The other small problem I didn’t like was that every single hole was 2mm even the shock mount positions. This is a very minor concern but noteable. Overall I like the kit a lot but it is definitely not a bolt on affair. I used the stock rod ends on the lower links and axial rod ends on the uppers as I didn’t feel like drilling them out for revo ones and also I planned on using the axial angles rod ends on my upper 4 links as you can see in the pics. After much thinking and pondering on link positions and so on I realized that at least for what I wanted to do the upper links are too long. So I used the front uppers on the rear and they were the perfect length and I then took the rears cut them to length (almost in half) and mounted them on the front. I had to drill the holes on the 4 link plates so I drilled and tapped them all to a 3mm thread size (warning here there is very little material here in certain spots and I am a little worried about some of the spots so I used the inner whole on the middle set of holes to mount to which is what I measured my link lengths to anyways). This link set up seems to give decent articulation with no binding on anything. The shocks are the Losi mini late model shocks which are very nice shocks for being mini shocks. They were fairly easy to mount (you have to use fuel tubing on them as they are not ball stud mount shocks at the top. It took a little testing to find the right position for this set up. As far as the cross braces go I wasn’t ok with having just the one delrin tube brace on each side and so also needing a place to mount electronics made two square braces for each side and drilled and tapped them very similarly to the cfx style of brace allowing me to not have to deal with locknuts when changing shock positions which I like A LOT J. Electronics are fairly straight forward: Sidewinder micro, Losi receiver which I use with a DX3R, Holmes hobbies Mini Torquemaster (which I broke a wire mounting tab too during assembly), and an E-flite 2 cell li-po (the ones used in the blade helis) I don’t normally mount batteries on the rear axle like that as I like to have all the weight up front but this battery weighs next to nothing and this way I can have an absolute maximum amount of link travel while still have my chassis sit low. I cut and clocked a set of super soft T300 panther step pins which seem to work ok but I will be switching over to the blue claws. I have aluminum parts coming in for it and a Hitec 645MG and The body mounts will be moved vertical and I am going to use a grappler body which will be interesting as I want to mount it as low as possible but the servo actually is pushed up rather high above the chassis during articulation Overall it is crawling fairly well right now however I need to add more weight to the tires. I highly recommend this kit if you are an experienced builder/tinkerer but if you are new it might prevent somewhat of a challenge. It was a tough build within respects to it being a mini and getting it the way I wanted it But it was very well worth it and I cant speak highly enough DNA’s products especially for the price that this kit costs. If you have any questions please feel free to ask          I am shocked at how planted this thing is even without enough weight in the tires. the CG is tremendous. So much so I can tip it ant an angle on its side as seen in the pics and it still stays. (I dont know if thats a good thign but i thought it was cool |

|  |
| Sponsored Links | |
| | |
|
01-02-2009, 09:18 AM
| #2 |
| Quarry Creeper Join Date: Feb 2008 Location: Clymer, NY
Posts: 394
|
WOW, Sunday this thing was in a parts tote and Friday its about completed. Looks dayum good Teets. I cant wat to see it in action and get my hands on the radio.
|
|
| |
|
01-02-2009, 10:32 AM
| #3 |
| Pebble Pounder Join Date: Aug 2008 Location: orlando
Posts: 135
|
which sidewinder are you using? how does it run in your set up?
|
|
| |
|
01-02-2009, 10:38 AM
| #4 |
| Quarry Creeper Join Date: Oct 2008 Location: Jamestown
Posts: 357
|
its just the micro sidewinder. it works perfectly. I personally think that the sidewinders are the absolute best speed controller out there for their price. |
|
| |
|
01-02-2009, 06:58 PM
| #5 |
| Quarry Creeper Join Date: Sep 2008 Location: Ukiah
Posts: 403
|
so is it hard to tap things i am really new to all this stuff but id be happy to learn so i dont have to ask my dad to help me with everything
|
|
| |
|
01-02-2009, 07:10 PM
| #6 | |
| RCC Addict Join Date: Apr 2008 Location: In The Machine, "Turn the light back ON"
Posts: 1,082
| Quote:
Thanks for the great build and input...It looks great and we will keep an eye out for the items that you mentioned..We will also look at 3mm hardware... Thanks again for the pic's and info... | |
|
| |
|
01-02-2009, 10:22 PM
| #7 |
| Quarry Creeper Join Date: Oct 2008 Location: Jamestown
Posts: 357
|
not a problem Solomon, They were just minor things like i said, easy to fix the chassis works quite well keep up the awsome work there and I hope to see more awsome products from ya guys soon |
|
| |
|
01-03-2009, 03:43 AM
| #8 |
| Quarry Creeper Join Date: Dec 2008 Location: Ramona
Posts: 233
|
I pravite messaged DNA about the kit.. im suprised I have not heard back from them... ?????
|
|
| |
|
01-03-2009, 05:36 AM
| #9 |
| Newbie Join Date: Dec 2008 Location: Woodstock
Posts: 43
|
Wow - I kinda don't wanna buy that kit anymore after reading that. I love to Crawl but I am not that mechanically inclined, and I'm pretty sure I will not be able to make the modifications you made to make the kit work, nor do I possess the correct tools, of that I am sure. Do you think your kit was a fluke or will all of them be equally as difficult to install? I was under the impression you just assembled the kit, I did not know there was drilling and tapping and swapping of links, etc, etc. Do you think it would have been possible to use all the provided pieces in their originally labeled positions, or did they have to be moved to work at all? Like, if I used the front links on front and rears on rear, what would be the problem or what would happen? Would it have been possible to use all the stock rod ends? Could it be assembled with no drilling like you did? My problem would be that where you made adjustments to get your setup right, I would be lost. I just like to crawl, I don't know that I would be able to see the problem with longer front links, or even know that there WAS a problem when I installed them. I'm really dissapointed to hear this I was looking forward to getting that kit. Last edited by NoDecoDiver; 01-03-2009 at 06:29 AM. |
|
| |
|
01-03-2009, 08:04 AM
| #10 |
| Quarry Creeper Join Date: Oct 2008 Location: Jamestown
Posts: 357
|
the kist can definately be assembled the way that it is. It was only a difficult build for me because I wanted it a different way. there are a few things though that will definately have to be addressed if you buy it. -you will will need more rod ends for the uppers: you can not use the upper 3 links on this kit nor would you ever want to so if you buy more of the losi MRC rod ends (8 to be exact) for the uppers you will be fine and not have to drill and tap the holes like I did for the uppers -You can easily assemble the uppers the way they come as parrallel uppers mounting on the far outside holes (there is a few builds on here that do it this way) and honestly unless you are useing the axial rod ends (the bent ones on the frame side) this is pretty much the only way you will be able to assemble the uppers with out cutting them down. In the rear this will actually give you a decent clocking of the axle and it will work well. In the fron this will also clock the axle but it clocks it to severely. I can not see any way to get around the need to cut down the front uppers, they will need it in order to not severely clock the front axle. The length they need to be will vary with your setup and your rod ends. -The last thing that can not be gotten around without jimmy rigging (which I am not a fan of if i can get around it) is the shocks need 3 mm mounting holes and they are 2mm. wether you use the losi mini lates or some other ones they will need 3mm mounting positions. This is a very simple fix ya can just drill them out to 3mm and use a locknut on the otherside to secure the shock or you can drill and tap them like I did (unless you have a brace like I do even if you tap them you will want to use a locknut to be safe) This is a very very very easy thing to do with a dremel and a drill. Its really a very nice chassis I can not stress this enough and the toughness of the build was simply because of me not the kit. It was just one of those builds lol which is happening again right now with factory team B4 I am working on. My build that I did just shows what can be done to make this rig even better and I wanted it to work similarly to the Slingshot CFX This is a very good price for this kit and honestly a great way to start learning how to modify things and work on your truck. if ya end up cutting a link to far then all ya goota do is head out and buy some delrin rod which is cheap enough and recut it. Its the perfect kit to begin "getting your hands dirty" with simple mods. A good learning expereince. |
|
| |
|
01-03-2009, 08:58 AM
| #11 |
| Newbie Join Date: Nov 2008 Location: Murphy, Tx.
Posts: 12
|
I am about to build mine up tomorrow morning and hopefully go crawl with it on Monday. These tips will help me out a lot! What oil are you using in your MLM shocks? Stock springs or different ones? Thanks! Last edited by Racerx336; 01-03-2009 at 09:13 AM. |
|
| |
|
01-03-2009, 09:51 AM
| #12 |
| Newbie Join Date: Dec 2008 Location: Woodstock
Posts: 43
|
Pardon my ignorance please - What does it mean when you say the front links will "clock" the axle? Will this affect a backyard crawler like me in a noticable way? |
|
| |
|
01-03-2009, 10:56 AM
| #13 |
| Pebble Pounder Join Date: Aug 2008 Location: orlando
Posts: 135
|
swisher- i've looked at the sidewinder micro --and it's only brushless? are you running brushless also? |
|
| |
|
01-03-2009, 11:27 AM
| #14 |
| Quarry Creeper Join Date: Oct 2008 Location: Jamestown
Posts: 357
|
Racerx336 I am using 60 weight shock oil with the springs that come with it and I put in the single hole piston it helped slow down articulation some but I still feel that its a little springy NoDecoDiver what I mean by clocking the axle is that the axle will be rotated counterlockwise in the front in other words the steering links are pushed closer to the ground and yes you would notice it. what this will do is it causes steering to be lost because if you think about it instead of the steering turning parralel to the ground instead it turns at and angle into the ground so ya lose actually quite a bit of effective turning radius Uberalles the sidewinder micro is brushed and brushless. It is an awsome speed controller and with the castle link ya just cant beat it for the money when it comes to adjustability. It can handle 3 cells and is just plain awsome. |
|
| |
|
01-03-2009, 11:48 AM
| #15 |
| Rock Crawler Join Date: Oct 2008 Location: Somewhere near the lake in IL
Posts: 975
|
I did have to drill and tap only for the upper links but I only did the chassis side the axle side I used stock losi links and 2mm hardware I was going to drill and tap but I starting looking at the clearances and felt it was going to be a little to tight for comfort as you said. I'm using mini T shocks and I mounted them inverted which also allowed me to use the 2MM hardware for my upper and lower mounts. The rest went together like a snap for me sept I also broke one of the wire tabs off my endbell on my mini torquemaster (clearly that was my fault for rushing). I just wish I knew then what I know now I have moved my battery around at least 3 times and moved my front links twice LOL Can somebody please post the part number for the offset axial rodends. I have spent waay too much time looking for them online already and my LHS is no help unless I can give them a part number. They carry no crawler parts of any kind. Last edited by WarTrader; 01-03-2009 at 11:53 AM. |
|
| |
|
01-03-2009, 01:56 PM
| #16 |
| Pebble Pounder Join Date: Aug 2008 Location: orlando
Posts: 135
|
thanx for the info swisher-- i was a nitro guy until this little thing came out. i made my own chassis and links 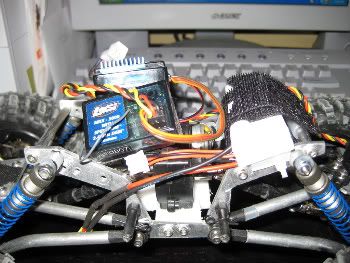 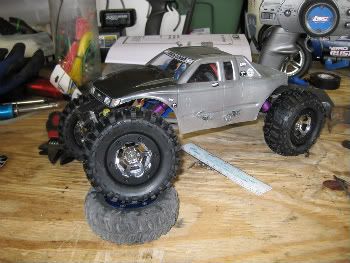 |
|
| |
|
01-03-2009, 02:45 PM
| #17 | ||
| RCC Addict Join Date: Nov 2008 Location: never been
Posts: 1,317
| Quote:
http://www.rccrawler.com/forum/showthread.php?t=146944 Quote:
i used the stock axial linkage set (AXI800 05), hope that helps. | ||
|
| |
|
01-08-2009, 04:11 PM
| #18 |
| Quarry Creeper Join Date: Oct 2008 Location: Jamestown
Posts: 357
|
I have seen and heard from several people very stressed over this chassis and building it and i have gotten several people ask me about my link positions so here are some better pics of my set up I can not stress how well this set-up is working for me. You can fully compress both the front and rear and theres is just enough room to fit a sheet of paper through above the top links and chassis. absolutely nothign binds at all and it articulates perfectly and runs amazingly well. I also go my Grappler body in and all the aluminum axle stuff and my hs645. the losi beadlocks and soft compund tires should be here soon well heres the pics hope they help  for anyone curious on link length I will try to clear it up: the lowers are not modified I used the front uppers for the rear and it clocked the axle perfectly the front uppers are the rears cut down: the length is very close to the stock stearing link of the AX10 if you cut maybe 5mm off the end of it that would be dam close to what i have. I have had many people ask me the axial rod end number and i believe its given in the post above this. I used the angled rod ends as you can see in the picks on the chassis side.   This is a picture of what i was talkign about with drilling out the 4 link mounting holes. for the most part i am ok with it its just the outer holes that worry me a bit but as you can see i dont use them anyways.  |
|
| |
|
01-08-2009, 04:44 PM
| #19 | |
| RCC Addict Join Date: Apr 2008 Location: Old Hickory
Posts: 1,137
| Quote:
| |
|
| |
|
01-08-2009, 04:53 PM
| #20 |
| Newbie Join Date: Dec 2008 Location: Woodstock
Posts: 43
|
Sweets - did you drill out the holes to make that longer screw fit or did you find a longer stock size screw somewhere? Man, I have looked everywhere and I cannot find a longer stock size screw. Thats the only thing I'm missing now. I have everything else hooked up and ready to rock. |
|
| |
|
| |


 Linear Mode


