| |
| |||||||
 |
| | LinkBack | Thread Tools | Display Modes |
 05-11-2010, 07:45 PM
| #1 |
| I wanna be Dave Join Date: Jul 2005 Location: North Idaho
Posts: 3,648
| MRC 4-Link Conversion
 I did this to try to dial out the nasty torque-twist the MRC has. I could find 4-link front and rear mounts, but I couldnt find any upper links, so I made my own I started out with these parts:  Delrin 6mm x 6 rods ($6) Axial bent rod-ends (4), Axial p/n AX80005 (two per part tree, $6.50) Set screws 3x16mm, Axial p/n AXA186 ($5) Front 4-Link Mount, RC Bros ($11) Rear 4-Link Mount, RC Bros ($10) Losi Ball Ends, LOSB 1418 ($5) 1. Taking measurements The first thing I did was to remove the front servo mount and mounted the front 4-link mount with the 3-link still attached, then I made me feeler gauge.  2. Mock-up After pulling the 3-link, I mocked up the two upper links using an Axial 33mm servo link, this gave me enough room to adjust the links to figure out what length of links I would need to fabricate. I used the feeler gauge to clock the axel close to what it was with the 3-link. I adjusted a little bit more to make sure my full size servo wouldnt hit the shocks when the truck flexes. By the time I time I got done tweaking the links they measured 41mm between the ball-ends.   3. Making the links There are two ways to make the links, the easiest way is to get two Axial aluminum lower links, cut them to length, then tap the holes that arent threaded (3mm). The second and harder way is to make them out of delrin. If you havent worked with delrin make sure you have extra on hand. Below is how I make them and some lessons I learned a. Cutting the Links I set up a jig on my scroll saw to cut the links straight. My first plan was to cut the links at exactly 41mm, but that didnt work, the delrin tends to break unevenly right before it is cut all the way through. What worked best was to cut the delrin about 1/3 - 1/2 the way through, then roll the delrin to complete the cut. I cut the delrin about 1-2mm longer than I needed then sanded the link to length using my Dremil and short taps. By using short taps the delrin is sanded away and not melted.  b. Drilling the Links This wasnt as hard as I thought it was going to be, it just took a little bit of time to make sure I was getting the bit as close to center as I could. I made my adjustments using the delrin the links that snapped when I tried cutting them straight through. I only drilled about 5mm at a time, pulling the bit out, letting the delrin cool, then going back in for another bite. If you have a really steady hand you could use a hand drill, but a drill press is really what you need for consistent results. (3mm bit)   I made two extra links for spares. 4. Threading the Links This is a bit more difficult than I thought it would be. I didnt think it would be any harder than threading a setscrew into a new ball-end, I was wrong The problem is in the delrin, it holds on to the heat that is generated, there is a point where it gets hot enough to melt, when it does the melted delrin acts like glue and captures the setscrew, when that happens the 2mm hex you are using to screw it in will strip; the damaged setscrew will have to be extracted with a pair of vise-grips. There are two ways to get around this, the easiest is to use a tap to cut your threads; or, just use a 3mm screw with a larger hex head (2.5mm recommended). Once the threads were cut the setscrews went in with just a little bit of force.    5. Read 4-Link Mount The day after I ordered the rear 4-link mount from RC Bros I realized I got the wrong one. RC Bros sells two rear 4-link mounts for the MRC, the one shown above, and one that is wide enough to strap a lipo to. The cool thing about these mounts is they come with extra screw holes, so it was real easy to make and attach my own battery mount.  Notes on the 4-Link Mounts: -The craftsmanship on these is outstanding. I was a little annoyed when I saw the 2mm screws they come with were Phillips and not hex, but, for screws that are that tiny, Phillips screws are really a lot easier to screw in. -They also come with 2mm nuts to attach the ball-ends, I recommend changing these to nylock nuts (self locking), this will ensure they dont fall out on you without having to deal with lock-tight. On the rocks I havent had time to do a full test, but just running it on my little rock pile in my garage I see an instant improvement, the torque twist is almost gone, I think with a little tweaking of the shocks and moving so weight around I can dial it out altogether. |

|  |
| Sponsored Links | |
| | |
|
05-11-2010, 07:49 PM
| #2 |
| RCC Addict Join Date: Dec 2009 Location: Rock Bouncin' with the Patented Technique
Posts: 1,374
|
Nice! I might have to try that with my mrc.
|
|
| |
|
05-11-2010, 08:03 PM
| #3 |
| RcBros Hobbies   Join Date: Nov 2005 Location: Oregon
Posts: 4,646
|
Nice little how-to, this will help alot of those new to 4 links.
|
|
| |
|
05-11-2010, 09:02 PM
| #4 |
| Rock Stacker Join Date: Nov 2008 Location: Dearborn
Posts: 65
|  Thanks, I'm going to try this. I have never seen a Decent post on a Easy diy for going to a 4 link with a stock body.Torque twist with the stock chasie (sp?) is driving me nutz... Question, did or have you considered about if going to the inside of the body would work , or does it screw up the geometry of the setup too much? Video of it in action? Please |
|
| |
|
05-11-2010, 09:58 PM
| #5 | |
| I wanna be Dave Join Date: Jul 2005 Location: North Idaho
Posts: 3,648
| Quote:
Video, eh? Dunno, it was hard enough getting enough time to make this mod with my 12-14 hour work days, but I'll see what I can do. Oh, one last thing about this mod: If you are competing in the Prescott Comp next month, you are not allowed to use this mod on your truck until AFTER the comp... | |
|
| |
|
05-12-2010, 09:45 AM
| #6 |
| Newbie Join Date: Mar 2010 Location: UK
Posts: 37
|
The clearest write up on the subject I've seen. Thanks for taking the time to do this - inspirational. |
|
| |
|
05-12-2010, 10:45 AM
| #7 |
| Newbie Join Date: Mar 2010 Location: Rancho Cucamonga
Posts: 33
|
Great Info. Thank you very much I have been working on creating my 4 link and this will help a lot. Is there anything that you would change or that you are looking to modify? Have you tried to connect the 4-link back closer to the axle so that it stretches out the links to be longer? |
|
| |
|
05-12-2010, 10:47 AM
| #8 |
| Quarry Creeper Join Date: Dec 2009 Location: Jacksonville, FL
Posts: 273
|
Great job on the 4-link! No disrespect, but with the money you spent on the 4-links you could nearly buy a Mixer or GC-3 chassis kit. Just something to think about for those contemplating doing this in the future. |
|
| |
|
05-12-2010, 11:17 AM
| #9 |
| Newbie Join Date: Mar 2010 Location: Rancho Cucamonga
Posts: 33
|
So, far I have $25 invested in the 4-link and I will put more into it, if need be. I am enjoying creating something myself with this one. I enjoy looking and reading what others have done as it gives me additional ideas. Both the Mixer and GC-3 are great chassis and for those that want a bolt on winner they should look to them. I know I will at sometime here in the near future as I am looking to get a 2nd car and one of those would be my choice. |
|
| |
|
05-12-2010, 11:46 AM
| #10 | |
| RCC Addict  Join Date: Mar 2010 Location: Yelm
Posts: 1,643
| Quote:
I have a hard time buying something that I can build myself. Nice work | |
|
| |
|
05-12-2010, 12:26 PM
| #11 |
| Newbie Join Date: Mar 2010 Location: Rancho Cucamonga
Posts: 33
|
I love the build process as well. I will post up where I am at with my build soon as I am make changes to the skip plate and how the bottom links mount. As soon as it is done I will post for feedback. Greatscott has done a great job detailing this build and it has sparked some new ideas for me. |
|
| |
|
05-12-2010, 08:15 PM
| #12 | |
| I wanna be Dave Join Date: Jul 2005 Location: North Idaho
Posts: 3,648
|
Thanks for all of the comments!!! Quote:
Maxx-Trail (56K warning) Plus, I haven't decided if I like running this thing or not; right now, if I buy a new chassis for this guy it will be an L-Trail with my Blackfoot body on it. I've only ran about a half a pack through it, so I can't really say what changes I'd make. I'll run it tomorrow after work and I'll compete with it on Saturday. What you see is all I have done with it, I might play with link lengths and see what changing the geometry does for handling. | |
|
| |
|
05-13-2010, 08:57 PM
| #13 |
| I wanna be Dave Join Date: Jul 2005 Location: North Idaho
Posts: 3,648
|
I put two packs through it today, the torque twist is diminished, but I was hoping for less than what it had. Next comes tweaking the shocks and weight to get the rest out; the TT is a lot more controllable and predictable. Also, the truck had a nasty habbit of loading up the suspension the releasing it suddenly, causing it to flip, I didn't see that at all today. As far as climbing goes, the truck is a lot more planted and was going over ricks that it couldn't before. The real test will be the comp this weekend... |
|
| |
|
05-13-2010, 09:40 PM
| #14 |
| Newbie Join Date: Mar 2010 Location: Rancho Cucamonga
Posts: 33
|
Great to hear how it has performed. I have completed the upper links almost exactly as you described above. I am working on the lower links and trying to get them closer to the center of the chassis and not on the outside. As soon as I have it complete I will post up pics.
|
|
| |
|
05-14-2010, 09:09 PM
| #15 |
| I wanna be Dave Join Date: Jul 2005 Location: North Idaho
Posts: 3,648
|
Schweet!!! Can't wait to see them!!! |
|
| |
|
05-26-2010, 02:48 PM
| #16 |
| Newbie Join Date: Mar 2010 Location: Rancho Cucamonga
Posts: 33
|
I have been working on moving the lower links from the outside of the chassis to be inside and create more of a triangle with the lower links. I ground down the Motor Plate and uses 4-40 all thread to attach the lower rod ends to. 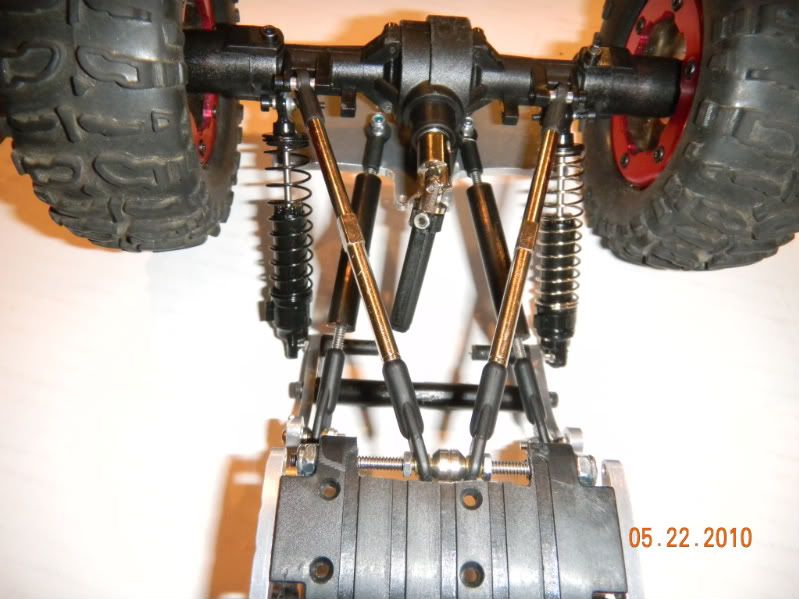 Last edited by Cucamonga Crawler; 05-26-2010 at 02:55 PM. |
|
| |
|
05-26-2010, 10:58 PM
| #17 |
| I wanna be Dave Join Date: Jul 2005 Location: North Idaho
Posts: 3,648
|
That is pretty schweet, looks like you have taken it to the next step!!! I have been playing with my setup and I've found droop works really well. I put medium and soft springs inside with 6mm spacers, the TT is almost completely gone and it climbs really well. |
|
| |
|
06-02-2010, 12:41 PM
| #18 |
| Newbie Join Date: Mar 2010 Location: Rancho Cucamonga
Posts: 33
|
Just ordered some RCbros Losi MRC Bent Delrin Links and was supprised with awesome machined bent high clearance links! I have already installed them and will take pics this weekned! |
|
| |
|
05-26-2013, 01:54 AM
| #19 |
| Newbie Join Date: May 2013 Location: Placer County
Posts: 36
|
Sweet writeup scott! ive been looking at ways to mount the shocks and thats the first time if seen someone mount them on the inside of the chassis like that, without any crossmembers. Im curious how that performs.. Does the chassis flex at all? Or is it pretty stationary?
|
|
| |
|
05-26-2013, 02:10 AM
| #20 | |
| E.Y. Designs Join Date: Sep 2011 Location: Springfield, OR
Posts: 3,591
| Quote:
| |
|
| |
|
| |


 Linear Mode


