| |
| |||||||
 |
| | LinkBack | Thread Tools | Display Modes |
 09-25-2011, 12:13 AM
| #1 |
| Pebble Pounder  Join Date: May 2008 Location: Two Harbors, MN
Posts: 118
|
Short story long this is the MRC pro roller I won previously this year. MNRCRC had a $10 challenge where we all competed with this truck. Thanks to Nicklepimp and Big Baller for making it RTR for the event. The seasons about rapped up here in northern Minnesota but this will be my 2012 comp rig. Enjoy! The list begins with what I have to date. MRC pro roller Mini juice chassis Stainless links with traxxas ends VP little harry w SS weights Crawler Innovations foams memory/med Hot bodies red dot rovers Traxxas rod ends RC bros high steer knuckles RC bros steering link RC bros servo/link mount RPM servo posts BDW motor plate Losi aluminum 12mm hexes Jeepindoug C cups Savox SC-1258tg 3PK Tekin FXR Spektrum SR3500 rec Castle Creations bec Last edited by wild bill; 04-13-2012 at 06:08 PM. |

|  |
| Sponsored Links | |
| | |
|
09-25-2011, 12:18 AM
| #2 |
| Pebble Pounder Join Date: May 2008 Location: Two Harbors, MN
Posts: 118
|
First thing I ripped the entire truck down and went through it. I've just seen too many mistakes on pre built rollers. Everything was good though IMO. I greased the tranny and rear end with VP's grease. I also glued and sanded all the edges of the carbon fiber to prevent it from separating. I purchased the chassis and links from ol' gravy leg just last weekend. I also purchased the rims, tires, foams and hardware from him. Im really happy with the deals I got. I also removed the front memory foams and replaced them with the softs. The temps in Minnesota seem to make memory foams hard. I went through and replaced all the rod ends with traxxas 2742x they are a little shorter and the shaft area is round instead of square. I then had to shim the rear links to compensate for the shorter link ends. The links in the rear are longer for more front bias and to push the wheelbase to 8.5" I just added some washers til I get my wheelbase and axle clocking set. This will be adjusted later after everything is in place.  Last edited by wild bill; 09-25-2011 at 10:00 AM. |
|
| |
|
09-25-2011, 12:25 AM
| #3 |
| Pebble Pounder Join Date: May 2008 Location: Two Harbors, MN
Posts: 118
|
I put some time into the front end. For now its assembled with no grease or internals for mock up. I did the clocking mod to the axle and im waiting for the Traxxas mini revo pinion for the overdrive mod. The pic shows the clocking I did. I also did some cutting to the top of the housing so the steering link would travel more to get the max steering angle.   Last edited by wild bill; 09-25-2011 at 10:21 AM. |
|
| |
|
09-25-2011, 12:33 AM
| #4 |
| Pebble Pounder Join Date: May 2008 Location: Two Harbors, MN
Posts: 118
|
Im kind of stuck now. Im waiting on my servo/link mount and posts I ordered today. Im also waiting on the traxxas pinion and some mini t springs. I did go through the shocks. I filled them with 40wt for now til I can get a feel of it. I also am going to limit the front shocks a bit more internally. Currently it has the stock pro roller shims in the shocks. I like to run softer springs with alot of droop. I like to set the ride height with spring rate. I like it to settle a good 1/2" at ride height. Ill run the back of the skid at 2.25" with it 2.75" at full droop. Once my servo plate arrives im going to shorten up the front uppers since they will be mounted behind the servo due to my steering link.  Last edited by wild bill; 09-25-2011 at 10:40 AM. |
|
| |
|
09-25-2011, 12:45 AM
| #5 |
| Pebble Pounder Join Date: May 2008 Location: Two Harbors, MN
Posts: 118
|
Here's a couple more pics of the steering. I can safely dermal more from the axle housings to get more travel but the cvd's are just starting to click now. I like it to bottom out a bit if my end points aren't perfect.   Now I patiently wait for more parts to arrive. Its about all I can do for now. |
|
| |
|
09-25-2011, 10:52 AM
| #6 |
| Quarry Creeper Join Date: Oct 2010 Location: The "Nanny" State
Posts: 276
|
Looks good Bill, can't wait to see it perform!  |
|
| |
|
09-25-2011, 10:58 AM
| #7 | |
| Pebble Pounder Join Date: May 2008 Location: Two Harbors, MN
Posts: 118
| Quote:
| |
|
| |
|
09-25-2011, 11:41 AM
| #8 |
| Pebble Pounder Join Date: May 2008 Location: Two Harbors, MN
Posts: 118
|
Just playing around with the weights. I like to run with the 60/40 bias. Obviously there's no servo plate, servo and electronics but my projected layout will be pretty balanced. I plan on running between a 350-500 mah 3s lipo. I plan on putting the FXR and bec on the rear uppers. Rec will be taped to the back side of the tranny. Battery will be placed on the front uppers. Battery will be determined on how much room I have on the front upper links once I get my link mount. For now I have four weights up front per wheel and two in back per wheel. I have a feeling this is what ill run.  |
|
| |
|
09-25-2011, 12:08 PM
| #9 |
| Pebble Pounder Join Date: May 2008 Location: Two Harbors, MN
Posts: 118
|
Here's a little piece of history. We had a $10 challange which consisted of 20 gates in 8 min. I amazingly finished the coarse with a flawless victory. MNRCRC purchased the roller from Jerry's RC. Baller supplied electronics and Pimp put it all together. Here's some pics.   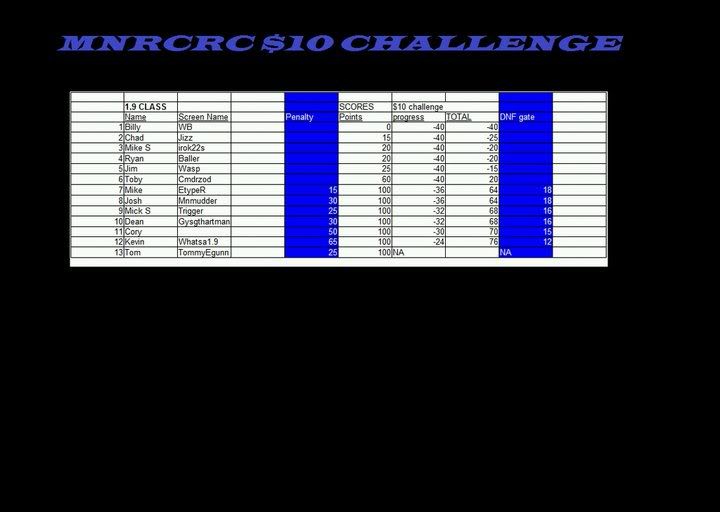 |
|
| |
|
09-25-2011, 12:38 PM
| #10 |
| Pebble Pounder Join Date: May 2008 Location: Two Harbors, MN
Posts: 118
|
Well im still doing some tweaking. I had to shorten the front drive shaft a bit. Roughly took about 3/8" off both ends of the shaft with a dremel. I like to pay close attention that the suspension cycles freely with no binding. The shaft was binding when compressing the suspension.  |
|
| |
|
09-25-2011, 06:55 PM
| #11 |
| Pebble Pounder Join Date: May 2008 Location: Two Harbors, MN
Posts: 118
|
Well I purchased a couple more items this evening. Thanks to motorman1600 for the new FXR and inkdaddy66 for the SR3500. Im thinking about possible making a mount off the rear axle to mount the esc between the rear upper links. Will see what I come up with.
|
|
| |
|
09-26-2011, 10:20 AM
| #12 |
| RCC Addict Join Date: Aug 2007 Location: Seattle
Posts: 1,765
|
Enjoy.. The best man won. |
|
| |
|
09-26-2011, 07:04 PM
| #13 |
| Rock Crawler Join Date: Jun 2009 Location: Minnesota
Posts: 750
|
Looking good bill. You should do a comparison shot with the cf chassis and the delrin chassis. Sense you do have my rig in your possession at the moment. Id like to see a side by side of the 2.
|
|
| |
|
09-26-2011, 07:08 PM
| #14 | ||
| Pebble Pounder Join Date: May 2008 Location: Two Harbors, MN
Posts: 118
| Quote:
Quote:
| ||
|
| |
|
09-26-2011, 07:13 PM
| #15 |
| Pebble Pounder Join Date: May 2008 Location: Two Harbors, MN
Posts: 118
|
Irok22's and my mini.   |
|
| |
|
09-26-2011, 07:30 PM
| #16 |
| Pebble Pounder Join Date: May 2008 Location: Two Harbors, MN
Posts: 118
|
Well I tore the wheels and tires down. Im gonna get the wheels drilled at work tomorrow for venting. I live in the land of 10,000 lakes so its not unlikely to have water on coarse. I prefer to vent the rims vs the tires. I also got the bit from Irok22's to drill the new holes on the caster mod. Ill post more detailed pics since I actually got a pm today on the mater. I've decided im not going to run a bec on the servo. I normally make a y harness so the bec directly feeds the servo. Im thinking I shouldn't need to with close to 200oz fed by the fxr.  Last edited by wild bill; 09-26-2011 at 08:22 PM. |
|
| |
|
09-26-2011, 07:59 PM
| #17 |
| Pebble Pounder Join Date: May 2008 Location: Two Harbors, MN
Posts: 118
|
Here's better pics of the new clocked C's and the the notch I cut for the RC bros steering link to clear after the caster mod.    |
|
| |
|
09-26-2011, 08:00 PM
| #18 |
| Pebble Pounder Join Date: May 2008 Location: Two Harbors, MN
Posts: 118
|   |
|
| |
|
09-26-2011, 08:47 PM
| #19 |
| Rock Crawler Join Date: Jun 2009 Location: Minnesota
Posts: 750
|
did you get the drill bit figured out finally?
|
|
| |
|
09-26-2011, 08:49 PM
| #20 | |
| Pebble Pounder Join Date: May 2008 Location: Two Harbors, MN
Posts: 118
| Quote:
| |
|
| |
|
| |


 Linear Mode


