| |
 03-09-2009, 12:37 AM
| #81 |
| Ex Nor-CalRCRC slave  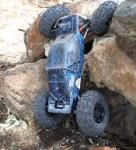 Join Date: Dec 2008 Location: San Mateo, CA.
Posts: 2,242
|
[quote=5150bronco;1669253]I figured if it was closer the angle would be harder to make straight. I was actually thinking of cutting into the plate. Good idea. so I thought of keeping it further. It all really depends on the servo horn your going to use. If it hangs down far enuf to make a fairly straight line to the operating rod or not. A longer link can make up some difference if the angle is not quite right. |

|  |
| Sponsored Links | |
| | |
|
03-09-2009, 10:50 AM
| #82 | |
| RCC Addict Join Date: Jan 2007 Location: San Jose
Posts: 1,697
|
[QUOTE=gunnar;1669265] Quote:
I was going to use the horn with two ends that are 180 degree, the white one that comes with 225, and cut one end off. Any suggestions. I was thinking of running it below the plate, but not sure. I will get a better angle if I move it back to original spot. TESTING SERVO: I could test it by putting collar on dig, not tightening screw and see if I can pull it off dig without it binding to see if the angle is fine.... my ideas...., anybody, give some ideas too.  | |
|
| |
|
03-09-2009, 10:54 AM
| #83 |
| Ex Nor-CalRCRC slave Join Date: Dec 2008 Location: San Mateo, CA.
Posts: 2,242
|
I guess just test it out and see what gives you the straightest pull on the operating rod. You're almost there!
|
|
| |
|
03-09-2009, 11:10 AM
| #84 | |
| I wanna be Dave Join Date: Jun 2005 Location: drillin Holes for the man
Posts: 2,736
| Quote:
 | |
|
| |
|
03-09-2009, 02:05 PM
| #85 |
| RCC Addict Join Date: Jan 2007 Location: San Jose
Posts: 1,697
|
Thanks Big! Pics work well for me. Looks like your rear shock is on 5th hole? Wonder if that matters? So, I guess the diff here in this issue is the mounting of the links on the bottom of the plate on axle. that is where bowtie's is too. Appreciate the ideas. I am going to change this I think so I can get better angle with the servo rod. I am....almost there gunn.... Just bought a new clean body too. |
|
| |
|
03-09-2009, 02:50 PM
| #86 | |
| I wanna be Dave Join Date: Jun 2005 Location: drillin Holes for the man
Posts: 2,736
| Quote:
| |
|
| |
|
03-10-2009, 12:49 AM
| #87 | |
| RCC Addict Join Date: Jan 2007 Location: San Jose
Posts: 1,697
| Quote:
I see you have your upper rear links in the middle hole on chassis side? Mine is on the lower hole. The longer side would mean that the link curves by the rear of the servo, right? Thanks Man Last edited by 5150bronco; 03-10-2009 at 12:53 AM. | |
|
| |
|
03-10-2009, 01:00 AM
| #88 |
| Ex Nor-CalRCRC slave Join Date: Dec 2008 Location: San Mateo, CA.
Posts: 2,242
|
Sounds like he's talking about the rear axle plate. One hole away from the inner holes on the plate, or, the second hole from the center.
|
|
| |
|
03-10-2009, 01:11 AM
| #89 | |
| RCC Addict Join Date: Jan 2007 Location: San Jose
Posts: 1,697
| Quote:
That makes sense to me. thanks. nice stuff gun! Tryin that shat tomorrow. dam i am almost there.  | |
|
| |
|
03-10-2009, 09:44 PM
| #90 |
| RCC Addict Join Date: Jan 2007 Location: San Jose
Posts: 1,697
|
I am running the hi-tec 225 dig servo. I am using DX3R tx too. Can people put what options they changes they made to dial in the dig servo? One issue currently experiencing...., The servo hums at about the 3rd to 4th engagement. Thanks guys! Last edited by 5150bronco; 03-10-2009 at 11:24 PM. |
|
| |
|
03-11-2009, 12:00 PM
| #91 |
| RCC Addict Join Date: Jan 2007 Location: San Jose
Posts: 1,697
|
What are some numbers or percent for frame rate with dx3r that people have used with this setup? thanks. |
|
| |
|
03-11-2009, 09:55 PM
| #92 |
| Pebble Pounder Join Date: Dec 2005 Location: MODESTO
Posts: 142
|
what rc4wd heims did you use .thanks I'll go search there site nvm i over looked them Steely 8-32 Rod End (Heim Joint) (Ship 3/18/09) |
|
| |
|
03-11-2009, 11:13 PM
| #93 |
| Pebble Pounder Join Date: Dec 2005 Location: MODESTO
Posts: 142
|
hey couldn't you just mount the servo upside down?are would it hit the drive line? i kinda just skimmed threw the whole build.
|
|
| |
|
03-12-2009, 12:10 AM
| #94 | ||
| RCC Addict Join Date: Jan 2007 Location: San Jose
Posts: 1,697
| Quote:
Quote:
hope this helps! | ||
|
| |
|
03-13-2009, 11:11 AM
| #95 |
| RCC Addict Join Date: Jan 2007 Location: San Jose
Posts: 1,697
|
Here are some pics of a lengthy project.   I had little challenge figuring out dig and the dx3r setup. My EPA or travel is 23% to 26%. Instead of starting at on end point and working to other, I started in middle or free wheel position and worked to each end point. This is new to me so not sure the "right" way, but this way worked better for me than starting at each end point. the dx3r has so many dam options and adjustments it is amazing. Luckily, I did not burn ANY servo's.....no casualties this round...... >>> I took the wire from servo ran underneath and bound it up in shrink tube......I am pretty anal about wires.....so I will make em look clean...! Any questions, let me know. Thanks |
|
| |
|
03-13-2009, 11:56 AM
| #96 |
| Ex Nor-CalRCRC slave Join Date: Dec 2008 Location: San Mateo, CA.
Posts: 2,242
|
That's good, yes, those end points are a bit tricky to get at first, but that is how I progammed mine too. One suggestion, loosen the collar on the operating rod, and turn it to the right so the linkage is more of a straight line to the servo horn. In other words, twist it toward the motor and retighten. The linkage should end up pointing along a line at the right edge of the DNA case, and will give a straighter throw. You also might want to make the linkage about 1/4" longer. In the neutral position of the servo(dig-freewheel) the horn should be pointing straight at the reciever.
Last edited by gunnar; 03-13-2009 at 12:07 PM. |
|
| |
|
03-13-2009, 12:02 PM
| #97 | |
| RCC Addict Join Date: Jan 2007 Location: San Jose
Posts: 1,697
| Quote:
Thanks, I will make it longer...so horn is facing rx in freewheel/middle position. NOT TODAY THOUGH...... I am going crawlin at linda vista and keeping it in place! awesome help dude! | |
|
| |
|
03-13-2009, 12:03 PM
| #98 |
| Ex Nor-CalRCRC slave Join Date: Dec 2008 Location: San Mateo, CA.
Posts: 2,242
|
Here is a pic to show you what I mean, see how the servo linkage is in line along the dig unit? Should take a few minutes to do: 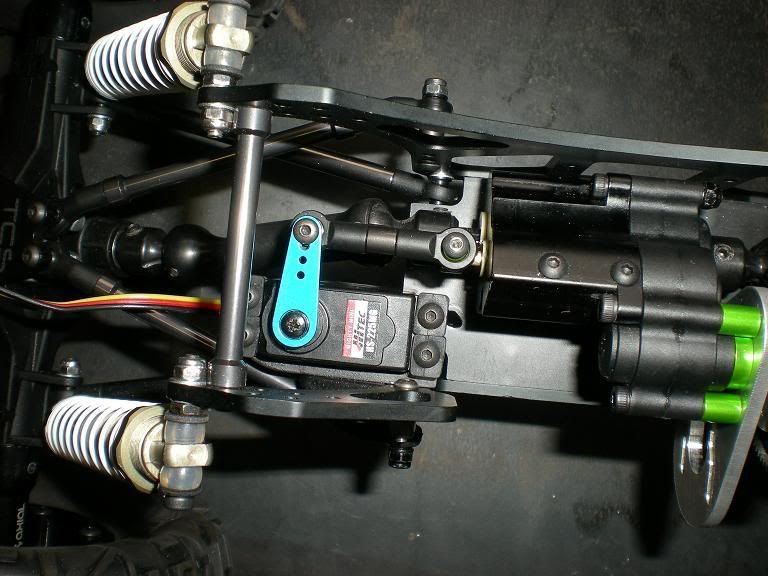 Last edited by gunnar; 03-13-2009 at 03:35 PM. |
|
| |
|
03-13-2009, 07:08 PM
| #99 |
| RCC Addict Join Date: Jan 2007 Location: San Jose
Posts: 1,697
|
cool. got it. I will make that change now. along with some others changes, that happened during testing. :-x:-x
|
|
| |
|
03-13-2009, 07:18 PM
| #100 |
| Just jump it!   Join Date: Aug 2008 Location: Cedar City, Utah
Posts: 1,947
|
Looking good. That next on my list for my build. I have always set my dig up with center for freewheel. Just works better or me. |
|
| |
 |
| |


 Linear Mode


