| |
 12-04-2009, 03:01 PM
| #41 |
| RCC Addict Join Date: Jun 2006 Location: Maryland
Posts: 1,255
|
Hahaha! Yeah, I'll have it with me at motorama. Im sure we'll have a micro comp at the hotel Saturday night. Layed down some paint today, its not the exact color of my 1:1, but its pretty close. As you can see, I got a little carried away with the dremel while I was removing the fender flares in the rear. Time for some styrene body work. 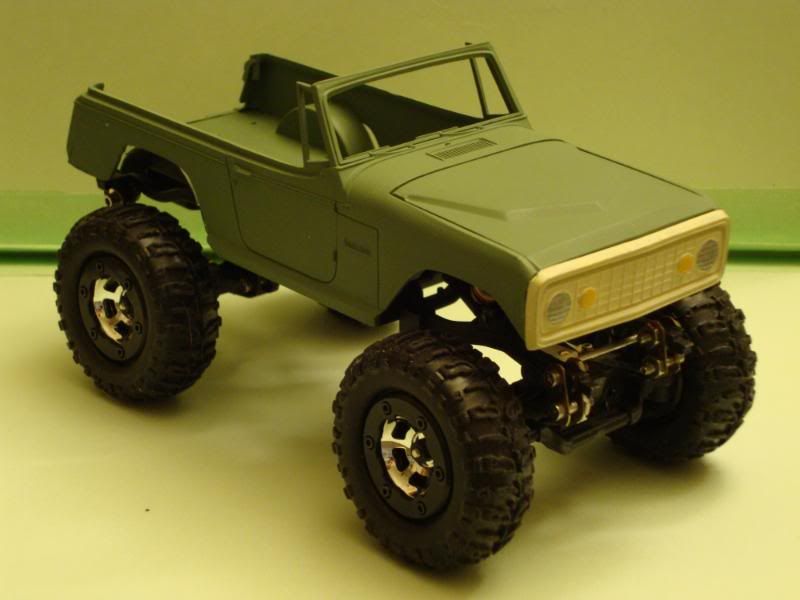 It flexes pretty well with the weight of the body and everything on there. Thats a bic lighter in the background for size reference. 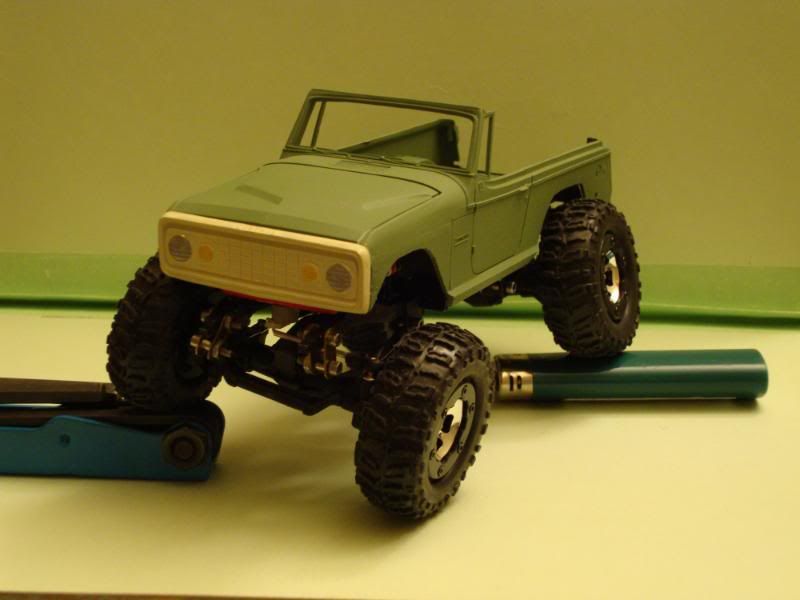 Ditched the hinged hood idea and stuck some magnets on the underside of the hood and on top of the esc. I rolled it on the little losi cardboard course, and the hood did'nt pop off, so I think it will work. Thats it for now, the next big obstacle is the roll cage. -YB 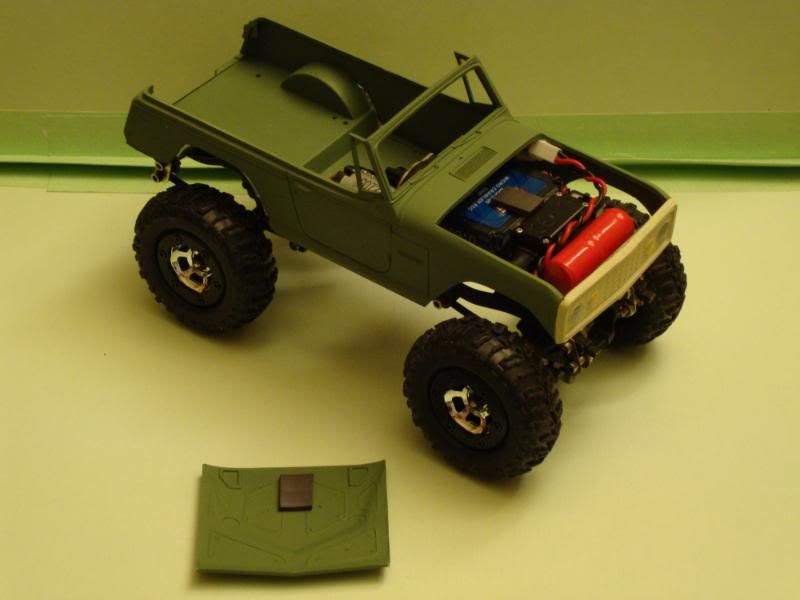 |

|  |
| Sponsored Links | |
| | |
|
12-04-2009, 03:57 PM
| #42 |
| Quarry Creeper Join Date: Nov 2005 Location: Los Angeles, CA
Posts: 399
|
that looks soo sick like i dont even want to buy a micro rock crawler nemore cuz how gay it is compared 2 urs lol.
|
|
| |
|
12-04-2009, 03:59 PM
| #43 |
| I wanna be Dave Join Date: Jan 2009 Location: By a lake in Thornton
Posts: 2,218
|
LOL it really is the best one yet. i hope you dont mind Bob biting your style in a few weeks |
|
| |
|
12-07-2009, 05:28 PM
| #44 |
| RCC Addict Join Date: Jun 2006 Location: Maryland
Posts: 1,255
|
Go for it BeelzeBob! I look forward to seeing what you come up with.  Mini... no, Micro update. Mounted tailgate, taillights, and windshield/butterfly glass. Spilled some CA on the tailgate. 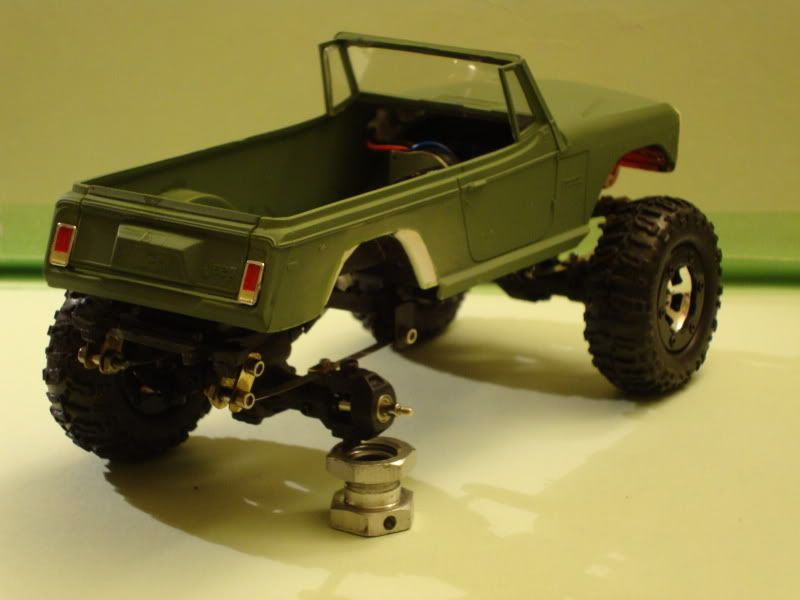 |
|
| |
|
12-07-2009, 05:58 PM
| #45 |
| Pebble Pounder Join Date: Nov 2009 Location: The Great Northwest
Posts: 115
|
Looks great! Those rear shackles (could just be the pic) look like they're angled back like the springs are a bit long....will limit uptravel a bit, should droop nice though. Tell ya what though, it's totally impressive how it's coming together!
|
|
| |
|
12-07-2009, 08:53 PM
| #46 | |
| Rock Crawler Join Date: Dec 2005 Location: houston
Posts: 650
| Quote:
| |
|
| |
|
12-07-2009, 09:06 PM
| #47 |
| Pebble Pounder Join Date: May 2007 Location: Dirty Jerz
Posts: 111
|
wow.... just amazing.... cant wait to see some videos of this thing
|
|
| |
|
12-08-2009, 09:16 AM
| #48 |
| RCC Addict Join Date: Feb 2008 Location: Hiatus..sutiaH
Posts: 1,620
|
Very impressive!!!
|
|
| |
|
12-08-2009, 09:40 AM
| #49 |
| I wanna be Dave Join Date: Oct 2007 Location: Scumrise, Flooriduh
Posts: 5,181
|
That looks great! I think the best I have seen yet.
|
|
| |
|
12-08-2009, 10:00 AM
| #50 |
| Newbie Join Date: Jun 2009 Location: Anza
Posts: 10
|
just awesome, i cant say more.
|
|
| |
|
12-08-2009, 11:41 AM
| #51 |
| Newbie Join Date: Dec 2009 Location: Indianapolis
Posts: 45
|
hinge the hood idea: http://www.briansmodelcars.com/tutor...D=49&CurPage=1 just like in regular model car building, besides being a crawler and more movable you may want to velcro the front down to keep it from popping up. |
|
| |
|
12-08-2009, 11:41 AM
| #52 |
| Rock Crawler Join Date: Jan 2007 Location: Tuscaloosa
Posts: 855
|
Ok, after seeing that I am going to have to order another one. That thing is killer. Great work on the chassis and leafs. |
|
| |
|
12-08-2009, 07:49 PM
| #53 |
| RCC Addict Join Date: Nov 2008 Location: Frederick
Posts: 1,286
| Looken good Potsie. |
|
| |
|
12-09-2009, 12:26 AM
| #54 |
| Rock Crawler Join Date: Jan 2007 Location: San Clemente, CA.
Posts: 531
|
Great build, best by far!
|
|
| |
|
12-09-2009, 04:12 PM
| #55 |
| Rock Crawler Join Date: Nov 2008 Location: CO
Posts: 549
|
Looks good! One problem though, you to my model kit! I was gonna do this body, it's been in my favorites for months now, waitin for a micro build. But oh well. Would have never of thought to use the model chassis. Let us know how it holds up to the micro abuse |
|
| |
|
12-10-2009, 05:05 AM
| #56 |
| Rock Stacker Join Date: Dec 2009 Location: The woods
Posts: 71
|
Great build Where do you wheel your 1:1 rig? |
|
| |
|
12-13-2009, 12:29 AM
| #57 |
| Quarry Creeper Join Date: Mar 2009 Location: searching
Posts: 384
|
great build!!! If you don't mind I'd like to get some more info on how you made your leafs...I'm builden a '79 bronco & want rear leafs to keep the scale look & have no idea where to start!...my first scaler!
|
|
| |
|
12-13-2009, 10:15 PM
| #58 |
| I wanna be Dave   Join Date: Jul 2007 Location: Within The Machine,,,
Posts: 2,031
|
this is the most bad ass build,,i didnt want anything to do with the micro crawler,,until i saw this ,,holy shit,,,,,,its awesome |
|
| |
|
12-13-2009, 10:39 PM
| #59 | |
| Rock Crawler  Join Date: Dec 2005 Location: Connellsville PA."fayettenam" lol
Posts: 739
| Quote:
| |
|
| |
|
12-15-2009, 06:11 PM
| #60 | |||
| RCC Addict Join Date: Jun 2006 Location: Maryland
Posts: 1,255
|
Thank you for the complements fellas! Quote:
Quote:
If my body werent already mounted, I would try it, but I cant get to the bottom of the cowl very easily.Quote:
Made the roll cage today. My first atempt at tube work, and I must say its pretty easy at this scale. First I picked up the tubing. Yes it is hollow. 1/16" brass tubing. .0625" x 24:1 = 1.5", the diameter of my 1:1 cage. I made all of the bends using a sharpie marker as a bending die. The tubing bends very easily, and doesnt kink. Then I fishmouth all of the tube ends with a small jewlers needle file. Before I solder, I soak the joint in liquid flux I feel this step is very important, it makes the solder wick into the joint. When you solder the joint, it is important to touch the iron to the cage as little as posible. If you keep it there too long, you could overheat a tube and loosen a joint that you've already finished. I build up a little puddle of solder (not too much!) on the tip of the iron and touch it to the fluxed joint. The solder almost instantly wicks into the joint, thanks to the previously applied flux. Things like boards with holes drilled in them, the little aligator clip soldering stations, and binder clips help alot for holding this tiny stuff together while you solder too. Thats a M3 screw holding up the back end for size referance. Im missing a couple spreader bars compared to my 1:1, but I need to get the transmission out somehow... 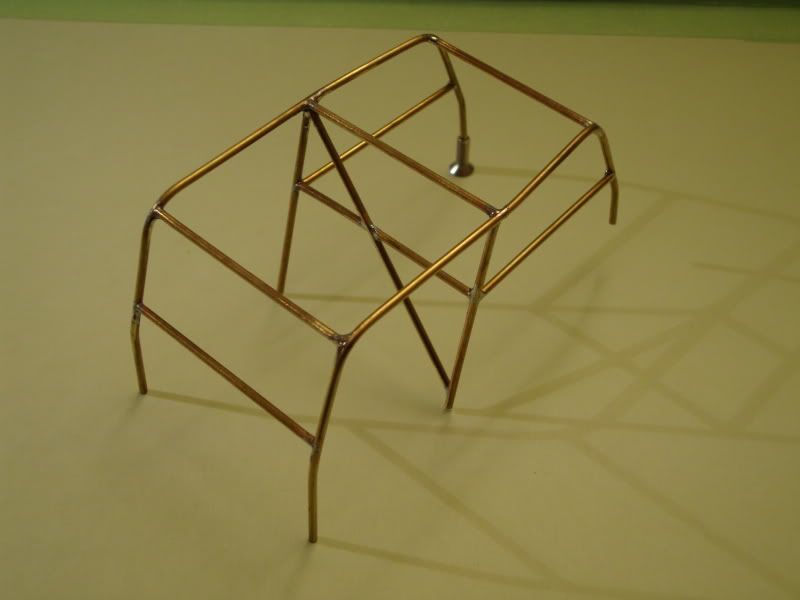 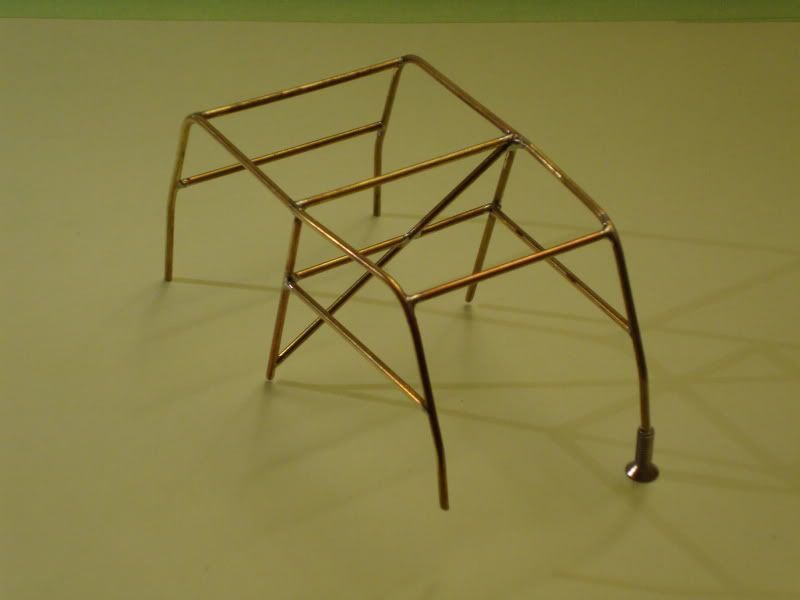 Last edited by youngblood; 12-16-2009 at 05:31 AM. | |||
|
| |
 |
| |


 Linear Mode


