| |
 11-28-2009, 05:10 PM
| #1 |
| Rock Crawler Join Date: Jan 2007 Location: Tuscaloosa
Posts: 855
|
I made it home last night after Bama's last minute win (Roll Tide!) and got to work on a scale frame. I tore the Micro RC down and traced the stock chassis plate on to a 0.60 sheet of styrene. Then, I sketched out the chassis rails and a couple tweaks I wanted to make. I needed to stretch the rear links so I moved the top link mounting holes back on the chassis so I wouldn't have to modify those links. I also decided to give droop another try since this was a scale rig so I moved the top link mounting holes up on both the front and the back so the top links are more parallel to the ground at the rigs normal stance. I also drilled a couple extra mounting holes for the shocks in case I wanted to mount them more perpendicular to the ground. I used the stock electronics tray, battery box, a piece of wood, and a long 3mm bolt to brace the chassis. I know that is a mix match of parts but I use what I got.:crazy: So far it seems plenty strong. 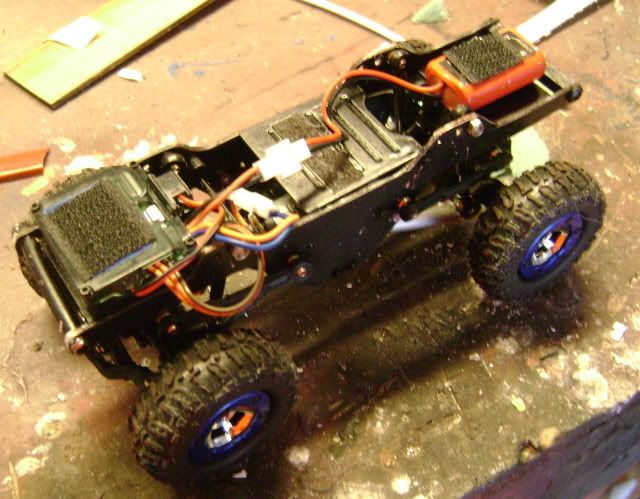 I stretched the rear lower links by cutting them in half and then gluing them inside of a piece of square styrene tubing. I got them a little off so I cut the modified links in half and glued them inside a piece of aluminum tubing. I extended the driveshaft with a piece of an ink pen. I stretched the rear lower links by cutting them in half and then gluing them inside of a piece of square styrene tubing. I got them a little off so I cut the modified links in half and glued them inside a piece of aluminum tubing. I extended the driveshaft with a piece of an ink pen.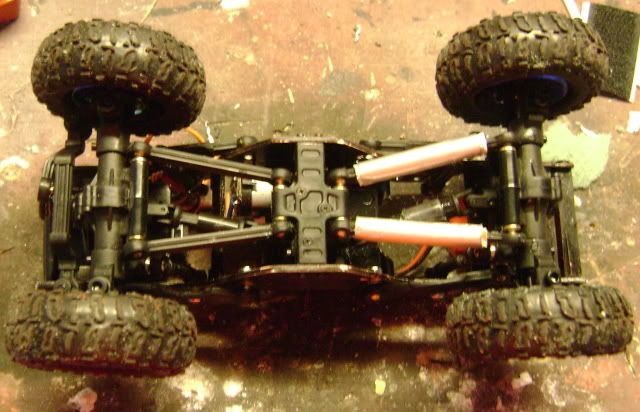 Once I had the chassis about like I wanted it, I hit it with a coat of red oxide primer and then sprayed it black. I mounted the ESC on a piece of styrene up front and the battery in the back. With my scale chassis finished it was time to turn my attention to the body. 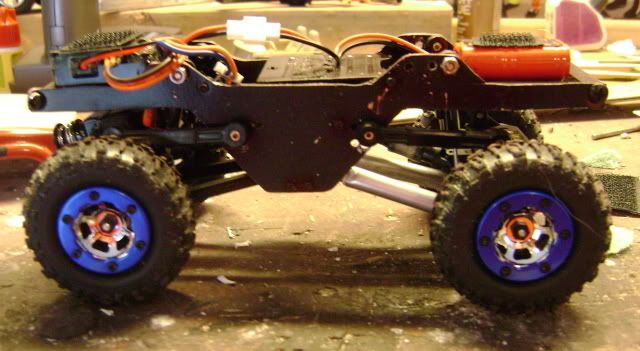 (Kinda looks like a really small K2 chassis.^_^) I had an Aoshima 4-Runner body laying around from a previous project that never got finished. It was already painted and just about ready to go. It just needed the glass and grill installed.  That would have been too easy though. I figure you are going to see a lot of Aoshima 'Yotas on these little things so I wanted to do something a little different. I have always liked the look of the beat up, mismatched trail rigs and I have really grown to like the topless, tubed out rigs like Badd's Blazer so that is the direction I am going on the 4-Runner. I started by cutting the top off and painting in some mismatched panels. Apparently the doors are from a blue 4-Runner, a rear quarter panel came off of a metallic orange one, and the hood is freshly primered. 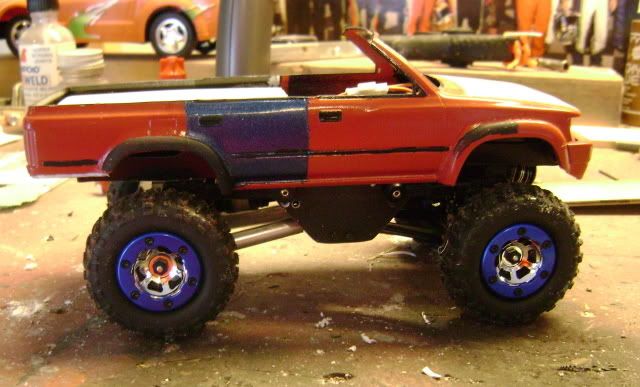  Fender flares will be black as well as the cover over the rear. Now I need to start on the tube work. But before I do that I decided to take it for a test run on the course I built.:rc:  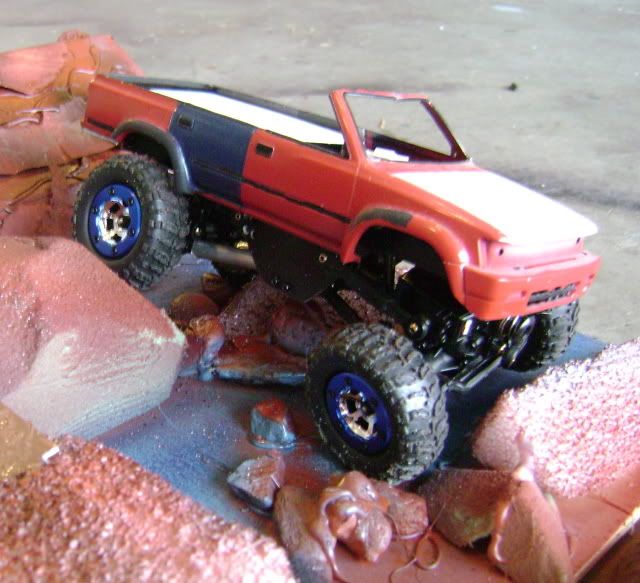 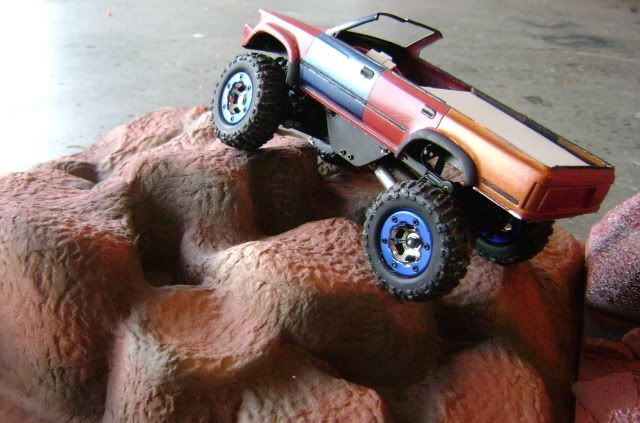 It did pretty well. So far I really like this little rig. In my banzai 24 hour period I have been building on this thing I have learned a lot. Below I will list a few tips for those who are tinkering with their own. Some are my ideas but many came from research on the net and other forums. *You can flip the tranny to get the weight of the motor closer to the front. *Pop the springs off of the shocks and wala, instant droop. (Some people are using rubber bands as shock travel limiters.) *A pen is just right for stretching the driveshaft. *Micro T ball ends and threaded rod is a quick way to make custom links. Wheels are not true bead locks. They are like the MRC and the wheels are glued but come off easily and ou can use solder wrapped around the wheel for weight. *If you break the pin off of the universal joint on the driveshaft yoke just drill it out and run an extra bolt through it. (Found that one out the hard way.) *Ebay had 160mah batteries for around $10. I have one but haven't tried it out to see how much of a difference it makes. I hope that info helps some people out. Thanks for checking out my build. I'll post updates as I get more work done.:burnout: Last edited by nascarkeith; 11-29-2009 at 02:51 PM. |

|  |
| Sponsored Links | |
| | |
|
11-28-2009, 07:20 PM
| #2 |
| Pebble Pounder Join Date: Nov 2009 Location: The Great Northwest
Posts: 115
|
Very, very nice.....I wouldn't mind tryin to duplicate my 1st gen runner once mine finally arrives. I think yours looks great, even with the wheels/tires that are on it!!! Toss in the lights/grill, maybe tube up some bumpers/sliders winch.....oh wait sorry, those are my pipe dreams for my dream rig. But still, yours is pretty dang choice. Love toys AND Toys. |
|
| |
|
11-28-2009, 08:12 PM
| #3 |
| Quarry Creeper Join Date: Nov 2005 Location: Los Angeles, CA
Posts: 399
|
WOW dude that 4runner looks Bittchhin!! looks just like my old 1:1 4runner! im searchin around 2 buy that model! PLEASEEEE put more pics of the 4runner crawling n flexed out!!! Ooh nevrmind u butchered it lol. That 4runner body would of looked sicklkkkkkkkkkkkkkkkkkkkkkkkkkkkk just 4 that body I'm considering the micro! Last edited by yellowpasta2000; 11-29-2009 at 02:46 AM. |
|
| |
|
11-28-2009, 11:45 PM
| #4 |
| Rock Crawler Join Date: Jan 2007 Location: San Clemente, CA.
Posts: 531
|
Congrats on the first custom trail chassis. Nice course, also. What did your WB end up at in MM?
|
|
| |
|
11-29-2009, 10:59 AM
| #5 |
| Rock Crawler Join Date: Dec 2005 Location: Hawaii
Posts: 888
|
looks good. now build a rollcage to save your windshield frame from future rollovers.
|
|
| |
|
11-29-2009, 01:02 PM
| #6 |
| Quarry Creeper Join Date: Apr 2008 Location: Racine
Posts: 476
|
Nice looking 4-Runner. I'm trying to decide between that or a Blazer on mine. Thanks for the tips! Especially about flipping the tranny, that'll help. |
|
| |
|
11-29-2009, 04:28 PM
| #7 | |||||
| Rock Crawler Join Date: Jan 2007 Location: Tuscaloosa
Posts: 855
| Quote:
Quote:
Quote:
Quote:
Quote:
While I was watching a little TV from the DVR with the wife today I did a little T.V. tray tinkering. I fabbed up a roll cage and a little armor for the rear end. It still need a little sanding and paint but so far so good. 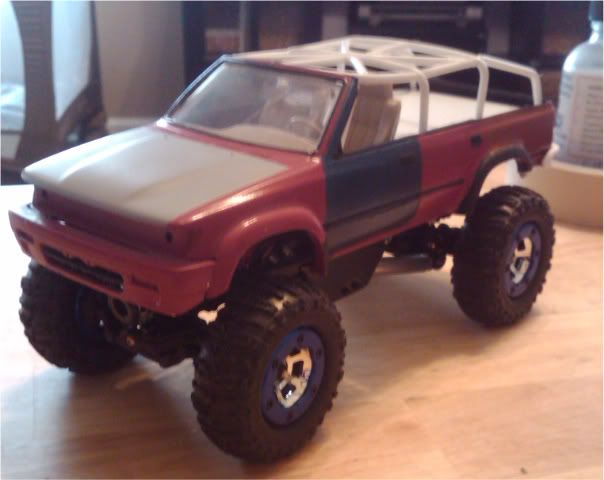 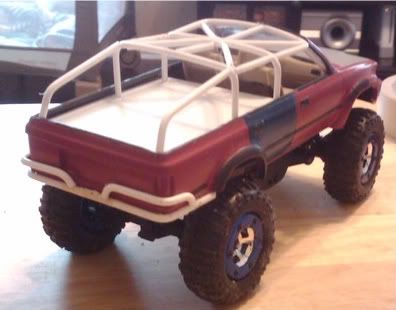 | |||||
|
| |
|
11-29-2009, 04:42 PM
| #8 |
| Adilynsdad too!   Join Date: May 2004 Location: G ville
Posts: 8,844
|
very cool styrene tube work
|
|
| |
|
11-29-2009, 04:58 PM
| #9 |
| Pebble Pounder Join Date: Nov 2009 Location: The Great Northwest
Posts: 115
|
Dang bro, did Poison Spyder do a cage for you??? Straight Pimp. And that rear bumper; lookin like a Badlands bumper... http://www.badlandbumpers.com/index_007.htm or at least close. Any pics of the build on the parts, maybe a how to? Yeah, I know, search.....lol
|
|
| |
|
11-29-2009, 05:49 PM
| #10 |
| Rock Crawler Join Date: Dec 2005 Location: Hawaii
Posts: 888
|
Looks awesome with the tube work, I wonder how top heavy would it be if the cage was done with piano wire. Guess I'll find out when I get mine, I'm either goin full exo runner or topless like yours.
|
|
| |
|
12-03-2009, 04:26 PM
| #11 | |||
| Rock Crawler Join Date: Jan 2007 Location: Tuscaloosa
Posts: 855
| Quote:
 Lucky for me my dad bought me my first model when I was about 8. I've been building them ever since and been scratchbuilding for about the past 7 years or so. Its a great hobby and a little cheaper than R/C. Lucky for me my dad bought me my first model when I was about 8. I've been building them ever since and been scratchbuilding for about the past 7 years or so. Its a great hobby and a little cheaper than R/C.Quote:
Quote:
Thanks for all of the responses folks! Here is a little UPDATE!!! I put the grill, headlights, and tailights in. When I was looking through the box for those I found a bull bar that fit the front and I thought it looked like a good simple match to the rear bumper. I was going to paint it black but in my haste I glued it on to see how it would look so I guess it will stay chrome and add to the mis-matched beater look.  I also painted the tube work, added a fuel cell, and found an exhaust that fit. I still need to paint the muffler silver and rust it up a bit. When I finished painting the tube work I did a wash with flat black to fill in the panel lines. After that, I masked off the area that the windshield wipers would cover and misted the whole rig with a light brown color to simulate dust. I hit the wheels and tires with a coat for now. The wheels will probably get a coat of black when I break them down to add some weight. 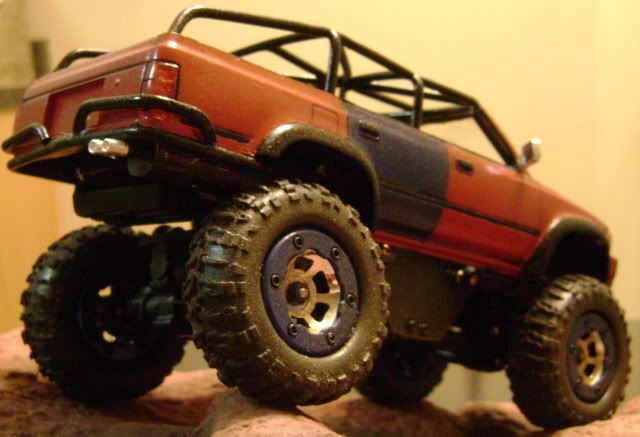 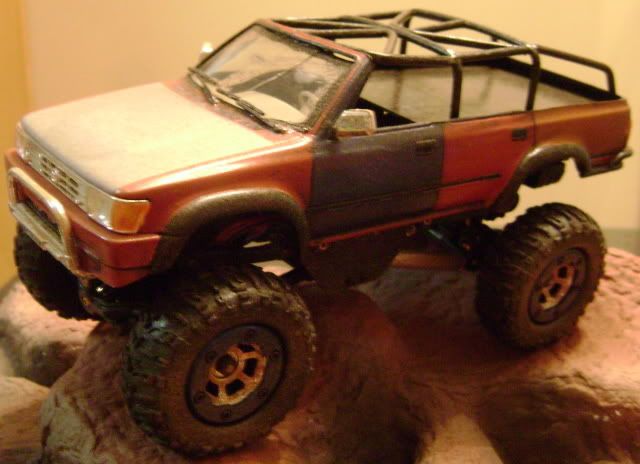 If you noticed the seats missing its because I pulled them to work on a better way to mount them. Last edited by nascarkeith; 12-03-2009 at 07:23 PM. | |||
|
| |
|
12-05-2009, 07:50 PM
| #12 |
| Rock Crawler Join Date: Jan 2007 Location: Tuscaloosa
Posts: 855
|
I had some time to work on the 4-Runner this morning. I pretty well got things finished up. I added some scale stuff, weighted, and painted the wheels. 2 wraps of solder in the rear and 3 wraps up front. Painted the wheels gunmetal and the rock rings black. 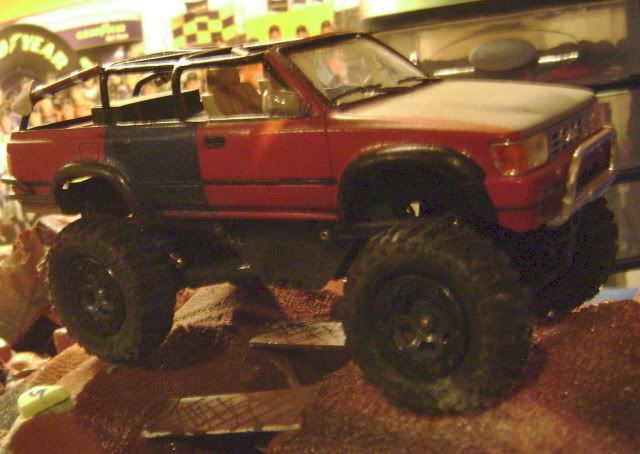 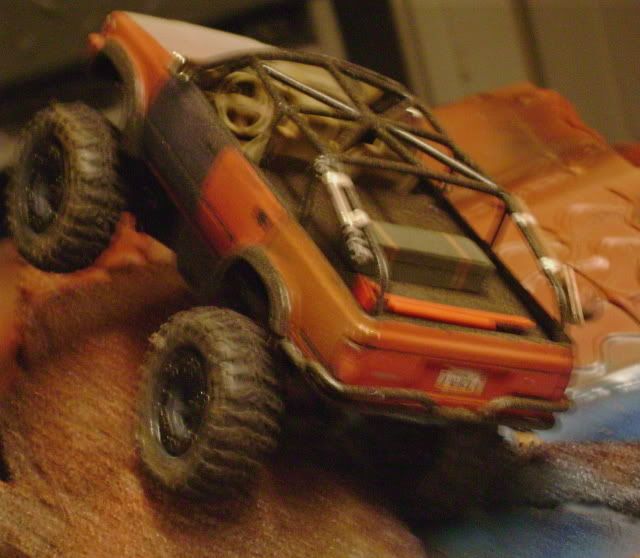 Unfortunately, I had a binding in the rear shocks. I took them off and noticed that a shock shaft was bent above the threads. I tried to straigten it and it broke. From what I have read it is a common problem. I had a Micro Desert Truck shock shaft that I was going to use but when I was trying to snap the ball end back on the ball it broke off in the ball end so now I'm running 3 shocks on the truck. Horizon is the only place that has the shocks in stock. They are $6.99 with $4.99 shipping. I hate it when you pay almost as much in shipping as you do for the part. Before I order does anyone have a better alternative? What about the 1/24 Radline oil filled shocks? |
|
| |
|
12-07-2009, 07:17 AM
| #13 |
| Rock Crawler Join Date: Jan 2007 Location: Tuscaloosa
Posts: 855
|
I got the shock issue fixed. I have seen where guys where using pony tail holders or hair rubber bands as some come them to limit the droop on springs without shocks so that gave me an idea. My wife was kind enough to give me a couple of her hair thingys so I was able to get the 4-Runner fixed up. I cut the hair band, tied a knot in the end, and ran it through an extra shock mount hole. I used the shock on the other side as a guide for length and tied the other end around the ball end. This way that side of the axle can only drop as far as the other side. Basically I just made a travel limiter. Its cheap and it works. 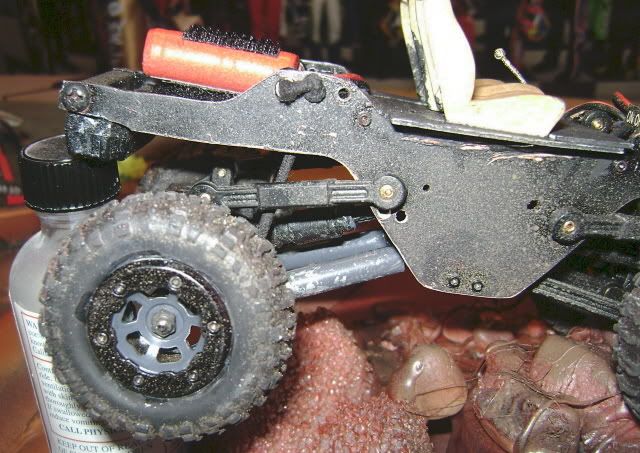 I still haven't had a chance to snap pics in the sunshine but here are a couple more that show the hi-lift and scale stuff a little better. 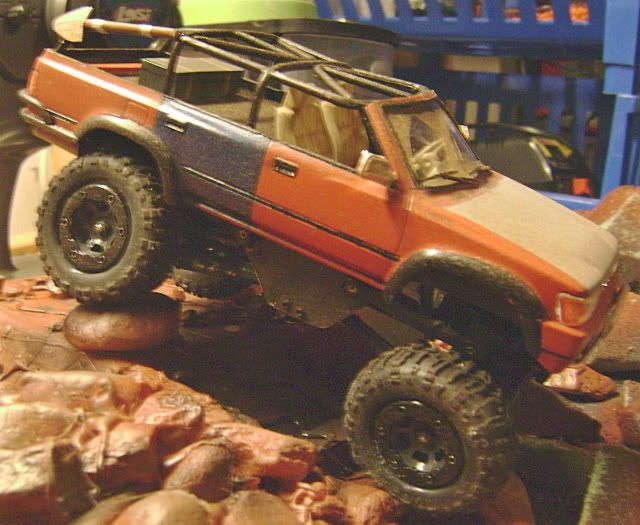  |
|
| |
|
12-09-2009, 07:16 AM
| #14 |
| Rock Crawler Join Date: Jan 2007 Location: Tuscaloosa
Posts: 855
|
I put together a short video of some work bench crawling on the course I built.  So far this little rig has been a blast. I look forward to seeing all of the aftermarket parts coming out. The only breakage I have had from driving is when I let it roll off of my workbench and had to catch it breaking off a mirror. A little super glue and it was good to go. The only other breakage was the shock and that was due to my clumbsy fingers.:( I still plan on getting some better pics of it in the sunshine but other than that it is pretty well finished up. What do you guys think? |
|
| |
|
12-09-2009, 07:41 AM
| #15 | |
| Quarry Creeper Join Date: Apr 2006 Location: 5280
Posts: 215
| Quote:
| |
|
| |
|
12-09-2009, 12:10 PM
| #16 |
| Newbie Join Date: Dec 2009 Location: USA
Posts: 2
|
Roll tide then an orange and blue 4runner?!? haha War Eagle! but really, awesome truck man.
|
|
| |
|
12-12-2009, 10:48 AM
| #17 |
| Rock Crawler Join Date: Jan 2007 Location: Tuscaloosa
Posts: 855
|
Thanks for the link mOOsE. I think I am just gonna run it with the droop limiters for now and see if some oil filled shocks come out. Portdogmc, its red with one orange panel and a few blue ones. You gotta run what you can find. Maybe I need to add a big SEC Champions flag on the back or something. 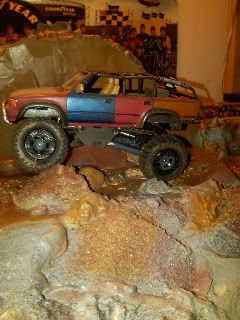 I wanted to get rid of the servo saver but I didn't have a servo horn that fit so I did a little redneck engineering with the stock stuff. 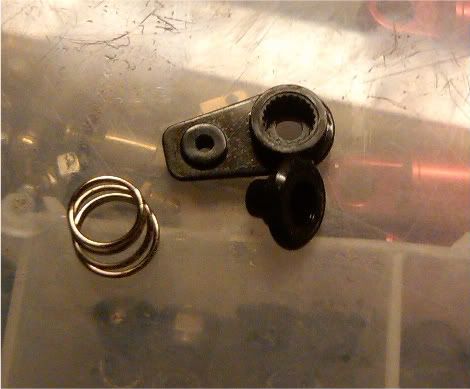 To remove the servo saver take the screw out of the front of the servo and then remove the spring, servo horn, and other plastic pieces. Toss everything aside except for the servo saver part that has the teeth on it, servo horn, and screw. Glue the v part of the servo saver to the matching part of the servo horn. Then, cut a little off the screw. When the glue dries reattach everything. |
|
| |
|
12-12-2009, 10:46 PM
| #18 |
| Quarry Creeper Join Date: Jan 2007 Location: Osaka, Japan
Posts: 425
|
So, in about 8 days, you took a truck that's fairly new to the market, made a custom chassis for probably under a dollar, fitted a body, and customized it into one of the nicer scalers I've ever seen. Great work, I can't wait to see what's next! |
|
| |
|
12-14-2009, 07:53 AM
| #19 | |
| Rock Crawler Join Date: Jan 2007 Location: Tuscaloosa
Posts: 855
| Quote:
So far the servo saver mod is working well. It doesn't hit stuff as quick and the super glue is holding up just fine. I've ordered an extra battery and some Mini-T ball ends so I can make some better links for the rear. I want to try and triangulate the top links a little more to get some of the axle sway out. I probably won't mess with the front links because the front suspension works really well as is. Guys who are using the bb's and no foam, is that a big grip improvement? I have read the threads where guys are doing this I guess I would just like to know how big of an improvement over foams is it? My front tires are spinning and not biting so I need to do something to get them to grab. I don't want to cut lugs just yet so I was thinking about adding some more weight and using bb's instead of foams. In that previouis post you see a small section of my new course. Here it is before paint.  I need to get some better pictures of the finished course and I'm still waiting for outdoor shots of the 4-Runner but it has been raining or cold for the past week. | |
|
| |
|
12-14-2009, 12:47 PM
| #20 |
| Rock Crawler Join Date: Mar 2009 Location: Cottontown
Posts: 880
|
I filled the entire channel with copper wire Super small size, I think its 24 gauge... at any rate. I pulled the foam out of the dront, and left the rears alone... worked like a charm. |
|
| |
 |
| Thread Tools | |
| Display Modes | |
| |


 Linear Mode


