| |
| |||||||
 |
| | LinkBack | Thread Tools | Display Modes |
 10-03-2019, 10:26 AM
| #1 |
| Let me 3D Print that...  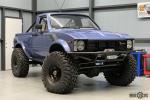 Join Date: Jun 2007 Location: Concord
Posts: 315
|
This is sort of a catch up thread if you will. Already posted this elsewhere, but since this is about the most active micro crawler forum anywhere, I figured I should contribute. I'm a fan of small scale and micro sized RCs. Still have two Losi Mini Rock Crawlers and a Losi Micro Rock Crawler. There have been many designs that have come and gone with varying levels of success. When Axial announced the SCX24 platform and posted pictures, it grabbed my attention right away. Obviously, the Deadbolt body was a good choice. I was also drawn to the chassis and drivetrain. They were both simple and scale appearing at the same time. I felt like it had a lot of potential...so I ordered one immediately once they came in stock.  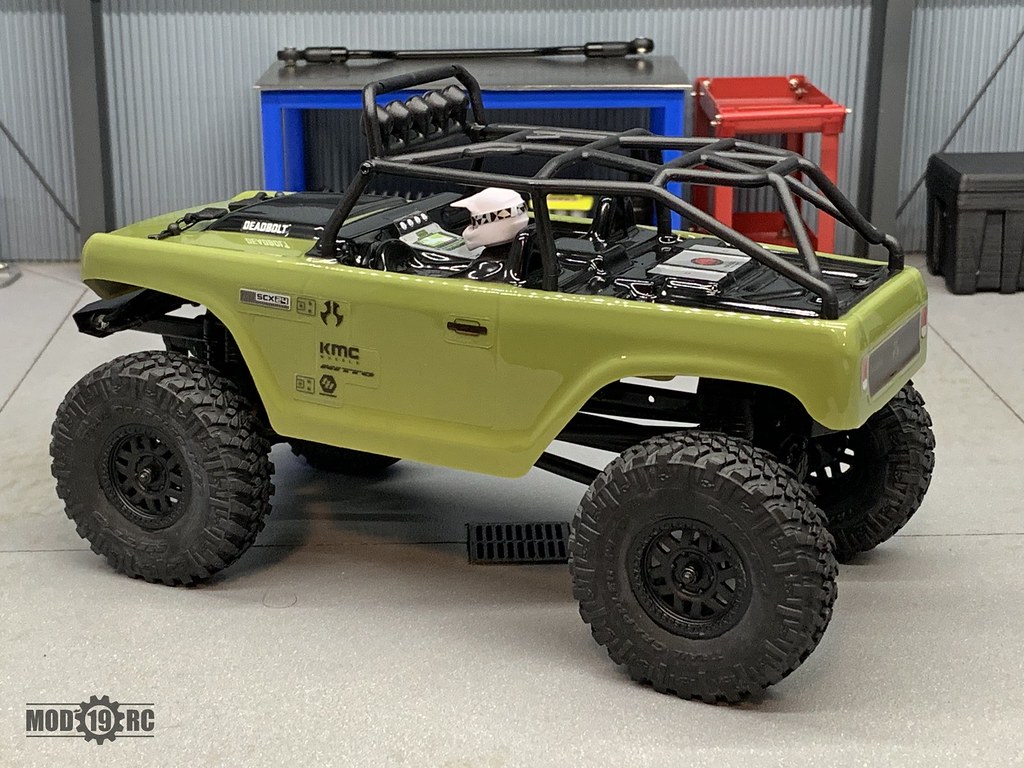 Is this not the cutest flex Friday pose ever? ...Fight me!  Once I got it, I was impressed. I feel like they got so many things right on the chassis overall, and it drives really nice. Of course there are plenty of areas that can be improved or modified, and I am not one to just leave things alone. From my perspective, there are only two areas where I think they missed the mark a little. The first was the steering linkage. A simple design flaw, ended up giving it a lot of slop that wasn't needed. Second, I think they should have worked on getting the electronics and battery a bit lower to improve the CG. With that in mind I am going to start tackling some of that stuff. The first thing I did was design a different steering linkage for it. I was able to use all the factory hardware and basically eliminate any slop in the system. I think it looks a little nicer as well.  A little video demonstrating the difference: https://www.youtube.com/watch?v=e7Bi45gbh9w The next thing I did was to design up a new roll cage. I wanted to change the look to be more of a "rock buggy" style and I wanted to shave some weight from up top. I was happy with the results on both fronts. The new cage weighs 3 grams compared to the stock 9 grams.   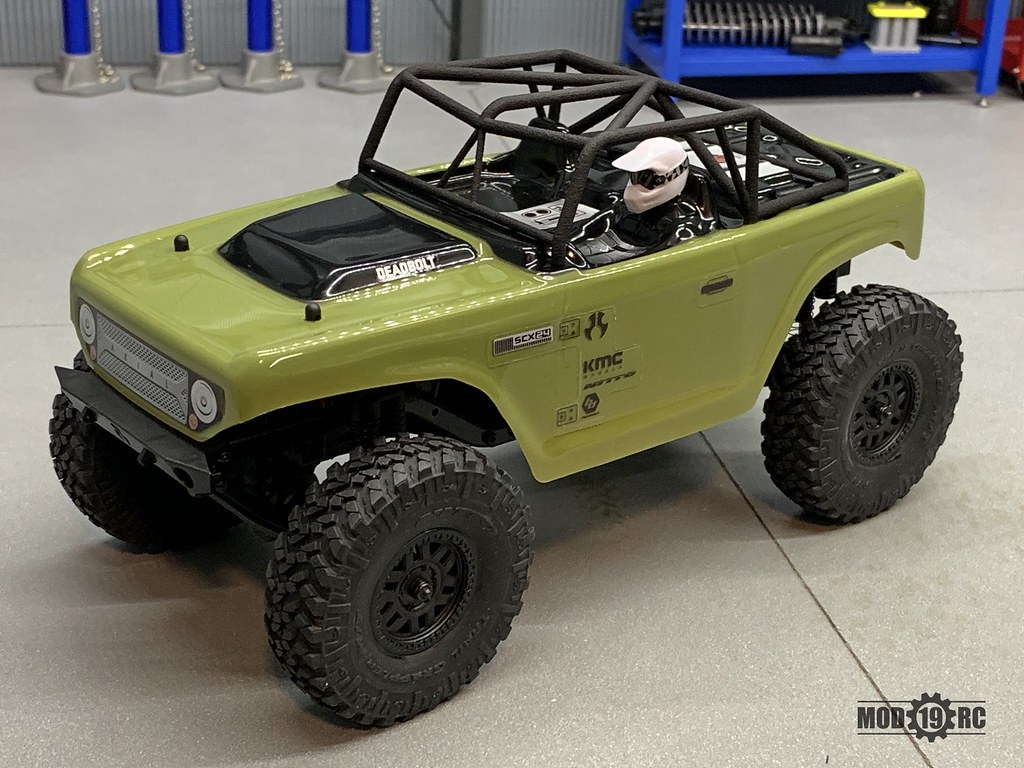 Next I am going to be addressing some of the weight issues on the chassis itself. |

|  |
| Sponsored Links | |
| | |
|
10-03-2019, 10:27 AM
| #2 |
| Let me 3D Print that... Join Date: Jun 2007 Location: Concord
Posts: 315
|
OK...I lied about what's next. I'm not a big fan of green or red, but do like the Deadbolt body. So I painted up a new one. I was a little surprised that the body didn't come with any overspray film, so I had to jump into the way back machine and tape it all up on the outside.    That's better. I still need to paint up the driver a little, but I am happier now. |
|
| |
|
10-03-2019, 10:28 AM
| #3 |
| Let me 3D Print that... Join Date: Jun 2007 Location: Concord
Posts: 315
|
Got it all back together along with another upgrade. I went with a set of Gearhead RC aluminum wheels. They look great, add a reasonable 4mm to the track, and also add 6 grams of weight to each corner in the ideal location. Ready to hit the mall!     Being back together as a cohesive machine will be short lived though...I have a micro sized mountain of 3D printed parts inbound from Shapeways. |
|
| |
|
10-03-2019, 10:29 AM
| #4 |
| Let me 3D Print that... Join Date: Jun 2007 Location: Concord
Posts: 315
|
Next order of business: Who doesn't love sliders? I designed up a set that works with the stock body and are 3D printed through Shapeways.  They attach using 3 existing screws on each side of the chassis.  I kept the look clean and simple overall. The body is already a little wide as it is, and I didn't want to have them end up sticking out past the wheels.  It will slide...  |
|
| |
|
10-03-2019, 10:30 AM
| #5 |
| Let me 3D Print that... Join Date: Jun 2007 Location: Concord
Posts: 315
|
Time to move on to the important bits to lower the CG. I mostly understand why things get designed a certain way, and almost all design has to have various compromises, so I try not to be to critical on what manufacturers produce. I think the biggest area that the SCX24 could use some help is in lowering the height of the electronics. In this post I'll talk about two separate approaches for the battery location. Approach 1 is to use the stock battery. Some folks are taking the battery and wedging it in front of the gearbox and moving the ESC/RX to the back. That takes a good bit of modding and the ESC/RX doesn't fit between the rails without forcing it. Between the servo, ESC/RX, and front bias of the transmission, even with the battery towards the rear, there is still front weight bias. (I need to record the numbers for comparison). With that in mind, I decided to design a battery tray that fits the stock battery, retains the velcro strap, and keeps it shifted forward as much as possible. The tray reduces the height by nearly 5mm and sets the battery right on top of the motor.  The advantage to this approach is that I wouldn't need to buy a new battery or alter any wires to make it all fit. Kind of the easy button method. Approach 2 is to ditch the stock battery and find something that can be placed better. In my search I was able to find these Beta FPV 2s 350 mAh batteries on Amazon. https://www.amazon.com/BETAFPV-Batte...-1-spons&psc=1 With this configuration of battery, I was able to design a tray that fits down between the frame rails as low as possible without interfering with the driveshaft or rear suspension at full compression. 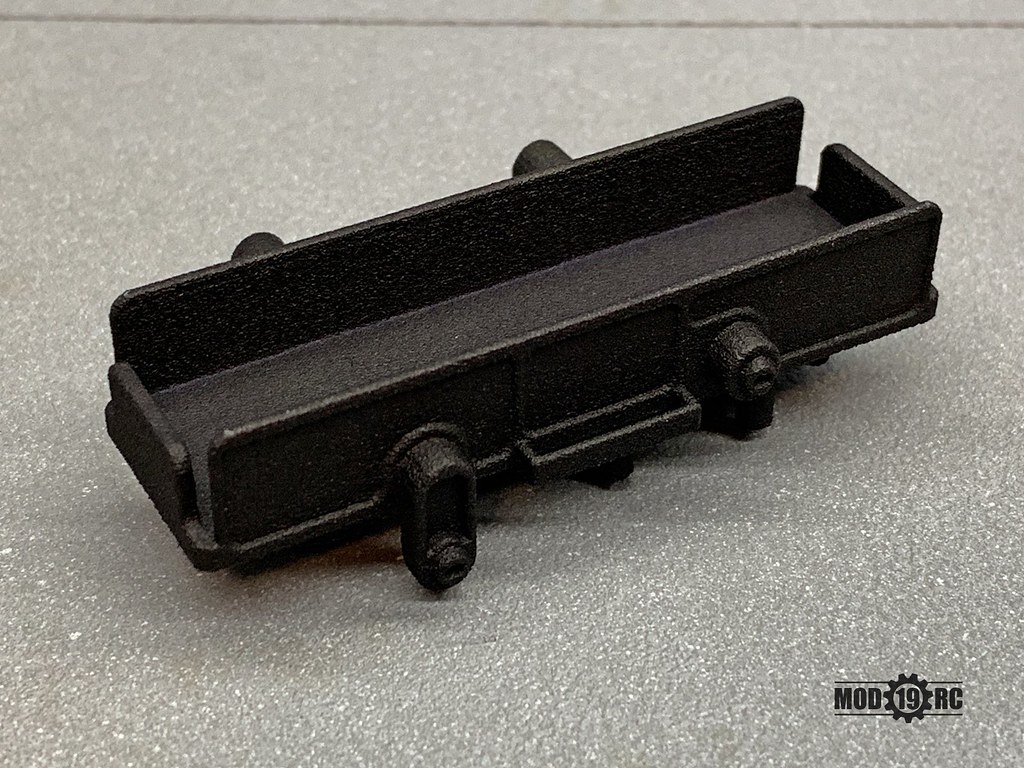    The upside is that this is about as low as you can get a battery in the chassis, but the compromise is that you have to buy a different battery and either have to make an adapter for plug or re-solder the correct plug on the battery to work with the ESC/RX. For me that is not big deal, but others might not want to have to do that. You may notice in some of the pics that I am also working on a mount for the ESC/RX that brings it much lower to the chassis. I'll talk about that later, as I am still finalizing some design and fit challenges to make it all work like it should. |
|
| |
|
10-03-2019, 10:31 AM
| #6 |
| Let me 3D Print that... Join Date: Jun 2007 Location: Concord
Posts: 315
|
This next mod (4 actually) took a little more time to get just right. I've been trying to design all the mods to utilize the stock parts of the SCX24 as much as possible so there isn't a scavenger hunt for required extras. The stock ESC/RX unit sits pretty darn high on the stock chassis. The main reason is to achieve full travel with the stock suspension. After playing around with it in CAD, I was able to figure out a way to drop it 9mm, all the way down to the frame rails. I simply needed to push the front axle forward 2mm. The hard part wasn't so much designing the parts, but getting the fit up of everything correct using the design guidelines that Shapeways provides for the material. After a couple of test prints, I was happy with the result. This 3D printed bundle of parts is four mods in one!   Prepping the parts is easy. 1) Separate and trim the sprues with some flush cutters. 2) Use a sharpie to hide the white bare plastic parts. 3) Use a 1.1mm drill bit to clean out the screw holes. There is always a little bit of residual unsintered powder in there.  The stock pivot balls get transferred from the front lower links and wishbones to the new parts.   You may have also noticed that there is a relief cut into the wishbone upper link. Many folks have reported that the driveshaft rubs there on the stock truck. This helps eliminate that issue. Here it is all back in the chassis. The integrated shock mounts match the rear with four mounting locations for the shocks. The stock location is the 3rd hole from the top. This should give some nice adjustment options or facilitate the use of longer shocks to win Flex Friday.   The SLS Nylon that Shapeways uses, despite being a pretty great material overall, doesn't like to stick to double sided tape that well unless painted, so I decided to incorporate some clips to hold the ESC/RX in place instead.  The comparison to stock is pretty noticeable. In addition to lowering the CG overall, it should give a little more clearance for mounting scale bodies.  |
|
| |
|
10-03-2019, 10:32 AM
| #7 |
| Let me 3D Print that... Join Date: Jun 2007 Location: Concord
Posts: 315
|
Next up was up-sizing the steering servo. The stock unit works well on the stock truck. I noticed as soon as I added the heavier wheels that the servo saver was struggling to give me full travel. I have heard others say that they are burning them out once they start modding the trucks as well. I shopped around for what was available and ultimately decided that the Emax ES08MAii was the best choice. Only slightly larger, more power, and metal gears for $10 seemed like a good buy. I designed up a mount for it since the stock one was not sized correctly in some critical areas.     Even with the 2mm extended wheelbase, it clears the stock bumper at full compression.  |
|
| |
|
10-03-2019, 10:33 AM
| #8 |
| Let me 3D Print that... Join Date: Jun 2007 Location: Concord
Posts: 315
|
I like the stock shocks on the SCX24. They have a nice, soft spring rate and a reasonable amount of travel. I guess for this truck and how I want to build it, it seemed like it needed a little more travel and some adjustability. I decided to give these Hobby Plus CR24 Aluminum shocks a try.  For $20 it was worth a try. While not oil filled, they are pretty nice. Right away, I hit a couple of snags. The biggest was that the lower ball cup on the shock was larger than the SCX24 (4mm vs 3.5mm). The other issue was that I felt the spring rate was a little stiff for a truck running the lexan body. They might work ok with a hardbody build though. After weighing my options, some surgery was in order. I took the stock shocks apart, drilled the blind hole out to 1.6mm, grabbed the stock springs, and transplanted all that to the CR24 Aluminum shocks.  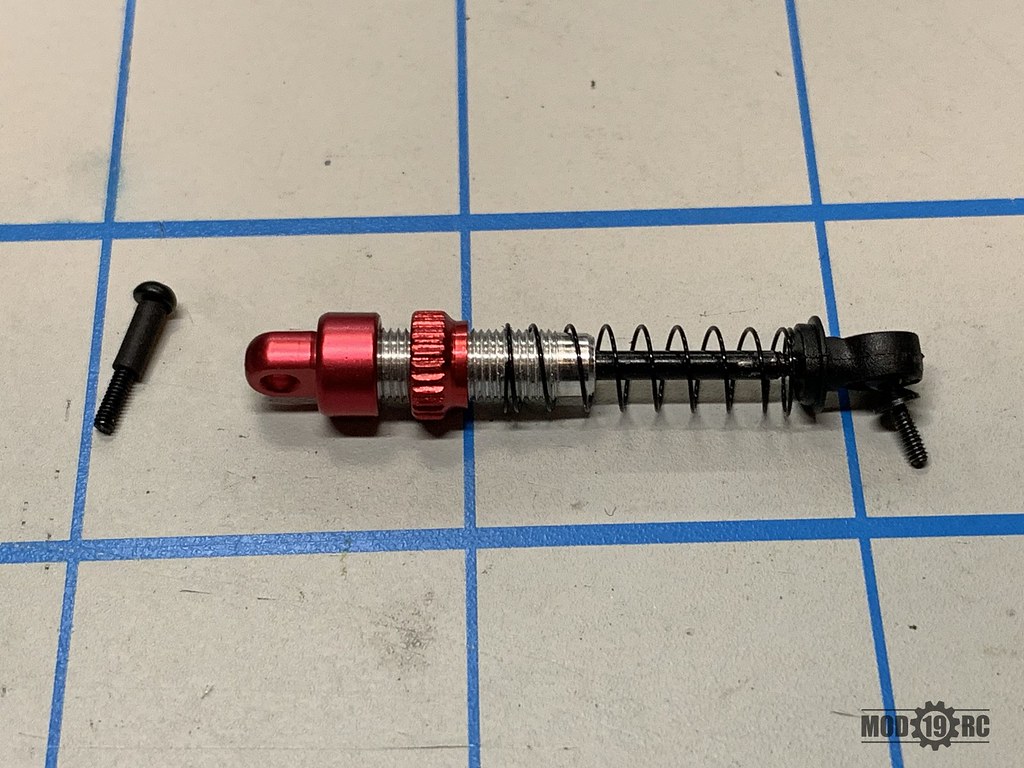 For the top mount, I shrunk a 5mm long piece of heat shrink to a M1.4x10mm screw. That removed enough just enough slop, but still let the shock float enough for smooth travel throughout the range. They mounted right up to the chassis using the taller shock towers...almost as if I had planned it.    Man, I wish I had a 1/24 scale can of Monster right now! Look at that FLEX!  Anyway...Friday can't get here soon enough! :laughing:    Once I find them in stock somewhere, I think I am going to give the Charisma oil filled micro shocks a try. Similar price point, just need to see how they mount up. |
|
| |
|
10-03-2019, 10:53 AM
| #9 |
| Pebble Pounder Join Date: Sep 2018 Location: Canada
Posts: 163
|
Those are some sweet designs you made  What CAD software you use for those? I wish I could get my 3D printer to print quality like that without purchasing a new multi thousand dollar printer. What CAD software you use for those? I wish I could get my 3D printer to print quality like that without purchasing a new multi thousand dollar printer. The SCX24 looks so good with the sliders and the stock body! You plan on keeping the ESC/Receiver combo? |
|
| |
|
10-03-2019, 06:14 PM
| #10 |
| Let me 3D Print that... Join Date: Jun 2007 Location: Concord
Posts: 315
|
Thanks. I use Solidworks mostly. I wish mine would print that well also. For now I am going to use the stock ESC/RX combo on this one. I have a micro receiver that is compatible with my Sanwa MT-4 that I am looking to try out along with a 10A micro ESC. They are going in one of my Micro Shark builds. |
|
| |
|
10-04-2019, 03:33 AM
| #11 |
| Pebble Pounder Join Date: Dec 2013 Location: NorCal
Posts: 170
|
This build is awesome. Totally makes me want to do more to mine. And now, I might..... You are mod19rc? Ha, I just ordered the draglink and cage. |
|
| |
|
10-04-2019, 07:41 AM
| #12 |
| Let me 3D Print that... Join Date: Jun 2007 Location: Concord
Posts: 315
|
Thanks. It's a great platform that I think will be around for at least a while. Yes, Mod19RC is me.
|
|
| |
|
10-04-2019, 09:49 AM
| #13 |
| Pebble Pounder Join Date: Dec 2013 Location: NorCal
Posts: 170
|
Sweet..... Bought some #57 drill bits  |
|
| |
|
10-05-2019, 01:53 PM
| #14 |
| Rock Stacker Join Date: Feb 2006 Location: Williamstown
Posts: 98
|
Awesome thread to show off your parts. Love the parts I have so far for mine just waiting on a resolution from shapeways on my shark chassis so I can do a thread.
|
|
| |
|
10-05-2019, 10:43 PM
| #15 |
| Pebble Pounder Join Date: Dec 2013 Location: NorCal
Posts: 170
|
you are going to make me spend way too much $ on this thing....... and the blue body is awesome! |
|
| |
|
10-06-2019, 02:06 AM
| #16 |
| Quarry Creeper Join Date: May 2019 Location: North Highlands
Posts: 483
|
I did the exact same thing with my shocks. I'm not to happy with the mod though. The Hobby Plus shocks are starting to stick. Getting ready to try to fit the Carisma shocks. I like the steering linkage, I think I'll be ordering that up here shortly. How does it hold up? . Last edited by punkindrublik; 10-06-2019 at 02:16 AM. |
|
| |
|
10-06-2019, 10:00 AM
| #17 | ||||
| Let me 3D Print that... Join Date: Jun 2007 Location: Concord
Posts: 315
| Quote:
Quote:
Quote:
 Quote:
I think it holds up well. It's more rigid than the stock parts. | ||||
|
| |
|
02-15-2020, 02:42 PM
| #18 |
| Newbie Join Date: Feb 2020 Location: San Francisco
Posts: 7
|
I've been looking at your shock mounts on shapeways. I just got some carisma shocks and was wondering if you thought it was possible to drill the holes out to fit the larger screws?
|
|
| |
|
02-15-2020, 06:23 PM
| #19 |
| Let me 3D Print that... Join Date: Jun 2007 Location: Concord
Posts: 315
|
Someone posted not long ago on how they adapted the stock upper and lower shock mounts to the Carisma shocks. That would probably be a better bet.
|
|
| |
|
04-10-2020, 08:47 AM
| #20 |
| Moderator   Join Date: Sep 2008 Location: PA
Posts: 13,935
|
That is an awesome looking rig. I love the blue. It looks great with those shiny GearHeads and the red shocks.
|
|
| |
|
 Mod19RC SCX24 Deadbolt Build - Similar Threads
 | ||||
| Thread | Thread Starter | Forum | Replies | Last Post |
| Axial SCX24 deadbolt epic dusk run | shenlonco | Scale Videos! | 0 | 07-25-2019 07:40 AM |
| RESTOCK!!! Axial Racing SCX24 Deadbolt 1/24 Scale 4WD RTR! | RPP Hobby | RPP Hobby | 0 | 06-21-2019 01:24 PM |
| Axial SCX24 deadbolt special test..... | shenlonco | Scale Videos! | 0 | 06-17-2019 01:44 PM |
| Axial SCX24 deadbolt first run! | shenlonco | Scale Videos! | 0 | 06-07-2019 04:51 PM |
| IN-STOCK NOW the Axial Racing SCX24 Deadbolt 1/24 Scale 4WD RTR! | RPP Hobby | RPP Hobby | 1 | 05-29-2019 04:16 PM |
| |


 Linear Mode


