| |
 02-18-2020, 04:18 PM
| #1 |
| RCC Addict Join Date: Nov 2017 Location: Austin Texas
Posts: 1,615
|
I guess I've done enough things to my scx24 at this point to warrant it's own thread. Actually I haven't done much performance-wise but combined with some aesthetic changes, here we are! Overview/ one guys perspective: There's no need to go crazy with this rig in order to have a very fun little crawler. Shocks/ springs and steering servo are obviously weak points... especially if adding much weight to this rig. Obvious issues are with the foam-less stock tires as well as with the overall weight of the vehicle but again, hard to add weight if keeping stock springs/ shocks. As of now, planned mods will ( or 'would' depending on aftermarket support) include: Shocks, springs, aluminum tie-rod, aluminum upper/ lower links ( stock length), brass steering knuckles, and aluminum axle-housings. First up are the performance-based mods that I've done so far: > RC4WD Classic 8-hole 1.0 bead-lock wheels > RC4WD Goodyear Wrangler MT/R 1.0 tires > Hot Racing brass diff covers ( painted black) > Hudy graphite grease on worm gears > EMAX ES08MDII 13g digital metal-gear servo plus ( 2) guitar string ball-end spacers ( approx 3mm) and ( 2) 11.33mm mounting screws >Ovonic AIR 450mAh 50C 2S lipo > O-rings ( 1 between drag-link & tie-rod/ 1 at each end of tie-rod at the steering knuckles) 3 total Next are the aesthetic mods that I've done ( including some Lego parts!): > Lego Scratchy figure head attached to generic Lego shoulders ( E6000) > Lego rear taillights/ reverse lights ( non functional/ E6000) > Lego generic side-view mirrors with mirror inserts cut to fit ( E6000) > Lego center console "cup holders" and axe-mounting bracket ( E6000) > Lego axe ( Cause Scratchy gotta have an axe/ Snaps into Lego bracket pieces) > Push-pin stick shift ( E6000) > 327 metal badge on hood ( Gorilla Glue adhesive spray) > Interior paint (Krylon satin black- textured) > Inside of body paint ( Krylon Fusion black) > Bumper fog-light removal > Roll-cage upper hoop/ light protector removal > Self-adhesive reflective tape applied to factory roll-cage lights & headlights > Fabricated aluminum door handles and tailgate handle ( Gorilla glue spray adhesive) > Gear Head RC 1/10 Toyota vinyl graphics ( cut/ modified for scx24 application) > Fabricated thin plastic plate to fit inside body in order to hide rear taillights/ reverse lights ( E6000) > White nylon servo arm painted black ( Krylon Fusion) Now onto some pics: In this pic you can see the rear body plate that hides the tail-lights/ reverse lights...  This pic is to show the guitar string ball-end spacer on the drivers side...  Here you can see the blue o-rings, the front painted HR diff cover, and the painted servo-arm ( more legit-looking than the bare nylon was)...  The 327 metal emblem...  The door handles were more of a PITA than I had expected... so small...  Really happy with the rear-end... Lights and tailgate handle came out well. I had used various decal-type stick-on lights but nothing "popped" like these did. More fun times getting these installed lol...  Pic showing the axe and mounting bracket...  Here you can see the stick-shift and how the interior satin texture came out...  This pic shows the one of a kind hood decal as well as the pass side Lego mirror... really happy with the look of the graphics. I also like that the black paint backing made the green a nicer shade than it was...       |

|  |
| Sponsored Links | |
| | |
|
02-18-2020, 05:38 PM
| #2 |
| Pebble Pounder Join Date: Jan 2020 Location: Kent, UK
Posts: 105
|
Love it, I also used a Lego head and shoulders as driver in my crc jeep.. but apart from driving over, that is the only Lego idea I had... Element Sendero 1/10. Crawler/Trailer. Scx24 crc. Crawler 1/24. Wltoys a212. Shortcourse 1/24. Wltoys k969. Drifty 1/28 |
|
| |
|
02-18-2020, 07:48 PM
| #3 |
| Rock Crawler Join Date: Jun 2018 Location: Orange County, CA
Posts: 711
|
Excellent work! Looks great! Very one off. Well done! Sent from my iPhone using Tapatalk |
|
| |
|
02-18-2020, 11:38 PM
| #4 |
| RCC Addict Join Date: Nov 2017 Location: Austin Texas
Posts: 1,615
|
I thought it might be kinda cool to add the Simpsons theme to this rig... fortunately I've got a meager bin of Lego parts that I was able to pick through. Thanks for taking a look, guys. I've gotten a lot of motivation and inspiration here on rcc. Very much enjoy seeing everyone's unique directions on these little rigs.
|
|
| |
|
02-19-2020, 12:34 PM
| #5 | |
| I wanna be Dave  Join Date: Jan 2006 Location: Corruptifornia
Posts: 12,107
| Quote:
X2, love the Scratchy head that you bolted on and everything else is tastefully done and nice scale details! Those tires seem like a great option too! What paint did you use on the HR brass differential covers? | |
|
| |
|
02-19-2020, 12:53 PM
| #6 |
| RCC Addict Join Date: Nov 2017 Location: Austin Texas
Posts: 1,615
|
Krylon MAXX satin black and thank you, Nate. I appreciate the kind words.
|
|
| |
|
04-24-2023, 12:28 PM
| #7 |
| RCC Addict Join Date: Nov 2017 Location: Austin Texas
Posts: 1,615
|
Part 1: Been a while but I started back into the Scratch-E built rig a few months ago and have it finally completed ( for now). I did some bolt-on/ mechanical mods ( Part 2- After this post) but also wanted to take another step up in the aesthetic department. I'm very happy with how things turned out despite the absolutely tedious and time-consuming work of getting the body to where it is now. I never hated the Deadbolt body but realized that if it was going to have a "better" scale appearance, that there was work to be done. So along with the things that I already did: taillights, brake-lights, door handles, tailgate handle, side-view mirrors, gearshift, 327 badge, graphics, etc... I decided to tackle a few more things. Up first was to take on the front end. I hated the Axial decal grill & headlights, so after peeling that off I had a clean slate. Decided to use orange translucent pieces for the marker lights/ turn signals and some 9mm Googly eyes from the craft store for the headlights. I like that the front orange Lego lights match the rear red and clear Lego lights. The grill is cut from a metal vent panel that I pulled out of an old MRC charger. The "bulbs" inside the headlights are plastic faux diamond dealies from a craft store and they are backed with a chrome/ mirror finish. The job was a royal pain and took a LONG time to complete due to many challenges, mock-ups, changes, etc... but very happy with how they turned out. Note- All lights non-functional.     Next was to replace the stock light-bar up top. I never liked it and although I tried a few different decal materials... white, yellow, black, and reflective... I just didn't like any of em and figured I just needed to get rid of it. I happened to have in my plastic parts bin, the same exact diameter plastic tube as the cage, so installation went pretty smoothly. MUCH cleaner and better-looking now imo. 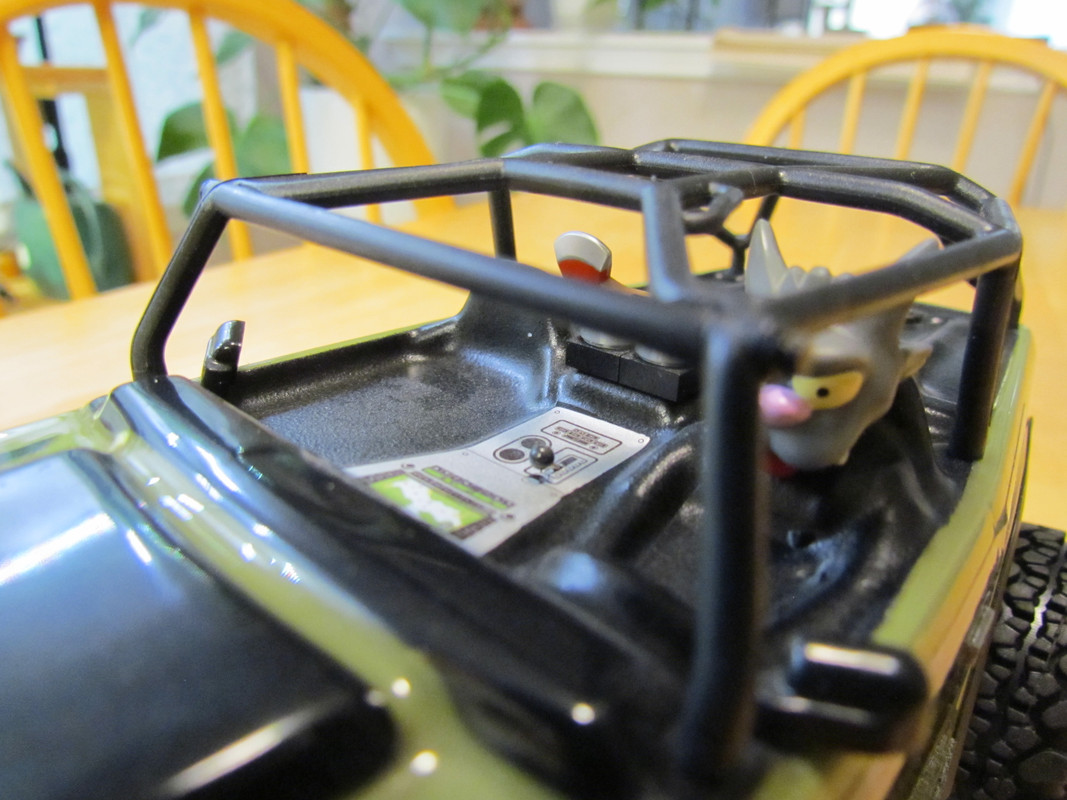 Now it was time to complete the front end with a proper aluminum bumper. I had bought another one that I liked better but returned it ( stinger type) due to my fear that where the stinger attached to the bumper was a weak spot... crappy quality. Otherwise I would've rather done the stinger. But all in all I'm happy with this one. Has a useless hawse fairlead cut out in it that won't be used but not a huge deal and I can live with it. Not much was done to the bumper although I did sink some 3mm lights in the holes to give it a more finished look ( nonfunctional). Also the shackles were that goofy red anodized so I painted those with regular red... looks good to me. 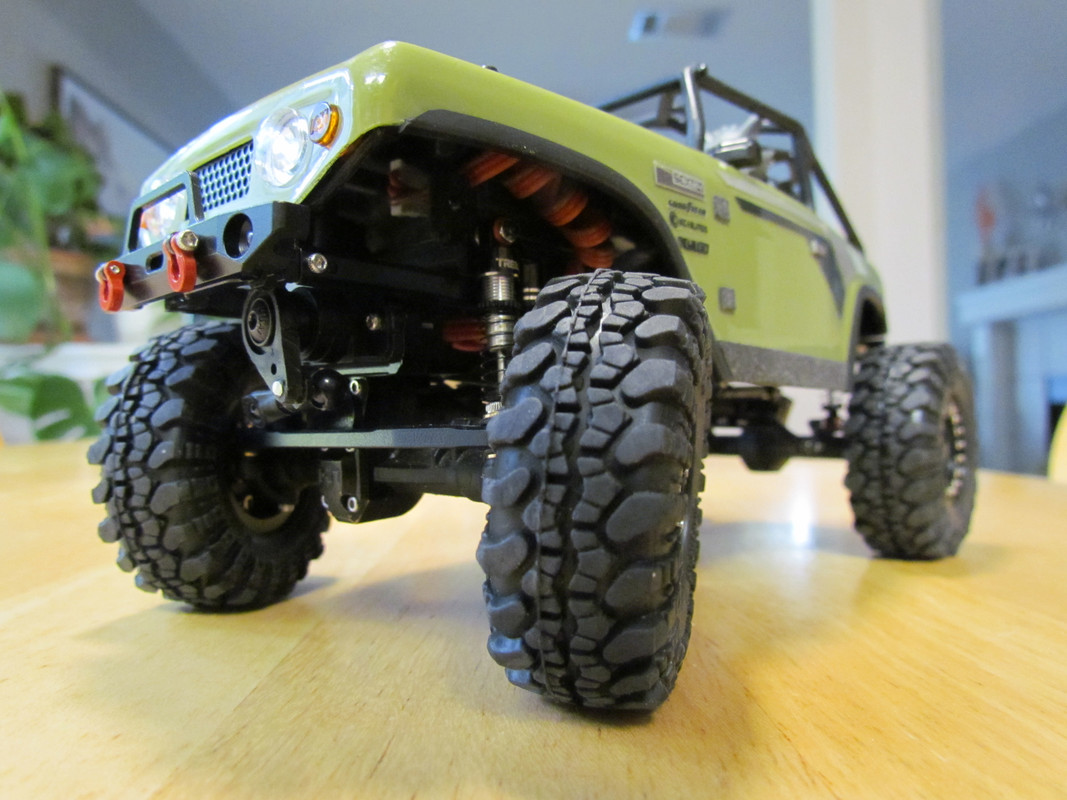 I looked for a long time for a rear bumper but never found any that I liked that would actually fit with the Deadbolt body or tie in naturally. Instead, I used the Axial stock front plastic bumper and modified it to fit the rear ( mounted to the body not the chassis). I like the low tight profile against the body and the ends that extend and angle to protect the rear corners. I also installed 3mm lights ( nonfunctional) to match the front. Looks great aside from the Axial logo on it lol. I need to add some rear shackles to it at some point but otherwise I'm loving the finished look of the rear-end now. 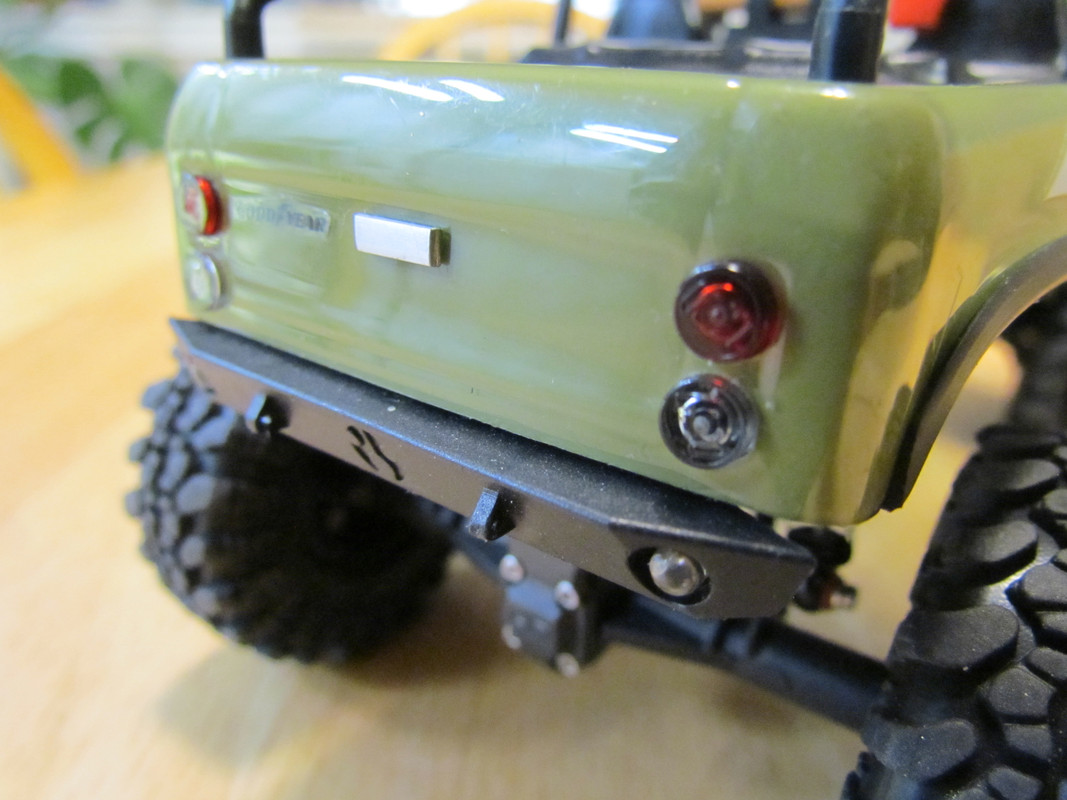 Onto the door hinges. I hated the decal hinges and wanted to continue the theme of adding more three dimensional accessories as apposed to flat stickers. This was a huge painstaking process because I had so many different versions.. aluminum, stacked stickers, plastic, etc. All of them looked either too thick, too thin, too large, too out of place, etc. Figuring out how they would attach was quite an issue as well. So this was the best solution and I wish I hadn't wasted so much time on all the other versions. These are 3M Safety Step material that are used for stair-treads. I had to sand them down as they were too thick and way too abrasive for such a small scale. But after sanding, the look was perfect.. just like a Rhino or Line-X appearance. I was so happy with the hinges that I used the same thing for the rocker guards. Extremely happy with using this 3M material and the adhesive is super strong.  The final aesthetic mod was a nail-biter but one that this Deadbolt body needed desperately... fender flares. This is a rubber 'C' channel that I've had for years ( can't find it anymore unfortunately). It's the perfect width at just a hair over 3 mm. What made it so tricky to install was that I needed to use a 10 sec cure thick CA. Trying to get each flare slid into place without any CA squishing out or drying before the flares were in place. I'm not sure that I breathed at all during each of the four installations lol. Extremely satisfied with how they came out.  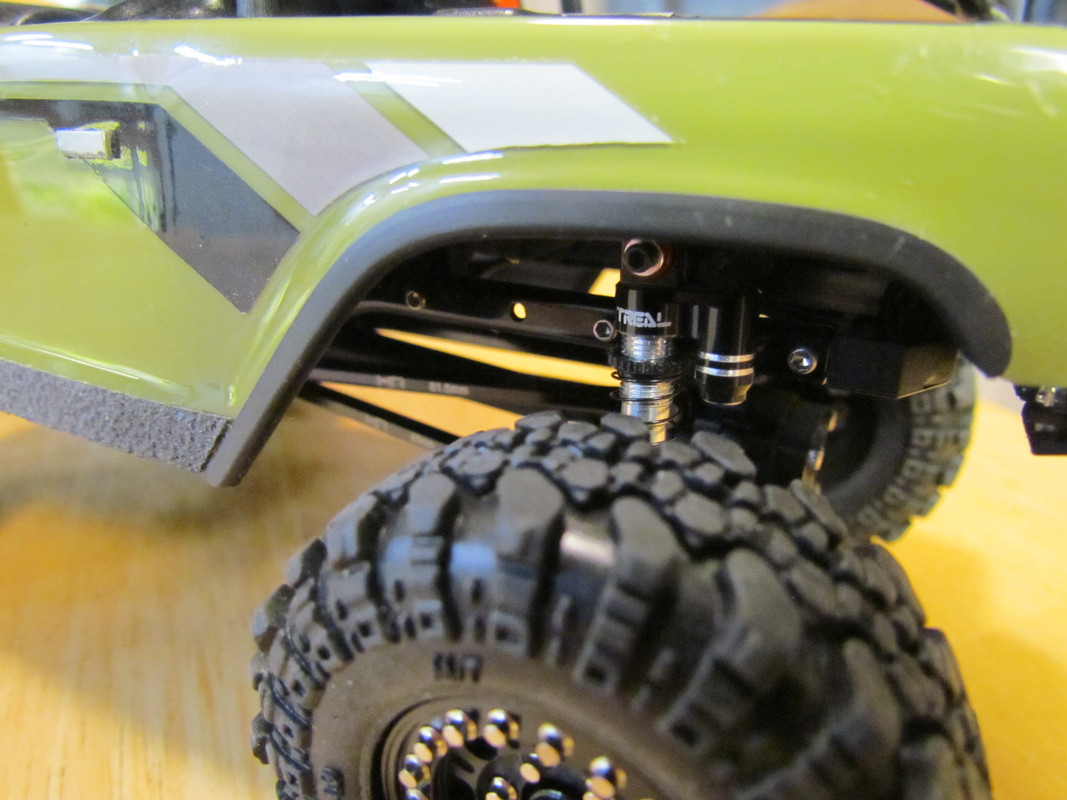 Last edited by high plains drifter; 04-24-2023 at 12:42 PM. |
|
| |
|
04-24-2023, 01:53 PM
| #8 |
| RCC Addict Join Date: Nov 2017 Location: Austin Texas
Posts: 1,615
|
So onto the list of mechanical/ bolt on mods... Hobby Park- Brass wheel hexes ( 8g ea.) Fabricated- hexagonal hex pins ( cut from Allen key) Injora- M2 wheel nuts RCAWD- CVD front axle shafts Treal- 32 mm aluminum threaded shocks Aimrock- Aluminum front bumper & shackles Hot Racing- High clearance links Hot Racing- Stainless steel motor plate Hot Racing- 66t motor ( with 11t gear) Samix- Aluminum steering link ( tie-rod only) Fabricated- Heavy duty adjustable drag-link Hobby Soul- 1.0 Beadlock wheels/ tires ( 55.5 mm x 20.4 mm) Bluebird- BMS 373MG digital servo ( 25 spline/ 22 oz @ 4.8v/ 28 oz @ 6.0v) I'm extremely happy with the Bluebird servo. I had upgraded the stock servo to an EMAX ES08MD a while back but had the Bluebird on hand so I decided to shoehorn it in there for a bit more torque and end-point travel. I did have to fabricate some inserts and 'tiny' plates to mount it since the mounting holes are larger than the typical micro servos but aside from that, install went smoothly. I also had to use a much more robust and larger horn due to the 25 spline and that presented a clearance issue with the front bumper mounting bracket but with some shaving of the bracket it fits.    The Samix steering link is a great upgrade over the flimsy stock plastic parts ( especially with a more powerful servo) but I decided to only use the tie-rod portion and scrap the drag-link in order to make my own adjustable drag-link out of threaded rod and heavy duty ball cups/ ends ( Associated throttle linkage for nitro). Would be nice if someone ever made an adjustable tie-rod portion for these little rigs but I couldn't find any at least.  I made the hex key wheel hexes as a cure for the standard pins falling out. These press in and eliminate the possibility of loosing a pin into the void if a wheel would happen to come loose. 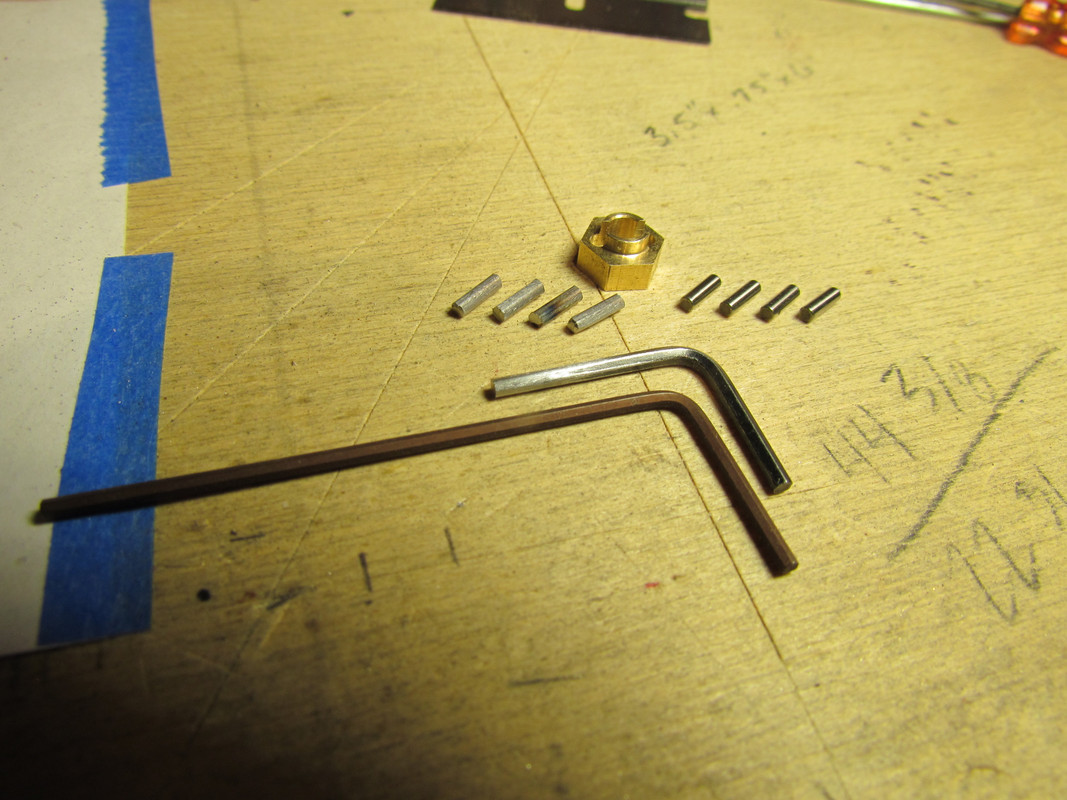 The CVD axle shafts needed to be trimmed by about 1 mm or less in order to not have the Injora caps pop off of the wheel nuts. The CVD's are just a tad longer than the stock shafts and tightening the wheels down snugly caused the caps to come off of the nuts. With regular nuts this wouldn't be an issue. 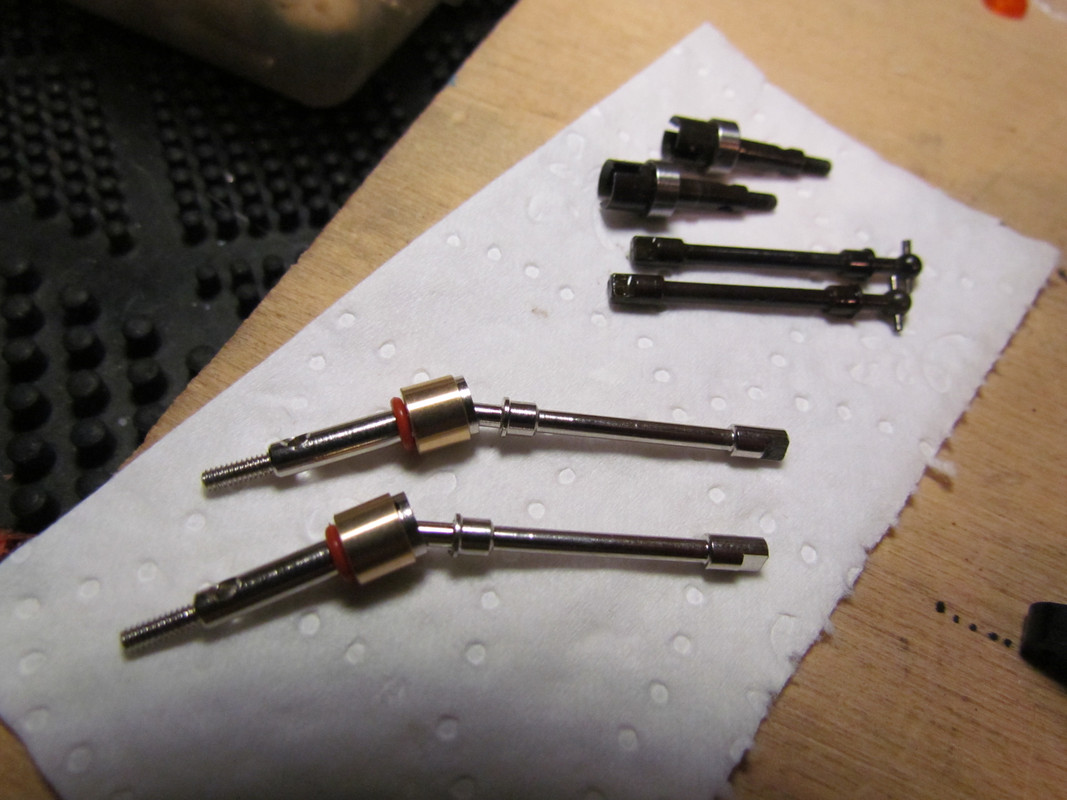 I modified the shock shafts of the new Treal 32 mm shocks as they would ever so slightly catch on the inside of the shock bodies. I used a dremel to very lightly round out the cylindrical shape of the piston around the top. Then I used a buffing wheel with polishing compound to finish them off. Shock travel is completely smooth as silk now. 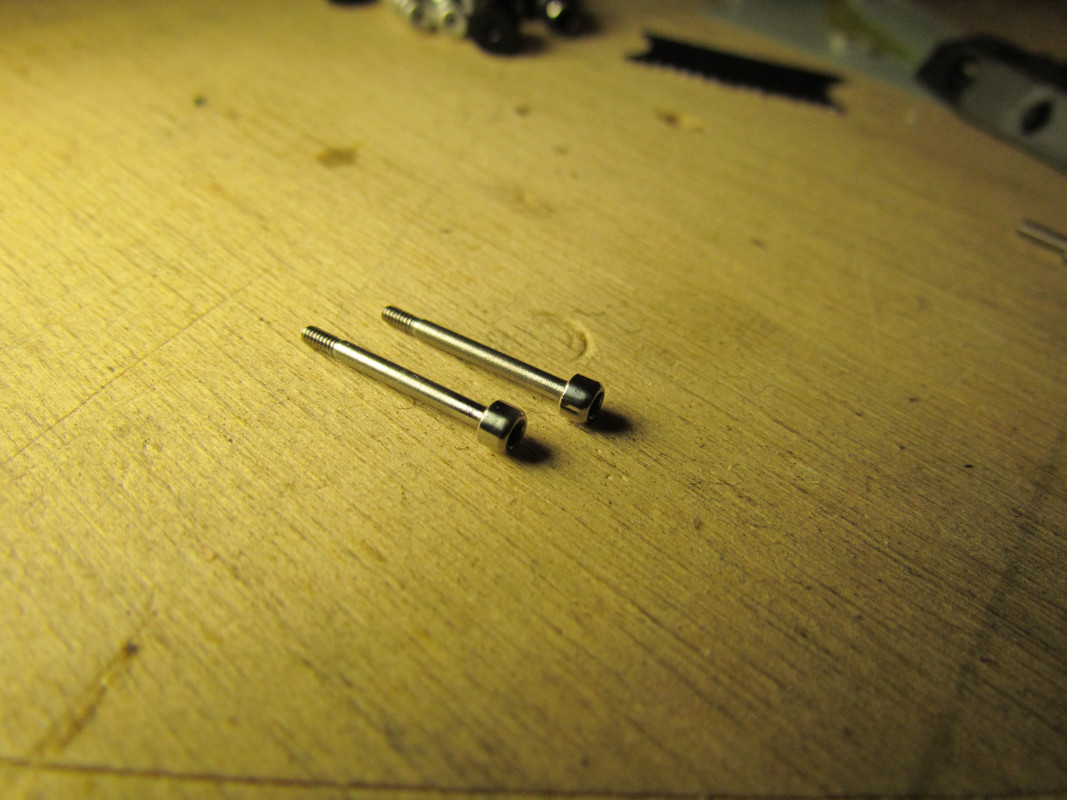 Maybe worth noting idk... The battery tray support doesn't have to be removed completely in order to fit a longer motor in the SCX24. You can just trim a bit of the post in order for a longer motor to fit.  And forgot to add this to the first part of the aesthetic mod list. I made a little radiator out of zip-ties to go behind the grill. I thought it would be more visible or I wouldn't have gone to all the trouble lol, but anyway... 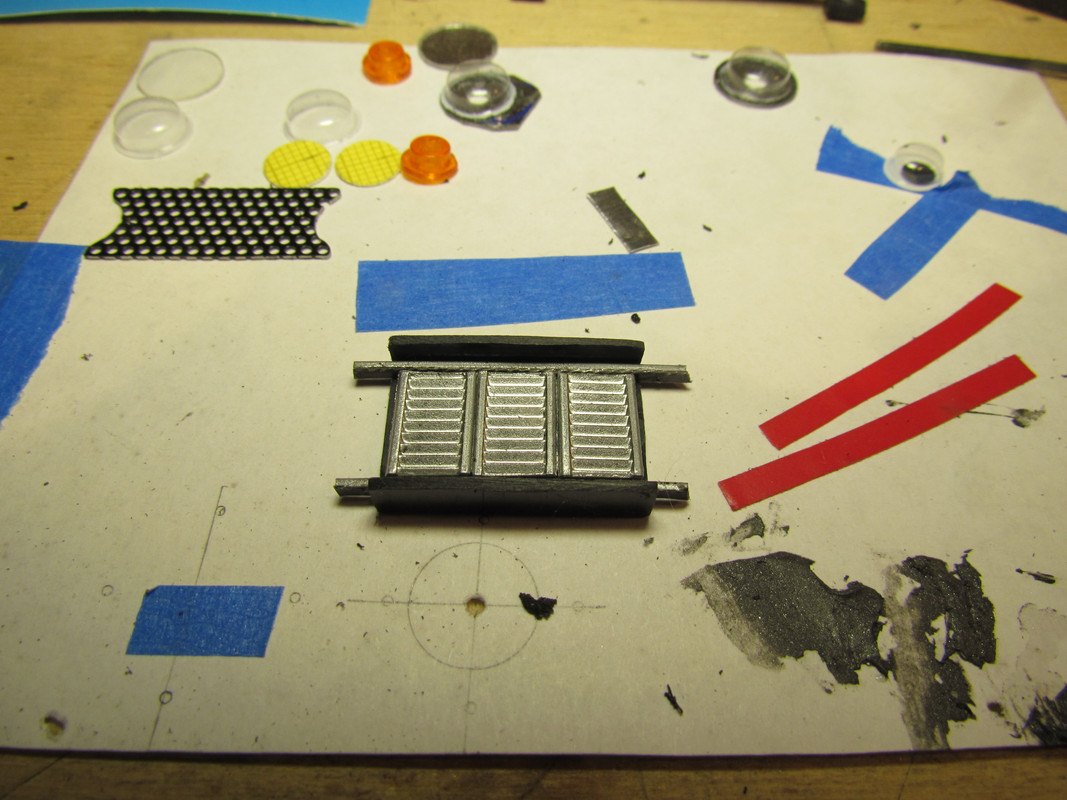 |
|
| |
|
04-24-2023, 05:26 PM
| #9 |
| Newbie Join Date: Mar 2015 Location: FL
Posts: 28
|
that's one nice looking scx24
|
|
| |
|
04-24-2023, 05:56 PM
| #10 | |
| RCC Addict Join Date: Nov 2017 Location: Austin Texas
Posts: 1,615
| Quote:
Thanks much. I appreciate you taking a look. Also time to add some 'action shots' I guess since I just finished up my 1/24 crawler course. This rig obviously can't tow the line with the heavily modified comp style builds that have very few original parts left, but for me and my backyard crawling course I'm very satisfied with the performance. Only two changes that I can see making at this point are going to be to the tires or foams... performed great on the rocks but on steep broken paver steps these tires and/or foams just cause a little too much bouncing. And the other thing that I'll add that I already have on hand is a set of brass steering knuckles. I thought they might be too heavy so I never installed them but indeed this rig could use a bit more weight up front down low. 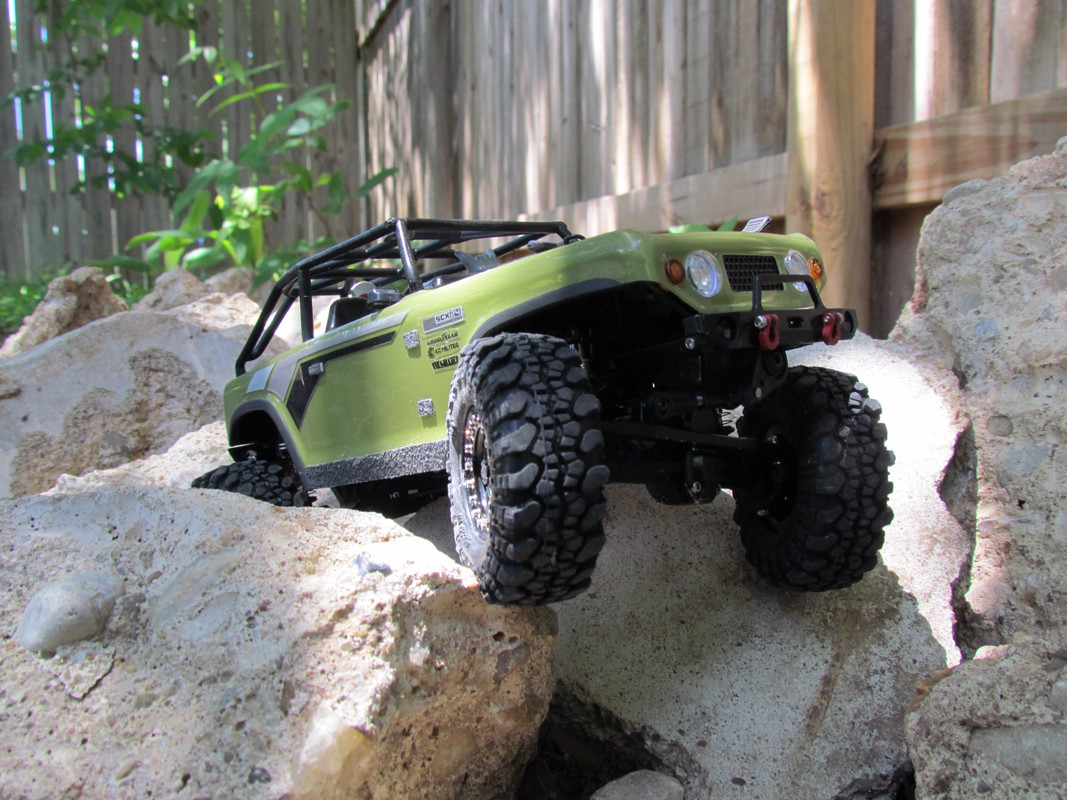   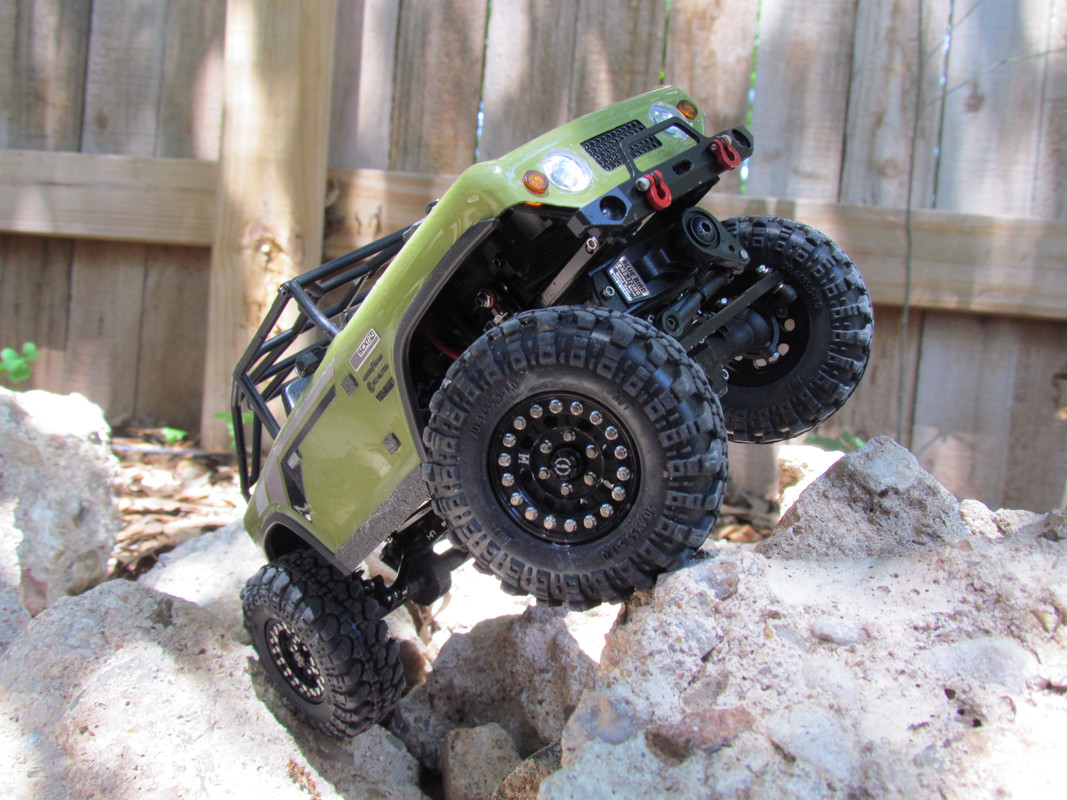 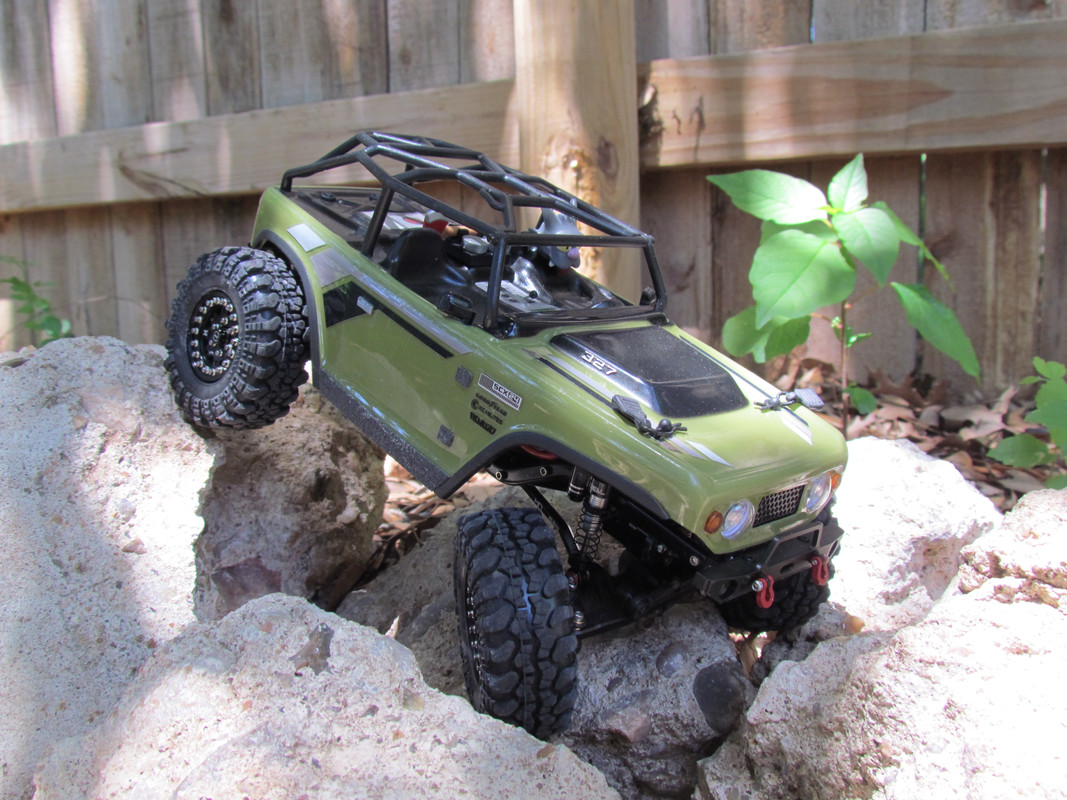 | |
|
| |
|
04-24-2023, 09:47 PM
| #11 |
| Quarry Creeper Join Date: Feb 2020 Location: Bakersfield
Posts: 236
|
The change turned out great!
|
|
| |
|
04-25-2023, 09:15 AM
| #12 |
| Rock Crawler Join Date: Jun 2018 Location: Orange County, CA
Posts: 711
|
Very cool! Nicely done. Thats awesome! I recently did a similar thing. I realized I have every stock part for almost 2 SCX24's so I built one out of all my spare parts I had in bags. It was fun to piece one together piece by piece, screw by screw. |
|
| |
|
04-25-2023, 09:24 AM
| #13 |
| Rock Crawler Join Date: Jan 2007 Location: monson
Posts: 651
|
that front end grill and light work looks great.  |
|
| |
|
04-25-2023, 10:00 AM
| #14 | |||
| RCC Addict Join Date: Nov 2017 Location: Austin Texas
Posts: 1,615
| Quote:
Quote:
Quote:
| |||
|
| |
|
04-25-2023, 10:20 AM
| #15 |
| Rock Crawler Join Date: Mar 2016 Location: Murphy
Posts: 732
|
You turned an ordinary looking Deadbolt into something with its own personality. If all our rigs drove the same it would get pretty boring fast. I have some that crawl better than others, the challenge is to finding lines the less capable rigs can conquer.
|
|
| |
|
04-27-2023, 11:10 PM
| #16 |
| Pebble Pounder Join Date: Nov 2021 Location: Finland
Posts: 162
|
This is looking very good. If you want more weight up front, you can relocate the battery and esc: SCX24 3D printed Front battery mount I did this without printing anything. I cut the esc tray after the body pins, and used the stock battery strap round the cutted esc tray and the battery. This way you get rid of extra weight up high and relocate the heaviest thing, the battery, lower and more up front. I relocated the esc with no tray behind the motor between the rails. I glued it in place. More lost weight that sits high and relocating the esc lower. This you can also see in the picture. This was a long time ago, and if I remember correctly, the stock battery lead is too short. But I’ve been using these batteries for a long time: https://www.verticalhobby.com/kauppa...ug-p-7252.html more capacity and they cost a lot less too. I have three of these. I also used a lead that put directly to the esc, so I don’t have to connect the battery directly to the esc. Much easier to connect the batteries. Last edited by 2471:24; 04-27-2023 at 11:13 PM. |
|
| |
|
05-01-2023, 07:02 AM
| #17 | ||
| RCC Addict Join Date: Nov 2017 Location: Austin Texas
Posts: 1,615
| Quote:
Quote:
| ||
|
| |
|
05-03-2023, 02:33 PM
| #18 |
| Quarry Creeper  Join Date: Apr 2023 Location: NW Connecticut
Posts: 203
|
Looking good , I love the front grill work very nice .
|
|
| |
|
05-05-2023, 03:03 AM
| #19 |
| Pebble Pounder Join Date: Feb 2022 Location: Brooklyn
Posts: 161
|
Good looking rig. ... With the passenger decapitation device Sent from my LG-V521 using Tapatalk |
|
| |
|
05-06-2023, 07:54 AM
| #20 |
| Quarry Creeper Join Date: Apr 2023 Location: NW Connecticut
Posts: 203
|
I was looking for a red Deadbolt for my first mini rock crawler , I ended up walking out of the store with a AX-24 because they had no red Deadbolts. That AX24 has been modded to my liking so there will be a red Deadbolt in my future. There is just something about the Deadbolts I like over all the other Scx24 models. |
|
| |
 |
 Scratch-E Built SCX24 - Similar Threads
 | ||||
| Thread | Thread Starter | Forum | Replies | Last Post |
| Another scratch built JK | rottenbelly | 1.9 Scale Rigs | 36 | 11-14-2011 05:46 PM |
| Scratch built | rag6 | Newbie General | 2 | 06-30-2011 07:50 AM |
| Scratch Built Bumper | wes81 | General Scale Talk | 15 | 10-21-2010 03:41 PM |
| Scratch built 2.2 | Kamikaze | Tamiya Clod Buster | 26 | 09-11-2007 07:51 PM |
| Scratch built crawler | jimbo_style | General Crawlers | 17 | 05-13-2007 04:03 PM |
| |


 Linear Mode


