| |
| |||||||
 |
| | LinkBack | Thread Tools | Display Modes |
 05-16-2020, 10:09 AM
| #1 |
| Let me 3D Print that...   Join Date: Jun 2007 Location: Concord
Posts: 315
|
Now available for the Axial Racing SMT10 is the Mod19RC DIY Backfire Header set. Combine this detailed, 3D printed header set with the MyTrickRC SQ-1 light controller (purchased separately) to get realistic backfire effects while driving your SMT10. Don't want the backfire effect? The headers can be used without the LEDs installed for those just wanting a highly detailed header set. Painting and assembly required. Follow the link below to the Mod19RC Shapeways store to purchase your DIY Backfire Header set today! https://www.shapeways.com/product/Q9...e-header-set-1 A link to the MyTrickRC light controller is on the Shapeways product page for the header set.   Assembly Guide: You will receive the 3D printed parts from Shapeways in their raw, white form. You will need to separate and trim the sprues from the pieces.   Next, paint the headers and mufflers. They can be any color you choose, but silver does have better light reflecting abilities for the LED lights. Get the dual LED lights purchased from MyTrickRC out as well. 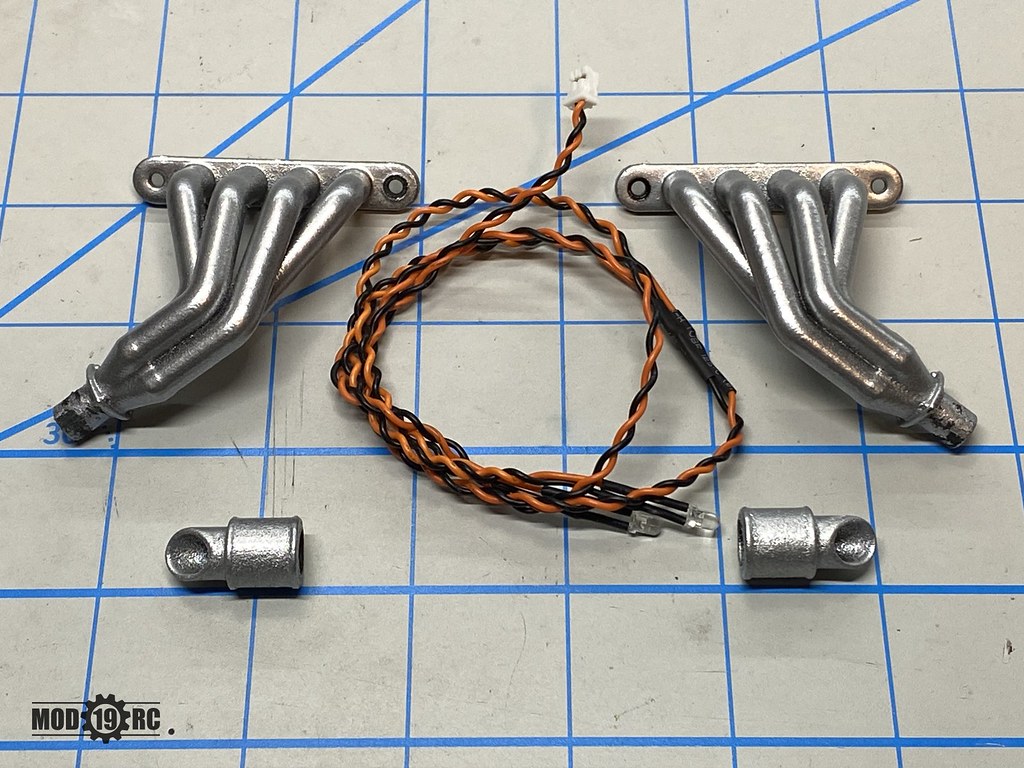 Install the LED light starting with the lens in the end of the header. Make sure to seat the base of the lens all the way into the recess in the end of the header. This will make sure that the muffler fits all the way on. Carefully route the wire up the slot, making sure to press it all the way in. Use a dull tool for this and be careful not to damage the wires.  Next, add a few dabs of glue in a few areas to keep the wires in place. You can use epoxy, rubber cement, hot glue, etc.  Repeat the previous steps for the other header.  Slip the mufflers on carefully to check the fit. They should fit all the way up as shown below. You may want to wait to glue them on until you have the headers mounted on your chassis to get the angle to your liking.  Finally, mount the headers to your chassis, route the wires, mount the light controller, and connect all wiring as instructed in the SQ-1 instruction manual. Enjoy the backfire effects!!! |

|  |
| Sponsored Links | |
| | |
|
06-29-2020, 06:13 AM
| #2 |
| Moderator   Join Date: Sep 2008 Location: PA
Posts: 13,935
|
That's really cool.
|
|
| |
|
 SMT10 DIY Backfire Header Set + Assembly Instructions - Similar Threads
 | ||||
| Thread | Thread Starter | Forum | Replies | Last Post |
| Backfire Exhaust! | heyok | Vendors Electronics | 5 | 04-19-2016 11:09 AM |
| 4 Link Set Up Instructions or Pic Details | BMFOTP | Newbie General | 3 | 03-13-2009 12:23 PM |
| TLT CVD Assembly Instructions | Rockpiledriver | RCP Crawlers | 30 | 06-11-2007 02:15 AM |
| |


 Linear Mode


