| |
 06-13-2015, 08:16 AM
| #1 |
| I wanna be Dave Join Date: Aug 2008 Location: Austin, TX, USA
Posts: 4,273
|
Several years ago I decided I wanted an 8x8 rig. Maybe it'd be a trials truck or perhaps a hardcore expedition vehicle.....but either way, I wanted one. So I started gathering the parts I'd need. Well, other projects kept taking priority and I never got started on it. Another reason was that I wanted a MAN Kat body, but didn't want to pay a fortune for one and also didn't feel like building one from scratch. Then RC4WD releases this kit. Okay, it's only a 6x6 and what the heck is going on with that hokey suspension? But look at that cab! And I felt that the Yota axles would be perfect, as well. So I sold all the parts I'd accumulated and pre-ordered a kit. To be honest, I'm kind of looking forward to the ease of a factory kit this time. Initially, the plan is to just assemble it per the manual, but eventually I'm going to make it different.....different bed, maybe add another front steering axle, leaf springs, who knows? Well, it showed up yesterday and since I'm sure no one has seen a box before, behold!  First order of business last night was to assemble the wheels/tires. I was very impressed this kit included the aluminum H1 wheels, but I'd heard horror stories regarding their assembly. Well, now I know why. It's not that the quantity of hardware is so high. It is, but the killer is the size of the hardware. I didn't know how small it is....1.6 mm! I could barely handle nuts that small. Wait, what? I didn't even have a nut driver that small so I had to improvise, but I think they're holding together okay. Here's a pic after I got the first one built.  Then I started on with the rest of the build, saving the body for last. I assembled all of the links, disassembled and greased the axles/t-case, and then began putting together the chassis. That's where I came across disappointment #1. Right hand drive? Really? I realize many people probably don't care about this level of detail, but I sure do. I'm kinda disappointed in myself that I didn't notice this on anyone else's builds yet.  No matter, let's just move on with the build, shall we? The chassis was beginning to take good shape and I was installing the drivetrain. This included the intermediate shaft between the transmission and transfer case:  Then I came across the next couple disappointments. First off, the shaft is too long. With one hole lined up, the other is entirely obscured. Loosened everything up to gain some tolerance (move the trans forward and t-case back) and......nope. No help. I should also point out here that the set screw (or drive pins) are not well done here. As you can see, they're just a long set screw that has had the threads removed from part of the length. Why? I've got a theory.... But also notice that the screw will not bottom out on anything during assembly. So you'll have to rely entirely on Loctite to secure the screws in place or the driveline will completely loosen up.  Now look at the assembly from above. It would seem to me if you're going to have a rigid driveline mount (such as this one), you'd better make sure the alignment and spacing between the two components is spot on. Well, as you can see, the t-case is mounted at an angle.  So now I'm beginning to understand why the set screws were "turned down" like they were....to give just enough play in the system to account for misalignment because they couldn't get the casting process consistent enough for the t-case skid. If so, that's definitely not the right way to address such an issue. Not at all. At a minimum, some sort of universal joint should be included......and if it were the right length, well, that would've been peachy, too. I've already modified the holes in the chassis for the trans mount to move it forward (not enough, though), but I really don't like how the alignment will be off. I'd really prefer some sort of legitimate driveshaft here instead of a solid coupling. Anyway, that's where I'm at thus far.... Has anyone else run into these issues? |

|  |
| Sponsored Links | |
| | |
|
06-13-2015, 12:47 PM
| #2 |
| Pebble Pounder Join Date: Jun 2013 Location: Espoo, Finland
Posts: 150
|
When I had my Trail Finder 2 which has the same 2-speed and t-case, it had a same type of misalignment. Never had any issues, since the solid piece in the middle allowed enough play for it to work. |
|
| |
|
06-13-2015, 02:10 PM
| #3 | |
| I wanna be Dave Join Date: Aug 2008 Location: Austin, TX, USA
Posts: 4,273
| Quote:
So I ended up opening the mounting holes for the transmission, which allowed me to move it forward enough to fit the driveshaft. And then I was able to continue along with the rest of the build. Here's the rolling chassis:  The front bumper details are pretty awesome. In fact, I didn't realize the whole framerails are machined aluminum! Lots of nice cast parts, too.  Love these wheels...  TowerPro 946R doing shifting duties. Had to open up the mounting ears on the servo 'cause the spacing was a bit far apart. Should be fine.  Hitec 7950 brings almost 500 ounces to the steering party.  Goofy rear setup.  A couple more observations. Overall, I'm impressed that RC4WD can offer this kit for this price. I was tallying the retail prices of each of the main items included and I think I stopped counting when I reached $700 or $800! It's definitely got a lot going for it, but it's not without flaws. In addition to the t-case alignment and driveshaft length issue mentioned earlier, the other main thing that concerns me is the length of the hardware provided. It seems in nearly all cases, the hardware seems to be borderline too short. I plan to replace most of the hardware with Locked UP RC scale hardware, but I wanted to wait and see what lengths would be best. I'm glad I waited because I'll be buying longer hardware to replace most of the currently installed stuff. And in the grand scheme of things, that's just not that big of a deal. But overall, I'm really excited about this kit and looking forward to starting the body real soon!  Last edited by Tommy R; 06-13-2015 at 02:12 PM. | |
|
| |
|
06-13-2015, 07:47 PM
| #4 | |
| I wanna be Dave  Join Date: Apr 2014 Location: North Carolina
Posts: 2,254
| Quote:
Glad you were able to get your hands on one. It's a fun build, though quite a bit more involved than any kit I've built given how many parts the body has (and how much of it gets glued instead of screwed together). The coupler in my kit has 2 sets of set screw holes that have slightly different spacing. It took playing with it for a minute or two before I figured out that one set was spaced perfectly and the other not. Not sure if you tried it, but here's how mine looks:  I also had questions about a rigid coupler when I built my first RC4WD kit (a TF2), but it's never been even a slight issue for me on that rig or my various others. I haven't read of others having wear issues from the coupler, either, so I wouldn't worry too much about it. Sent from my iPad using Tapatalk | |
|
| |
|
06-13-2015, 08:14 PM
| #5 |
| I wanna be Dave Join Date: Aug 2008 Location: Austin, TX, USA
Posts: 4,273
|
Thanks for the input. But yeah, I'd noticed the differing spacing on each end of the shaft and even optimizing it, it was still too long. That's how it was configured in the pic I posted earlier. But that's good to hear that it's not posing a long term reliability problem! |
|
| |
|
06-14-2015, 12:56 PM
| #6 |
| I wanna be Dave Join Date: Aug 2008 Location: Austin, TX, USA
Posts: 4,273
|
Progress last night before calling it a night....  |
|
| |
|
06-15-2015, 11:12 PM
| #7 |
| I wanna be Dave Join Date: Aug 2008 Location: Austin, TX, USA
Posts: 4,273
|
Today I wrapped up all of the kit's styrene work. But I want to add an interior (of course!) so there's still quite a bit of styrene work ahead for me. I looked around at MAN Kat interiors and, of course, they're all very basic and miltary-esque. Well, I've got a fairly unique idea for this build. I plan to have two separate beds I can run for very different looks/function. Option 1 will be the stock cargo bed. I want to make a new challenge of simulating carrying really heavy weights and dealing with the challenges that come from it. It'll be quite a bit different from what I'm used to, but should be fun. Option 2 will replace the cargo bed with an expedition/overland style camper. But it'll be on the small side so I can have a deck on the rear for accessories. Something similar to this....maybe even the same colors.  Given Option 2, I wanted to give this thing an interior that kinda looks like it's been updated at least into the '90s.  I've already trimmed out the footwells a bit, but I need to do more trimming to make things look more realistic. I also began experimenting with shifter positions.  Held in place with rare earth magnets, similar to what new2rocks did. I've been a fan of rare earth magnets for years and I'm surprised people don't use them more often.  The exterior of the cab is done, but I'll wait 'til later to decide if I want to keep the roof removable or make it permanent. I'll likely make it removable.  Cargo bed is done.....almost.  So here's my dilemma. I really like this backbone/subframe setup and I want to replicate it for my camper assembly. That's why I haven't glued it to the cargo bed, as instructed in the manual. I'm really hoping I'll be able to buy these items from RC4WD. So I may just go ahead and finish the cargo bed with this subframe OR I may make the cargo bed bolt to the subframe so the subframe could be moved over to the camper. It would definitely be a bigger PITA, but having this subframe would make mounting the camper SO easy!  |
|
| |
|
06-16-2015, 10:06 AM
| #8 |
| I wanna be Dave Join Date: Aug 2008 Location: Austin, TX, USA
Posts: 4,273
|
Forgot I hadn't mounted the hinges onto the front of the cab so I did that this morning. Not the size fasteners I would've used. M2 is too small, IMO. And the longer (6mm) hardware that threads into the body used a smaller hex driver than the 1.5mm driver I'm accustomed to. This made them very prone to stripping the screw heads. STRONGLY recommend pre-tapping the holes with a 6mm screw with a larger hex head. I did that and had no issues the rest of the time. The shorter (4mm) length hardware *did* have a larger hex head......go figure.  It seems to hold okay, though, so maybe that dinky hardware is sufficient? Time will tell.......  Another bit of disappointment, though. The latch to secure the cab.....well, doesn't. Ultimately, what's needed is a shorter spring. This one is bottomed out, but as you can see it's still not hitting the screw that's supposed to act as a stop. I could relocate the lower spring mount farther away to get some tension, but.....you guessed it.....the nut on the backside is now fully boxed in with styrene. So in order to access it, holes will need to be drilled. Yea! Sure, I can come up with a solution for this. Just a bit bummed I need to.  |
|
| |
|
06-17-2015, 09:37 AM
| #9 |
| SCALE PERFORMANCE PARTS  Join Date: Oct 2007 Location: Cedar Park
Posts: 5,452
|
Looking forward to seeing how it turns out!
|
|
| |
|
06-17-2015, 10:20 AM
| #10 |
| ~THE SCALE SHOP~ Join Date: Apr 2006 Location: KILLEEN TX
Posts: 10,056
|
be sure to reinforce that bed for heavy loads. no way styrene glue or styrene is gonna hold that kinda weight. sheetmetal liner? alumimum angle corner bracing? nice job on the interior. what do you have planed for driver? looking great Tommy! |
|
| |
|
06-17-2015, 11:53 AM
| #11 | ||
| I wanna be Dave Join Date: Aug 2008 Location: Austin, TX, USA
Posts: 4,273
| Quote:
Quote:
And thanks! The interior is continuing to come along. Trying to figure out seats right now and nothing I'm doing is coming out worthwhile.  No ideas on a driver yet. All I know is that Harold (of Harold and Kumar fame) is too large!  | ||
|
| |
|
06-17-2015, 03:24 PM
| #12 |
| ~THE SCALE SHOP~ Join Date: Apr 2006 Location: KILLEEN TX
Posts: 10,056
|
what does he measure from butt/seat to top of head? ill see what I have for shorter figures. btw check out this thread. hes hauling some seriously heavy loads. and for some reason it looks fun as shit. http://www.rccrawler.com/forum/1-9-s...adventure.html |
|
| |
|
06-17-2015, 04:06 PM
| #13 | |
| I wanna be Dave Join Date: Aug 2008 Location: Austin, TX, USA
Posts: 4,273
| Quote:
So here's a more proportionally sized figure. Of course, he's some angry wrestler type, but he's much closer to the right size. Doesn't look too bad through the front window!  Side view, not so much! Too big...  He's just under 5.5" tall. I'm guessing I'd need someone 4.5"-5" overall in height.  | |
|
| |
|
06-17-2015, 05:04 PM
| #14 |
| ~THE SCALE SHOP~ Join Date: Apr 2006 Location: KILLEEN TX
Posts: 10,056
|
can you lower the seat any?
|
|
| |
|
06-17-2015, 05:07 PM
| #15 | |
| I wanna be Dave Join Date: Aug 2008 Location: Austin, TX, USA
Posts: 4,273
| Quote:
| |
|
| |
|
06-17-2015, 06:51 PM
| #16 |
| I wanna be Dave Join Date: Aug 2008 Location: Austin, TX, USA
Posts: 4,273
|
After two failed attempts at making nice looking, formed seats.....I decided that simple is a better option for me.  Interior styrene work is done now, except for the last couple gauges I want to add to the dash, but I need to wait on the styrene to arrvie for that.  |
|
| |
|
06-19-2015, 09:03 AM
| #17 | |
| I wanna be Dave Join Date: Aug 2006 Location: under a rock and a hard place
Posts: 5,443
|
I use that same driver almost exclusively.... Look at my Thing build and you will see how a simple head swap and shirt completely change the looks. Speaking of looks, try not to be to creepy when you are perusing the doll isle for clothing for the little guy Nice build Tommy, I am getting ready to start a Kraz build myself and may have to steal a few of your ideas. Quote:
| |
|
| |
|
06-19-2015, 09:50 AM
| #18 | |
| I wanna be Dave Join Date: Aug 2008 Location: Austin, TX, USA
Posts: 4,273
| Quote:
You mean this Hilter lookin' dude you've got??  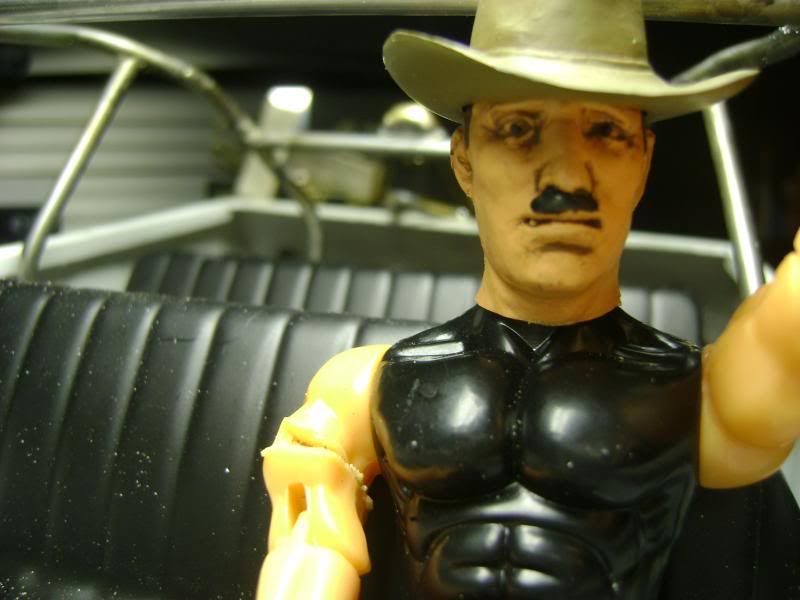 Give him a beard and we can talk. Can't wait to see what you do for a Kraz build! Are you going to base it off a Bullhead body? If so, you could likely make it a true 1/10th scale, which would be nice! That's my only gripe with the Beast II.....only 1/14th scale. But that's okay... | |
|
| |
|
06-19-2015, 10:01 AM
| #19 |
| I wanna be Dave Join Date: Aug 2008 Location: Austin, TX, USA
Posts: 4,273
|
So a little more progress last night. Lo and behold my LHS had the styrene I was looking for so I got my larger gauges finished up. They look a little "tall" here, but in reality I think they look okay.  Then to tackle the removable roof idea. First I glued some rare earth magnets to some styrene which I bonded to the interior in strategic locations. I applied the magnets in areas to help draw the roof parts in line with the cab since things weren't aligning perfectly in a couple spots.  Glue some magnets to the roof. I could've just glued metal to the roof to secure it, but using magnets to attach to other magnets will assure that the body will line up in the exact same spot each time. Works really well!  And installed. No alignment required. I basically just half-assed dropped the roof onto the cab and VOILA!!  Of course, the hatch is still functional and makes it easier to grab and remove the roof.  |
|
| |
|
06-19-2015, 12:19 PM
| #20 |
| ~THE SCALE SHOP~ Join Date: Apr 2006 Location: KILLEEN TX
Posts: 10,056
|
that's awesome.
|
|
| |
 |
 Tommy's Beast II 6x6 - Similar Threads
 | ||||
| Thread | Thread Starter | Forum | Replies | Last Post |
| RC4WD Beast II 6x6 | IronGut | Multi Axle Rigs | 7 | 04-22-2015 09:30 AM |
| The Beast 6x6 revised | blumaro | Multi Axle Rigs | 9 | 03-14-2014 02:11 PM |
| |


 Linear Mode


