| |
 12-09-2018, 10:10 AM
| #1 |
| Pebble Pounder Join Date: Apr 2007 Location: Summerville
Posts: 120
|
I should start off by saying I have zero experience with RC drag cars, but with that being said I've always wanted to build one. I don't have any RC drag tracks near me so there is a good chance this one never sees much action besides up and down the street in front of my house. It was difficult to even find info on the different drag chassis available, but in the end I settled on a Drag Race Concepts pro street chassis. I liked the layout and it looked like a quality product to start from. I opted for no wheelie bar, I'm trying to go for a more street car look than a full on drag car look. Stock chassis: 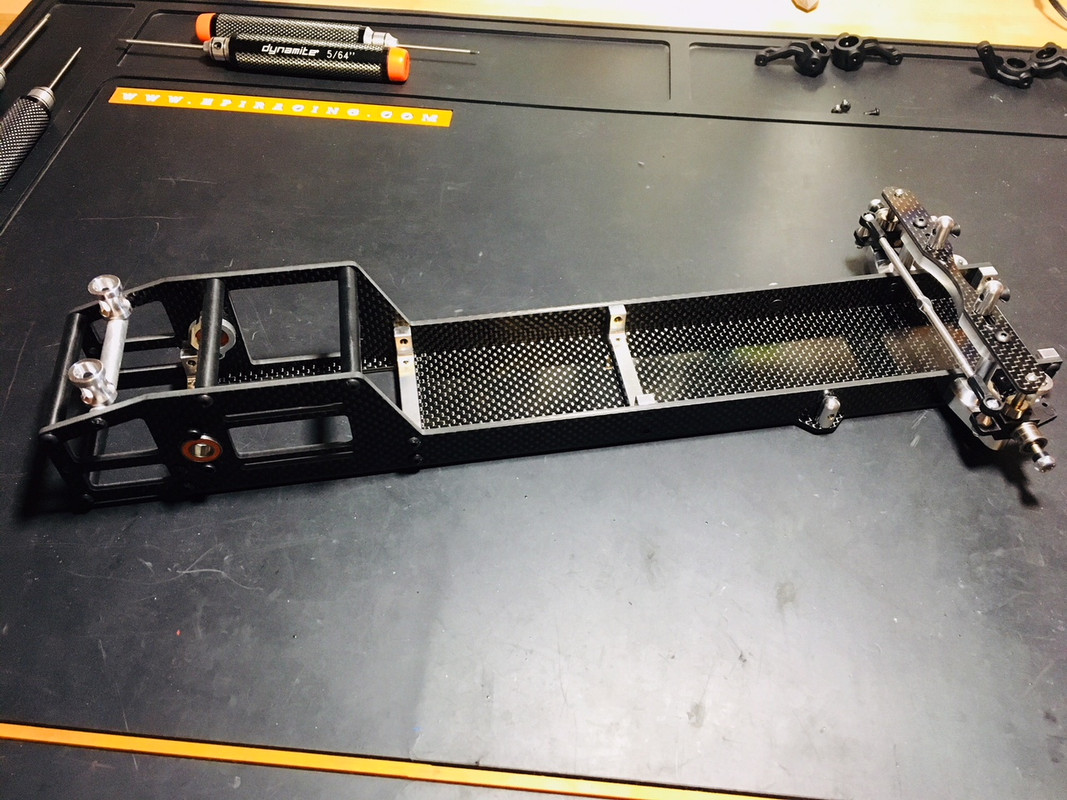  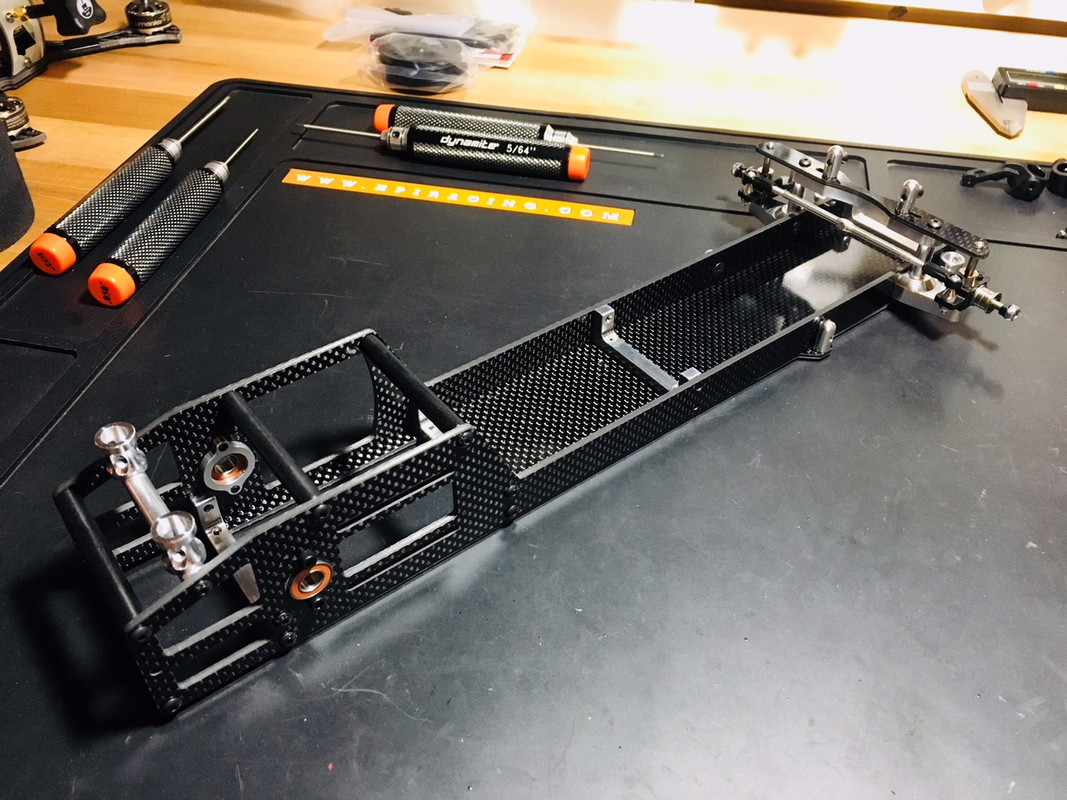 Taking the front end apart. 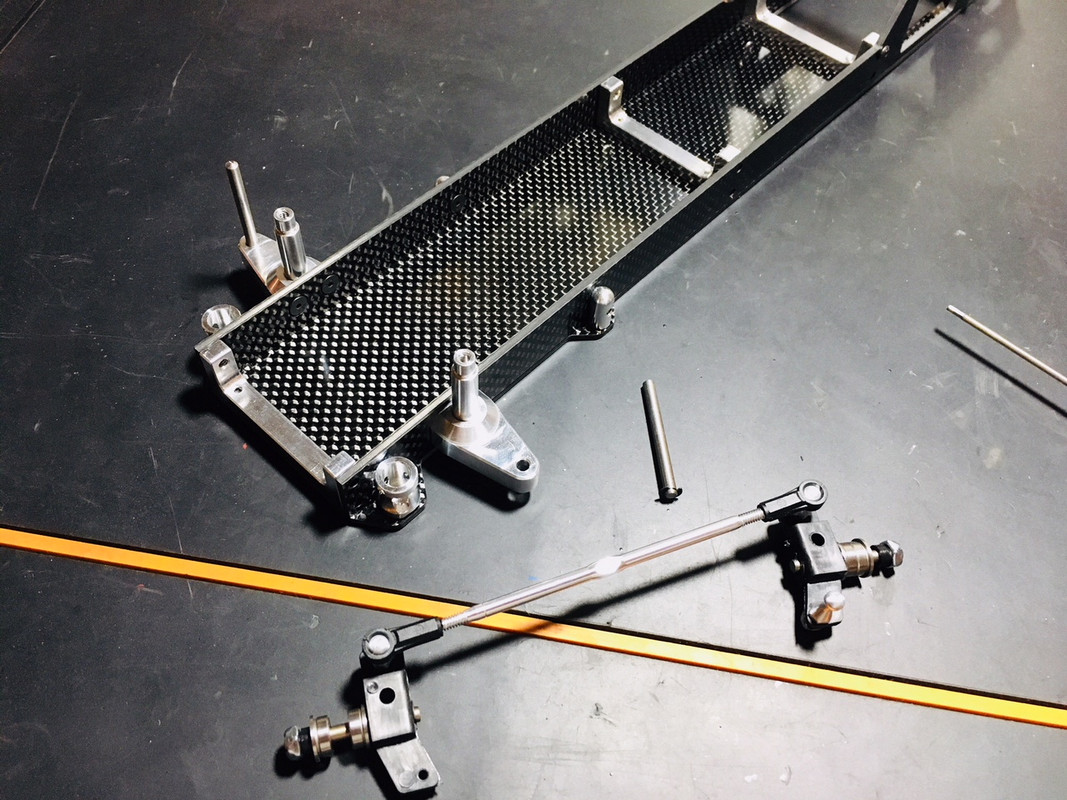 After doing some research on RC drag cars you quickly learn that they have a very narrow track width and vary in wheelbase quite a bit. While there are a handful of bodies that fit these chassis's perfectly I've always wished they made a drag chassis that uses a standard 190/200mm touring car body, the touring car body market has a TON of options to make a cool drag car. The rear axle is pretty easy to widen slightly. The front end is really what needs to be changed significantly to fit a 190mm body better. My first mockup of what I want it to look like, I also want to ditch the front ball bearing wheels and run a 12mm hex so that I can also run any touring car wheel up front. I know that's not ideal for drag racing but I'm going for more of a street car look than an all out drag car. I settled on M-chassis wheels and tires which are slightly smaller than touring car wheels/tires. The body is made by Pandora RC.  I designed up and 3D printed some new front suspension mounts that bolt into the existing chassis holes. They also move the front wheels back 13mm to make the wheelbase 257mm which is the standard touring car wheelbase. The mounts also widen the car an extra 50mm to get me pretty close to the 190mm mark. I designed them around some HPI Pro4 steering knuckles I had laying around, then I just used some Pro4 axles without the bone portion of the CVD's as front axles. Now I have a chassis that fits any touring car body and I can run any 12mm hex wheels up front.  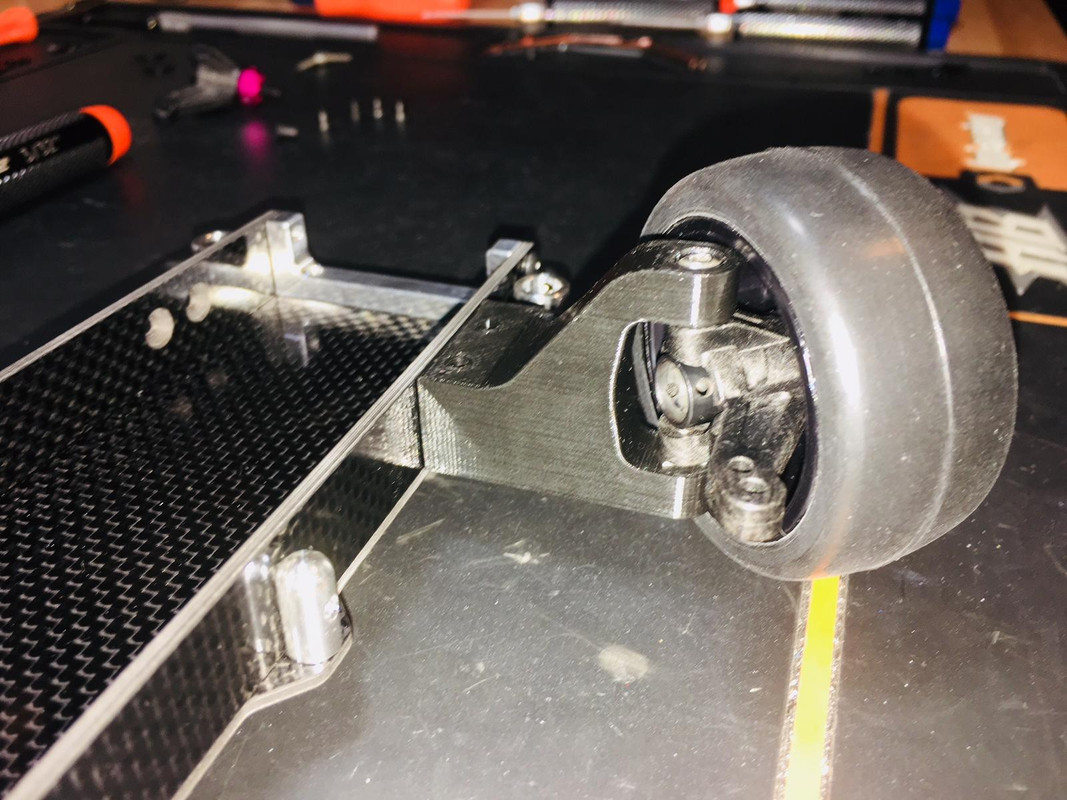   Body back on with new front end installed: 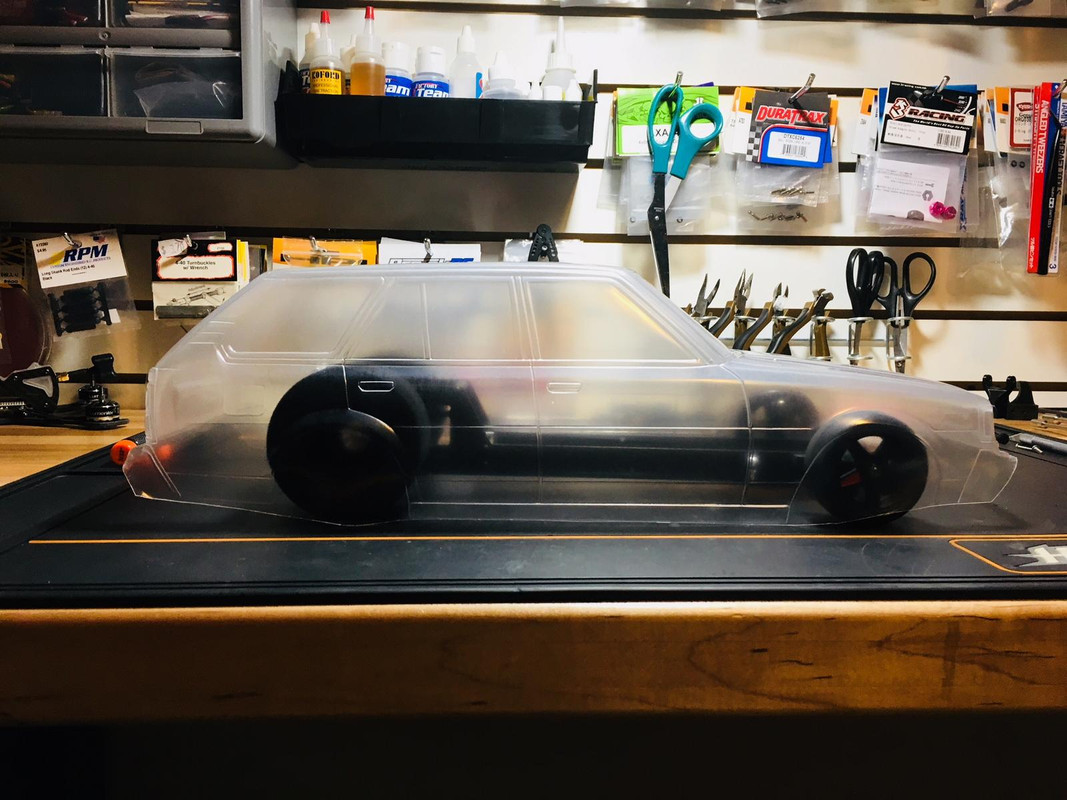 I still have plenty more ideas to come, I'm still toying with the idea of ditching the rigid front end all together and replacing it with an actual suspension front end. I may take the front end off my Tamiya M07 and see if I can adapt it to this chassis. Any RC drag racers on here? I'm trying to learn about setting these cars up, but any info about drag cars seems to be impossible to find. |

|  |
| Sponsored Links | |
| | |
|
12-10-2018, 07:04 PM
| #2 |
| Rock Crawler  Join Date: Jun 2015 Location: In the Sticks in the Ozarks
Posts: 940
|
Nice build! Anyway, that's a nice chassis to start with. I can't wait to see how this turns out. Last edited by dr frankenstyle; 12-10-2018 at 07:05 PM. Reason: DOH!! |
|
| |
|
12-10-2018, 07:27 PM
| #3 |
| I wanna be Dave Join Date: Jun 2016 Location: Austin
Posts: 6,010
|
That is some seriously cool engineering... very, very, nicely done! With the Shapeways poking-thru-the-hood turbo bits you could make a sweet "Import Nights" scale drag car. |
|
| |
|
12-10-2018, 07:33 PM
| #4 |
| Moderator   Join Date: Sep 2008 Location: PA
Posts: 13,935
|
Wow this is going to be bad ass!
|
|
| |
|
12-10-2018, 08:03 PM
| #5 | |
| Pebble Pounder Join Date: Apr 2007 Location: Summerville
Posts: 120
| Quote:
Funny you mention engine parts sticking through the hood, I'm actually designing something up currently, I hope to have it on the 3D printer in the next day or so. I've always liked the look of the old school mechanical fuel injection stacks, so I'm thinking about giving my concept a go. It's kind of tough to tell whats going on in this photo but the somewhat transparent thin piece pretend is the polycarbonate body with the opening cut it in it. The grey-ish colored piece with 4 holes in it will get shoe-gooed to the underside of the body. The black piece bolts to the underside of the grey piece with 4 M3's, the red stacks are just glued to the black piece. My thought is if the stacks get damaged I can just unbolt the black piece and replace it, or better yet, I can swap it for something different, like maybe a blower with a scoop or just a couple carbs with air cleaners, tons of possibilities really. 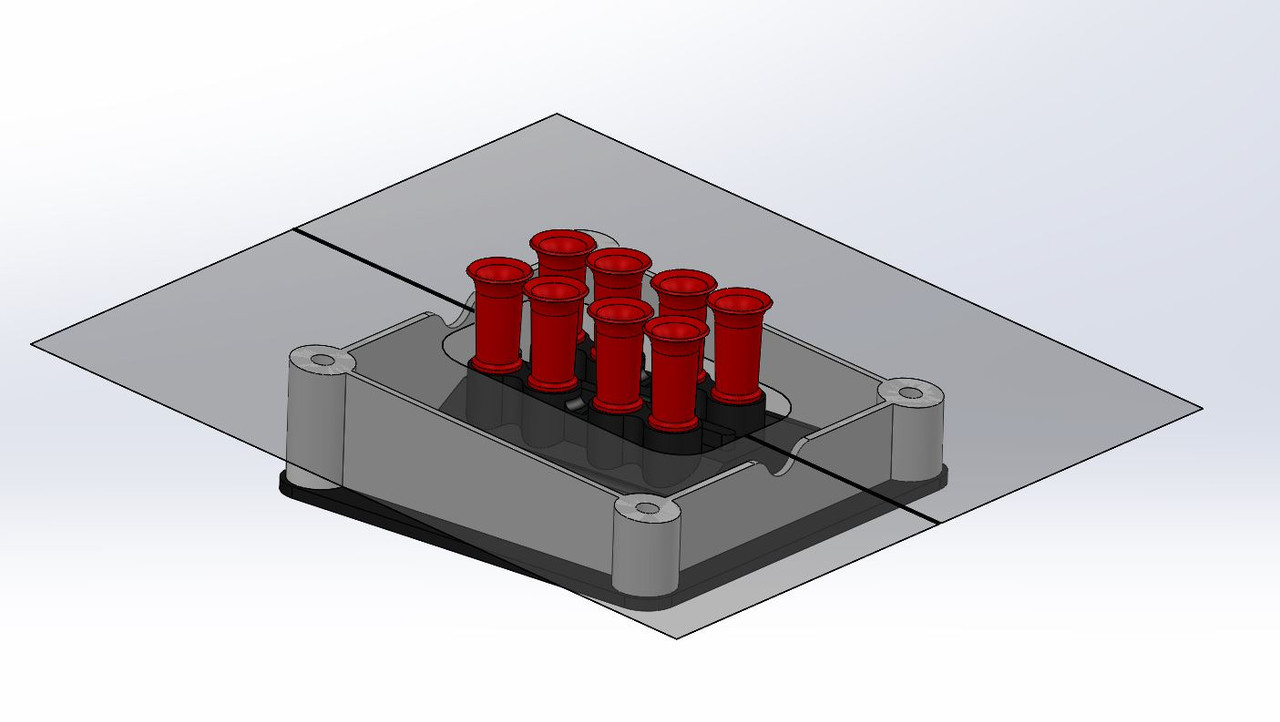 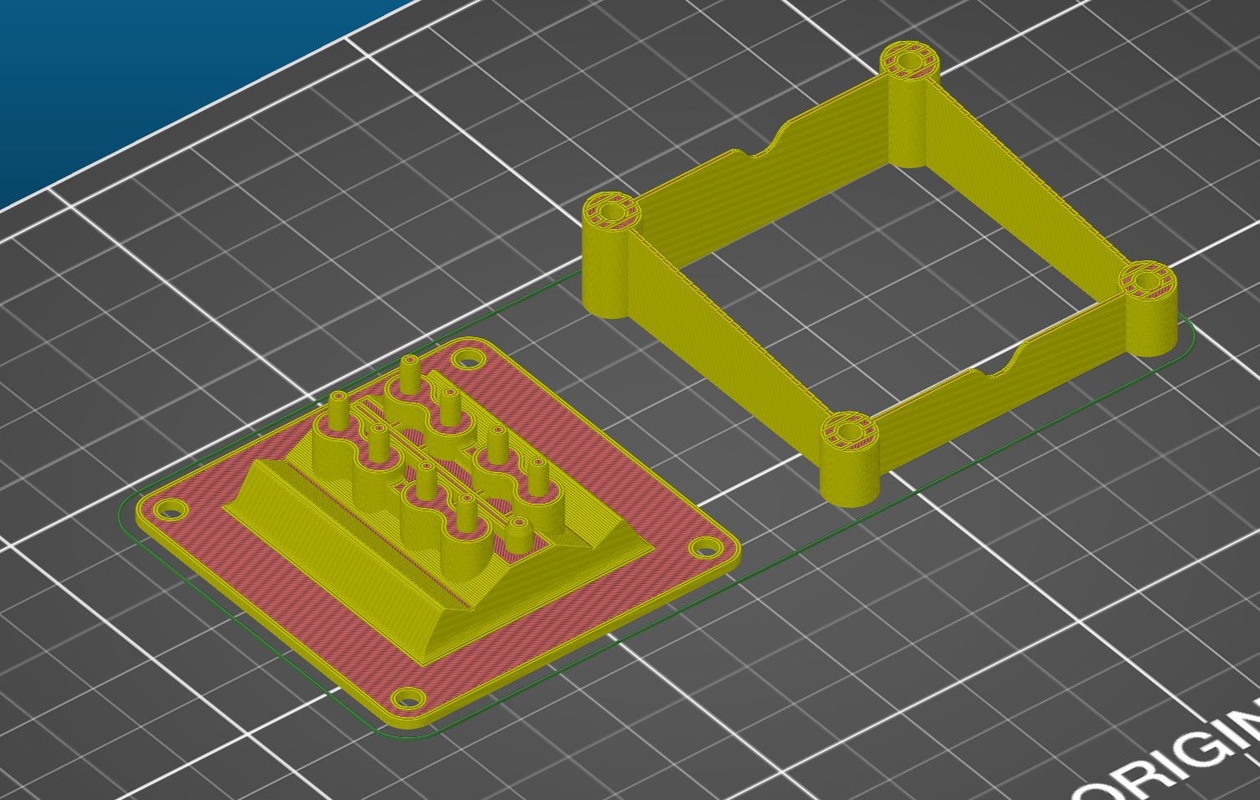  | |
|
| |
|
12-10-2018, 08:06 PM
| #6 |
| I wanna be Dave Join Date: Jun 2006 Location: Here
Posts: 2,319
|
What body is that? Looks like a 80s Audi wagon
|
|
| |
|
12-11-2018, 03:45 AM
| #7 |
| I wanna be Dave Join Date: Jun 2016 Location: Austin
Posts: 6,010
| |
|
| |
|
12-11-2018, 02:19 PM
| #8 | |
| Pebble Pounder Join Date: Apr 2007 Location: Summerville
Posts: 120
| Quote:
| |
|
| |
|
12-11-2018, 06:22 PM
| #9 |
| Pebble Pounder Join Date: Apr 2007 Location: Summerville
Posts: 120
|
Designed up a battery tray to start getting an idea on where everything is going to end up. This is where I'm kind of in the dark, I'm not sure where exactly the ideal position for the battery is, so I made a mount with a ton of holes in it to slide the battery for and aft as I see fit. The only issue I might run into is if the battery is really suppose to go all the way to the very front of the chassis, I still haven't figured out my steering setup yet but most likely I'll need that real estate for the servo and steering. On the printer: 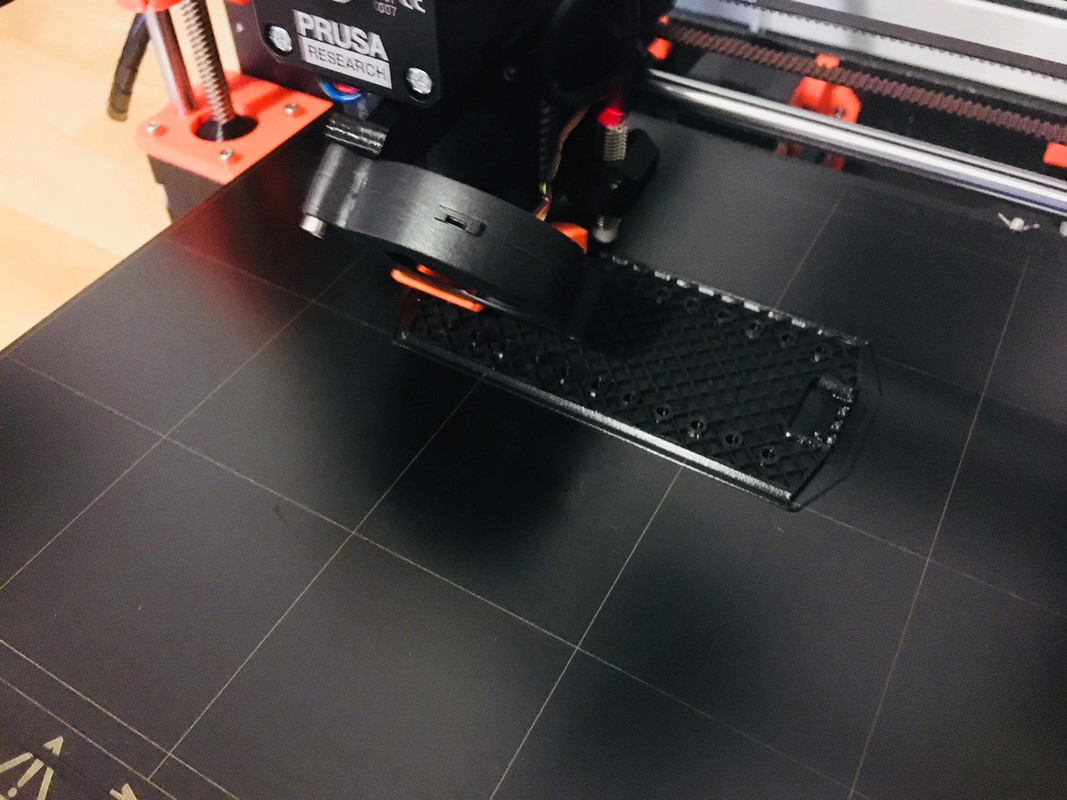 Installed in the car: 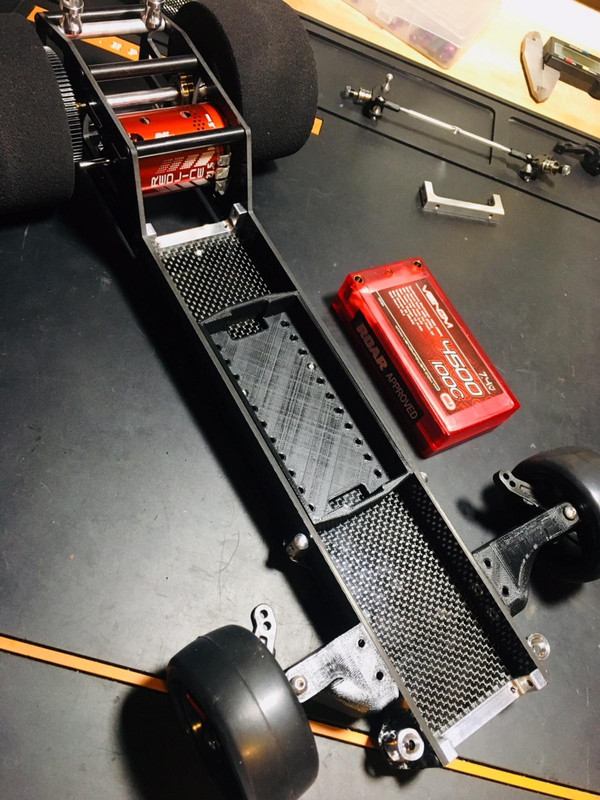 With battery installed:  After I installed the first battery tray, I immediately started thinking I could make it lighter. My solution was to make a new one that is just an outer frame, I guess as a bonus it lowers my COG (not that it matters in a drag car?) Same with the other 3D printed parts, it uses existing holes in the chassis to mount in securely. 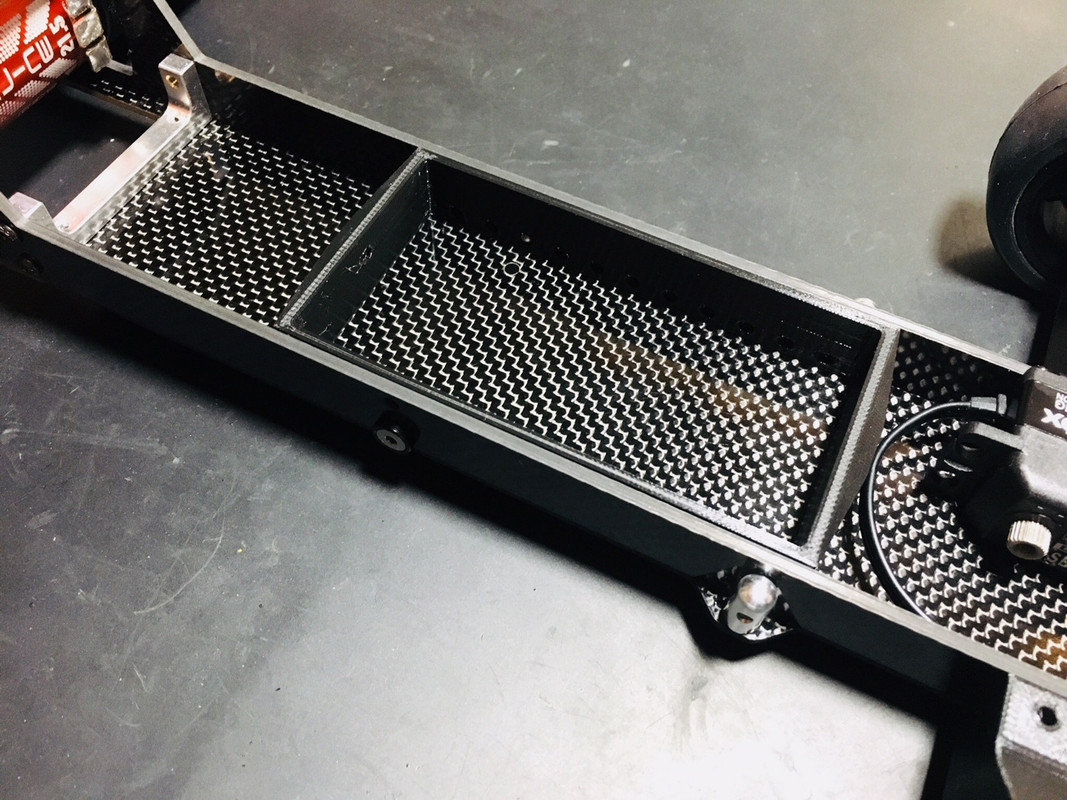 Just a generic idea of electronic locations, obviously I'm missing my receiver still and no I'm not really running a 21.5, I'm just practicing my head games for the grudge racing.  |
|
| |
|
12-11-2018, 07:27 PM
| #10 |
| I wanna be Dave Join Date: Oct 2007 Location: Castle Rock, WA
Posts: 8,785
|
this is some serious rad right here.
|
|
| |
|
12-13-2018, 06:27 PM
| #11 |
| Pebble Pounder Join Date: Apr 2007 Location: Summerville
Posts: 120
|
I finally had some time to get the engine and stacks printed.     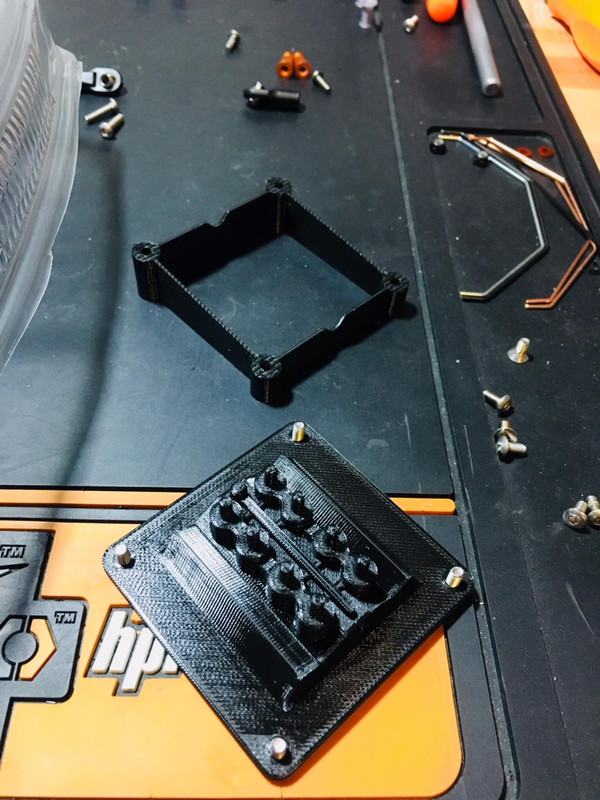  The stacks are printed in silver PLA, all the black pieces are printed in PETG. The PLA definitely gives a better looking print. I have some black PLA coming to try. For structural pieces I would still use PETG, but I'm thinking strictly cosmetic pieces should be fine in PLA. 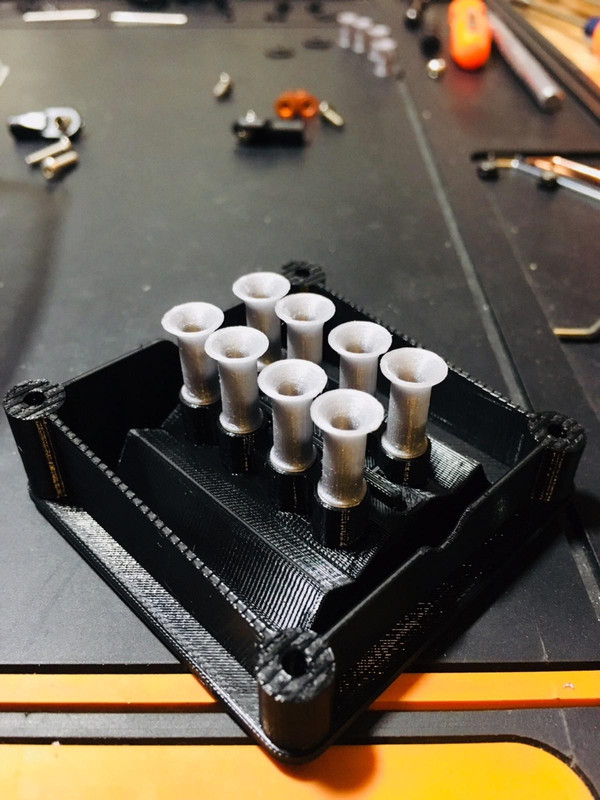 I also like this staggered look so I may do a test print on this style as well, if my concept works out well then I should be able to swap in whatever engine look I want.   |
|
| |
|
12-14-2018, 05:57 PM
| #12 |
| Pebble Pounder Join Date: Apr 2007 Location: Summerville
Posts: 120
|
The first cut always makes me nervous... 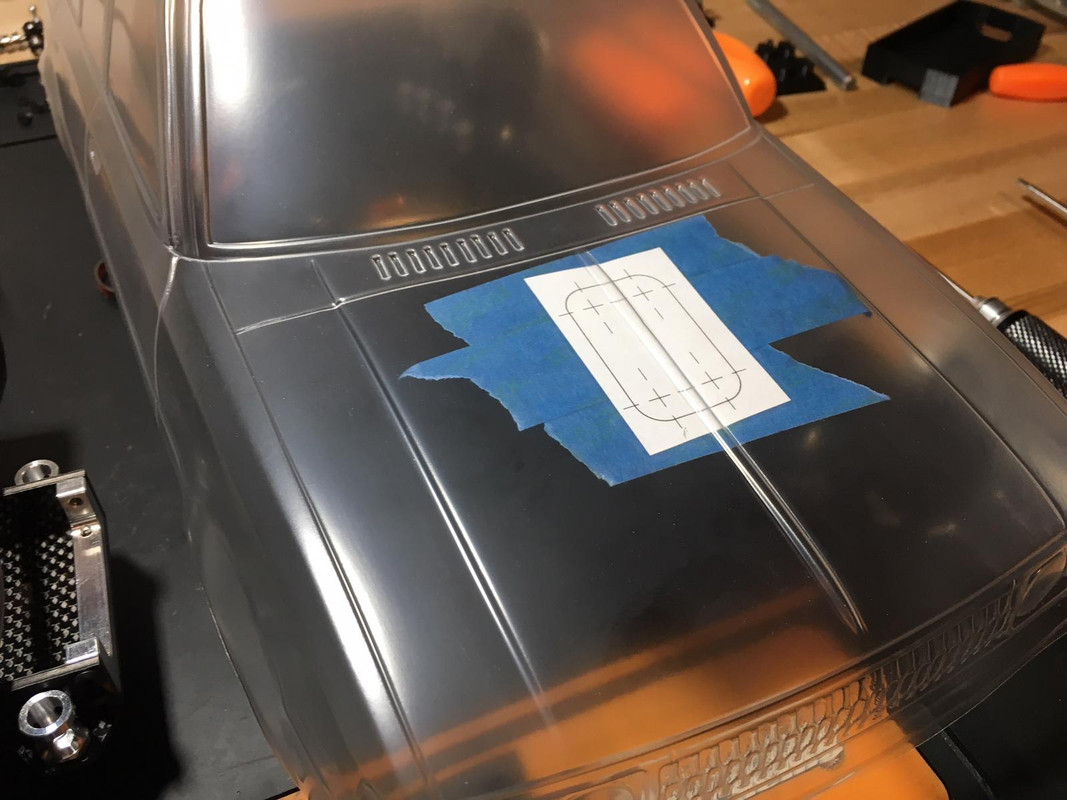 Just needs a little more fine sanding before paint  This should give an idea of how it will look.  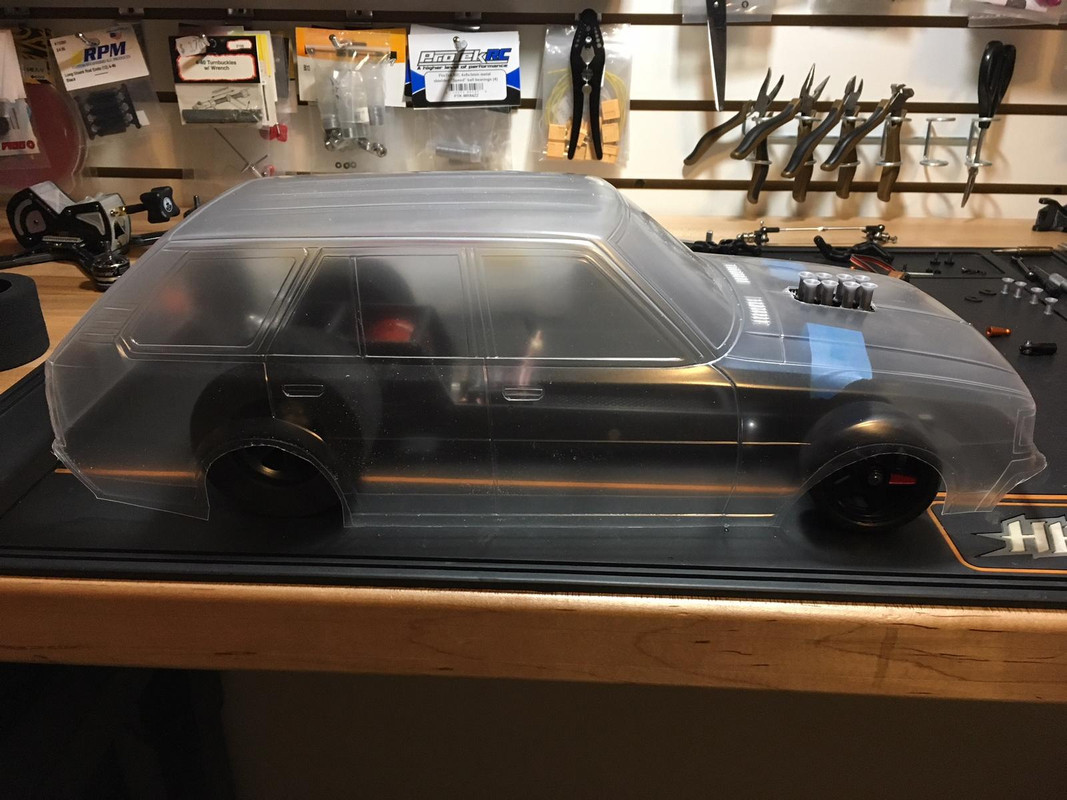 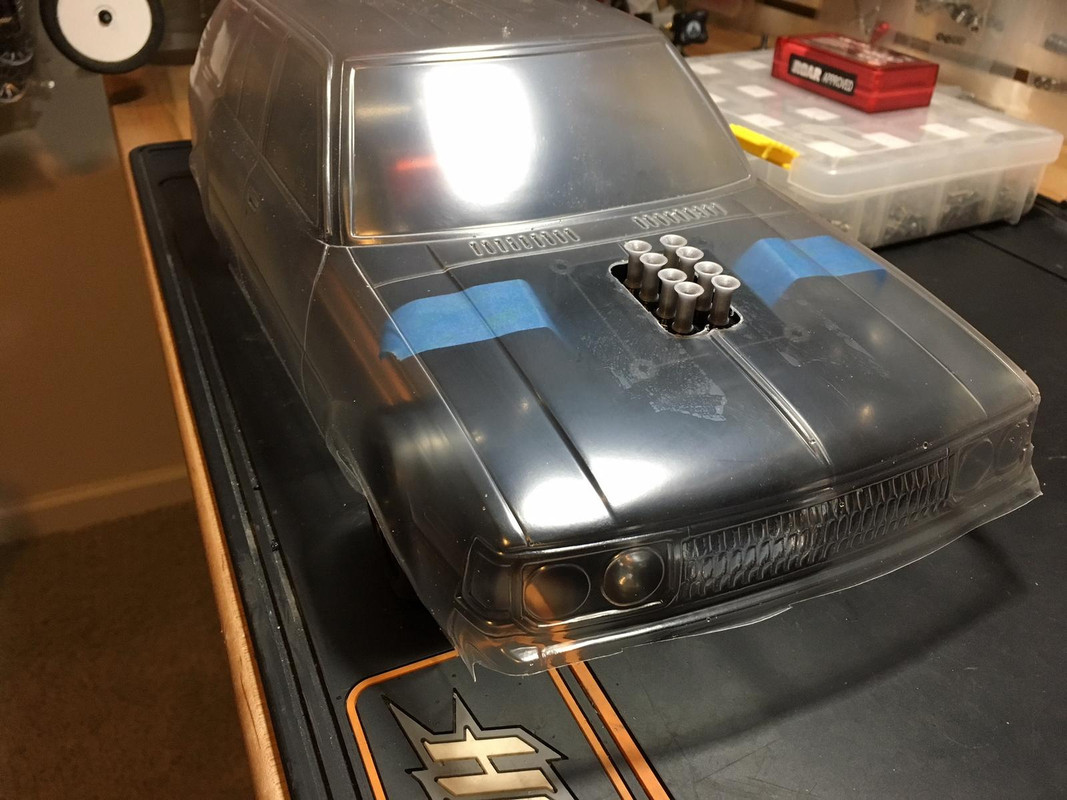  I'm pleased with it, I think it will look good once it's finished. Now I need to hit the drawing board and figure out how exactly I'm going to do the steering. |
|
| |
|
12-15-2018, 03:09 PM
| #13 |
| Rock Stacker Join Date: Jul 2015 Location: New Richmond
Posts: 93
|
I'd find a narrow servo, and/or get the current servo to fit in the chassis rails 90* from how it's pictured. Use a servo mounted servo saver like a Kimbrough 124, Associated B4 titanium ball studs, RPM 4-40 rod ends, and Lunsford titanium turnbuckles in the length(s) you need.
|
|
| |
|
12-16-2018, 10:11 AM
| #14 | |
| Pebble Pounder Join Date: Apr 2007 Location: Summerville
Posts: 120
| Quote:
A strip of servo tape under the servo should hold it in place just fine, the servo mount I made holds it down tight and stops it from sliding side to side. I order a long turnbuckle to make a link that goes between the two steering knuckles, then I'll just make a shorter link to go from one of the knuckles back to the servo, fairly simple solution.    | |
|
| |
|
12-16-2018, 05:22 PM
| #15 |
| Rock Stacker Join Date: Jul 2015 Location: New Richmond
Posts: 93
|
That's gonna be killer!!
|
|
| |
|
12-17-2018, 07:01 AM
| #16 | |
| Pebble Pounder Join Date: Apr 2007 Location: Summerville
Posts: 120
| Quote:
| |
|
| |
|
12-17-2018, 11:36 AM
| #17 |
| Rock Stacker Join Date: Jul 2015 Location: New Richmond
Posts: 93
|
You're adding weight, and the wide front tires don't help - most run the Traxxas aluminum Funny Car front wheels/tires, as they are 1.9" scale drag fronts. If it's going to be brushless in the 4600-6900kv on 2s or 3s range it's going to be a rocket.. direct drive cars are VERY fast.. |
|
| |
|
12-20-2018, 05:31 PM
| #18 |
| Pebble Pounder Join Date: Apr 2007 Location: Summerville
Posts: 120
|
I got a little carried away with the CAD, decided to just model up the entire chassis, probably should have just done it from the start to be honest. Change of plans yet again, the big open section in the rear of the chassis seemed like a waste of space. I decided to try and stuff the receiver and ESC in that area for a much cleaner look. This also allows me much more freedom to move the battery for/aft in the chassis depending on where I need the weight. 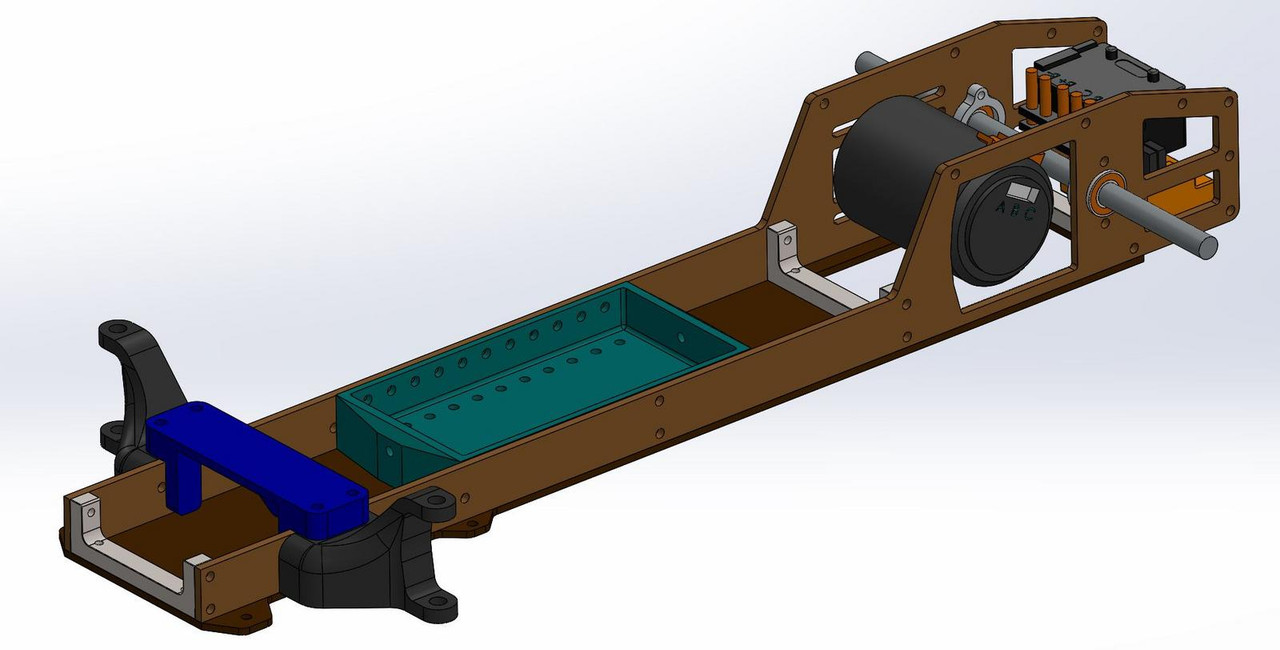   Settled on a 3 piece design for the rear, a lower shelf for the receiver, an upper shelf for the ESC, and the rear plate that the two shelves mount too. I'm also printing an axle tube that snaps into the bearing holders. It's simply there to protect all of the wires that will be in that area from the spinning axle shaft. It's going to be a tight fit but I think I can manage it. 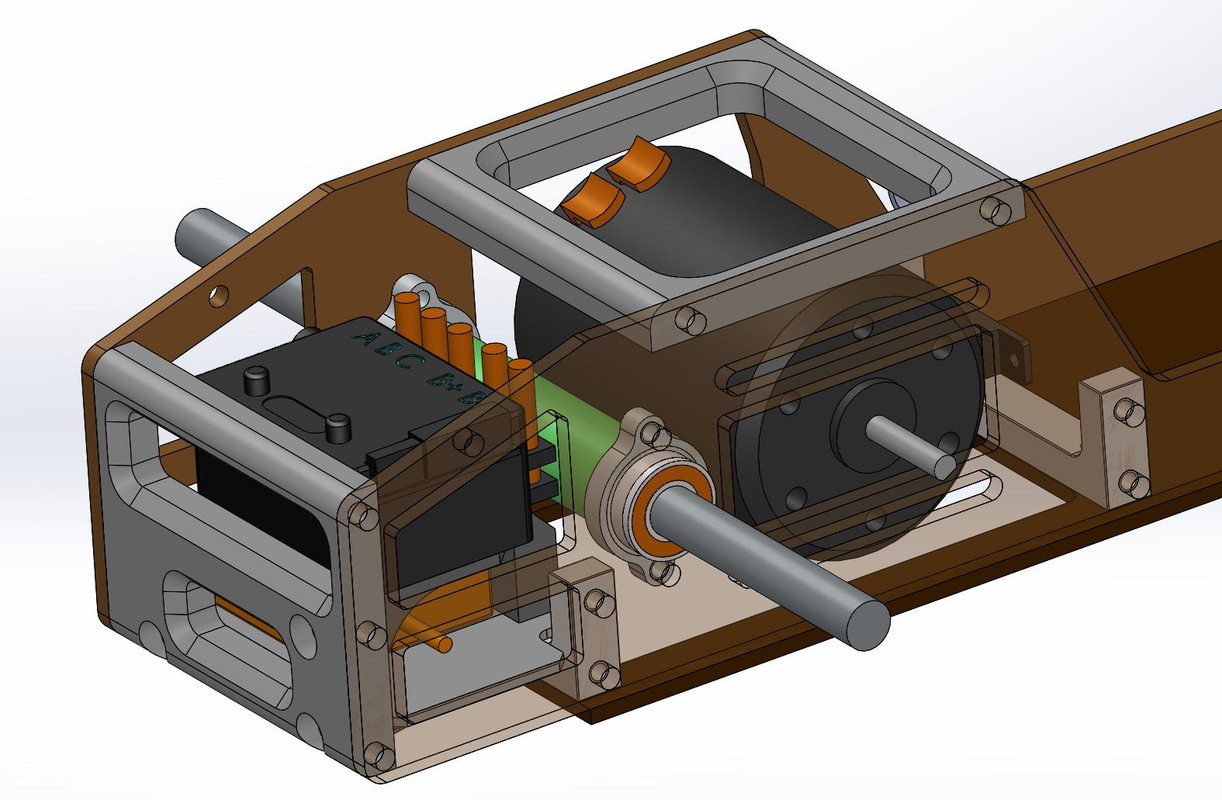 Parts laid out for the printer.  Prints complete. 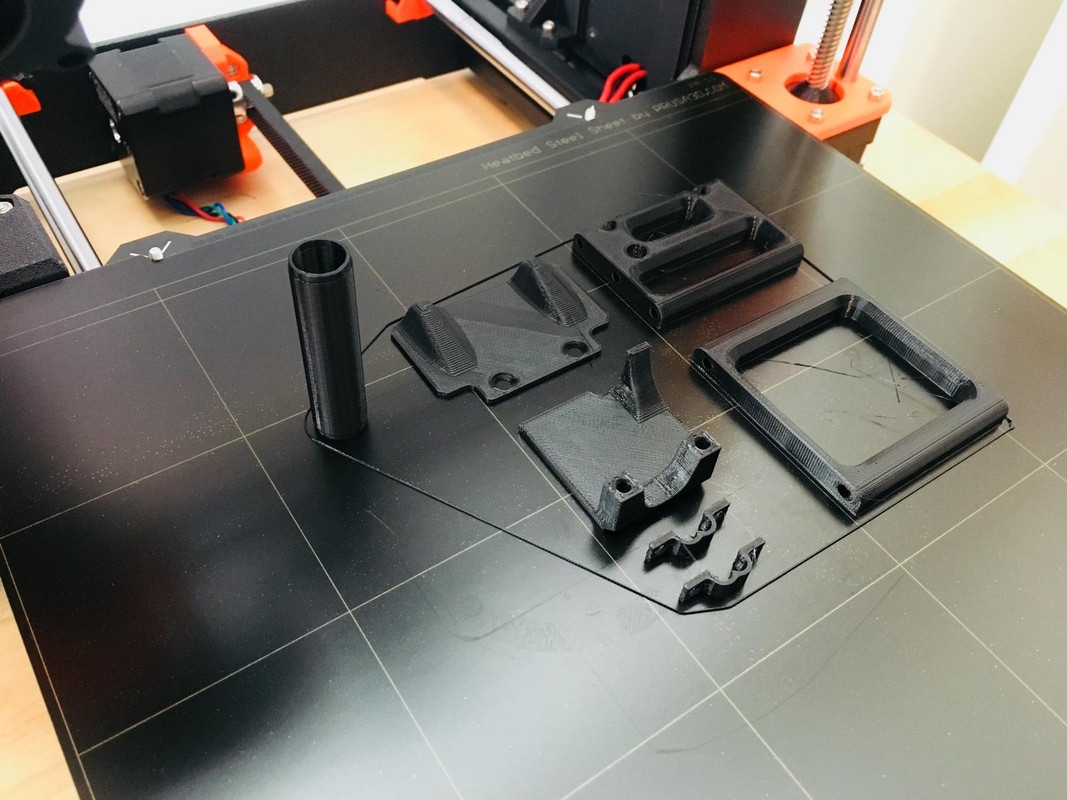  Trays assembled. 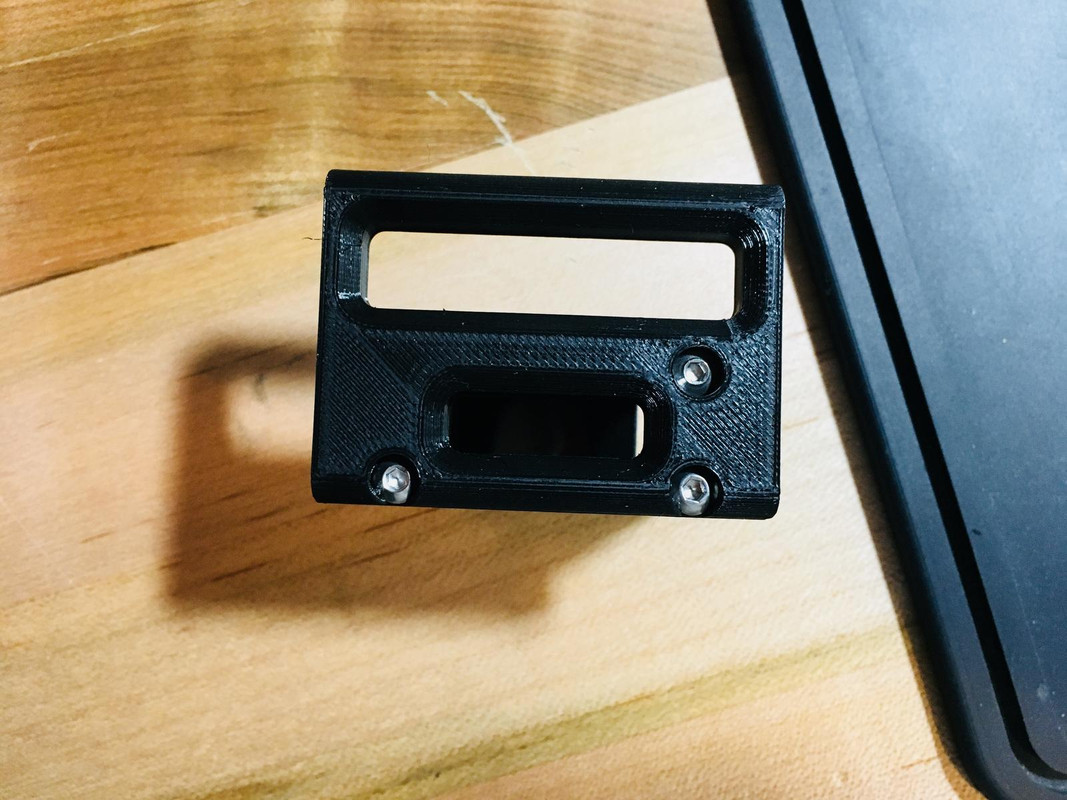  Initial fit appears to be good.  Some shots with one of the frame rails removed, you can see the axle tube in place as well.  Receiver in it's final resting place.  ESC in place.  This is why I felt the axle tube might be necessary, the servo lead barely made it to the receiver, if that tube wasn't there it would probably just wear on the axle as it spun. 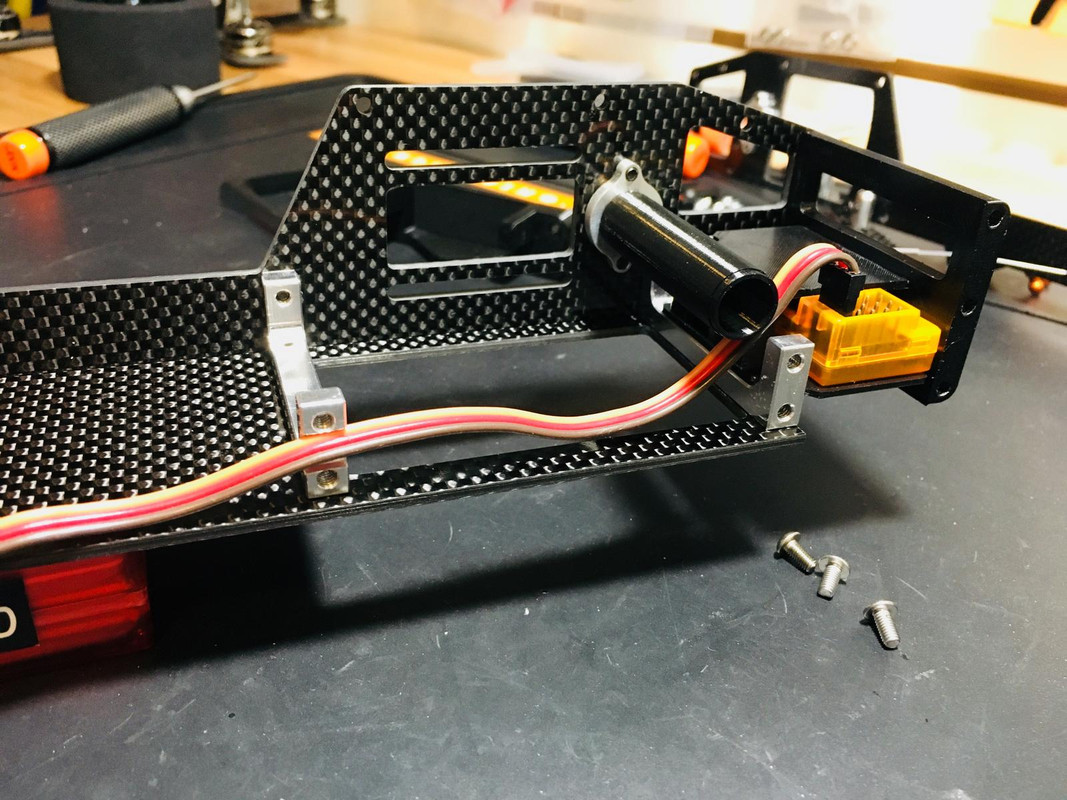 Last minute change to add an antenna holder.  Getting closer, just planning my wire routing's now. 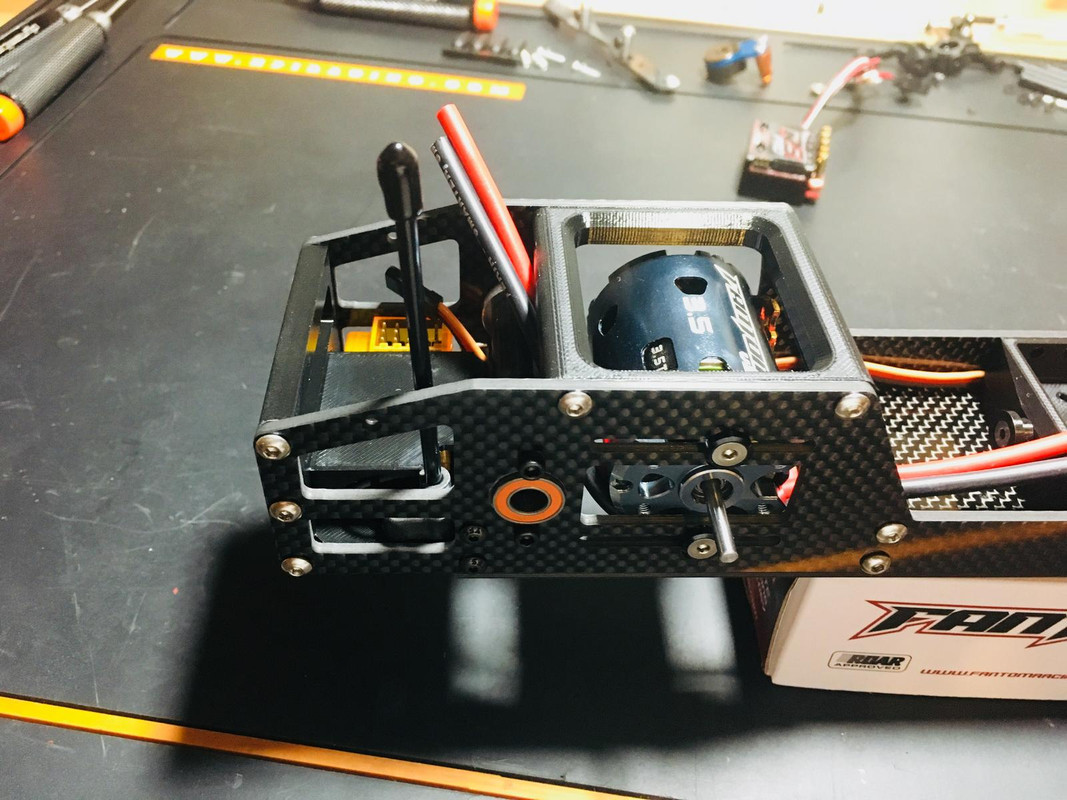 |
|
| |
|
12-20-2018, 07:58 PM
| #19 |
| Rock Crawler Join Date: Jun 2015 Location: In the Sticks in the Ozarks
Posts: 940
|
Moving the electrics to the back like that will help it hook up, but you'll probably need wheelie-bars. |
|
| |
|
12-24-2018, 06:22 AM
| #20 |
| Pebble Pounder Join Date: Apr 2007 Location: Summerville
Posts: 120
|
Chassis is complete, for now anyways. I got nervous having really tall rear body posts, the body would move around a lot. My solution was to design and print some rear body post supports. I decided it wouldn't hurt to support the front body posts too, so they got the same treatment. Got everything soldered and zip tied and realized I forgot to bind the receiver, that was fun trying to disassemble it to get to the bind button. Eventually I got to the button without having to un-solder anything. First drive in the garage, nothing broke so I guess we call that a success. Without traction compound this thing is a burnout machine. I'm excited to find a stretch of road somewhere.  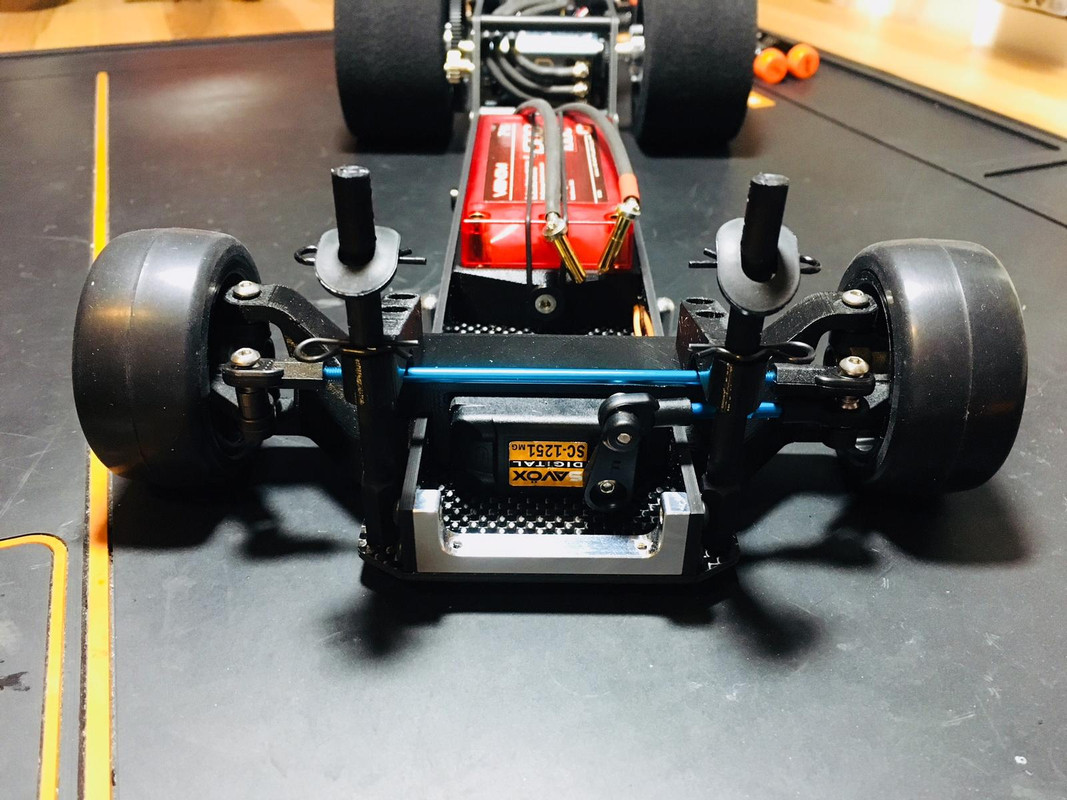 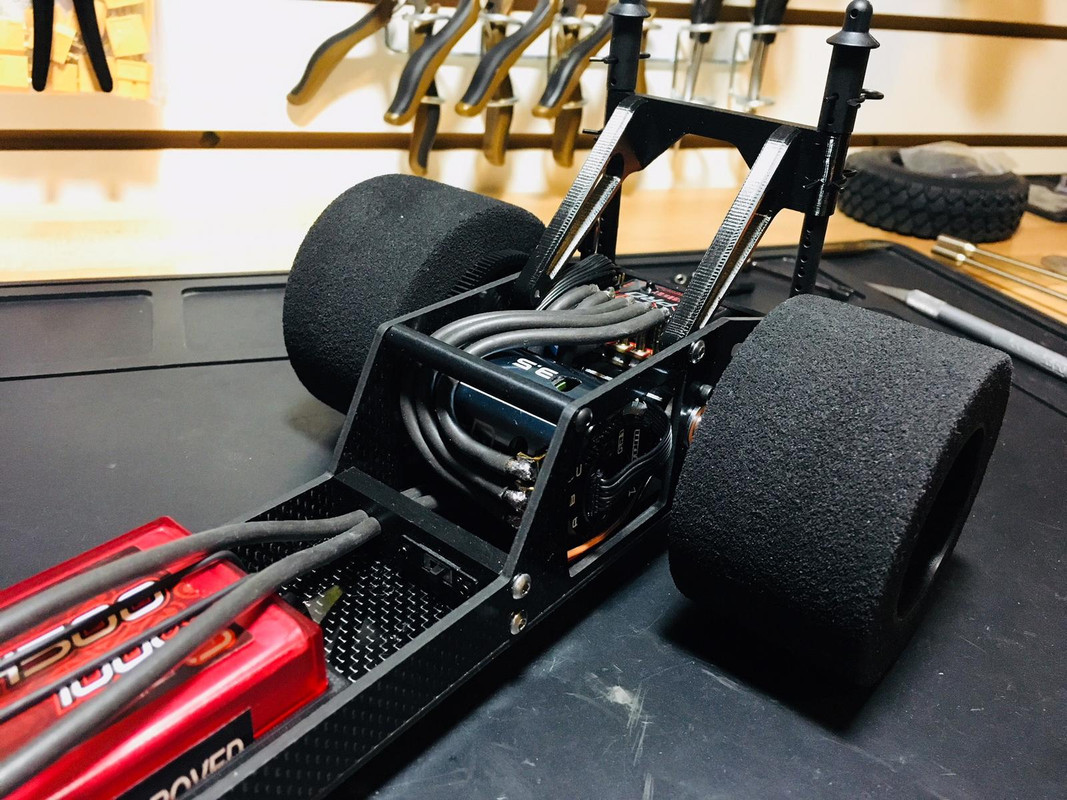  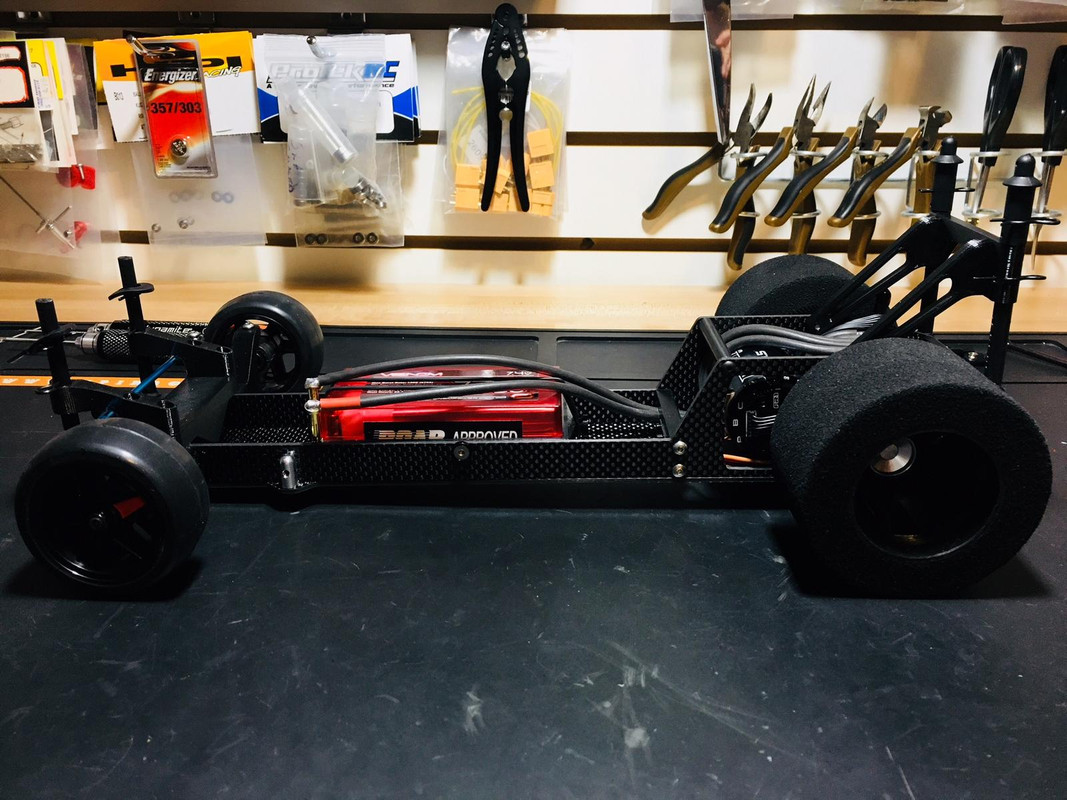 My first prototype wheely bar is on the printer, not sure if I'll need one yet, but I'll have it ready to go just in case. There will be turnbuckles between the two rod ends, I was just to lazy to model them yet.    Last edited by JpSonoma; 12-24-2018 at 09:15 AM. |
|
| |
 |
 Drag Wagon build - Similar Threads
 | ||||
| Thread | Thread Starter | Forum | Replies | Last Post |
| Power wagon build up | Jfrisch01 | Axial SCX-10 | 71 | 03-09-2015 01:07 AM |
| Crosley Wagon Build | jeepjames87 | Non Crawler RC's | 10 | 03-04-2010 10:19 PM |
| Quick G Wagon Build | tjb | 1.9 Scale Rigs | 83 | 08-04-2008 06:14 PM |
| DINKY R/C G-WAGON build | muddauber7 | 1.9 Scale Rigs | 56 | 05-02-2008 11:29 AM |
| power wagon build | XxPr3miumRid3rxX | 1.9 Scale Rigs | 14 | 08-23-2007 08:12 AM |
| Thread Tools | |
| Display Modes | |
| |


 Linear Mode


