| |
 04-14-2011, 07:38 PM
| #1 |
| Rock Crawler Join Date: Jul 2005 Location: Central Coast
Posts: 667
|
Lots of questions here. I want to do a digital camo paint job with four colors on the inside of the body. Specifically, I don't want it to look patchy, plain (dominated by a single color), or like a jigsaw puzzle missing a few pieces, but more even and uniform like an actual military pattern on clothing, etc.. I seen a 'how to' for this somewhere, but searched and couldn't find it again (might have been on another site..?). Things mostly related were people painting guns so they just sprayed the entire thing, applied a few masks, and repeated that pattern a couple times. So do I want to start with the darkest color first and work to the lightest (reverse from painting the exterior like the guns, etc.)? Do I cover virtually the entire body with paint masks for the first color? I've got some inkjet sticker printer paper, if I cover masks with other masks and multiple layers of paint, is there a trick to peeling up one mask and not the rest it may be stuck to? Would I be better off to make a negative of the mask and use liquid mask and the sticker paper together? Is the Tamiya paint a good paint or should I look for another brand? The LHS had a good selection of Tamiya and a limited selection of Pactra. |

|  |
| Sponsored Links | |
| | |
|
04-14-2011, 07:59 PM
| #2 |
| I wanna be Dave  Join Date: Dec 2009 Location: San Francisco
Posts: 2,236
|
You have got the idea. The hard part is going to be getting it to lay down nice and straight. I would try to find some vinyl or something like that to use because it will stretch to fit the odd shapes of the body. When you lay everything out, cover most of the body but try not to overlap the pieces too much because it will be hard to tell whats what after you shoot a color in there. Make sure you use a credit card or something like that to get them all stuck down really well. Also I like to shoot a thin layer first and let it dry, it really helps seal up the tape before shooting your actual coats. Pull 1/3 of them or so, shoot your next color and repeat. It would probably be best to go from dark to light but if you cant help it just shoot some silver before going to the darker color. I like pactra but the tamiya stuff should be fine. |
|
| |
|
04-14-2011, 08:05 PM
| #3 |
| RCC Addict Join Date: Sep 2007 Location: Hallsville, Tx
Posts: 1,820
|
Here is the body i did with digi camo but it is 3 color and painted on the outside, i showed the process of doing it but you just have to do it reversed. You want to start with the top layer first and it needs to be darker, then lay your next layer down after the first layer is dried, so on and so on. Tamiya paint will be fine as long as the number starts with a letter P. ~" Rc4wd's RCX TIMBERWOLF "~ Built by Run2jeepn |
|
| |
|
04-14-2011, 09:20 PM
| #4 | ||
| Rock Crawler Join Date: Jul 2005 Location: Central Coast
Posts: 667
| Quote:
Quote:
| ||
|
| |
|
04-14-2011, 09:22 PM
| #5 |
| RCC Addict Join Date: Sep 2007 Location: Hallsville, Tx
Posts: 1,820
|
I didn't cut those out, i have a secret source for the paint mask, they come in negative and positive on a big roll. |
|
| |
|
04-15-2011, 12:00 AM
| #6 | |
| Quarry Creeper Join Date: Jun 2009 Location: Minnesota
Posts: 247
| Quote:
When I think of digital camo, I think of like this.. http://www.theblackswantheory.org/wp...igitalcamo.jpg | |
|
| |
|
04-15-2011, 11:10 AM
| #7 | |
| Rock Crawler Join Date: Jul 2005 Location: Central Coast
Posts: 667
| Quote:
| |
|
| |
|
04-15-2011, 04:36 PM
| #8 | |
| I wanna be Dave Join Date: Jan 2009 Location: By a lake in Thornton
Posts: 2,218
| Quote:
I have seen a few good digicamo paint jobs, but not many. I would almost wonder, if getting a "skin" printed or using the cool picture glue and printing out some REAL digital camo patters would be the way to go> | |
|
| |
|
04-15-2011, 05:00 PM
| #9 |
| RCC Paint & Graphics  Join Date: Oct 2005 Location: Wauseon, OH.
Posts: 2,017
|
Take a look at Tacticalcamo, they have a good selection of camo paint mask patterns to choose from.  http://www.tacticalcamo.com/Paint-Stencils.html |
|
| |
|
04-15-2011, 05:03 PM
| #10 |
| I wanna be Dave Join Date: Jan 2009 Location: By a lake in Thornton
Posts: 2,218
|
that snake skin is so goin on the rail of my AR!
|
|
| |
|
04-15-2011, 06:42 PM
| #11 | ||
| RCC Addict Join Date: Sep 2007 Location: Hallsville, Tx
Posts: 1,820
| Quote:
Quote:
| ||
|
| |
|
04-15-2011, 08:22 PM
| #12 |
| Rock Crawler Join Date: Jul 2005 Location: Central Coast
Posts: 667
|
Doesn't look like my sticker paper masks are going to work. I stuck one to another overnight and peeled them apart. The paper sort of tears as you lift it.
|
|
| |
|
04-15-2011, 08:50 PM
| #13 |
| Newbie Join Date: Apr 2011 Location: Birmingham
Posts: 28
|
It isn't a crawler lid, but this is one i did in Pearl white, silver and gunmetal gray. It was all hand cut. I made a template on my computer and printed it out. Then i just held it inside the body and traced it off on the outside. I really just used it as a reference since there isn't any set pattern. 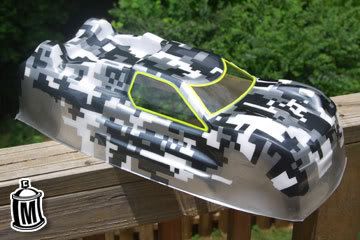 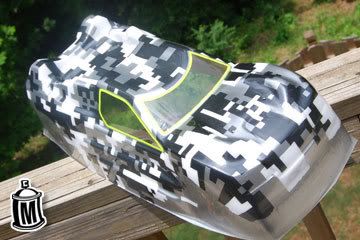 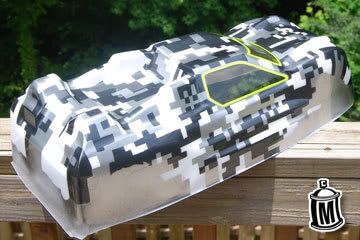 |
|
| |
|
04-15-2011, 09:01 PM
| #14 | |
| Rock Crawler Join Date: Jul 2005 Location: Central Coast
Posts: 667
| Quote:
| |
|
| |
|
04-15-2011, 09:02 PM
| #15 |
| Newbie Join Date: Apr 2011 Location: Birmingham
Posts: 28
|
That is all painted on the inside. I used liquid mask and an Xacto.
|
|
| |
|
04-15-2011, 09:43 PM
| #16 |
| Quarry Creeper Join Date: Jun 2009 Location: Minnesota
Posts: 247
|
Nice work momo. That looks great! Ive made some masks and cut them out on my plotter but a person would be there all day weeding after it was laid out.. |
|
| |
|
04-15-2011, 10:10 PM
| #17 |
| Newbie Join Date: Apr 2011 Location: Birmingham
Posts: 28
|
Thanks. I know what you mean. I set up some other files and had a buddy cut them out for me on his plotter. It took me two nights just to weed them out. But it sure beats the hell out of cutting them by hand. |
|
| |
 |
| |


 Linear Mode


