| |
| |||||||
 |
| | LinkBack | Thread Tools | Display Modes |
 09-10-2015, 06:06 AM
| #1 |
| Rock Crawler Join Date: Jul 2008 Location: Pearland, TX
Posts: 595
|
Here is my first hardbody build, taking (2) Tamiya F-350 bodies and making a super cab F-350 with extended hood and opened up wheel openings in the rear. Using a hot knife I cut the cab up and got that part done. Happy with this method, quick and easy. Will obviously need some sanding to prep the seam prior to bonding together then some bondo likely, but still am happy for the most part with how it came out. With the early stages of arthritis, I was afraid the thread cutitng method would be too much for me. Also cut off the hood off the extra body and am going to extend the front end on the new one. Have started that, but likely will shorten the nose up a bit. This is for my Mega-truck build, which is just getting started. This is the first big piece for that. That build thread can be found here: My Mega Truck Build Will update this thread as I have more progress. Will likely be a couple of weeks before I can pick back up on this as I have time. Wes |

|  |
| Sponsored Links | |
| | |
|
09-10-2015, 06:59 AM
| #2 |
| RCC Addict Join Date: Dec 2012 Location: Crookston
Posts: 1,872
|
Looks like a good start.
|
|
| |
|
09-10-2015, 12:03 PM
| #3 |
| Rock Crawler Join Date: Jul 2008 Location: Pearland, TX
Posts: 595
|
Got a bit further on my lunch break today. Bed wheel arches are done. Also sanded a bit and the cab pieces now fit together fairly well, nothing some bondo/bumper filler wont solve. Hood is also close. At its final length. Needs to be bonded together then the hood lines cleaned up and the wheel arches curved a bit at the top. This is actually cool to see. Even though it is in its infancy, this is more fun than I thought it would be. Lots of work to do to make it look right, but still it is better than I thought thus far. Wes |
|
| |
|
09-10-2015, 12:51 PM
| #4 |
| Quarry Creeper Join Date: Jun 2004 Location: aurora, CO
Posts: 472
|
Looks like a good start, the only thing i see that i had to deal with on mine was aligning the body lines from one cab to the other, i also had problems with it and it took some fitting to get it square. Even then the top window line didnt line up with the other, but at that point it was jist a little sanding that helped it out. I also considered cutting out the roof and fabing a new flat panel, however i ended up filling it with the bumper repair epoxy and then a light coat of body filler. |
|
| |
|
09-10-2015, 12:55 PM
| #5 | |
| Rock Crawler Join Date: Jul 2008 Location: Pearland, TX
Posts: 595
| Quote:
Wes | |
|
| |
|
09-10-2015, 12:59 PM
| #6 | |
| Rock Crawler Join Date: Jul 2008 Location: Pearland, TX
Posts: 595
| Quote:
Wes | |
|
| |
|
09-10-2015, 04:56 PM
| #7 |
| Rock Crawler   Join Date: Sep 2009 Location: Bloomsburg, pa
Posts: 583
|
this will be cool when its done. This is some friendly advice and i could be way off since its just pictures. It looks like the roof cut got away from you just a bit, in my model making/customizing experience the straighter and more planned out the cuts the easier it is to put it together and make it look good. I understand manual dexterity can be hard sometimes when it comes to arthritis and trying to grip small objects, it can be EXTREMELY frusterating, and one thing that helps with that is using the longest straightest blade you can get your hands on to make straight cuts. The most exact way is to take it one stroke of the saw at a time to leave a minimal and mirror kerf. A hot knife works but there are better ways to make future things easier, even a hacksaw could work if you took your time. if it was me trying to solve the hood line i would cut out the ridge on the front part and narrow it a bit to match up then fill the rest in with plasticard. You could also even it out with filler but for me thats the "easy way out". It looks awesome and i cant wait to see more posts from you |
|
| |
|
09-10-2015, 05:33 PM
| #8 |
| Rock Crawler Join Date: Jul 2008 Location: Pearland, TX
Posts: 595
|
The roof was my very first cut. A little sanding should get it much closer (just a little hand sanding made a huge difference in this mornings pics vs lunch pics). The part I am most scared about committing to is putting the styrene backer on the underside and bonding it all together for good! Thanks for the tips and critique, it is appreciated! Wes |
|
| |
|
09-10-2015, 05:53 PM
| #9 |
| Rock Crawler Join Date: Jan 2008 Location: P-TOWN
Posts: 748
|
Your biggest hurdle will be matching your uneven edges to get a good bond. Next time try drawing some lines to follow when cutting. Once you get it there, just tack it together in a few spots with some CA glue to make sure it all looks good before the styrene backing goes on. I also covered the styrene with drywall mesh tape and E6000 for reinforcement. FWIW i would beef up the window post. They seem to be the weak point of hard bodies.
|
|
| |
|
09-10-2015, 09:25 PM
| #10 | |
| Rock Crawler Join Date: Jul 2008 Location: Pearland, TX
Posts: 595
| Quote:
Wes | |
|
| |
|
09-11-2015, 04:55 PM
| #11 | |
| Rock Crawler Join Date: Sep 2009 Location: Bloomsburg, pa
Posts: 583
| Quote:
clamp the body how you want it alont the rockers, put masking tape across the roof over the split line, if you can think of a way to add temporary structure over the masking tape for support that would be a good idea. Fill in the roof gap with shoe goo, or some other glue along those lines, from the inside and spread it from side to side a bit and add mesh. Let that dry and then do small sections on the sides (without taking off the clamps) so it can support itself without clamps. The masking tape will keep the glue even with the surface it is applied to and will be easy to remove after the glue is dry, doing little bits on the sides while its in position will help hold everything in place after the clamps are off so you have better access to all areas. sounds simple but i know first hands things dont always go as planned.  | |
|
| |
|
09-14-2015, 09:51 AM
| #12 |
| Rock Crawler Join Date: Mar 2010 Location: Onalaska
Posts: 547
|
WOW what did you do to that poor thing!!!!!! Just kidding going to be sweet when shes done but you do got your work cut out for ya JUST remember PATIENTS and lots of it if starts to get to ya walk away for bit LOL come back to it.
|
|
| |
|
09-14-2015, 10:39 AM
| #13 |
| Fan of wheelspeed Join Date: Jun 2011 Location: Southern IN
Posts: 3,369
|
One of my best investments for doing crew and extended cabs was a small sheet of 1/8" steel. I use it to lay my cabs on while gluing them to one another to make sure that the door lines and all of the side molding line up properly. Believe it or not that alone was a big help. Plus you can use magnets to help hold things in place while you line up one half or the other. Follow the sticky at the top of this section for the methods and glues when it comes to bodywork. It'll walk you through backing the body with styrene. It's very easy to do, it just takes commitment to taking time for each step. As for the roof line, you need to go further back with your cut. Right to the point that the window lines start to slope down. You'll have to use a bit more styrene but it's easier than trying to get that curve straightened out. There are a handful of these builds in this section that people have done that you can use as a guide of sorts for the cuts. One big tip I can give is to not worry if there's a slight gap somewhere. The main thing is to get the body straight. So if you have a small gap but the body is straight, affix it from the backside to hold the body pieces in position and fill the gap on the outside of the body using styrene. Just my $0.02
|
|
| |
|
09-14-2015, 11:15 AM
| #14 | |
| Rock Crawler Join Date: Jul 2008 Location: Pearland, TX
Posts: 595
| Quote:
Been looking at the glue recommendations and have all 3 options for the different purposes. This week will be crazy with work, should get back to this next week. Wes | |
|
| |
|
09-14-2015, 12:24 PM
| #15 |
| Rock Crawler Join Date: Sep 2009 Location: Bloomsburg, pa
Posts: 583
|
magnets..... brilliant idea! Thanks for posting those tips, i know they werent meant for me but they are really good! |
|
| |
|
09-14-2015, 02:39 PM
| #16 | |
| Rock Crawler Join Date: Jul 2008 Location: Pearland, TX
Posts: 595
| Quote:
Ive been toying with the idea of building a miniature chassis table to help with chassis fab like the pros use: 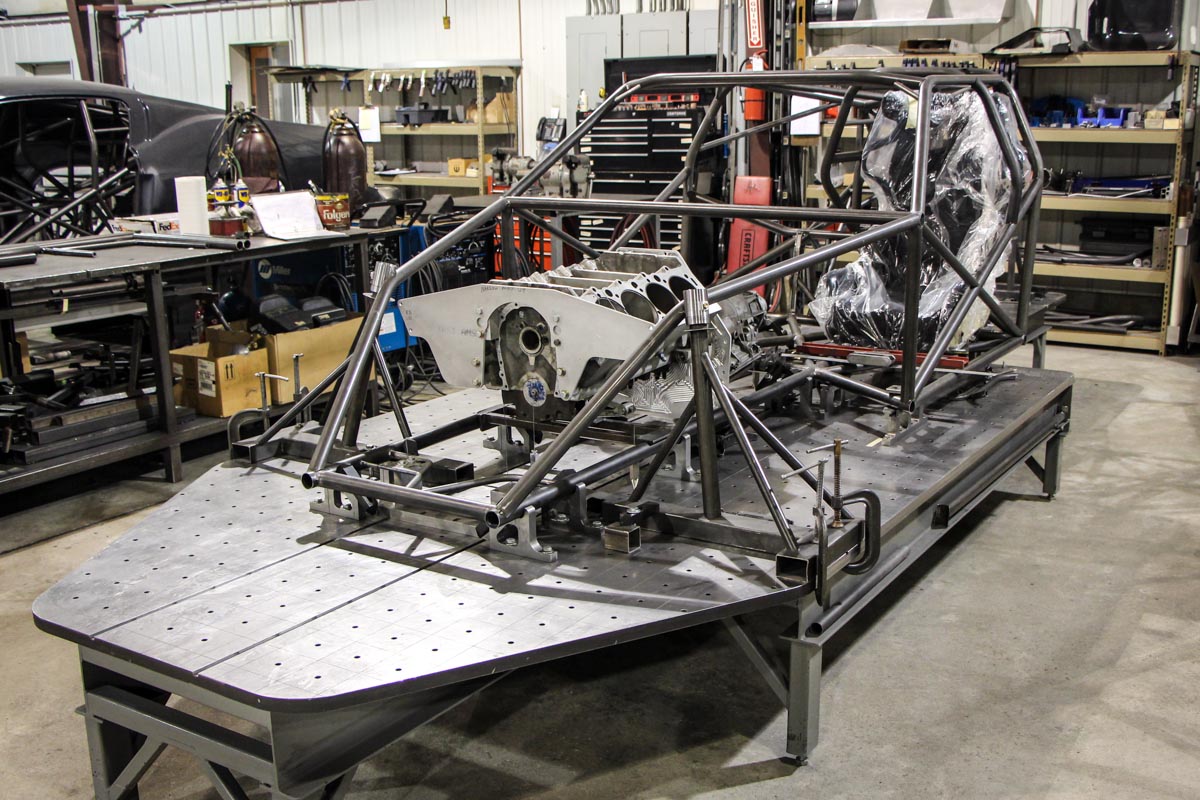 out of this: McMaster-Carr Looks like you could use something similar to this: McMaster-Carr To hold a body in place in a fixture type setup. Thoughts? Wes | |
|
| |
|
09-14-2015, 04:19 PM
| #17 |
| Fan of wheelspeed Join Date: Jun 2011 Location: Southern IN
Posts: 3,369
|
That may work out alright. The only hang up would be those "in between hole" moments. I tape neodium magnets to the base of the body with my steel sheet and it does great. It's just enough to hold them down and prevent the cabs from tilting forward while I'm lining up the other half of the cab. I probably have $20 invested if that. For cutting I use a Dremel with a thin cutoff wheel as well as thread for those cases where the dremel heats the plastic to much or when I can't get into a tight space with the wheel. Either way I always measure twice and cut thrice, lol. F350's are difficult to make into a crew or extended cab due to the curves in the roof and windows. When I was taking on jobs like this I charged an extra $10-20 to account for the 10-20 extra times I'd have to stop and scratch my head. On the roof panel I've learned to cut the whole roof out and replace it with styrene. Its a lot easier than trying to fill in the curved void and make it straight again.
Last edited by Hoosierdady; 09-14-2015 at 04:25 PM. |
|
| |
|
09-14-2015, 04:24 PM
| #18 |
| Fan of wheelspeed Join Date: Jun 2011 Location: Southern IN
Posts: 3,369
|
Another tip I can give you is to invest in a 6" drywall knife for the roof and sides of the body. Standard "putty knives" are almost always made of flexible materials and they'll give some as you lay down the putty/Bondo, the metal drywall knife will not. It also serves as a great tool to make sure that you have the body panels and roof halves even and that you don't end up with a soup bowl for a roof.
|
|
| |
|
 My first Hardbody build - tips and critique appreciated - Similar Threads
 | ||||
| Thread | Thread Starter | Forum | Replies | Last Post |
| About to make a backyard course - any tips would be appreciated. | Mr.RonGilbert | Newbie General | 12 | 03-08-2014 09:06 AM |
| First SCX-10 Build (Guidance Appreciated!) | sdhsbaseball | Axial SCX-10 | 11 | 02-18-2014 10:45 PM |
| critique my first scx10 build | tank4114 | Newbie General | 8 | 02-22-2013 04:44 PM |
| hardbody tips needed! | 604crawlerdude | Axial AX-10 Scorpion | 3 | 02-19-2012 03:57 PM |
| |


 Linear Mode


