| |
| |||||||
 |
| | LinkBack | Thread Tools | Display Modes |
 08-30-2014, 05:59 AM
| #1 |
| Rock Stacker Join Date: Jan 2012 Location: Vancouver
Posts: 68
|  rc 1 by A+G vIsUaLs, on Flickr rc 1 by A+G vIsUaLs, on Flickr rc 2 by A+G vIsUaLs, on Flickr rc 2 by A+G vIsUaLs, on Flickr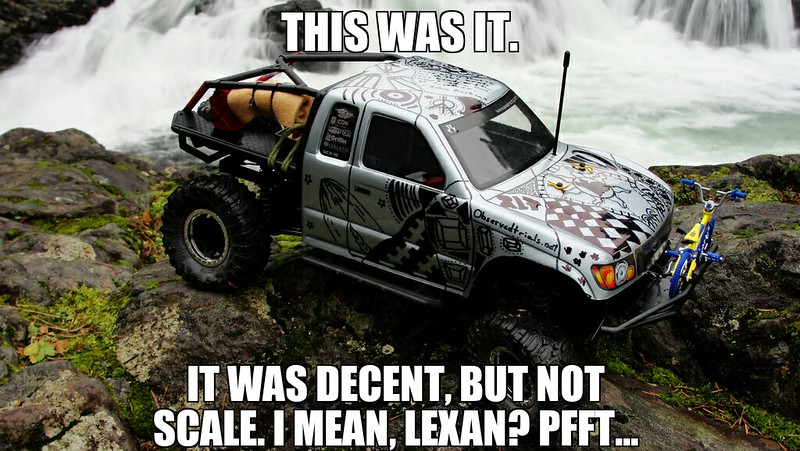 rc 3 by A+G vIsUaLs, on Flickr rc 3 by A+G vIsUaLs, on Flickr rc 4 by A+G vIsUaLs, on Flickr rc 4 by A+G vIsUaLs, on Flickr rc 5 by A+G vIsUaLs, on Flickr rc 5 by A+G vIsUaLs, on Flickr rc 6 by A+G vIsUaLs, on Flickr rc 6 by A+G vIsUaLs, on Flickr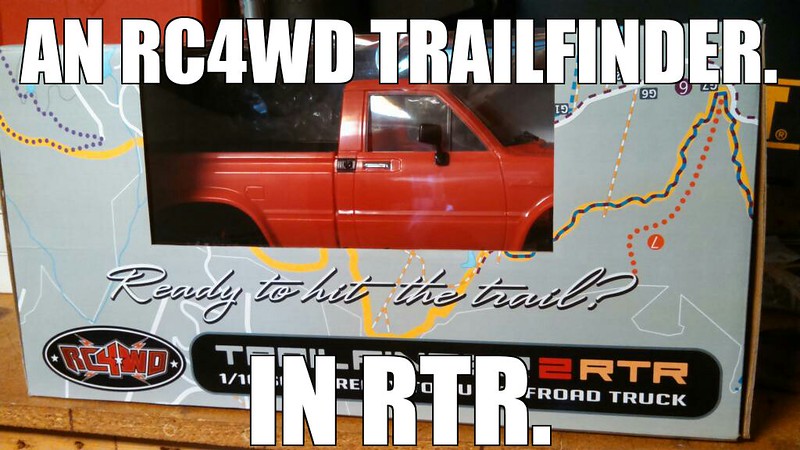 rc 7 by A+G vIsUaLs, on Flickr rc 7 by A+G vIsUaLs, on Flickr rc 8 by A+G vIsUaLs, on Flickr rc 8 by A+G vIsUaLs, on Flickr custom image plankton meme by A+G vIsUaLs, on Flickr custom image plankton meme by A+G vIsUaLs, on Flickr rc 10 by A+G vIsUaLs, on Flickr rc 10 by A+G vIsUaLs, on Flickr rc 11 by A+G vIsUaLs, on Flickr rc 11 by A+G vIsUaLs, on Flickr PhotoGrid_1408008325205 by A+G vIsUaLs, on Flickr PhotoGrid_1408008325205 by A+G vIsUaLs, on Flickr rc 12 by A+G vIsUaLs, on Flickr rc 12 by A+G vIsUaLs, on Flickr[IMG] 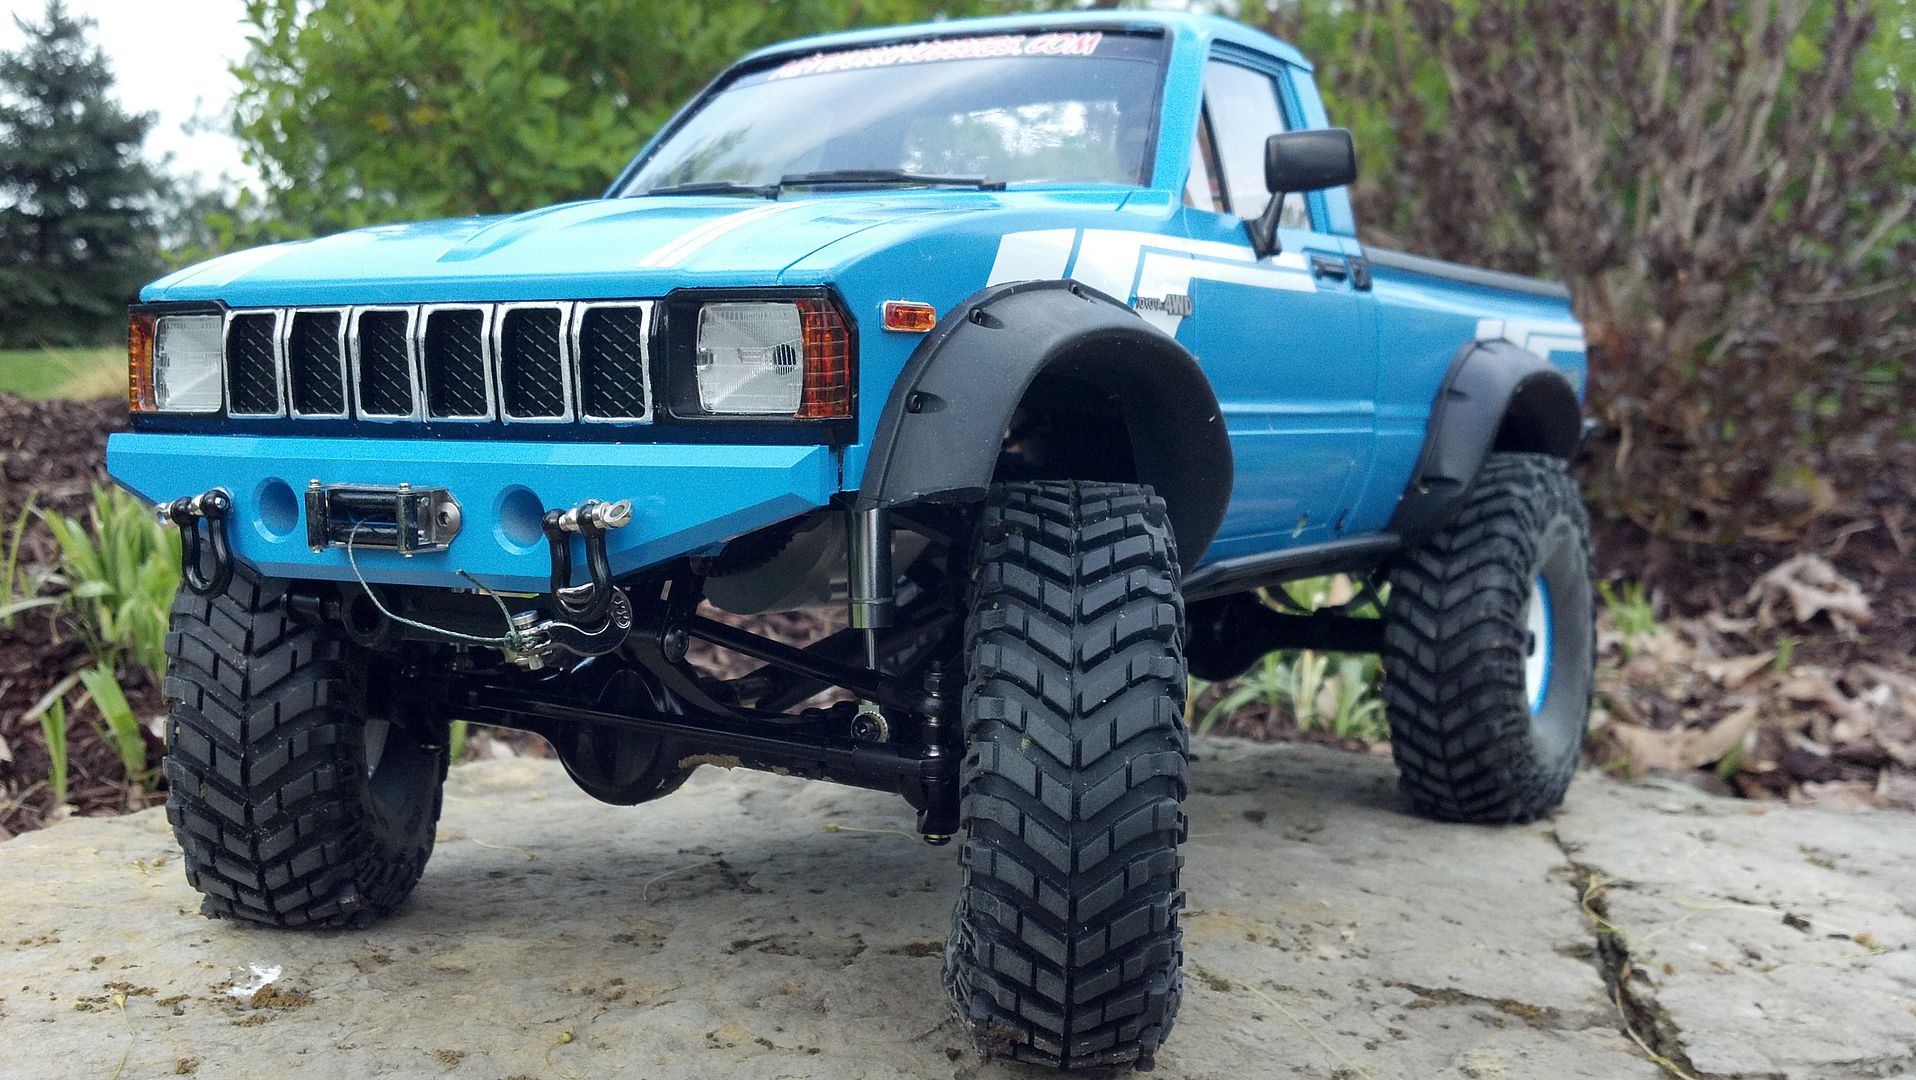 [/IMG] [/IMG] 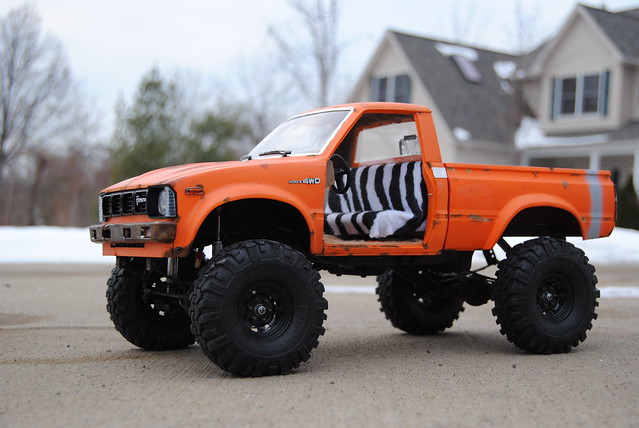   rc 13 by A+G vIsUaLs, on Flickr rc 13 by A+G vIsUaLs, on FlickrBAAAAAM!!!! Now the truth is, I have no talent, or money, or time, or energy, or drive, or care, or temperament, or whatever to get my rig anywhere near scale as the beautiful creations I posted above. A huge inspiration for me was the artist otherwise known as "Pardonmynoob" of RCCRAWLER. I know nothing of this man except that he has a talent that knows no equal. I tried the best of my inabilities to create something even remotely, possibly close to the creations he seems to create with ease out of his hands and imagination. My beginnings were humble, and the further I continued the more challenging it got. To say I have a new found respect for the modeling side of RC would be an understatement. Unfortunately, most of my pictures of the build process were lost when I was abducted by Aliens.  Yes, Thank you Giorgio. ^^^ Anyhoozer, here is my finished product. I will offer some insight along the way to hopefully make up for the lack of tomato sauce. Wait wut... Money shots!!! More to follow...  20140829_125035 by A+G vIsUaLs, on Flickr 20140829_125035 by A+G vIsUaLs, on Flickr DSC_0282 by A+G vIsUaLs, on Flickr DSC_0282 by A+G vIsUaLs, on Flickr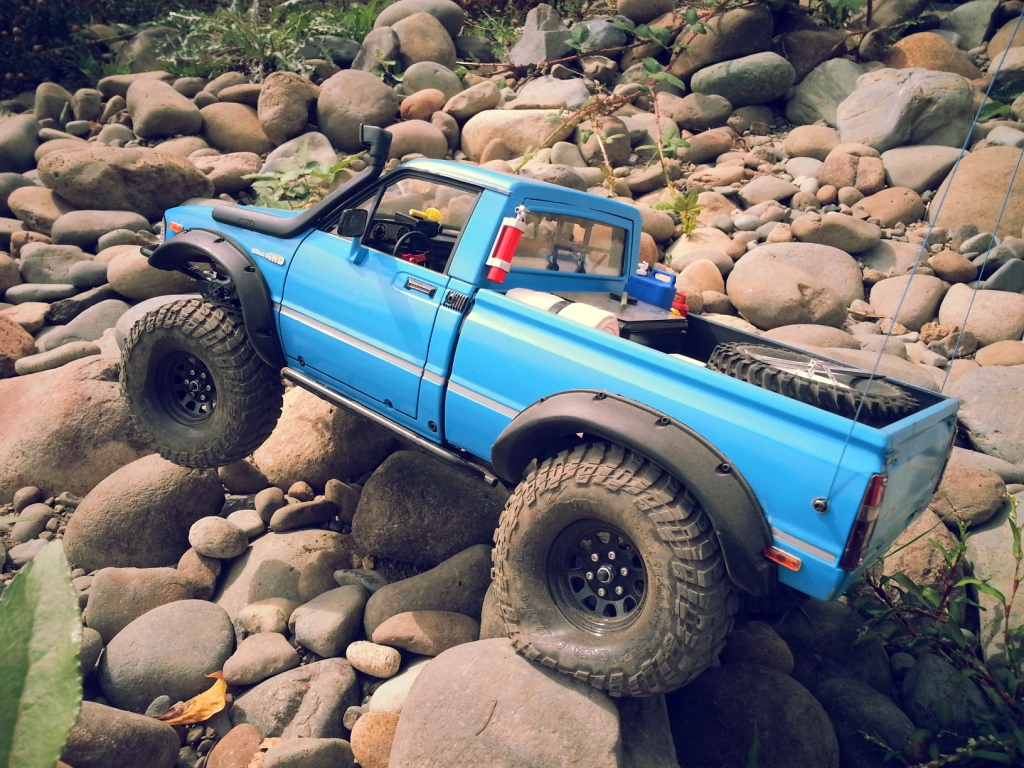 20140829_125047 by A+G vIsUaLs, on Flickr 20140829_125047 by A+G vIsUaLs, on Flickr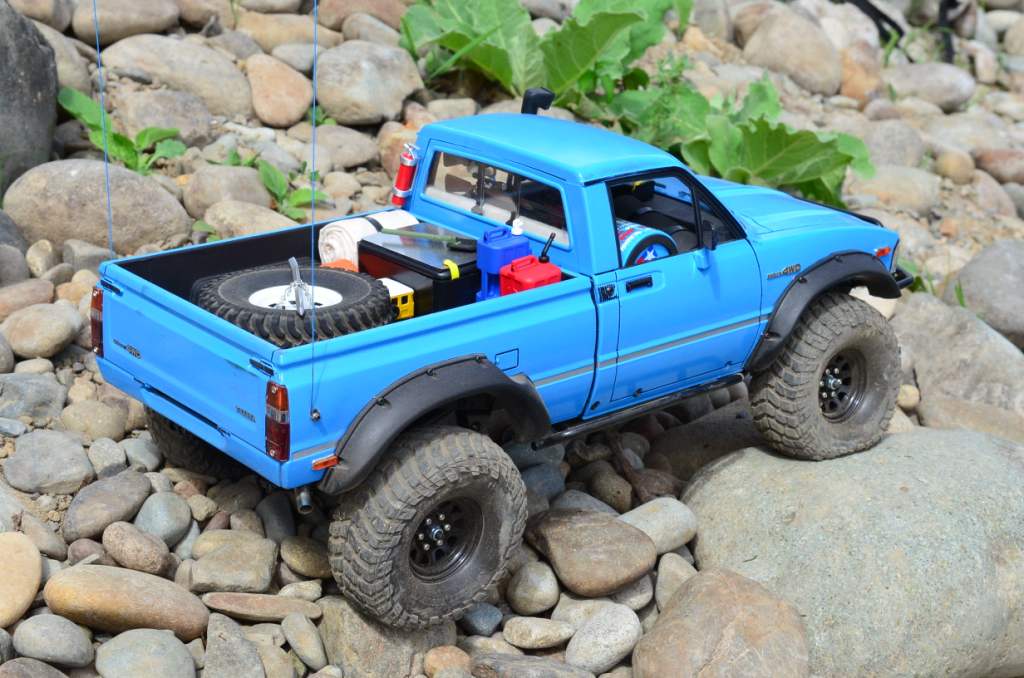 DSC_0285 by A+G vIsUaLs, on Flickr DSC_0285 by A+G vIsUaLs, on Flickr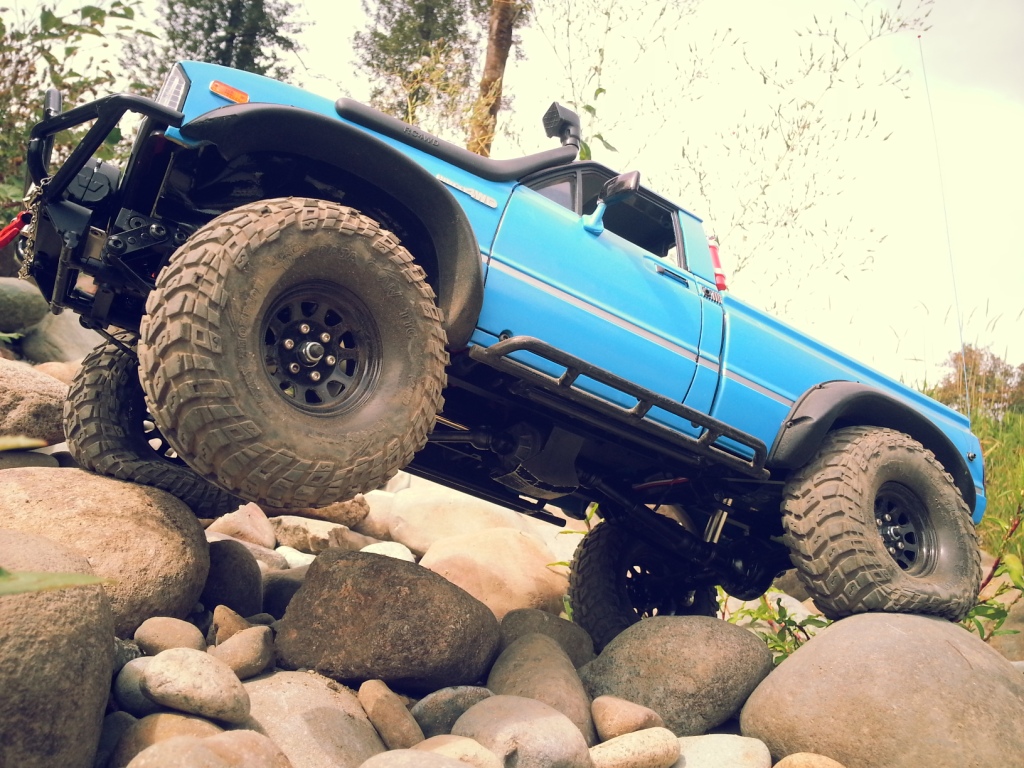 20140829_125101 by A+G vIsUaLs, on Flickr 20140829_125101 by A+G vIsUaLs, on FlickrTo-Be-Continued in much more, sensual, romantic depth. Stayed tuned beautiful people! |

|  |
| Sponsored Links | |
| | |
|
08-30-2014, 06:05 AM
| #2 |
| Rock Stacker Join Date: Jan 2012 Location: Vancouver
Posts: 68
|
First up is the last thing I installed on my creation, Lights. I opted not to use the confusing RC4WD TF2 light kit and instead kept it simple and minimal. Two white led's for front, two reds in back, and two yellows for the instrument cluster. I custom cut the dashboard so the lights would illuminate the sticker from the back.  DSC_0269 by A+G vIsUaLs, on Flickr DSC_0269 by A+G vIsUaLs, on Flickr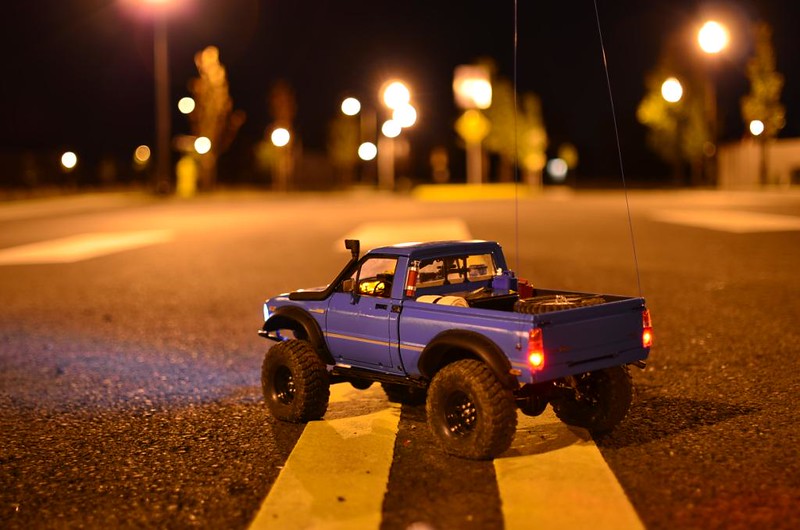 DSC_0272 by A+G vIsUaLs, on Flickr DSC_0272 by A+G vIsUaLs, on Flickr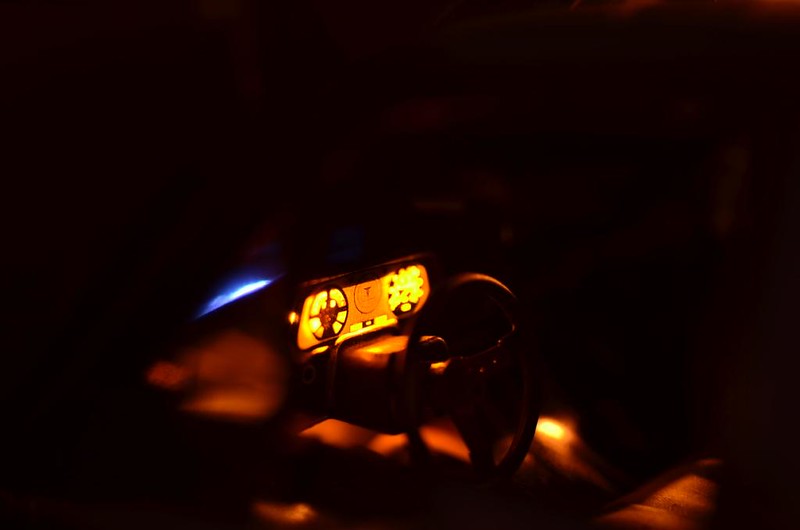 DSC_0278 by A+G vIsUaLs, on Flickr DSC_0278 by A+G vIsUaLs, on Flickr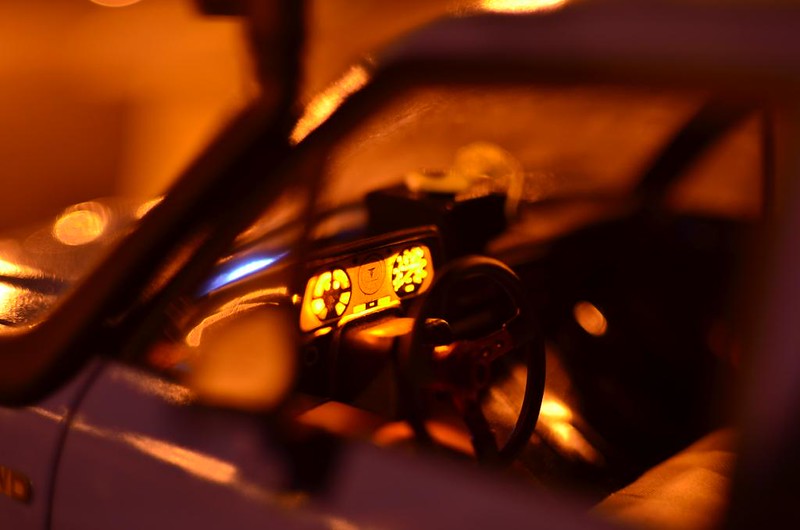 DSC_0275 by A+G vIsUaLs, on Flickr DSC_0275 by A+G vIsUaLs, on FlickrNext is some wicked use of .020 thick Piano Wire. I can honestly say this is my personal favorite feature of my rig. It WHIPS ITS HURR, BACK AN FURTH!!! The red ends are small beads glued on, and then painted.... well red, obviously. 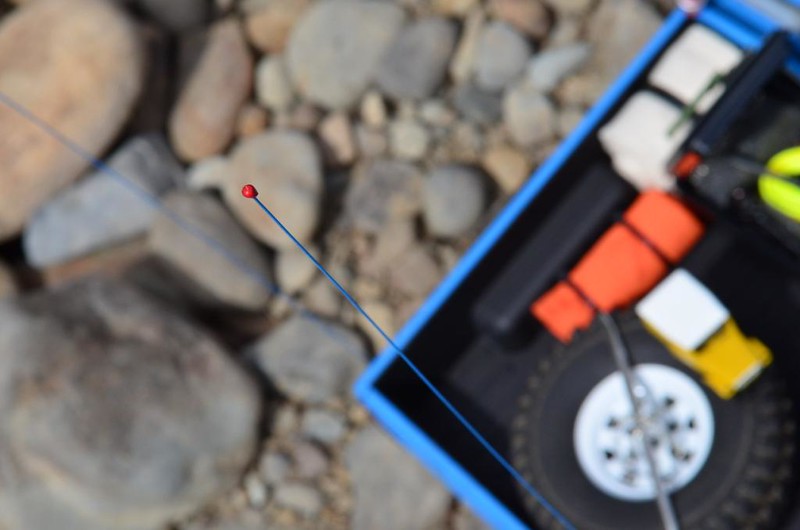 DSC_0302 by A+G vIsUaLs, on Flickr DSC_0302 by A+G vIsUaLs, on Flickr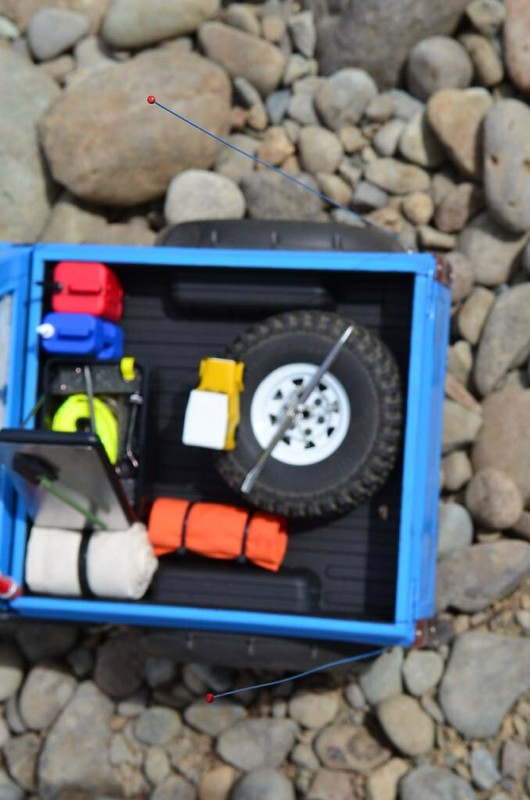 DSC_0304 by A+G vIsUaLs, on Flickr DSC_0304 by A+G vIsUaLs, on FlickrMoving on is my seat. Stock RC4WD utilizing some tan fabric bought at Wallyworld. Rubberband for seatbelt that actually doubles to keep the fabric from fluffing up. I did not like the idea of gluing it down. If you notice carefully sitting on the seat is a small iFrogz Bluetooth Speaker. That's right friends, my rig BUMPS TUNES. 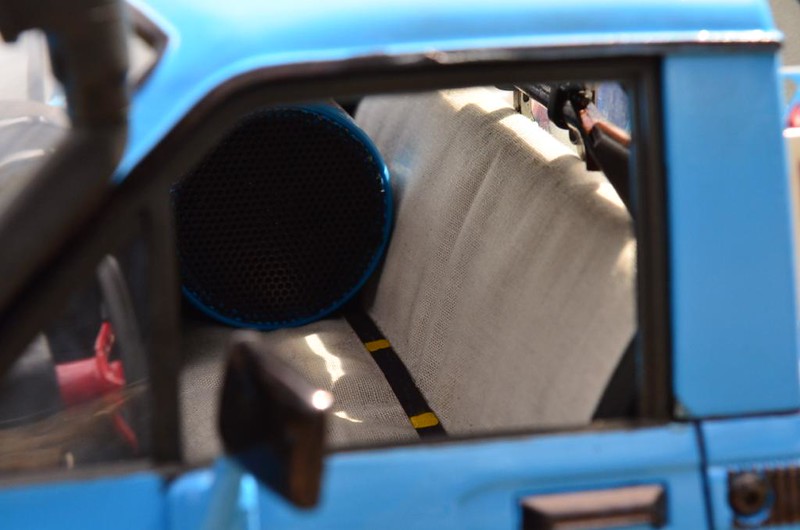 DSC_0301 by A+G vIsUaLs, on Flickr DSC_0301 by A+G vIsUaLs, on FlickrHere's a close up of the steering wheel that comes in an AXIAL aftermarket scale kit. I hated the stock wheel and it was massive, so went with this. Nice thing is its bolted in instead of glued which makes it adjustable up and down. Comfort is king afterall.  DSC_0300 by A+G vIsUaLs, on Flickr DSC_0300 by A+G vIsUaLs, on FlickrClose up of the firearms that also came in that AXIAL kit. Hand painted these babies myself. Only took a couple of hours to get the texture right. 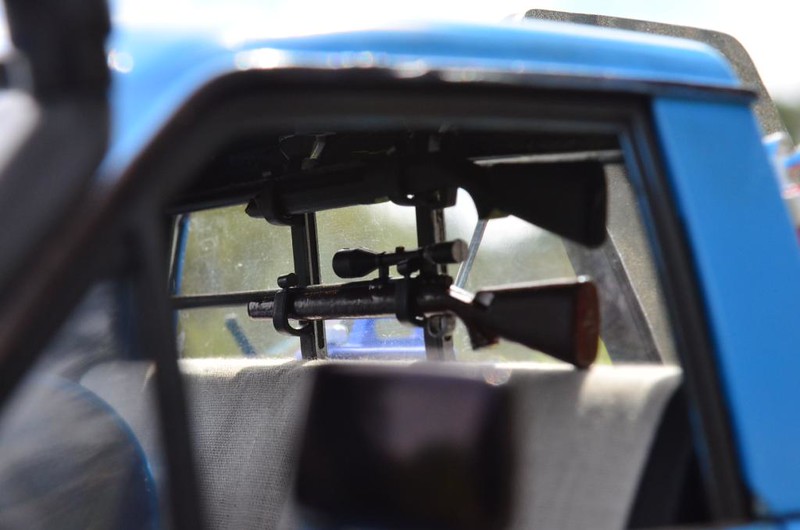 DSC_0298 by A+G vIsUaLs, on Flickr DSC_0298 by A+G vIsUaLs, on Flickr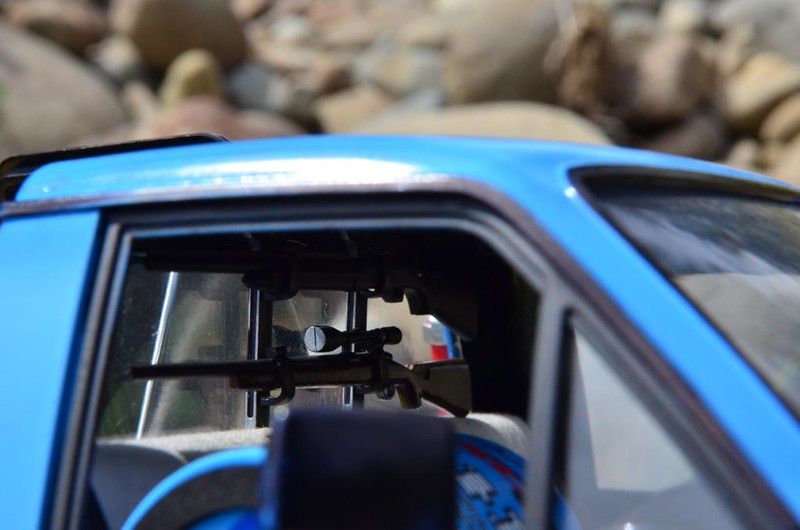 DSC_0296 by A+G vIsUaLs, on Flickr DSC_0296 by A+G vIsUaLs, on FlickrClose up of my winch system. Opted to replace the annoying stock hook with the spring for an HR one in red, and then made a custom pullstrap for it. Excessive use of electrical tape and the transparent WARN sticker that came with my winch system. A MASSIVE shout-out to Kenny at Hobbytown in Happy Valley for custom making me wiring harness that powers the whole system. YOU ROCK DUDE!!!! ;D 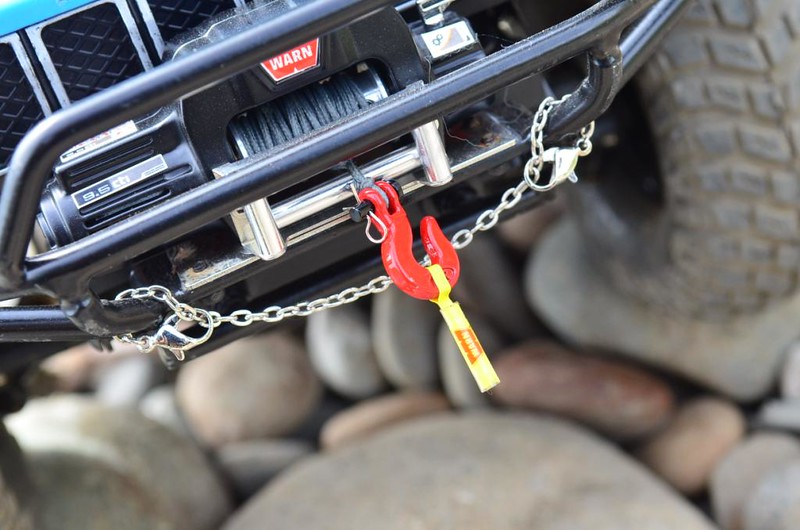 DSC_0287 by A+G vIsUaLs, on Flickr DSC_0287 by A+G vIsUaLs, on FlickrCB Radio. By the time I got to this I gave up and literally threw it together. Layers of Styrene wrapped in electrical tape, with a styrene mic also wrapped up in electrical tape, and lashed together with some yellow coated wire I had laying around. 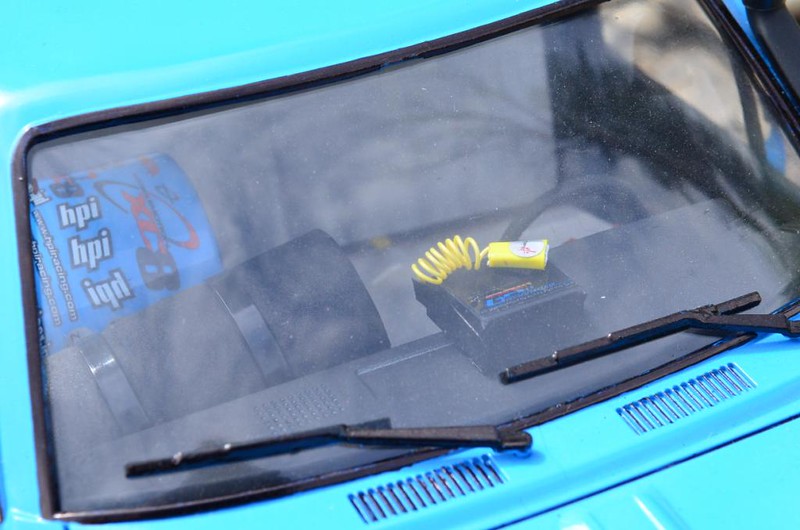 DSC_0286 by A+G vIsUaLs, on Flickr DSC_0286 by A+G vIsUaLs, on FlickrOH YEAH!!! I'm still kicking out about this one. All I did was take the handle of a really, insanely cheap aluminum paint-bush handle, smash one end flat and custom bend and fold it so it tapes up real nice underneath the bed, and then take a handheld blowtorch and singe the outer end of it to give it the nice discoloration you see here. Tell me that doesn't look awesome!  DSC_0289 by A+G vIsUaLs, on Flickr DSC_0289 by A+G vIsUaLs, on FlickrI used a stock wheel from my kit to be my spare. I hand-made a prybar and spent an hour or so making it at work from a broken Allen Wrench I kept (Note the Bondhus brand name and size written on the side,) and lashed it together from jewelry-making chain also bought at Wallyworld.  DSC_0291 by A+G vIsUaLs, on Flickr DSC_0291 by A+G vIsUaLs, on FlickrGlued on the fire extinguisher to the cab from the Proline kit.  DSC_0295 by A+G vIsUaLs, on Flickr DSC_0295 by A+G vIsUaLs, on FlickrHere's an overview of the bed trimmings. Packs wrapped by yours truly, with a few Proline bits and bobs, and a converted Radioshack electrical box I hogged out to be my bedbox. Mini FJ-Cruiser is from H-scale train-modeling company Busch.  DSC_0290 by A+G vIsUaLs, on Flickr DSC_0290 by A+G vIsUaLs, on Flickr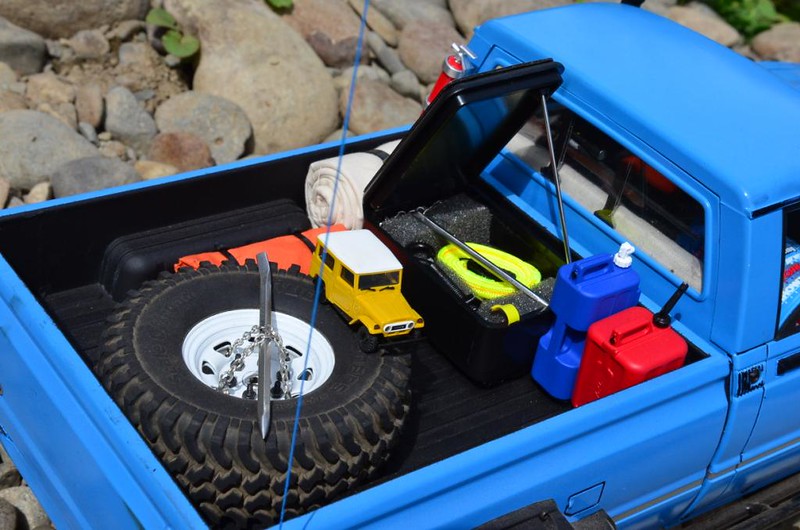 DSC_0294 by A+G vIsUaLs, on Flickr DSC_0294 by A+G vIsUaLs, on FlickrClose up of the toolbox. I custom made the aluminum inner and outer lid along with the foam inserts to keep everything nice and tidy. Don't worry, it's not just for looks. EVERYTHING in this box is usable and I often do use them. Contents are as follows: RC4WD Tow Strap. (2) 60Lb Test Wire Leader Spare Winch Hook Spare chain Another hand-made Bondhus prybar in 7/64" (2) Steel Crack Hooks (For winching when I have nothing else to winch to.) 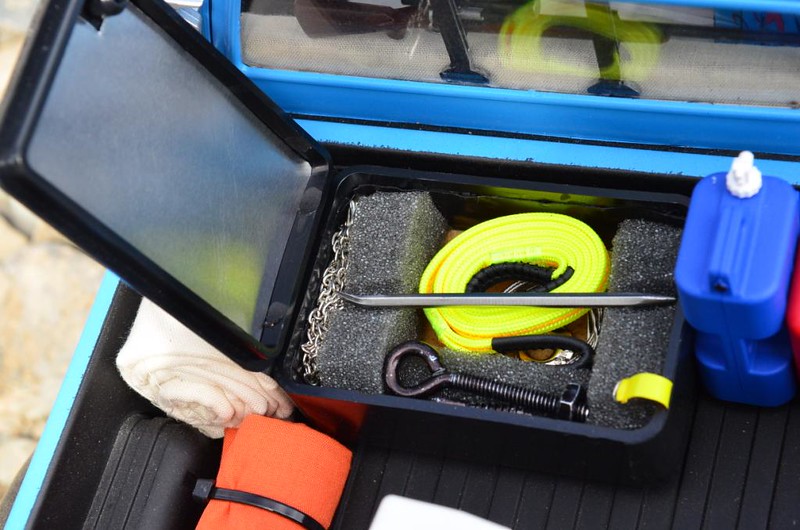 DSC_0292 by A+G vIsUaLs, on Flickr DSC_0292 by A+G vIsUaLs, on Flickr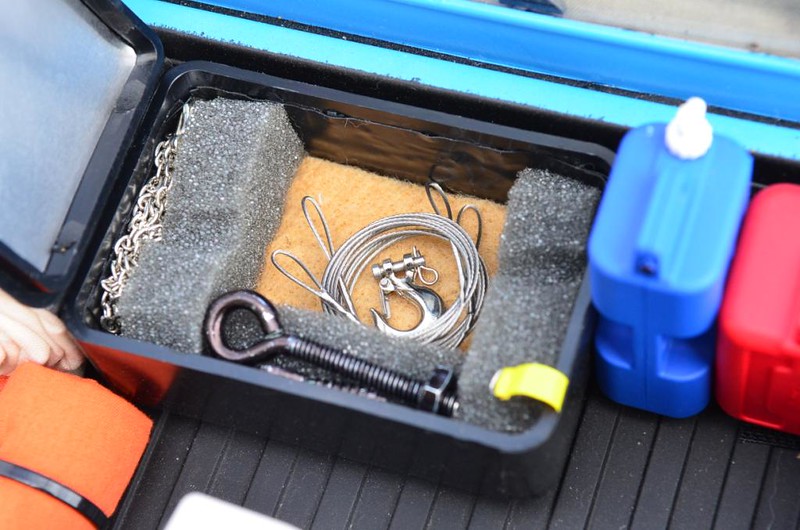 DSC_0293 by A+G vIsUaLs, on Flickr DSC_0293 by A+G vIsUaLs, on FlickrFor those that haven't figured it out by now, this baby's been bobbed. This was my first bobbing and the only one I have done to date. Please let me know what you think. Lashed it all together with JB-Weld. Yes... you read that right. None of that hobby-grade nonsense was working for me. JB-Weld... next best thing since Ductape. 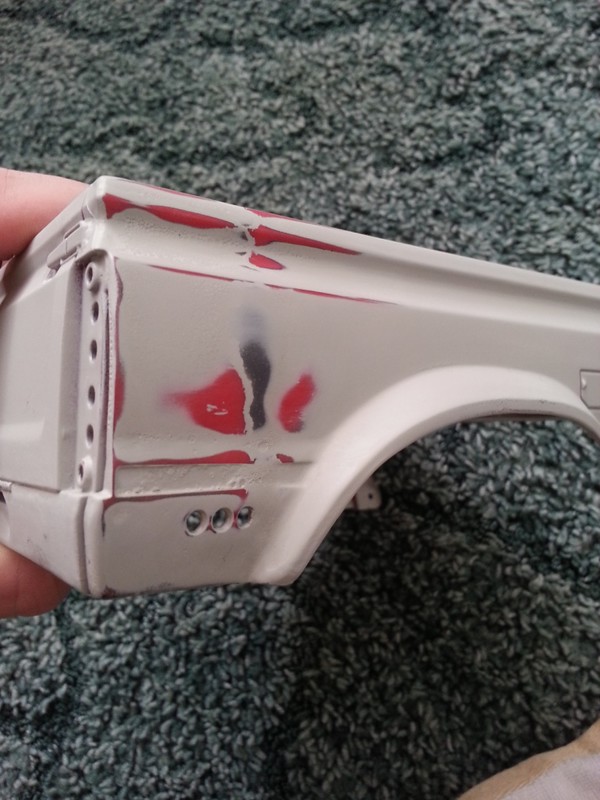 20140805_123813 by A+G vIsUaLs, on Flickr 20140805_123813 by A+G vIsUaLs, on Flickr"Jinky" is not finished yet. She's got a whole laundry list of details I still need worked out, but it's been only now I felt she has had the potential to be seen. Probably 90% complete. I would very much like insight on how others out there felt it turned out to them. I do not do this sort of thing often so any helpful insight would be humbly appreciated and taken with extreme gratitude. I have had my fair share of inspiration and want to contribute some of my own for others.  custom image stimoy by A+G vIsUaLs, on Flickr custom image stimoy by A+G vIsUaLs, on Flickr
|
|
| |
|
08-30-2014, 07:58 AM
| #3 |
| RCC Addict Join Date: Feb 2012 Location: Ca.
Posts: 1,580
|
Nice looking TF-2.
|
|
| |
|
08-30-2014, 05:55 PM
| #4 |
| Rock Crawler Join Date: Sep 2009 Location: Spring, Texas
Posts: 697
|
Very entertaining post!  I think the truck looks great. I'm not crazy about your favorite part - the two antennas - but I think you did a great job overall! I think the truck looks great. I'm not crazy about your favorite part - the two antennas - but I think you did a great job overall!
|
|
| |
|
08-30-2014, 06:14 PM
| #5 |
| Rock Crawler  Join Date: Sep 2013 Location: New Orleans
Posts: 630
|
Looks awesome From the last post before all the pics started, I was expecting a horribly, melted, mangled body on a TF2. Great job.
|
|
| |
|
08-31-2014, 05:40 PM
| #6 |
| Pebble Pounder Join Date: Mar 2013 Location: Lehi
Posts: 171
|
Extremely nice build! Tons of detail and I love the color choice. Question on the bobbing, which Jb weld did you use exactly? Keep the pics and details comin! |
|
| |
|
08-31-2014, 09:01 PM
| #7 |
| Pebble Pounder Join Date: Nov 2012 Location: illinois, rockford
Posts: 186
|
awesome post. you did a fantastic job. I love how scale of a job you did. I want to do this to my other scx10 build I'll most likely put some trail finder axles under it to give it that scale look
|
|
| |
|
09-02-2014, 05:27 AM
| #8 |
| Rock Stacker Join Date: Jan 2012 Location: Vancouver
Posts: 68
|
Sorry for late responses all. The Gnomes on my front lawn have been having a Turf war, been trying to break it up for a while.... it's a mess.  @raceeng18: Thank you very much kind sir! This truck is so damn popular that it's really hard to set anything apart from the rest. I appreciate all compliments given! @Alpha Male: Haha, I hope I didn't annoy anyone with all those silly pictures. I figured it was something unusual that could be enjoyed by others. In regards to the antennas, I find I am literally the only person that likes my configuration of them. I wasn't sure what vehicle in real-life short of a rescue vehicle somewhere in Moab that would utilize such massive antennas. I just liked the idea of two, and watching them wip back and forth is always fun. Next build I do I will add them again just simply because I like them so much. I fell in love with antennas watching a youtube video of someone with an insanely scale, AX-10 with a Tamiya Mitsu Montero body. Sadly the video doesn't seem to exist anymore. @Tokdl: Sadly, you aren't far from the truth. My truck, being RTR had the red plastic body. Becuase I had NO INTENTION of getting this serious into this truck as I have I chose to paint it orange so it would blend well with the undercoat of red plastic. Didn't want to add primer. The color I really, really, really wanted is the color I have now, Tamiya French Blue. Imagine this. I go out to paint my body orange, during the last coat I walk away and it starts to rain. I wasn't able to salvage it. 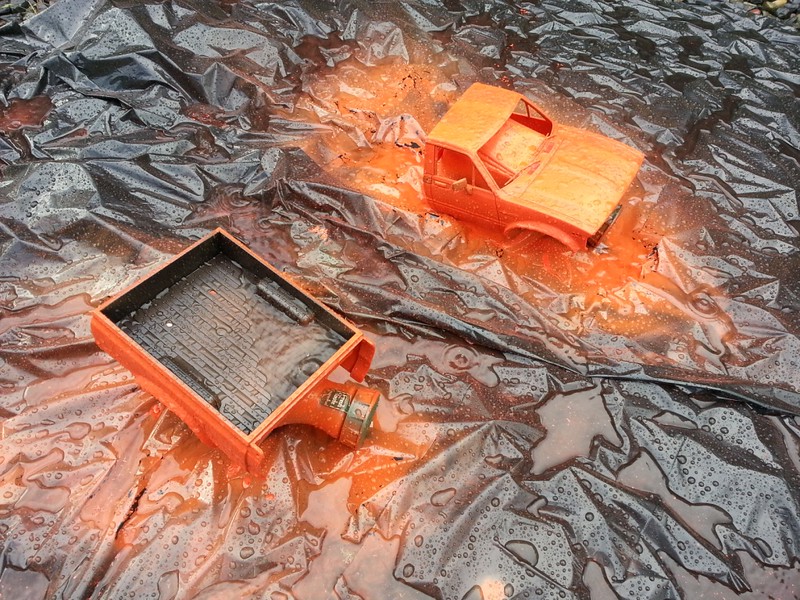 20140723_184332 by A+G vIsUaLs, on Flickr 20140723_184332 by A+G vIsUaLs, on Flickr 20140724_001846 by A+G vIsUaLs, on Flickr 20140724_001846 by A+G vIsUaLs, on Flickr 20140724_001901 by A+G vIsUaLs, on Flickr 20140724_001901 by A+G vIsUaLs, on Flickr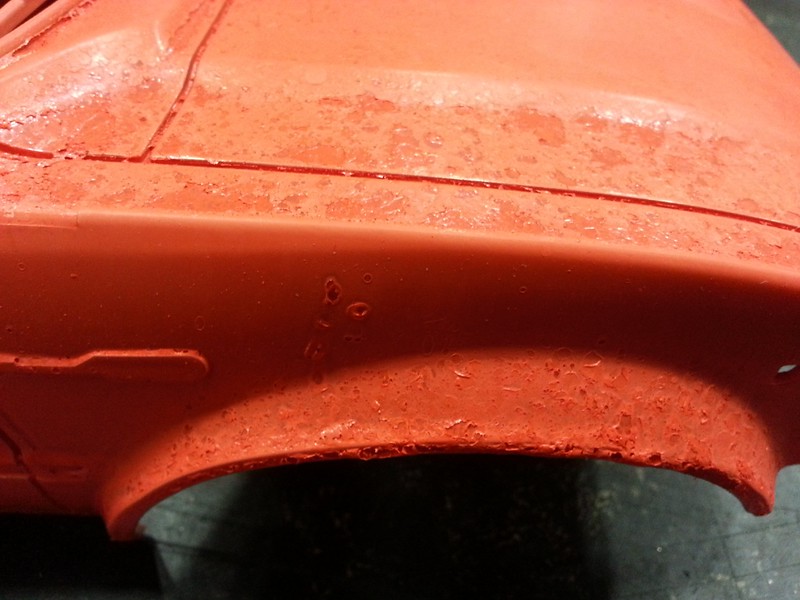 20140724_001912 by A+G vIsUaLs, on Flickr 20140724_001912 by A+G vIsUaLs, on FlickrOddly enough, texture-wise it was SPOT-ON for a scale, rusted-through look. Just the color was too linear, it would have needed to look more real as far as color was concerned. But ultimately I didn't want a rusted TF2, I wanted it to look mint condition. Just the theme I was going for anyway. Ironically this was a blessing in disguise. The body was so torn up I just sand blasted it to death and started from scratch. I ended up getting exactly what I wanted originally. @nsimps: What a good-looking question!  20140805_123801 by A+G vIsUaLs, on Flickr 20140805_123801 by A+G vIsUaLs, on Flickr@FATALLILL: Wowzers! Thank you kind sir. Compliments are awesome!!! I love and hate the leaf spring setup. For scale realism they can't be beat. Just watching the truck bob and bounce along always brings a smile to my face. For crawling though, no way. Forget it. Link-system wins there, hands down. Not sure it will apply to your build, but I removed two of the three springs in my build to get the flex I wanted. I also changed the shock positions a bit. AND I got rid of the stock hardware that came with the truck that was holding the suspension/axles together. Absolute and complete utter garbage. Bolts all different size heads, neither American or metric Allens could remove.  20140714_010032 by A+G vIsUaLs, on Flickr 20140714_010032 by A+G vIsUaLs, on Flickr
|
|
| |
|
09-02-2014, 05:34 AM
| #9 |
| Rock Stacker Join Date: Jan 2012 Location: Vancouver
Posts: 68
|
Just for fun, here's a pic of Jinky before the Big Boss Flares and snorkel, as well as most of the scale bits. I really, really likes this particular look and would have kept it this way but at the time of this picture I had already bought the fenders and snorkel. So I just put them on. But to give others ideas or comparison, I'll post this here. 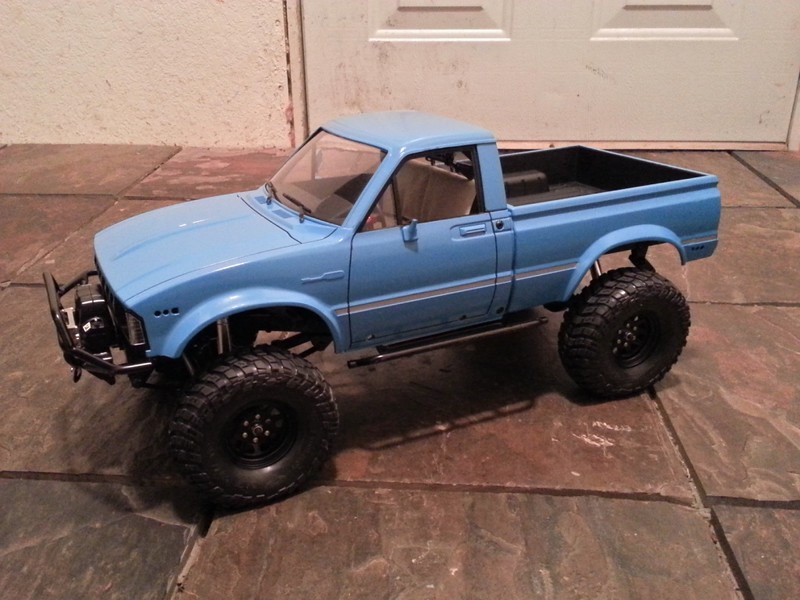 20140808_003847_HDR by A+G vIsUaLs, on Flickr 20140808_003847_HDR by A+G vIsUaLs, on Flickr
|
|
| |
|
09-02-2014, 05:39 AM
| #10 |
| Rock Stacker Join Date: Jan 2012 Location: Vancouver
Posts: 68
|
Oh yeah, and just for reference the tires I used are the 1.7 Mickey Thompson Radials on 1.7 Steelies. This was the biggest tire I could go without it rubbing the body to death. For some unknown reason these exact tire in the 1.55 version are bigger and they didn't work out for me. So now I'm sitting on a full set of unused MT's in 1.55. Only body modification I did was chop off the front fender and lower grill to accommodate the tire size. This is the only aspect of the build I regret, chopping off the grill. I wish I could have found a way to keep it on. Would have been just that much more scale. |
|
| |
|
09-22-2014, 05:10 PM
| #11 |
| I wanna be Dave Join Date: Mar 2013 Location: Minden
Posts: 2,198
|
So what your saying is, if I where to paint a r/c hard body and use my garden hose with a sprinkler attachment and before the paint dries and is still wet, I can make it look rusted out, so should I use a rust colored primer first, then the coat you pit out. What kind of paint did you use, does it do that with normal spray paints.
|
|
| |
|
 "Jinky!" My First TF2 Build!!!! - Similar Threads
 | ||||
| Thread | Thread Starter | Forum | Replies | Last Post |
| Joywrex's TF2 "MiAylita" Build (Pic Heavy) | joywrex | RC4WD Trail Finder 2 | 165 | 02-17-2017 03:23 PM |
| Jkabee's "total noob" TJ build "this should be fun!" | jkabee | Axial SCX-10 | 128 | 03-24-2013 12:10 PM |
| Chaotic Crawlers "DEMON" build! aka "Kreacher" | Mac10 | EnRoute Berg | 96 | 09-26-2010 01:49 PM |
| |


 Linear Mode


