| |
| |||||||
 |
| | LinkBack | Thread Tools | Display Modes |
 03-08-2022, 09:35 AM
| #41 |
| I wanna be Dave Join Date: Jun 2016 Location: Austin
Posts: 6,010
|
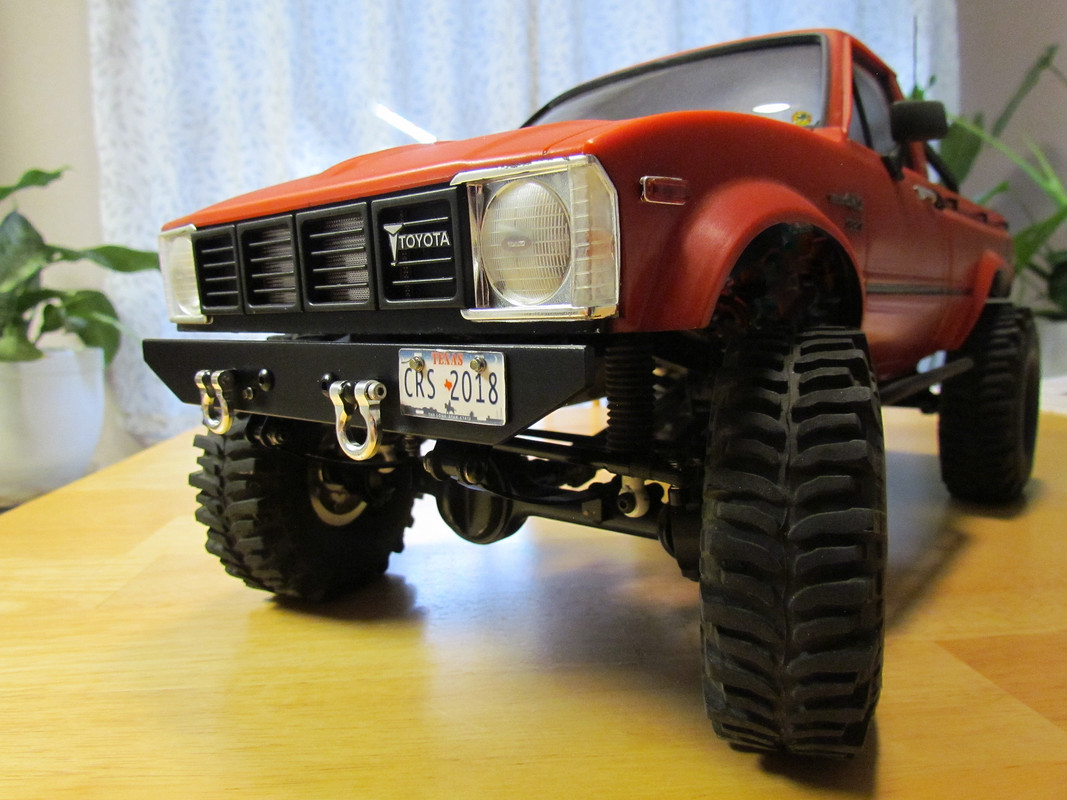
Perfectly shaped and proportioned little pusher bar...  Looks as good or better than what's offered aftermarket! |

|  |
| Sponsored Links | |
| | |
|
03-08-2022, 09:41 AM
| #42 |
| RCC Addict Join Date: Jan 2019 Location: Corvallis, OR
Posts: 1,561
|
Yeah thats awesome, nice and straightforward. Sometimes less is more Sent from my iPhone using Tapatalk |
|
| |
|
03-08-2022, 10:57 AM
| #43 | |||
| RCC Addict Join Date: Nov 2017 Location: Austin Texas
Posts: 1,615
| Quote:
I was so furious that my mind just went blank... I got up from my work-table, smiled, and turned out the light in the hobby room. My eye was probably twitching tbh lol. But I gave myself an hour or so then went back to it and proceeded to use the smallest Dremel bit that I had to very carefully and precisely grind out the broken piece while making sure not to accidentally enlarge the hole or damage the threaded portion of the hole. Man that was rough but I got it cleaned out without damaging the hole and without any collateral damage to the surrounding paint. Cut down a new bolt, threaded it in and done! Quote:
Quote:
| |||
|
| |
|
03-09-2022, 07:49 PM
| #44 |
| I wanna be Dave Join Date: Jun 2020 Location: The Big Island
Posts: 2,010
|
Good looking bumper HPD! thanks for reminding me I can build my own bumper rather than not having one because i cant find it anywhere lol. Sometimes I get caught up in just buying it I forget I have the ability to build. _________________ Veterans deserve a whole month too |
|
| |
|
03-09-2022, 09:07 PM
| #45 | |
| RCC Addict Join Date: Nov 2017 Location: Austin Texas
Posts: 1,615
| Quote:
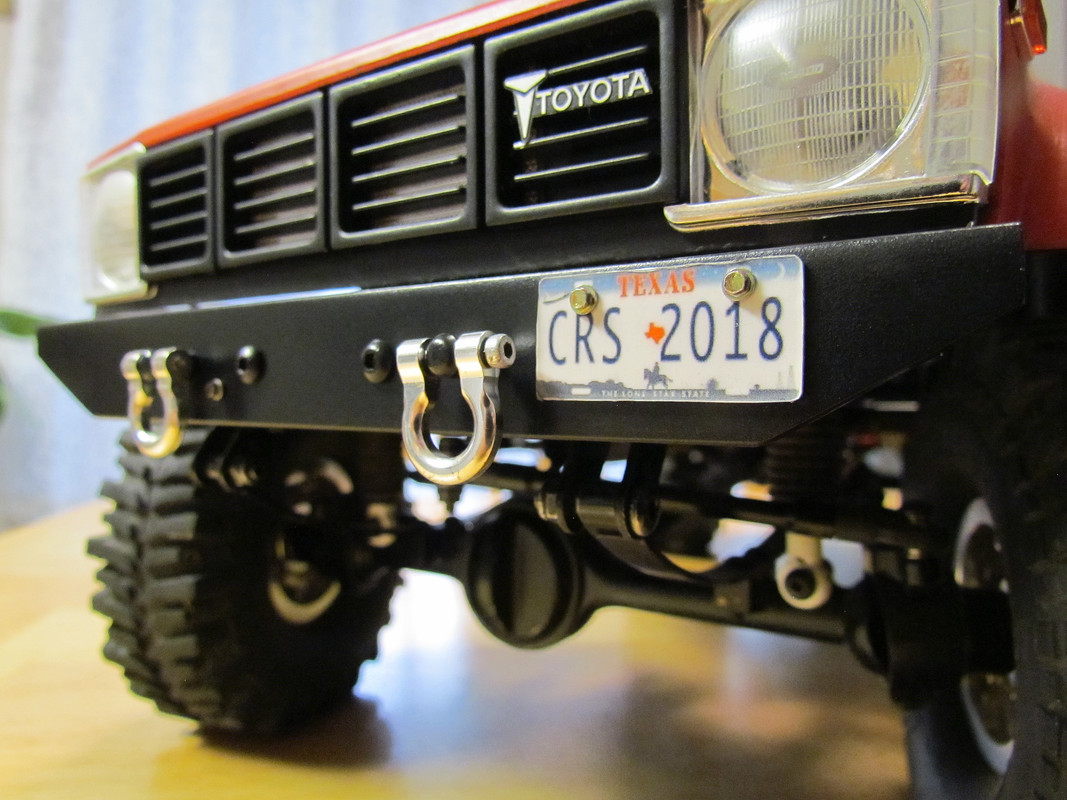
I have bins separated into 'metal', 'hard plastic', 'soft plastic', and 'foam'... just scraps of whatever stuff I might need. I really like being able to make things without spending additional money. Feels good. Only thing with this one that woulda been nice would've been if I could've bent or angled the ends back a little to get them closer to the body. But all in all this one is much lower profile than the RC4WD tube bumper that I had on there previously. I hated losing the Warn winch on the front of this rig but all in all, the new one looks pretty good and will afford WAY better performance in the way of approach angle. So... I'm satisfied. Thanks again, brother. | |
|
| |
|
03-10-2022, 09:54 AM
| #46 | |||
| Go Buckeyes!   Join Date: Jun 2017 Location: Mid-Ohio
Posts: 4,134
| Quote:
Quote:
Quote:
| |||
|
| |
|
03-10-2022, 12:26 PM
| #47 |
| Pebble Pounder Join Date: Dec 2021 Location: Central Florida
Posts: 101
|
Nice looking truck bud! I have wanted to make my own metal bumper for some time now. But the organic bumper has grown on me soo much I don't want anything else  |
|
| |
|
03-10-2022, 01:36 PM
| #48 | ||
| RCC Addict Join Date: Nov 2017 Location: Austin Texas
Posts: 1,615
| Quote:
j/k.. It's pretty cool all the crazy stuff they let us spend money on lol Quote:
| ||
|
| |
|
03-10-2022, 05:58 PM
| #49 | |
| Pebble Pounder Join Date: Dec 2021 Location: Central Florida
Posts: 101
| Quote:
  My build thread is in here too. Oh look, Another TF2 build thread...... (Watch me transform a used ebay TF2) | |
|
| |
|
03-10-2022, 07:14 PM
| #50 |
| RCC Addict Join Date: Nov 2017 Location: Austin Texas
Posts: 1,615
|
Man that's pretty slick... fun-looking trail, great color on that rig, and REALLY cool bumper. Good idea and we've all seen full-size trucks with wood bumpers so it definitely looks scale. Thanks for sharing... I'll have to check out your thread.
|
|
| |
|
03-11-2022, 06:16 AM
| #51 | |
| Pebble Pounder Join Date: Dec 2021 Location: Central Florida
Posts: 101
| Quote:
Top pic was at USTE this year and the second is on my little home trail. I can't take credit for the color or dents, but the rest is all me. You'll see when you get a chance to check it out. With the dents it was only right to do it up like an old farm truck, or some old guys truck that wasn't maintained, So it was between a scale I beam, or a scale railroad tie lol | |
|
| |
|
03-17-2022, 12:26 PM
| #52 | |
| Quarry Creeper  Join Date: Feb 2008 Location: Quincy
Posts: 334
| Quote:
| |
|
| |
|
07-09-2022, 10:46 AM
| #53 |
| RCC Addict Join Date: Nov 2017 Location: Austin Texas
Posts: 1,615
|
@ diggerj - Thanks much for taking a look. I haven't gotten to run this rig since making the new front bumper but hopefully soon. Unfortunately, 106 degrees is just too danged hot to play outside for very long lol. Been a while since updating this thread. Not much to add but might as well keep things documented at the very least. >>> Installed RC4WD front fender liners. Made from quite possibly the thinnest most flimsy lexan in the entire universe. Not a big deal for a part such as this but definitely worth noting. Also worth mentioning that these do NOT fit the Marlin Crawler with shock-hoops in the stock location. You really can't just lower the mounts without some major modifications so modifying the fender-liners is about the only option. You could leave enough material along the bottom of the liners in order to mount them high enough to clear the top of the shock-hoops but I had already cut these out before realizing that. Not sure that all makes sense to read lol. I wanted to keep the shocks where they were, so it was time to break out the Dremel instead. Pretty self explanatory.... Just have to cut out enough material to slide these down over the mounts as well as making a cut-out for the top of the shocks to clear as well. They look fine and they do the job of blocking out the electronics inside but again... these pieces are pathetically thin and flimsy. Fwiw I used Krylon Fusion satin black and painted both sides of the liners. >>> Next up was motor replacement. After corresponding with Holmes Hobbies I decided on the Crawlmaster Sport 550 15t. Gearing is the stock 14/ 64. I have some reservations about this being too much motor for this application but I'll give it a try and see how things go. I can always use this motor in another rig if it doesn't work out for the TF2 and at only $20 it won't be a big deal. Pretty straight-forward install although I did replace the cheap RC4WD connectors with the much more robust ProTek 3.5 mm gold bullet connectors. Night and day difference with the ProTek connectors... Very happy with these. I'll definitely update this part of the thread after I've had a chance to run a few 2S and 3S packs with this new motor. That's it for now/ few pics... Original RC4WD 540 45t next to the new HH 550 15t... 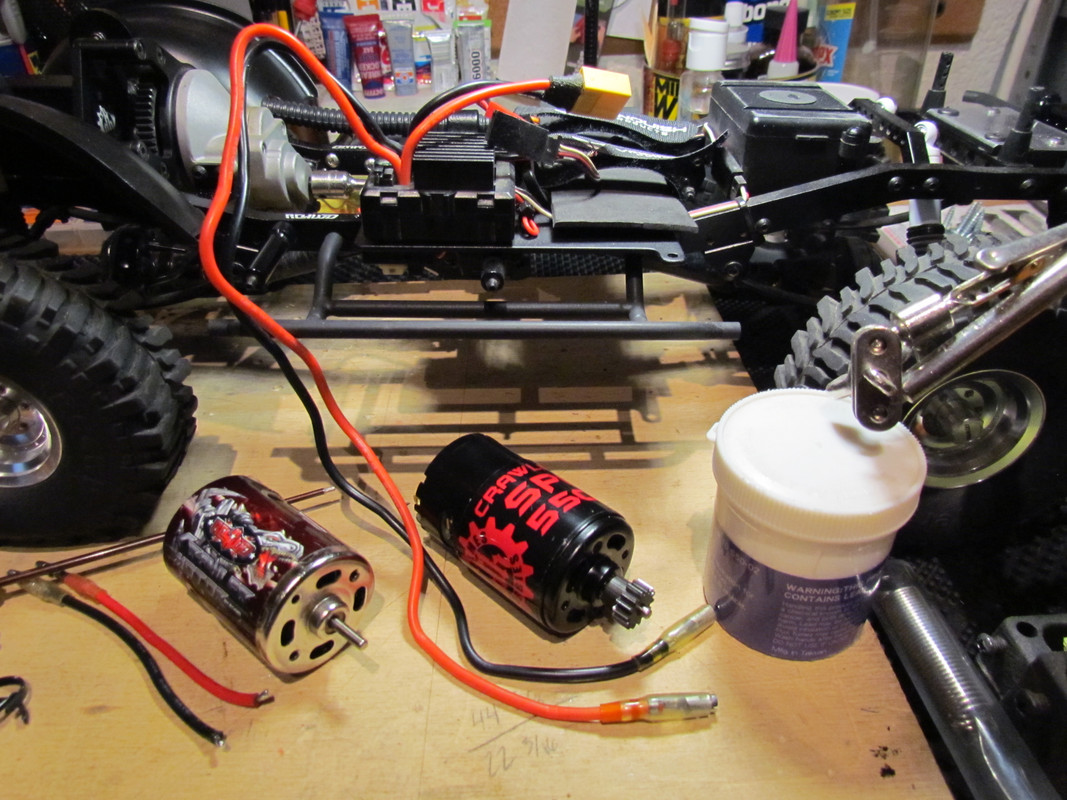 Old connectors & new connectors... no comparison...  Installed and ready to go. Also you can see in this pic the RC4WD fender liners and how they had to be cut out in order to accommodate the shock hoops and shocks. 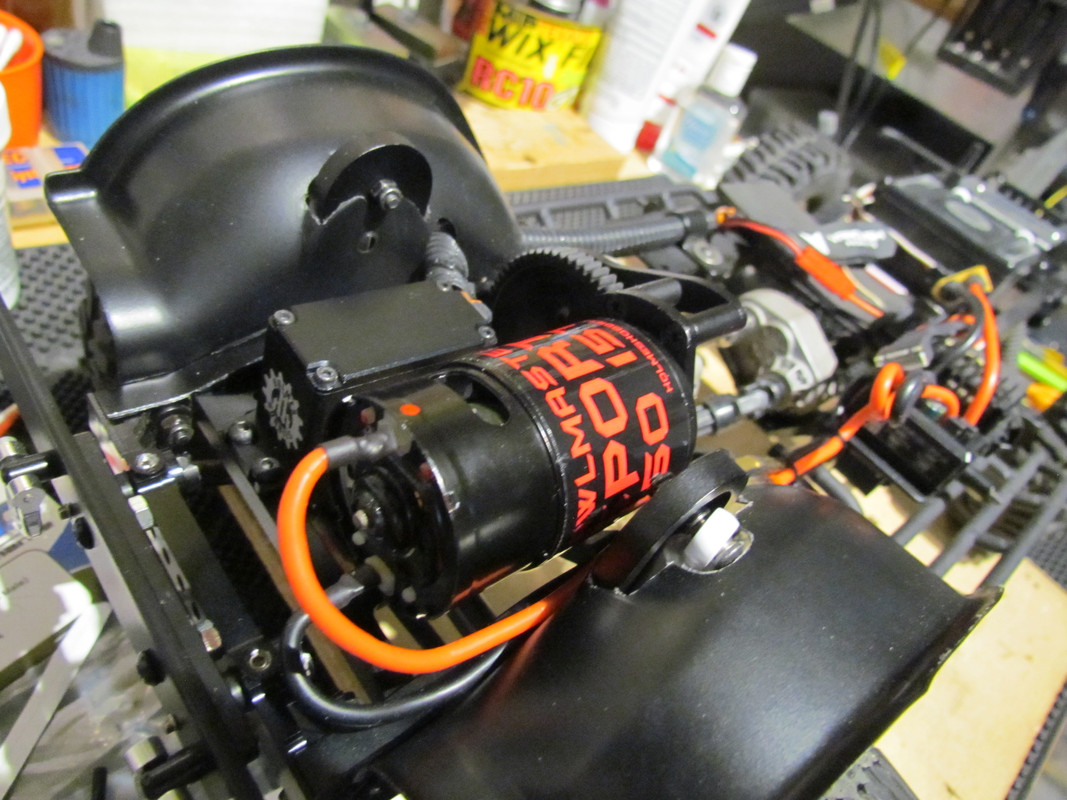 |
|
| |
|
07-15-2022, 07:21 AM
| #54 | |
| Pebble Pounder Join Date: Dec 2021 Location: Central Florida
Posts: 101
| Quote:
That 15T may be a little much for the TF2; I find at times the 27T I put in mine to be a handful in second gear Awesome little update none the less! Trucks looking good! Last edited by RC Perspective; 07-15-2022 at 09:33 AM. | |
|
| |
|
07-15-2022, 08:30 AM
| #55 | |
| RCC Addict Join Date: Nov 2017 Location: Austin Texas
Posts: 1,615
| Quote:
If it DOES wind up being too much I'm hoping that a different spur or pinion might do the trick. I'm planning on running a 2S in this rig... not sure if that will change much though. Btw I would've rather used plasti-dip on these liners too but had to just use what I had on hand. I've got too many partially used spray paints already taking up shelf space lol. Thanks for the advice and for taking a look... appreciated. | |
|
| |
|
07-15-2022, 09:32 AM
| #56 |
| Quarry Creeper Join Date: Mar 2021 Location: SOCAL
Posts: 290
|
Rc4wd fender liners are a joke ... lesson learned though I did reinforced them with shoe goo and a piece of styrene at the sidewall mounting area and they have held up ... if you mount and dismount your hardbody regularly they will likely not survive long.
|

| |
|
07-15-2022, 09:37 AM
| #57 | |
| Pebble Pounder Join Date: Dec 2021 Location: Central Florida
Posts: 101
| Quote:
I wound up just changing the forward rate lower for mine, if you have that option on your Tx it'll probably be easier than another motor swap when you get to that point. | |
|
| |
|
07-15-2022, 01:50 PM
| #58 | ||
| RCC Addict Join Date: Nov 2017 Location: Austin Texas
Posts: 1,615
| Quote:
Quote:
| ||
|
| |
|
07-22-2022, 03:45 AM
| #59 |
| Pebble Pounder Join Date: Dec 2021 Location: Central Florida
Posts: 101
|
BTW, I'm stealing your bumper design, as after the axle flip on my TF2, sadly the organic bumper I have is now an issue It'll take a little work designing something to 3D print, but I can make it look used and abused, and hopefully match a few dents in my front grille. Would you mind getting some measurements of just the bumper part for me? If so, generic LxWxH would be perfect, I've already downloaded the mounting posts file to attach to the back. I'll have to cut my lower sill plate off. -RC Perspective |
|
| |
|
07-22-2022, 07:37 AM
| #60 |
| RCC Addict Join Date: Nov 2017 Location: Austin Texas
Posts: 1,615
|
Nice! So don't laugh... and I hope that this works but when it comes to computer stuff, files, scanning, and all of that... I'm about as dumb as they come lol. Anyway.. Here is the bumper template with measurements. I've shown here each dimension with the corresponding A/ B/ C/ D as they relate to the top/ bottom/ side/ and bottom angle A = 168.55 mm or 6.64" B = 123.50 mm or 4.86" or 4 55/64" C = 8 mm or .31" or 5/16" D = 26.25 mm or 1.03" or 1 1/32" * Angle of "D" = approx 25 degree * Thickness = 3.19 mm or 1/8"  |
|
| |
|
 The journey of a slightly de-marlinized TF2 - Similar Threads
 | ||||
| Thread | Thread Starter | Forum | Replies | Last Post |
| Journey of SMP | TAT76 | Axial SCX10 II | 57 | 03-08-2021 06:08 AM |
| My trx-4 journey | dittohead | Traxxas TRX-4 | 6 | 08-05-2017 10:42 PM |
| I seen Journey last night... | Kamikaze | Chit Chat | 8 | 08-09-2008 01:47 AM |
| |


 Linear Mode


