| |
 07-07-2010, 06:38 PM
| #81 |
| RCC Addict Join Date: Jul 2009 Location: Blacksburg, VA
Posts: 1,882
|
Updated the first post with a how-to on homemade delrin steering/suspension links.
|

|  |
| Sponsored Links | |
| | |
|
07-07-2010, 09:30 PM
| #82 |
| Rock Crawler Join Date: Jul 2009 Location: waterville
Posts: 525
|
this mod will take you servo from 90 degree throw to 180 degree throw or more. okay after i modded my steering for everything it was worth to get the most out of it. it was quite apparent that the servo was now the issue. i had done everything i know to get the most steering out of my rig. shaving the dogbones. shaving the stoppers, gas line in the axle stubs to push the dogbone in the axle further and opted for high clearance knuckles. even modding the steering wheel on my radios. when i got my axles the first thin i noticed was the lack of steering. for the guys that are running rear steer might not notice it as bad. but for us that dont want rear steer im sure you noticed the same thing. well here is your cheap fix. i preformed this mod to my current servo and it works flawless. ran it for a couple weeks now. there are other systems that will do the same thing. the only difference is that this is 99 cents plus tax. very cheap. if your soldering skills are up to par, you are good to go. ill will do a step by step. not to detailed. if there is a need for more detail i will edit a better one to further aid if anyone would like. on another note. im not on here alot lately, and i am also not very good at checking all the threads i post in 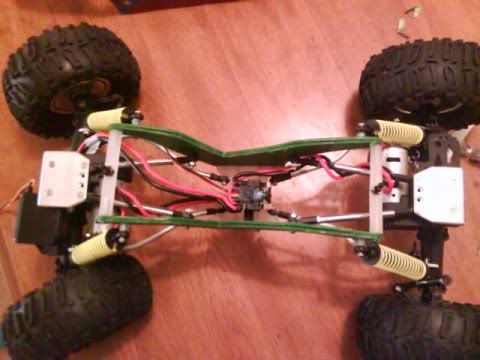  on the left was what i had after some modifications. on the right is what i had after all the modifications.   this is about what i was getting for throw before give or take a little bit. 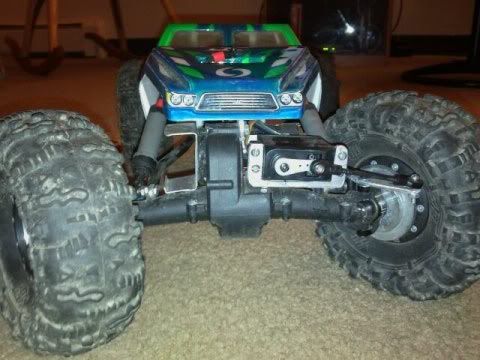  this is what i have for throw now... much better 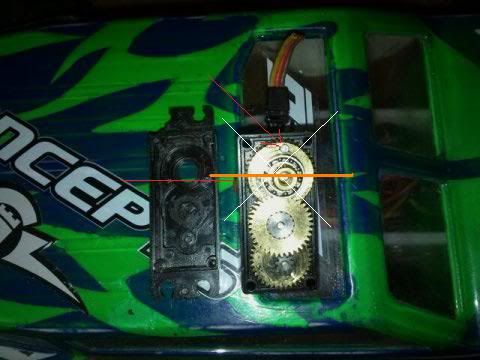 okay for starters. the yellow lines are you basic travel of a servo. the orange line is what you will get with this mod in both directions. big difference in throw. first you will want to make sure your stoppers let you get the 180 degrees.the red line over the case is where the stoppers are. this one as well as my other one did not need trimming. trim if needed, but do not take off more then you need to prevent damage. the stopper on the gear has the arrow. this is what will make it stop when contacted the stoppers. this protects the pot in the servo from being damaged as well as prevents destroying gears. the pot should be able to handle the extra throw.it also helps to have just the gear that goes on it to test, so you can see how much you have before the stopper hits or the pot maxes out. the pot must be centered after being put back together. you will know it if it isnt. there will be buzzing or if all your gears are off the motor will be turning. if centered it will stop. 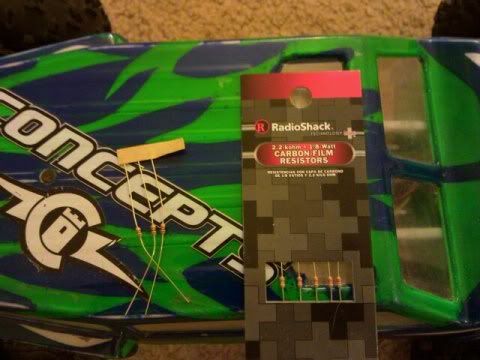 these are the resistors i used. 1/8watt. i picked up 1k's as well as 2.2k's.i suppose you could go with 1/4 but space is limited in a servo. i ended up using a total of four 1k resistors to preform this mod. other resistances may work better or worse. these can be had at radio shack for 99 cents a pack. 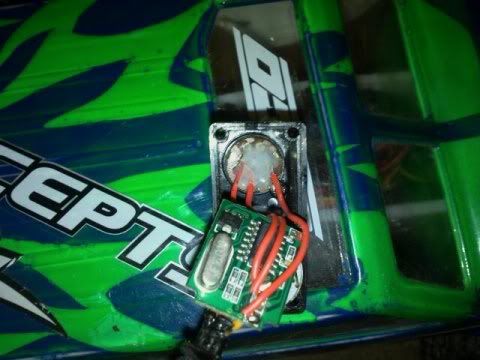 the resistors are to be soldered to the outer posts of the pot. leaving the center one alone. in my case since i used a total of four. two for each post in series creating a total of 2k per side. this one would be much easier then the one i am running now. the posts were directly soldered to the breadboard, so there was no wires like this one. after the resistors are soldered in. stuff it all back together. assemble the servo. before running the servo. turn your trim pots all the way down. then turn them up to increase the travel til your max is achieved. with my dx3e i can control throw right and left. when they were turned all the way down the servo did not operate in one direction til the trim was turned up.it would be a good thing to test before installing into the truck. i have not tested this on a tx that only has a single steering rate knob or switch. all in all with this mod i got the most out of my steering. well worth the time and the minimal dollar it cost. happy steering!  |
|
| |
|
07-29-2010, 05:06 PM
| #83 |
| Quarry Creeper Join Date: Jul 2010 Location: Independence
Posts: 368
|
ok i got a question on mounting the shocks to the axles. Will the stock shocks work for this? It seems like they might be too short.
|
|
| |
|
07-29-2010, 06:40 PM
| #84 |
| Pebble Pounder Join Date: Jun 2009 Location: Selah
Posts: 175
|
yes they are to short
|
|
| |
|
07-29-2010, 06:51 PM
| #85 |
| Rock Stacker Join Date: Jun 2010 Location: Calgary
Posts: 80
|
Oh you CAN mount the stock shocks to the axles... but like me you'll be sad.
|
|
| |
|
07-29-2010, 10:10 PM
| #86 |
| Quarry Creeper Join Date: Jul 2010 Location: Independence
Posts: 368
|
any suggestions on which ones to use?
|
|
| |
|
08-15-2010, 09:27 PM
| #87 |
| Rock Stacker Join Date: Jul 2010 Location: Santa Cruz
Posts: 60
|
Depends on what you want to spend. Seems as if they would need to be almost an inch longer if you would want to keep the same mounting point on the body. I guess you could just measure the shocks. I don't know how long the stock ones are to start with.
|
|
| |
|
08-16-2010, 06:51 AM
| #88 |
| RCC Addict Join Date: Jul 2009 Location: Blacksburg, VA
Posts: 1,882
|
They'll work if you make extensions for the chassis shock mounting areas...or if you decide on some nicer 4'' shocks, there's a how to on the first page of this thread showing simple extensions made out of rod ends to make them work.
|
|
| |
|
09-12-2010, 08:19 PM
| #89 |
| Quarry Creeper  Join Date: Sep 2010 Location: In Tha Mountains
Posts: 211
|
Dont know if anybody has seen this or if it has been posted somewhere else, but, Punk has a dig that works with a 2-channel.....No more having to buy a better radio with more channels. Here is a link, I hope it works....if it doesnt just go to Punk RC.com and look for it in electronics. http://www.punkrc.com/index.php?main...products_id=32 |
|
| |
|
09-12-2010, 08:26 PM
| #90 |
| Quarry Creeper Join Date: Jul 2010 Location: Independence
Posts: 368
|
i saw that too. dont remember if i started a thread on this or if i read it somewhere but I heard there is a pretty bad delay when activating it so that kind of detered me from it. so i then emailed redcat to see if they could send me a diagram of the radio to try to to convert the 3rd channel to work with a dig. But got nowhere. they say it wont work. I say it has to work. I think i started a thread on that too but cant remember. if i had another radio and was familiar with how the dig operated i would tear into the radio and see if i could do it. but i dont have spare radio so dont have the guts to try it just yet. edit: here is the link RS10 dig |
|
| |
|
09-13-2010, 09:47 AM
| #91 |
| Quarry Creeper Join Date: Sep 2010 Location: In Tha Mountains
Posts: 211
|
Just so happens I have an extra stock radio, minus an antenna......just laying around it is.
|
|
| |
|
09-14-2010, 06:53 PM
| #92 |
| Quarry Creeper Join Date: Jul 2010 Location: Independence
Posts: 368
|
replied to your PM with my address. appreciate it man.
|
|
| |
|
09-16-2010, 02:28 PM
| #93 |
| Newbie Join Date: Sep 2010 Location: Blue Ridge Mtns
Posts: 7
|
I was trying to limit the articulation amount and came up with this. Get a small piece of 4mm vacuum hose (Advance Auto etc.) cut 4 sections about 3/8 long and then split kinda diagonal instead of straight this will make them stay together better. slide the lower portion of the spring upward to reveal the shaft and wrap your hose section onto the shock shaft and slide it to the bottom and replace the spring. You dont have to remove anything so this is a simple ,quick and CHEAP way to create stopping points for your stock shocks, the rubber hose also keeps the shocks from having an abrubt stop as with a hard tube etc. You can experiment with different lengths for your best results, the 4mm size hose fits perfectly around the shock shaft and also inside the spring retainer! Good luck! |
|
| |
|
09-23-2010, 07:53 AM
| #94 |
| Pebble Pounder Join Date: Sep 2010 Location: Brussels/Belgium
Posts: 196
|
I have question about the "Upgrade motor recommendations"part. I've search the web and somme people are speaking about those two type of motors as good upgrade for the RS10: The Losi 1/18 crawler motor http://www.losi.com/Products/Feature...rodId=LOSB0839  The "Insane 370 Motors" as uprgrade parts for the Losi Mini Slider http://www.losi.com/Products/Feature...rodId=LOSB0836  So does any body knows about those motors and if they would be gould for our RS10 and his ESC |
|
| |
|
09-23-2010, 08:51 PM
| #95 |
| RCC Addict Join Date: Jul 2009 Location: Blacksburg, VA
Posts: 1,882
|
I'm not sure if those motors would be worth picking up at that price. The slider motors or whatever those were cost $60 for the pair. For that price or just a little more, you could buy some way nicer motors.
|
|
| |
|
09-24-2010, 01:15 PM
| #96 |
| Pebble Pounder Join Date: Sep 2010 Location: Brussels/Belgium
Posts: 196
|
Still in the "Motor upgrade" section, what do you think about this one: It's from Atomic RC and it's a 26T 380 can: http://www.rcatomic.com/atomic/index...emart&Itemid=5  On the same page they have a big range of "Climbing" motors, but I think those are 540 can... I've found those one from Team Epic there is 33T and 22T: 33T  http://www.teamepiconline.com/shop/i...p?item=TEP1500 22T  http://www.teamepiconline.com/shop/i...p?item=TEP1501 So what do you think of those? Last edited by Big Pitt; 09-26-2010 at 05:35 AM. |
|
| |
|
09-27-2010, 07:44 PM
| #97 |
| dnf  Join Date: Sep 2009 Location: Under a big fkn rock.
Posts: 1,901
|
Just wondering why you are looking at mini motors for a 1/10 scale truck? But of what you have shown,I wouldnt even consider the atomic mod motor. Of what you have shown the best choice for a mini to push a 1/10 scale truck would be the 33t IMO But i'd go with a holmes mini torquemaster 33t before I went with the trinity. another choice would be a motorman1600 35t mini motor. Last edited by rock hard; 09-27-2010 at 07:50 PM. |
|
| |
|
09-28-2010, 11:31 AM
| #98 |
| Pebble Pounder Join Date: Sep 2010 Location: Brussels/Belgium
Posts: 196
|
Why mini motor?? Because on the RS10 there is 2 380 motors and I think they are considered by the manufacturers as mini motor not to be confused with micro motors...
|
|
| |
|
09-28-2010, 09:12 PM
| #99 | |
| dnf Join Date: Sep 2009 Location: Under a big fkn rock.
Posts: 1,901
| Quote:
AH,I didn't know that.I have never seen one,I have seen some nice mini motors though I would still want to say the holmes 33t is probably the best mini for it.the 33t can handle 3s lipo,so thats nice.also hpi has a 45t mini motor,I think stormer had them last time I looked,I'll check and see if they still got em. But reading the thread,it sounds like the holmes pullers fit,and also a guy got 540's to fit. I'd use 540's,but pullers are a great motor too. Last edited by rock hard; 09-28-2010 at 09:31 PM. | |
|
| |
|
09-28-2010, 09:14 PM
| #100 |
| dnf Join Date: Sep 2009 Location: Under a big fkn rock.
Posts: 1,901
|
here ya go https://www.ssl-stormerhobbies.com/c...=cs&pn=hpi1065 https://www.ssl-stormerhobbies.com/c...=cs&pn=pek1400 http://www.lrp.cc/en/products/electr...80-ht/details/ http://www.rccrawler.com/forum/showthread.php?t=190726 Last edited by rock hard; 09-28-2010 at 09:19 PM. |
|
| |
 |
| |


 Linear Mode


