| |
| |||||||
 |
| | LinkBack | Thread Tools | Display Modes |
 11-08-2016, 07:54 PM
| #1 |
| Newbie Join Date: Nov 2016 Location: Outside Bullalo, NY
Posts: 2
|
Bought myself an Everest 10 a little bit ago on an impulse buy, drove it around and started to change a few things. At first impression, this RC is a more than capable for its options and has more than enough power. Now I really like the crawler scene and I've made a few changes and custom parts for the Everest 10. This thread will show basic changes I recommend, custom parts I've made, upgrades I've attempted, and any other things I've tried. Pay attention, you might see a new frame, upgraded chassis parts, new bodies, and maybe a 6x6? Lets start off with a quick review of the Redcat Everest 10 in its stock form and its components. It's a 1/10 scale crawler with full time 4WD. Note* I have watched a few videos on YouTube and read a few other forum posts and there were some minor small differences between my Everest 10 and others. Note that my findings may be different than your's. I purchased mine from a registered Redcat dealer in September of 2016 and it was new-stock (dealer got it in a week before). I've taken it fully apart (because I drove underwater and in the sand and wanted to thoroughly clean everything) and took a good look at everything. The electrical side of this crawler is pretty basic. the receiver is a 3 channel Redcat brand 24.GHz paired with a 2 channel Redcat brand pistol grip transmitter. The motor is a 540 size brushed motor with 60 turn windings (from what I can research, the motor doesn't specify on it nor in the manual). It comes with a Hexfly 2000 mAh 7.2v NiMH battery. ESC is a Redcat/Hobbywing 1/10 scale waterproof unit. It has jumper tabs to switch between Lipo or NiMH and also crawler or boat mode. It can accept a 2-3 cell Lipo or 5-9 cell NiMH. When in crawler mode, the ESC locks the motor when no input in received, not allowing the crawler to coast (roll due to gravity or other forces). It has full power in either direction. In boat mode, the crawler has full power in one direction and a limited power in another. It also has the ability to coast. The steering servo is Redcat/Hexfly brand HX-15S. It is a standard sized servo and is rated for 15KG and splash resistant, even though the crawler is marketed as "waterproof". Axles: The front and rear axles (Housings, internal parts, axle shafts, hubs, knuckles, spindles) are interchangable. The front uses a tie rod from the servo to the driverside for steering, using a drag bar style tie-rod to connect either steering knuckle together. The rear uses individual tie rods from either knuckle to connect to the axle housing, and a drag bar between the knuckles. A quick note: all tie rods on this crawler are normal threaded, meaning they have to be taken apart at one end and spun to be adjusted. The axle shafts themselves are metal, along with the ring and pinion gears. The differentials are locked, meaning that both tires on an axle must spin together; there is no slip from one tire to the next. The axle shafts are held in place with ball bearings. The axles come non-lubricated. Drivetrain: The transfer case in this crawler is a single unit that the motor bolts onto. All gears inside are plastic and non-lubricated. An output shaft is located on the front and rear of the unit. The driveshafts are plastic with metal yoked u-joints on either end. The driveshafts are the inner slipping kind, where one end slides over the other. Suspension: Front and rear 4 link suspension. The upper links are the same on either side, bent inward to avoid contact with the shocks during articulation. The rear lower 4 link arms are straight, while the fronts are bent slightly to clear the front tires while turning. All 4 link arms are aluminum with plastic ball-and-socket inserts. Shocks are aluminum capped plastic oil filled coil-overs. 121mm length. Chassis: The sides of the chassis are stamped aluminum while the lower frame and upper frame are plastic. The lower frame houses the motor/transfer case while the upper holds the battery, receiver, and ESC. Misc: The body is a flexible plastic, held on by two body pegs on either side of the side chassis. Tires are a soft rubber, semi-aggressive tread with 3 piece beadlocks. Inside is a red open celled foam. Hubs are standard Redcat plastic .475" (12mm) hex with centerbolt. **will update with pictures soon Last edited by THX_138; 12-29-2018 at 12:12 AM. |

|  |
| Sponsored Links | |
| | |
|
11-08-2016, 09:20 PM
| #2 |
| Rock Stacker Join Date: Jun 2016 Location: Squaw Valley
Posts: 60
|
Check my redcat everest out   Custom aluminum bottom chassis plate custom made steering hubs. Brushless 1/8 scale hobbywing esc. 3650 5900kv brushless motor. Shorter shocks. XS 2.2 Interco Super Swampers. Developed to be more of a rock racer/bouncer. Super fun. Does awesome on vert. climbs Everest on left with RC4WD SuperSwamper Boggers and RS10 on Right with Proline SX SuperSwampers both highly modified.  Sent from my SAMSUNG-SM-N900A using Tapatalk Last edited by THX_138; 12-29-2018 at 12:14 AM. |
|
| |
|
11-08-2016, 11:12 PM
| #3 |
| Quarry Creeper Join Date: May 2010 Location: ny
Posts: 466
|  Sent from my iPhone using Tapatalk |
|
| |
|
11-09-2016, 01:46 PM
| #4 |
| Newbie Join Date: Nov 2016 Location: Outside Bullalo, NY
Posts: 2
|
So after driving around for a while, I made a few adjustments to my crawler. First was the front lower 4 link mount. This has two position to choose from and it comes in the inward most position. By switching to the outer most position, you change the steering geometry. The front axle rolls out more, but this also changes the caster angle of the front hubs/knuckles. This has no affect on the front tires when driving straight, but when turned it increases the amount of camber inward. This helps when trying to pull the front end to one side while on an obstacle. The only downside I can see to this would be a steeper driveshaft angle but I don't see this being any real problem.
|
|
| |
|
12-12-2016, 09:03 PM
| #5 |
| Newbie Join Date: Aug 2016 Location: Townsville
Posts: 36
|
These lil rigs go great for the coin. A few simple mods makes them worthy. So far, we moved all the electronics on top/side of the steer servo using Velcro. Threw out the battery tray. Made top braces to suspend the battery from. Battery moved forward, changed to 5800 mah. Swapped the trans for axial unit, mirrored it (this adds a slipper clutch now and rids it if any torque flex), added axial 35 turn motor. Made a brace for the rear steer servo mount to stop the rear axle roll. Installed axle extensions, bort high mass alloy boom racing wheels with no brand tyres off eBay {surprisingly good} as option to stock wheels with stick-on wheel weights, stock tyres with every second lug cut out. Cut off the stubs underside of diff housings and rubbed off the steering stops. Wiring has been tidied with plastic spiral guard. Alloy servo arm on front, countersunk the screws underneath for trans mount after flipping for the mirror mod, after slotting to accept new trans. All diffs, trans get marine grease. Uni's get silicon spray. Changed the rear trailing arms/links for clearance units (same as fronts, sadly they are just bent, making them slightly shorter). Stuff yet to do? Probably ditch the axle extensions (or go back to 20mm), top-up the standard shocks with 50w oil, maybe inboard the lower trailing arms at the skid plate. Maybe plasti-dip the lectronix, definitely get the hsp alloy diff carrier. Put driveshafts in that have provision for the grub screw to travel all the way through the flange at trans output. Definitely need lipo later. Not sure what to do with the springs. They seem too strong. New steering servo would help too, it's a bit weak. Oh yer, I got deans plugs in the mail too, and an adaptor lead to charge with my venom pro something something plus. Sent from my iPad using Tapatalk Last edited by Disco Stu III; 12-12-2016 at 09:50 PM. |
|
| |
|
12-13-2016, 06:14 AM
| #6 | |
| Quarry Creeper Join Date: Jun 2016 Location: Grand Rapids
Posts: 376
| Quote:
Alternatively, if you want to keep the stock ride height and just want softer springs, I'm pretty sure axial sells some springs that are the same length as the stock E10 springs, but in differing firmness. | |
|
| |
|
01-06-2017, 01:50 PM
| #7 | |
| Newbie Join Date: Dec 2016 Location: Scottsdale
Posts: 4
| Quote:
Thanks! | |
|
| |
|
01-18-2017, 09:31 PM
| #8 | |
| Newbie Join Date: Aug 2016 Location: Townsville
Posts: 36
| Quote:
Just got the hsp diff centres/crown wheels in the mail, they look mint! Had to order new driveshafts, they developed a loud clicking noise over Xmas when I discovered some great terrain at a hotel on our journey. Think I got stainless cheapies on fleabay. Still waiting on the slow boat from china for them AND the new 30 kg servo from the 'states. Started soldering the new deans plugs the other day. MMm, progress. Sent from my iPad using Tapatalk | |
|
| |
|
01-18-2017, 09:40 PM
| #9 |
| Newbie Join Date: Aug 2016 Location: Townsville
Posts: 36
|
Has anyone used grommets or similar on the body posts to stop that annoying rattle from the body? What kind of tool can I get, kinda like a step drill to enlarge the lexan? body, to receive grommets? This would REALLY make it a lot more refined, compared to how it came from new. The trans n motor change got rid of a lot of noise too. The body rattle depletion would make it feel a lot closer to a name brand type finish, if that makes sense. Sent from my iPad using Tapatalk |
|
| |
|
01-19-2017, 10:33 AM
| #10 |
| Rock Stacker Join Date: Jan 2016 Location: farmington
Posts: 76
|
yea i used grommets, i hate watching a flimsy shell rattle it looks redik thats why i bolted my body to the frame , also add weight to your shell by means of undercoating and such
|
|
| |
|
03-12-2017, 08:46 PM
| #11 |
| Rock Stacker Join Date: Jun 2016 Location: Squaw Valley
Posts: 60
|
Thank you. Been a long time since I posted. I will get some video footage and some pics of my rig now. Changed a few things around. I got a 3200 kv motor for it so I can run a 3s lipo. I put the RC4WD 2.2 SuperSwamper Boggers on it. It tracks alot better with those on it vs. the Proline 2.2 SuperSwampers. Those were too wide and wobbled alot on the top end. I wanna say this E10 R.R. (Everest 10 Rock Racer) as I will call it now probably does 25-30 m.p.h.-ish. Fast for a Crawler/Racer. Sent from my SAMSUNG-SM-N900A using Tapatalk Last edited by Ctrain57; 03-12-2017 at 08:54 PM. |
|
| |
|
04-01-2017, 06:18 PM
| #12 | |
| Newbie Join Date: Dec 2016 Location: Scottsdale
Posts: 4
| Quote:
Thanks in advance! | |
|
| |
|
04-03-2017, 07:53 AM
| #13 | |
| Rock Stacker Join Date: Jan 2016 Location: farmington
Posts: 76
| Quote:
i found a chassis that i liked (g-made R1) , went steel pinion/spur, threw in a 20t, and it rips... 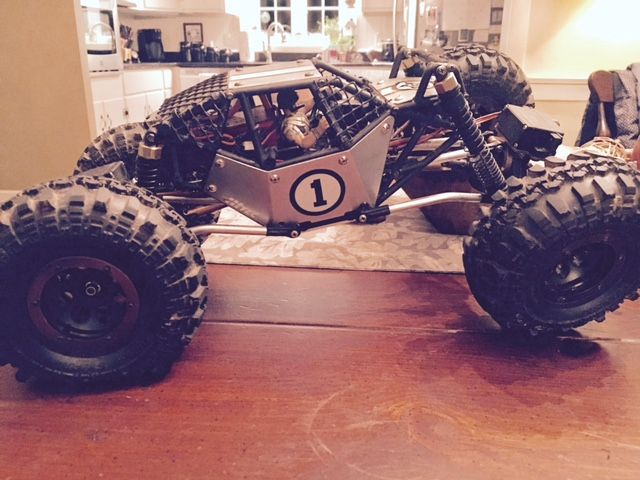 | |
|
| |
|
04-03-2017, 10:42 AM
| #14 | |
| Rock Stacker Join Date: Jun 2016 Location: Squaw Valley
Posts: 60
| Quote:
Heres a comparison. Far right is my sons stock everest. Mine is black to the left of it. And my RS10 Rockslide is the far left one next to my HG P402 Silver Mercedes scaler. Oh yeah. And my girlfriends Losi Night Crawler 2.0.  Sent from my SAMSUNG-SM-N900A using Tapatalk Last edited by Ctrain57; 04-03-2017 at 10:49 AM. | |
|
| |
|
| Tags |
| budget, everest 10, redcat |
 My Redcat Everest 10 Build - Similar Threads
 | ||||
| Thread | Thread Starter | Forum | Replies | Last Post |
| Redcat Everest 10 | Ctrain57 | General Crawlers | 12 | 11-29-2018 09:43 PM |
| Redcat Everest 16 | thenova70ss | Redcat Crawlers | 0 | 03-08-2016 12:33 PM |
| Redcat Everest 16 build in progress | Casper Crawler | Newbie General | 9 | 10-03-2015 12:43 AM |
| Redcat Everest 16 | sled | General Crawlers | 4 | 10-01-2015 10:56 PM |
| |


 Linear Mode


