| |
 05-19-2009, 03:25 PM
| #1 |
| I wanna be Dave Join Date: Apr 2009 Location: Unnecessary Surgery Land
Posts: 3,406
|
I am in need of scale accessories for my truck, but I can't justify paying all that money for stuff to strap to my vehicle. Granted my scratch built stuff probably doesn't look as good as the commercial products it's nice to say I made something. Here is my first attempt at a jerry can. If anyone is interested, I'm probably going to build one more and I could turn this into a build thread/how to. Materials used were: sheet styrene and short piece of 3/16 brass tube.   I don't know anyone else that happy wearing a wedding ring. He must still be in love |

|  |
| Sponsored Links | |
| | |
|
05-19-2009, 04:00 PM
| #2 |
| Quarry Creeper Join Date: Apr 2008 Location: sanford
Posts: 228
|
it looks just as good if not better man  |
|
| |
|
05-22-2009, 06:51 AM
| #3 | |
| I wanna be Dave  Join Date: Oct 2006 Location: Martinsburg WV
Posts: 2,781
| Quote:
It's a little on the big side maybe, but thats compared to Mr. Happy there. It might look totally different mounted on your truck. It looks pretty good for scratch built, it'll look even better with a coat of red or olive drab paint... | |
|
| |
|
05-22-2009, 08:39 AM
| #4 |
| Rock Crawler  Join Date: Mar 2009 Location: West of Eugene, OR
Posts: 942
|
Looks good! Yes; a 'how to' FYI would be cool. |
|
| |
|
05-22-2009, 10:19 AM
| #5 |
| Quarry Creeper Join Date: Jan 2009 Location: North Wales, UK.
Posts: 404
|
Yes, do a build thread! Looks good!
|
|
| |
|
05-22-2009, 02:20 PM
| #6 | |||
| I wanna be Dave Join Date: Apr 2009 Location: Unnecessary Surgery Land
Posts: 3,406
| Quote:
Quote:
Quote:
I painted and mounted this one on the fj truck. I'll build up another one tomorrow morning. I'm going to need it for the pajero i just ordered. the holder is just made of styrene. I'll probably be making a permanent one out of brass.  | |||
|
| |
|
05-22-2009, 04:58 PM
| #7 |
| RCC Addict Join Date: Apr 2009 Location: United States of the Offended
Posts: 1,184
|
Looks good on there. |
|
| |
|
05-22-2009, 05:52 PM
| #8 |
| Picky Fab'r/Acetal Junky 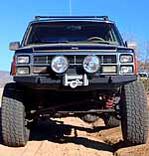 Join Date: Jul 2006 Location: Arizona Desert/AJ
Posts: 3,073
|
Looks pretty sweet. |
|
| |
|
05-22-2009, 08:13 PM
| #9 | ||
| I wanna be Dave Join Date: Apr 2009 Location: Unnecessary Surgery Land
Posts: 3,406
| Quote:
Quote:
I got some free time and heres the first part of the build. I used something like .030 styrene or so. Not exactly sure, but really any size will do. I like using metric to make models so i hope thats ok! I started by making a template 40x50mm then traced onto styrene and cut em out.  next I took a square mini file to blend in the outer edges of the X's  Cut some strips 15mm wide for the sides, top and bottom  Attached the sides all together with some tenax. I also like plastic weld  I noobed it even on my own build and should have done this before attaching sides. just scraps of plastic to go behind x's  It's pretty easy stuff here. If you have never used styrene this would be a great thing to start with. | ||
|
| |
|
05-23-2009, 12:05 AM
| #10 |
| Newbie Join Date: Feb 2008 Location: Thailand
Posts: 27
| Look good.
|
|
| |
|
05-23-2009, 12:09 AM
| #11 |
| Quarry Creeper Join Date: Jan 2007 Location: Osaka, Japan
Posts: 425
|
That's very nice, I've been on a styrene kick all week, that may be next on my list! -val |
|
| |
|
05-23-2009, 01:37 AM
| #12 |
| RCC Addict Join Date: Apr 2009 Location: United States of the Offended
Posts: 1,184
|
You guys make it look so easy, think I might have to give it a try too. |
|
| |
|
05-23-2009, 05:32 PM
| #13 | |||
| I wanna be Dave Join Date: Apr 2009 Location: Unnecessary Surgery Land
Posts: 3,406
| Quote:
Quote:
Quote:
I finished it up here are the rest of the pictures. I went a slightly different route with this one and put 3 handles instead of the 2.  The not so fun part, I softened all the edges with varying grits of sandpaper to give a nice rounded off finish.  I busted out the file again to blend in the handles  and finally, i cut a short piece of 3/16 brass tube and used CA to glue a little lid to it.  There you have it, I hope everyone can make use for this little project. Thanks again for the comments guys. | |||
|
| |
|
05-23-2009, 05:38 PM
| #14 |
| Rock Crawler Join Date: Aug 2008 Location: Tucson
Posts: 625
| What a creepy looking figure. Theres also a slight resemblance to Dexter. |
|
| |
|
05-25-2009, 03:32 PM
| #15 | |
| I wanna be Dave Join Date: Apr 2009 Location: Unnecessary Surgery Land
Posts: 3,406
| Quote:
anyway, i painted it red and thought it was to boring. so i forgot about it and let it sit outside for 15 years...  | |
|
| |
|
05-25-2009, 05:29 PM
| #16 |
| RCC Addict Join Date: Apr 2009 Location: United States of the Offended
Posts: 1,184
|
Great job on the weathering!! |
|
| |
|
05-25-2009, 05:59 PM
| #17 |
| RCC Addict Join Date: Jun 2007 Location: San Antonio, Tx
Posts: 1,093
|
Looks awesome with paint on it I think I will atempt oneof these, in one of the pics he's got blood on his right hand he's about to go burn that body |
|
| |
|
05-25-2009, 06:40 PM
| #18 | ||
| I wanna be Dave Join Date: Apr 2009 Location: Unnecessary Surgery Land
Posts: 3,406
| Quote:
Quote:
in case anyone would like to know, i used artists acrylic colors(burnt sienna, raw sienna, burnt umber, raw umber) stippled with a hard brush to simulate the rust. follow it up with a nice layer of flat clear | ||
|
| |
|
05-26-2009, 01:48 AM
| #19 |
| Quarry Creeper Join Date: Jan 2009 Location: North Wales, UK.
Posts: 404
|
Looks great painted too. Thanks for the build up. |
|
| |
|
05-26-2009, 06:19 AM
| #20 |
| RCC Addict Join Date: Oct 2008 Location: Plainfield, IL.
Posts: 1,297
|
Did you paint his finger nails? |
|
| |
 |
| |


 Linear Mode


