| |
 07-29-2007, 08:06 PM
| #1 |
| Quarry Creeper Join Date: Jul 2006 Location: PDX
Posts: 426
|
I got a lot of comments on my homemade winch in my K2-K5 build thread, so as promised, here is the how-to: Start with two of the cantilever parts from the TLT kit, a strip of thin sheet styrene and a papermate pen barrel.  When you look at the cantilever parts you will see a side with no lip on the outside and one with a lip. I cut off the arm on the side with the outside lip. You want to cut it as straight and square with the other arm as you can. These will serve as the feet of the winch.  Now cut off the nub on the back and try to keep it square as well.  Now on the arm that's left cut off the top just at the bottom of the hole. Again you want it to be square, as this will be the top of the winch.  Now take the papermate pen barrel and cut a 3/4" - 7/8" piece out of the middle. Clean up the edges as you will glue this piece in to the cantilever parts.  When you glue the barrel into the cantilever pieces, it is imperative that the arms are straight and square. As long as they lay flat against the table, you should be good. Trace some circles onto the styrene sheet, cut them out and glue them onto the ends.  Now wrap whatever you are using for winch line around the center barrel and secure with a knot on the back side. Put a small drop of CA to insure it doesn't unravel.  Cut 3 strips of the styrene and glue to the front, back and top. Take a small file and smooth out all of the edges.  Now take a few short pieces of wire and drill two holes in the arm and two in the body the same general size. These will be the power cables from the controls to the winch motor.  Now cut an elbow off one of the sprue trees and glue it on to the barrel on the opposite side from the wires.  Add a little paint and a sticker, drill a couple of holes for mounting and ta-da, instawinch!  It will depend on how you set up your winch line, but there should be room under the center barrel for the actual line to run out, like mine above. Good luck! |

|  |
| Sponsored Links | |
| | |
|
07-29-2007, 09:14 PM
| #2 |
| I had the hottest girlfriend at the MSD Nats Join Date: Dec 2006 Location: Hecho en Tejas
Posts: 2,399
|
INSANE. i never knew. excellent job hombre. that really is awesome! friggin creative, man thats cool!
|
|
| |
|
07-29-2007, 11:32 PM
| #3 |
| Quarry Creeper   Join Date: Apr 2006 Location: MEDFORD
Posts: 440
|
wow some of the most exellent use of stock tlt parts.
|
|
| |
|
07-29-2007, 11:46 PM
| #4 |
| I wanna be Dave Join Date: Sep 2005 Location: USA
Posts: 11,196
|
Nice jon of using what you have. Top Notch for sure... |
|
| |
|
07-30-2007, 02:16 AM
| #5 |
| Pebble Pounder Join Date: Apr 2007 Location: Anchorage
Posts: 180
|
Awesome!! I'm going to build a faux winch like this, and i may just have to use your design! Great job, I'll be sure to give proper credit. |
|
| |
|
07-30-2007, 06:19 AM
| #6 |
| Newbie Join Date: Mar 2004 Location: montgomery co
Posts: 5
|
Great tutorial.
|
|
| |
|
07-30-2007, 06:22 AM
| #7 |
| RCC Addict Join Date: Mar 2007 Location: MS Gulf Coast
Posts: 1,949
|
Nice job man!  Very creative. Very creative. |
|
| |
|
07-30-2007, 06:43 AM
| #8 |
| Rock Crawler Join Date: Jan 2006 Location: Connecticut
Posts: 795
|
Wow! That came out better than expected. I'm gonna have to try that out. Keep up the good work, it looks great!!
|
|
| |
|
07-30-2007, 06:53 PM
| #9 |
| RCC Addict Join Date: Jul 2006 Location: So Cal USA
Posts: 1,109
|
WOW, what can I say that hasent been said... oh well, Ill say it anyway... THATS FRICKEN AWSOME MAN! You are the man! Nice job, a sticky for sure ~John |
|
| |
|
07-30-2007, 08:58 PM
| #10 |
| I lost my vendor privileges Join Date: May 2006 Location: TOP OF THE HILL
Posts: 3,014
|
well im another one that will be copying this one. nice job.
|
|
| |
|
07-30-2007, 09:36 PM
| #11 |
| Rock Crawler Join Date: Jan 2006 Location: Connecticut
Posts: 795
|
What type of paint did you use? I can't get any I have to stick to the damn thing.
|
|
| |
|
07-30-2007, 09:50 PM
| #12 |
| Quarry Creeper Join Date: Jul 2006 Location: PDX
Posts: 426
|
I just used Testors enamel. It has held up for me so far. And thanks for all the compliments. It's amazing what a rainy Saturday, some rummaging and a little imagination can do. Hope it helps. |
|
| |
|
07-30-2007, 10:20 PM
| #13 |
| Rock Crawler Join Date: Jan 2006 Location: Connecticut
Posts: 795
|
Just found some Testors Steel and used that. Worked great! Ill post up pics tomorrow. Thanks for the great tip |
|
| |
|
07-30-2007, 11:08 PM
| #14 |
| RCC Addict Join Date: May 2006 Location: California
Posts: 1,361
|
Great idea! I'll have to try it tomorrow.
|
|
| |
|
08-01-2007, 09:32 PM
| #15 |
| Rock Crawler Join Date: Jun 2006 Location: capon bridge
Posts: 571
|
Thanks for the tip. I made my own. I did a few things diffrent tho.  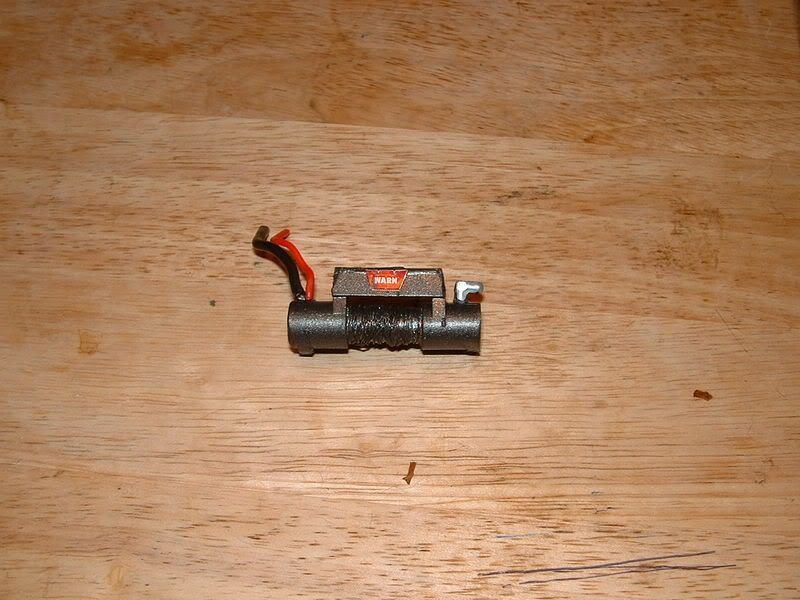 |
|
| |
|
08-01-2007, 09:42 PM
| #16 |
| Quarry Creeper Join Date: Jul 2006 Location: PDX
Posts: 426
|
Right on, man. It's all about making it your own.
|
|
| |
|
08-02-2007, 10:44 AM
| #17 |
| Quarry Creeper Join Date: Jul 2007 Location: Sierra Vista, Arizona
Posts: 271
|
I really like that man! That really nifty. I wonder if there would be some way to power it.... servo with arm that can continuosly spin and round servo horn on the side of whinch. Put the servo on the chassis and connect a little arm between the servo horn on the servo and the one on the winch. turn on the servo and watch it crank the whick like a steam train! Great idea man. Very creative. Looks great. And where are you getting the small warn decals? |
|
| |
|
08-02-2007, 05:26 PM
| #18 |
| Quarry Creeper Join Date: Jul 2006 Location: Snover, MI
Posts: 301
|
I will deffinatly do this, just was digging through the parts box and walla I got everything to do it! Great how to! |
|
| |
|
08-02-2007, 07:06 PM
| #19 |
| Rock Crawler Join Date: Oct 2006 Location: Tacoma
Posts: 699
|
im working on one right now for my hummer buildup . Thanks for the tip...
|
|
| |
|
08-02-2007, 07:56 PM
| #20 |
| Rock Crawler Join Date: Aug 2006 Location: On the trail
Posts: 668
|
i dont like to copy things but i am going to do this but a little funcional thanks |
|
| |
 |
| Thread Tools | |
| Display Modes | |
| |


 Linear Mode


