| |
 02-06-2006, 11:43 PM
| #1 |
| Rock Crawler Join Date: Sep 2004 Location: Santa Rosa
Posts: 688
|
I decided after having to cut off my tires for the second time that there had to be a way to make some cheap functional beadlocks. While walking through Home Depot looking for large washers I stumbled upon the reducing washers in the Electric Department. They are the perfect fit and are the exact diameter of the Pede front rims. I picked up 4 packages and headed home to see how I could make them work. I decided that I would cut the outer bead off both the front and back of the rim; just like a 1:1 homebrew beadlock. I've used a hacksaw to cut off the beads before for narrowing and it works but leaves a nasty edge. I found that the 2.2 rims have the same size hex as a 1:10 touring car. A lightbulb went off and EUREKA!! I picked up a touring car tire arbor for my tire truer and now I have the perfect lathe for cutting rims. I was able to cut and smooth all four wheels in under 20 minutes. The cutting only took about 5 - 10 seconds per bead but I wanted to make sure I had a super flat surface to mount the rings to - I have found that this makes for a strong mounting surface. If you have a tire truer or have access to one I highl recommend spending the $25 for the 1/10 touring car tire arbor. Anyway, I finished them up and mounted a set of Moabs to them and to my surprise they clamp down well enough to hold the air in. I actually had to make breather holes to allow the tires to compress. The entire process probably took about 3 - 5 hours most of which was spent drilling the holes in the rings. Since I do not have a drill press I had to work with 4 rings at a time making sure to keep everything lined up. Well I finally got the time to document the process I used to make my beadlocks. All the parts cost under $30. I used Pede fronts cus they are always in good supply at my LHS and they are cheap. Parts used: Stampede Front wheels Reducing washers 1 1/2" - 1". They come 4 to a package at Home Depot UPDATE: Brand: Halex Part no: 26853 approx $2.00 per pack of 4 4-40 1/2" button head socket screws 4-40 nuts Tools Used: Tire truer w/1:10 touring car arbor; a hacksaw or drill press with cut-off wheel will work too Heavy Duty X-Acto w/#19 blade Sandpaper - Emory cloth, 220 grit, 120 grit (not necessarily in that order) CA Glue 7/64" drill bit Files - Flat and rat tail Cordeless drill Vice Forecepts - The curved ones would work best but, small needle nose pliers should work too Making the rings: I layed the holes out using a piece of graph paper and a circle template. I tried to get the holes 45 degrees apart but they are slightly off. I'm going to be working on a better template and I'll upload that when I get it done. Holes drilled with 7/64" bit and ring notched with a file for easy positioning. Since the holes are not perfectly spaced the notch was needed to keep me from going insane while trying to line up the holes. Cutting the wheels and attaching the rings: Pic 1: Wheel mounted for cutting on my tire truer Pic 2: Outer beads cut off and mounting surface smoothed Pic 3 and 4: I used the Heavy-Duty X-Acto handle with a #19 blade. I used the backside of the blade (non-cutting side) to cut the beads off. I also used the blade to true the mounting face of the wheel. This made for a truely flat mounting surface. I finished it off with an emory board (borrowed from the wife but you could also used 220 grit sandpaper). I used CA glue to attach the inner rings to the wheel. I also scuffed the matting surface of the ring with 220 grit sandpaper to allow more bitting surface for the glue. UPDATE: When mounting the washers, the stampings (visible in pictures) should be facing outward on both rings for Moabs. Masher 2K's have a thinner bead and he outer washer should be mounted with the stampings facing inward. UPDATE 9/19: Since posting this how-to, a problem was found when mounting Masher 2K's. The update listed above seemed to help remedy some of the bead slipping problem but I found that adding fuel tubing to the completed wheel/washer assembly greatly eased the mounting of both Moabs and Mashers and virtually eliminated the ability for the bead to slip free. Here are the links to what I did and some pictures of the assembly: How-To: Functional 2.2 Beadlocks for under $30 How-To: Functional 2.2 Beadlocks for under $30. Pic 5 (coming soon): Front inner ring mounted. You will need to make sure that the ring is squarely mounted to the rim so that it is not offset creating an offset mount. Pic 6: Back inner ring mounts the same as the front - Pay close attention to the position of the holes in the ring in relation to the holes in the rim. The holes in the ring must be mounted inline with the holes in the rim otherwise there will be interference. EDIT: The images are not posting correctly and are a little out of sequence. The descriptions will point you to the right image though. Continued on next post... Last edited by gone_wheelin; 09-19-2006 at 10:16 AM. |

|  |
| Sponsored Links | |
| | |
|
02-06-2006, 11:46 PM
| #2 |
| Rock Crawler Join Date: Sep 2004 Location: Santa Rosa
Posts: 688
|
...continued Mounting the tires: Before mounting the tire I scuffed the matting surface that will clamp down on the tire with 220 grit sandpaper. This shoudl allow the ring to bite into the tires bead more and resist slippage from torque. This part will require some special attention to keep the tire bead from becoming distorted and sliping out from between the rings. You also don't want to overtighten the rings causing the inner ring to break loose from the rim. They only need to be snug. Pic 7: Tire mounted - Note the position of the tire bead around the ring. It is important to keep the bead centered around the ring. Pic 8: I found that if you finger tighten the screws in a pattern that crosses the tire (note numbers in picture) before sinching with a wrench that it will keep the bead uniform and keeps it from deforming. Once all the screws have had the slop taken out continue in a cross pattern across the ring using the forecepts or needle nose pliers to hold the nuts. Only tighten the screws 2 to 3 full turns at a time until they are all snug. Pic 9: Front outer ring mounted with screws and nuts Pic 10: Back outer ring mounted with screws and nuts - This is where the curved forcepts or needle nose pliers are needed. There isn't much room between the ring the and rim. EDIT: If you are not getting enough clamping to keep the tire in place try flipping the outer ring so that the stampings are facing in towards the wheel. This will expose the screws to the rocks more but may provide additional clamping pressure on the tires bead. continued on next post... Last edited by gone_wheelin; 09-19-2006 at 10:06 AM. Reason: Re-attaching images |
|
| |
|
02-06-2006, 11:50 PM
| #3 |
| Rock Crawler Join Date: Sep 2004 Location: Santa Rosa
Posts: 688
|
...Last part Here's the final product. I haven't had a chance to really put them through some serious testing but from what testing I have done they have not had any problems yet. I hope to visit a favorite rock spot in the next day or so to give them a good workout. I will post back with the results. Pic 11 & 12: Finished tire Pic 13: Clearance at knuckle on TLT Pic 14: Another shot of the clearance I still need to get some better pictures of the front and back inner rings mounted. The ones I have were taken with the camera on my phone and are not that clear. Well that's it. This is my first how-to and I tried to be as thurough as possible so if you have any questions, comments or suggestions post up or PM me. Thanks for reading. Last edited by gone_wheelin; 09-19-2006 at 10:07 AM. Reason: Re-attaching images |
|
| |
|
02-07-2006, 12:06 AM
| #4 |
| Quarry Creeper Join Date: Aug 2005 Location: Crawlorado
Posts: 333
|
Nice, I just finished my first 2.2 beadlock rim tonight. I used pvc, though 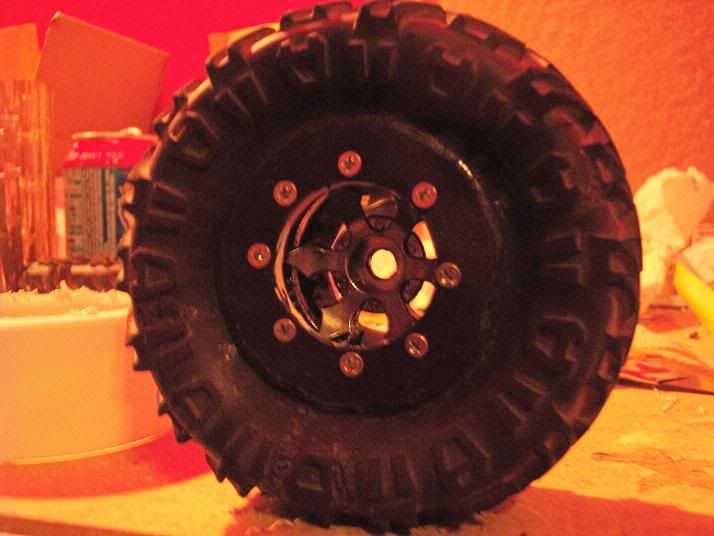 |
|
| |
|
02-07-2006, 12:08 AM
| #5 |
| Rock Crawler Join Date: Sep 2004 Location: Santa Rosa
Posts: 688
|
Right on. Looks good.
|
|
| |
|
02-07-2006, 12:38 AM
| #6 |
| I wanna be Dave Join Date: Jun 2004 Location: San Jose
Posts: 5,207
|
Looks great but , I'm confused about this part. I think I missed it but not sure. Did you have to cut a ring down to fit in the rim? This is a great idea. I'm gonna try it or something like it. Oh and is the rim narrower than stock or is it the same width? Great idea and greater article. Nice work, I wonder if Jason will put this up in the tech section. |
|
| |
|
02-07-2006, 01:48 AM
| #7 |
| Quarry Creeper Join Date: Nov 2005 Location: fairfax
Posts: 226
|
very nice article. great job. so you cut off the plastic outter ring from the original rim right. by the way great idea with the lathe, trying to hold and cut rims by hand is a pain. so then what,,,,, you screwed one of the reduction washers to the rim and then an outside ring for the tire? are there 2 rings per beed side of the rim? |
|
| |
|
02-07-2006, 02:43 AM
| #8 |
| I wanna be Dave Join Date: Jun 2004 Location: San Jose
Posts: 5,207
|
ya there's two rings per side but I can't tell how the inner bead stays in place.
|
|
| |
|
02-07-2006, 06:57 AM
| #9 |
| Quarry Creeper Join Date: Aug 2005 Location: Jefferson City
Posts: 345
|
The inside washer on both the front and the back of the rim are CA'ed on. All four washers for each wheel are the same size...they weren't cut down at all. I just picked up my 16 1-1/2"-1" reducing washers this morning. I'm hoping to have them all finished this evening and will post a picture of them here, if that's OK with you gone wheelin'. This really is a great way to have CHEAP functional beadlocks. The washers weigh next to nothing (they are a lot lighter than the 1" flat washers I was using as rock rings) and the whole process is really quite simple. The outer diameter of the washer fits perfectly inside the lip of the Moab, so getting them centered should be fairly easy as well. |
|
| |
|
02-07-2006, 08:22 AM
| #10 |
| Pebble Pounder Join Date: Oct 2005 Location: Ashville, Pa
Posts: 141
|
Thanks for the how-to. I was overtightening my screws and forcing the tire out of the ring. I'm going to try again tonight.
|
|
| |
|
02-07-2006, 09:53 AM
| #11 |
| Rock Crawler Join Date: Sep 2004 Location: Santa Rosa
Posts: 688
|
Bugman has it correct. The inner rings are glued on with CA glue. That is why a flat surface is so important. I also forgot to mention that I scuffed the mating surface of the inner ring where it will mount to the wheel to provide a more bite for the glue. I will try to get 2 pics of the inner rings mounted on the wheel tonight. One more thing to do that I will update on the original post; scuff the mating surface that will hold clamp down on the tire. I used 220 grit paper. This should help resist any slipping from torque. RCKJeep: The rim is physically narrower than stock but, once the rings and tire are mounted it is probably about the same width. All I did was remove the original mounting surface and replace it with riings to lock the bead. I will actually be trying this on narrowed set of wheel soon. I saved all the cut off beads so I should be able to use them for narrowing. Bugman: Thats fine with me. If anyone actually goes through with making these post the pics. Thanks for the compliments everyone. |
|
| |
|
02-07-2006, 11:28 AM
| #12 |
| I wanna be Dave Join Date: Jun 2004 Location: San Jose
Posts: 5,207
|
Oh I get it now. I'm off to the depot, just not the one close to my house cuz it's full of fawkin idiots. Last time I was there I stood in line for 10 minutes to be told the that the line was closed. I thru my stuff on the ground and left. Anyway, again nice write up
|
|
| |
|
02-07-2006, 11:31 AM
| #13 |
| Rock Crawler Join Date: Sep 2004 Location: Santa Rosa
Posts: 688
|
Thank you for reading. Post up some pics when you finish yours. If you have any more questions about the process feel free to post up or PM me. It was late when I finished the write up and I'm sure I probably missed something else. |
|
| |
|
02-07-2006, 10:29 PM
| #14 |
| Quarry Creeper Join Date: Jul 2005 Location: Oran, MO
Posts: 347
|
Aren't those made of metal? How well does CA bond metal to plastic. Everytime I get CA on metal I just let it dry and scrape it off with a screwdriver. I'm not saying it isn't gonna work because you have a set made and they look great. I'm just worried about taking hits from rocks or getting in a bind and twisting off.
|
|
| |
|
02-08-2006, 12:36 AM
| #15 |
| I wanna be Dave Join Date: Jun 2004 Location: San Jose
Posts: 5,207
|
Well I had just enough time to make one wheel but a bit narrower and it didn't hold the tire much at all. I think I'll try and coat the inside of the rings with some rubber coating or something.
|
|
| |
|
02-08-2006, 06:55 AM
| #16 |
| Newbie Join Date: Jan 2006 Location: Ocean county
Posts: 27
|
I love how the you can see the washer specs and UL stamp on the outside, for some reason that strikes me as really cool, almost like seeing a manuf. stamping hehe.
|
|
| |
|
02-08-2006, 09:24 AM
| #17 |
| Rock Crawler Join Date: Sep 2004 Location: Santa Rosa
Posts: 688
|
MazdaParts: If you scuff the mating surface that will be bonded to the wheel it will hold real well. In fact, I tried to remove a larger 1" washer that I had attached and tried beating it against my vice to break it loose and all I managed to do was dent my vice. RCKJeep: Did you scuff the clamping surface of the washers real well. If you put them on without scuffing the tire can just slip out. Also, make sure that the recessed part of the washers are facing in the same direction. If for example the inner washers recess is pointing out and the outer washers is pointing in then the washers will bottom out without providing enough bite. I will try to work up a diagram today to help out with this. |
|
| |
|
02-08-2006, 09:26 AM
| #18 |
| Rock Crawler Join Date: Sep 2004 Location: Santa Rosa
Posts: 688
|
RCKJeep: Can you post up a pic of your assembled tire & wheel?
|
|
| |
|
02-08-2006, 09:47 AM
| #19 |
| RCC Addict Join Date: Aug 2005 Location: Akron
Posts: 1,784
|
What's the diameter of the hole in the washer?
|
|
| |
|
02-08-2006, 10:48 AM
| #20 |
| Quarry Creeper Join Date: Aug 2005 Location: Jefferson City
Posts: 345
|
I got my beadlocks started last night, but had a couple of problems that will delay the final product. I'm using HPI 5-spoke wheels and have them single narrowed. I can't double narrow them due to the 5-spoke design. So, I'm going to have to get another set of wheels to use. The other thing that will slow the project down a bit is that I have decided to solder the nuts to the ring to aide in putting the beadlocks together. Doing 8 nuts per ring and having to do 8 rings will take some time, but will be very much worth the effort.
|
|
| |
 |
| |


 Linear Mode


