Go Back   RCCrawler Forums > RCCrawler Brand Specific Tech > Superclass Crawlers
Loading

Notices

Thread: Super Experiment... :&

Reply
 
LinkBack Thread Tools Display Modes
Old 04-08-2011, 04:59 PM   #121
RCC Addict
 
Join Date: Apr 2010
Location: Ringwood
Posts: 1,233
Default

if you looked at his signature u would get an idea
asw27x is offline   Reply With Quote
Sponsored Links
Old 04-08-2011, 05:11 PM   #122
RCC Addict
 
Join Date: Mar 2010
Location: Colorado Springs, Co
Posts: 1,441
Default

Quote:
Originally Posted by XtrmTJ View Post
When do you think this "kit" go into production ?
Probly a month or two once i get settled after the move in get my work routin in place. It also really depends on how soon my new unit is set to deploy.
Abavuso is offline   Reply With Quote
Old 04-08-2011, 06:56 PM   #123
RCC Addict
 
Join Date: Mar 2010
Location: Colorado Springs, Co
Posts: 1,441
Default Custom Chassis

I think I'm finally happy with the chassis layout. I've fixed the Shock and link mounting location so this should work just fine. I'm planning on using 4 small buggy shocks so that that I don't have to limit them all that much so we shall see how well this works once I get it made... again, it's going to be a while before this design roles.
Attached Images
 
Abavuso is offline   Reply With Quote
Old 04-08-2011, 10:37 PM   #124
Rock Stacker
 
Join Date: Mar 2011
Location: Parker
Posts: 82
Default

Quote:
Originally Posted by Abavuso View Post
This is something I've been working on to satisfy a couple of functions.

The ability to:
- duel servos on one axle
- 1 servo and 1 ESC on each axle W BEC mounted on the brace
- true 4 link suspension
- add additional bracing/strength for the axle

The key to making these plastic axle more durable(not that they aren't already solid as is) I think is to brace the axle. This will give you 3 solid mounting points. One on each end of the axle an using the old 3 Link mount for the front to rear brace. I've notices in my make shift set up this does a couple of things. It helps limit axle and trans oscillation and flex due to the 3 link puling on the trans and the torque from the motor putting power to the ground. essentially pulling the axle components in 3 different directions while it's operating. This isn't a huge deal when running it stock. But when you add more power and heavier/bigger wheels, it starts to become extremal noticeable.

The components will be made of 1/4 in delrin for maximum durability.

The only modification you will have to make on the axle is to cut off the existing servo mounts.

Parts you will need are:
2-servo plates
1-pack of setscrews for the links
4- short rod ends

The Kit would come with:
-1 bracket plate
-2 bracket mounting plates
-3 3x6mm Spacers
-1 3link brace
-all hardware to put it together
-1 long delrin rode for run from the servo to the knuckle for single servo setup.

Man wish I would have known you were going to sell this thing my wife probably wouldn't be so mad at me for taking all my time making mine..

Big E is offline   Reply With Quote
Old 
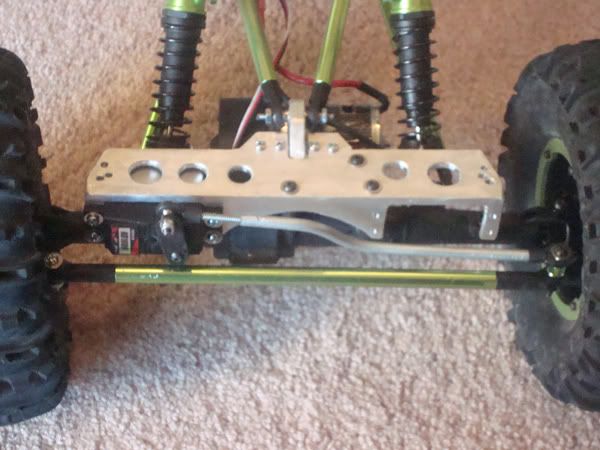
04-08-2011, 11:59 PM   #125
Pebble Pounder
 
Join Date: Mar 2011
Location: Kings Mtn.
Posts: 101
Default

got mine in, ran it for a few minute,put it up, and took it back out to show a friend and notice that i have a split in the back left tire about an inch and a half long down the seam of the tire. any ideas of how to fix this until i get some new tires? glue? thread? fishin line if glue what kind should be used?
JugRKnoT is offline   Reply With Quote
Old 04-09-2011, 01:06 AM   #126
I wanna be Dave
 
Join Date: Oct 2008
Location: Golden
Posts: 2,588
Default

Quote:
Originally Posted by JugRKnoT View Post
got mine in, ran it for a few minute,put it up, and took it back out to show a friend and notice that i have a split in the back left tire about an inch and a half long down the seam of the tire. any ideas of how to fix this until i get some new tires? glue? thread? fishin line if glue what kind should be used?
Use super glue (cyanoacrylate - CA glue) to get the cut closed up, let it set for a few minutes, then turn the tire inside out and use some IC2000 rubberized CA glue to seal it completely.
monkeyracer is offline   Reply With Quote
Old 04-09-2011, 01:15 AM   #127
Pebble Pounder
 
Join Date: Mar 2011
Location: Kings Mtn.
Posts: 101
Default

Ok, thanks. Should the local hardware carry the ic2000 glue? Its not a huge deal at the moment but i do need to get it fixed. Other than that i love this thing in its stock form as it is the first crawler that i have owned besides a cheap maisto haha
JugRKnoT is offline   Reply With Quote
Old 04-09-2011, 01:45 AM   #128
RCC Addict
 
Join Date: Jan 2011
Location: Wheat Ridge
Posts: 1,315
Default

Quote:
Originally Posted by JugRKnoT View Post
Ok, thanks. Should the local hardware carry the ic2000 glue? Its not a huge deal at the moment but i do need to get it fixed. Other than that i love this thing in its stock form as it is the first crawler that i have owned besides a cheap maisto haha

X2 what Monkeyracer said. FYI a little goes a long way
The Crawl Space is offline   Reply With Quote
Old 04-09-2011, 01:46 AM   #129
Rock Crawler
 
Join Date: Jan 2011
Location: bridgeport
Posts: 738
Default

Quote:
Originally Posted by Big E View Post
Man wish I would have known you were going to sell this thing my wife probably wouldn't be so mad at me for taking all my time making mine..

Very cool bracket for the servos but the only thing im noticing is they might be to vonerouble to getting damaged when crawling,they're to out in the open.i've broken so many servo horns and bent so much steering linkages when mine were up front in that position.but very cool design and good luck with it.
GREEDY GENIUS is offline   Reply With Quote
Old 04-09-2011, 01:48 AM   #130
RCC Addict
 
Join Date: Jan 2011
Location: Wheat Ridge
Posts: 1,315
Default

Quote:
Originally Posted by Abavuso View Post
Probly a month or two once i get settled after the move in get my work routin in place. It also really depends on how soon my new unit is set to deploy.
Dude! You are beast with all the ideas and fab work you got going on! All while moving! Super mad dope props to you man
The Crawl Space is offline   Reply With Quote
Old 04-09-2011, 04:46 AM   #131
RCC Addict
 
Join Date: Mar 2010
Location: Colorado Springs, Co
Posts: 1,441
Default

Quote:
Originally Posted by JugRKnoT View Post
Ok, thanks. Should the local hardware carry the ic2000 glue? Its not a huge deal at the moment but i do need to get it fixed. Other than that i love this thing in its stock form as it is the first crawler that i have owned besides a cheap maisto haha
Call nitrix tech suport ant tell them. You should get a replacment for free. My dog bones and difs were bent out of the box and they sent me those for free.
Abavuso is offline   Reply With Quote
Old 04-09-2011, 07:48 AM   #132
RCC Addict
 
Join Date: Apr 2010
Location: Ringwood
Posts: 1,233
Default

Quote:
Originally Posted by Abavuso View Post
I think I'm finally happy with the chassis layout. I've fixed the Shock and link mounting location so this should work just fine. I'm planning on using 4 small buggy shocks so that that I don't have to limit them all that much so we shall see how well this works once I get it made... again, it's going to be a while before this design roles.
looks like the JPcustoms hovac chassis
asw27x is offline   Reply With Quote
Old 04-09-2011, 08:19 AM   #133
RCC Addict
 
Join Date: Mar 2010
Location: Colorado Springs, Co
Posts: 1,441
Default

Quote:
Originally Posted by asw27x View Post
looks like the JPcustoms hovac chassis
I don't think it does.
Abavuso is offline   Reply With Quote
Old 04-09-2011, 08:59 AM   #134
Quarry Creeper
 
Join Date: Feb 2011
Location: Vancouver Wa, USA
Posts: 209
Default

Quote:
Originally Posted by Abacus View Post
Call nitrix tech support ant tell them. You should get a replacement for free. My dog bones and difs were bent out of the box and they sent me those for free.
X2, small bearing blew-up and they sent (2) free. Their customer support is second to none.
XtrmTJ is offline   Reply With Quote
Old 04-09-2011, 02:39 PM   #135
Pebble Pounder
 
Join Date: Mar 2011
Location: Kings Mtn.
Posts: 101
Default

Well i got to test mine out on a huge pile of broken concrete we had from a demo job, and it did very well... Tires do need attetion though and skid plates seem like a must for me. Im gonna look back and see if you guys wrote a how to on skid plates if not where to start?
JugRKnoT is offline   Reply With Quote
Old 04-09-2011, 05:14 PM   #136
I wanna be Dave
 
Join Date: May 2010
Location: Stowe
Posts: 3,987
Default

Adam and I are driving to the GSRCRC comp on Sunday, I can't wait to see all the work that he has done to this. Great Job.
Jslick is offline   Reply With Quote
Old 04-09-2011, 05:21 PM   #137
RCC Addict
 
Join Date: Mar 2010
Location: Colorado Springs, Co
Posts: 1,441
Default

Quote:
Originally Posted by JugRKnoT View Post
Well i got to test mine out on a huge pile of broken concrete we had from a demo job, and it did very well... Tires do need attetion though and skid plates seem like a must for me. Im gonna look back and see if you guys wrote a how to on skid plates if not where to start?
I won't bother doing skids on the bottom of the axle but get a 5 Hr energy bottle and cut the top and bottom off put a slit in it and wrap your motors to protect them. The rocks slide onthe plastice easier then the motor can.

Unless you talking about narrowing the skip plate on the chassis. Then that's a must.
Abavuso is offline   Reply With Quote
Old 04-09-2011, 07:22 PM   #138
RCC Addict
 
Join Date: Apr 2010
Location: Ringwood
Posts: 1,233
Default

the only thing i think about the RTX-27 shafts is because they are like the bull have a big joint but then some homemade knuckles and the cool think is ti atach the hex its a pin and setscrew

and the are so smooth full steer and you can turn them and there is no rough spots
asw27x is offline   Reply With Quote
Old 04-09-2011, 08:09 PM   #139
Pebble Pounder
 
Join Date: Mar 2011
Location: Kings Mtn.
Posts: 101
Default

[QUOTE=Abavuso;3035150]I won't bother doing skids on the bottom of the axle but get a 5 Hr energy bottle and cut the top and bottom off put a slit in it and wrap your motors to protect them. The rocks slide onthe plastice easier then the motor can.

Unless you talking about narrowing the skip plate on the chassis. Then that's a must.[/QUOTE

Ok sounds like that would be much easier, also is anyone having problems with the pins holding the bottom of the shock to the bottom links, trying to slide out?
JugRKnoT is offline   Reply With Quote
Old 04-09-2011, 11:16 PM   #140
RCC Addict
 
Join Date: Jan 2011
Location: Wheat Ridge
Posts: 1,315
Default

[/QUOTE]Ok sounds like that would be much easier, also is anyone having problems with the pins holding the bottom of the shock to the bottom links, trying to slide out?[/QUOTE]

Quick fix/cheap fix: put a "crimp" in the pins with a pair of side cutters or a little bend in the pin and it will stay in place.

Upgrade fix: Drill out the lower link and shock bracket and thread a 2.5mm screw thru each one
The Crawl Space is offline   Reply With Quote
Reply


Thread Tools
Display Modes

Posting Rules
You may not post new threads
You may not post replies
You may not post attachments
You may not edit your posts

BB code is On
Smilies are On
[IMG] code is On
HTML code is On
Trackbacks are On
Pingbacks are On
Refbacks are On


All times are GMT -6. The time now is 06:40 PM.


Powered by vBulletin® Version 3.8.7
Copyright ©2000 - 2024, vBulletin Solutions, Inc.
Content Relevant URLs by vBSEO ©2011, Crawlability, Inc.
Copyright 2004-2014 RCCrawler.com