| |
 08-18-2008, 07:17 PM
| #1 |
| Tire&Foam Extraordinaire   Join Date: Jun 2007 Location: C.I. Compound, Tyler, Texas
Posts: 5,601
|
This is "Cookie" my GC2 TLT "fill in" comp rig. This is not really the crawler I want to build, but I have all the parts for it and I need a comp rig for the '08 - '09 TXRCRCA East Texas Chapter points series. My son had let me borrow his GC1 TLT for the first comp, but two drivers on one rig gets old so I needed to build something of my own. Dezfan ruined me towards shafties after rebuilding and competing with "The Grunt" (2.2 pimp cane clod). Motor Driven Axles fit my driving style better and I prefer them over shafties. But the funds to build another MDA comp rig are not there and I am waiting to see how the Bergs hold up as well giving time to some of the other vendors to release some new MDA's (you know who you are, finish those axles all ready). So in the meantime, here is "cookie". And yes cookie stands for cookie cutter since shafties overwhelmingly outnumber the MDA's on the RC crawler scene. Here are the specs: - Gate Keeper designs GC2 chassis, aluminum TVP plates - Axial Transmission with Axial slipper clutch, Crawler Design Works 6mm front output shaft for use with Maxx Shafts - DNA dig - My own dig mount - TLT Axles with RCP Lockers and Pinions front and rear, RCP aluminum rear lockouts, RCP stainless axle C's with flanged bearings installed, RCP aluminum max clearance steering knuckles, RCP CVD's front, RC4WD stainless straight axles in rear, Full bearings, pinions have been shimmed, TLT axle housings have been shaved - Losi Crawler Shock set - Traxxas links, 5318 for uppers, 5319 for lowers - Eritex beadlocks - custom tires - custom foams - Traxxas receiver box to mount the ESC on rear axle - Pro-Line C10 crawler body Electronics - CC Mamba Max ESC - CC BEC - Hitec 5955 TG steering servo - Hitec 645 MG dig servo - AR6000 Spektrum receiver - DX6 transmitter - Holmes Hobbies 1000KV Crawl Master brushless outrunner - 3S Lipo 1300MAH Unfortunately, it's still under construction. I have been busy tuning my son's GC1 and rebuilding my Hilux scaler. This is what I have done so far:  Crawler Design Works 6mm output shaft, Axial Slipper, 96 tooth Robinson Spur:  DNA Dig, custom mount for Hitec 645MG servo: 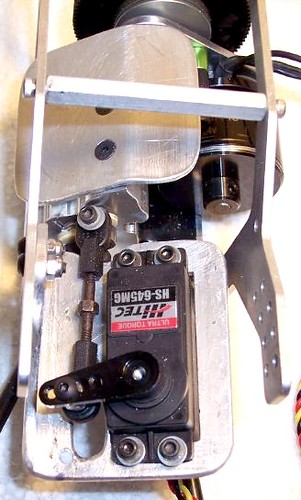 Holmes Hobbies 1000KV crawlmaster brushless outrunner: 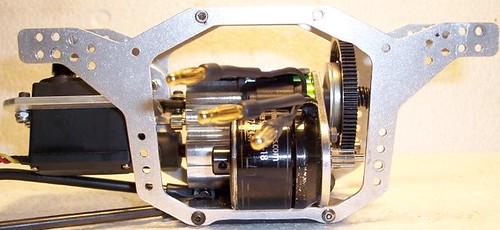 DNA dig had to be notched out for clearance of the lower link:  Last edited by Nova's Ark; 09-17-2008 at 02:27 PM. Reason: Update photos |

|  |
| Sponsored Links | |
| | |
|
08-18-2008, 08:07 PM
| #2 |
| Rock Crawler Join Date: Jul 2007 Location: central PA
Posts: 679
|
Sweet build. Your dig servo location is just like mine, only I made a smaller L-shaped bracket that attaches at the dig case. The servo is really crammed in there:-P The GC2 performed great on the TLTs for me. I'm sure you will like it |
|
| |
|
08-18-2008, 09:04 PM
| #3 |
| Rock Crawler Join Date: Aug 2007 Location: Atlanta
Posts: 615
|
Wow, thats inpressivly clean! |
|
| |
|
08-19-2008, 08:57 AM
| #4 | ||
| Tire&Foam Extraordinaire Join Date: Jun 2007 Location: C.I. Compound, Tyler, Texas
Posts: 5,601
| Quote:
Thanks Hildy I have been searching the TLT and Axial sections for quite a while reading up on the GC1 and GC2. I saw your dig servo mount and thought it was a very good idea I made a similar servo mount for my son's GC1 and it is working very well (I need to update his build thread). I had to go back to square one on his GC1. I had over modified his link lengths, shock length, as well as a few other things and the GC1 was just not performing right. Once I went back to how Austin originally designed it, while fixing some of the other problems, it is now performing amazing  . So much so, that he wants to keep his GC1 and see how my GC2 does before he decides if he wants to switch chassis. . So much so, that he wants to keep his GC1 and see how my GC2 does before he decides if he wants to switch chassis. GateKeeper did such a great job with the GC1 & GC2 chassis . I am excited to see how this one will perform.Quote:
| ||
|
| |
|
08-19-2008, 10:19 AM
| #5 |
| Pebble Pounder Join Date: May 2008 Location: Tyler, Texas
Posts: 119
|
That looks great nova, keep up the good work, mine is at about the same stage as those pics, but i am free tonight so i should get some huge headway... perhaps i should start a build thread
|
|
| |
|
08-19-2008, 10:42 AM
| #6 | |
| Tire&Foam Extraordinaire Join Date: Jun 2007 Location: C.I. Compound, Tyler, Texas
Posts: 5,601
| Quote:
. I partially started the build thread to help prompt me to finish it. So I would definitely suggest you do the same. You have been going through a lot lately. Finishing your crawler and posting a build thread could bring some much needed relief.
| |
|
| |
|
08-19-2008, 12:42 PM
| #7 |
| no talent hack Join Date: Feb 2007 Location: Redwood City
Posts: 2,479
|
looks good eddie. did you notch the bottom of the tvp's?
|
|
| |
|
08-19-2008, 12:48 PM
| #8 | |
| Tire&Foam Extraordinaire Join Date: Jun 2007 Location: C.I. Compound, Tyler, Texas
Posts: 5,601
| Quote:
. Yes, I did notch the bottom of the TVP's. This way it should hopefully slide more on the delrin skid and not catch itself on the aluminum. I did this to my son's GC1 after noticing all the aluminum skid marks on the rocks. It made a noticeable improvement.
| |
|
| |
|
08-20-2008, 10:54 PM
| #9 |
| Tire&Foam Extraordinaire Join Date: Jun 2007 Location: C.I. Compound, Tyler, Texas
Posts: 5,601
|
I finally made some progress on this crawler. Figuring out link and shock placement has been more challenging than normal. After mocking it up several different ways, the way it is pictured seems to be the best. I came up with this set up after hours of searching and reading on RCC in mostly the Axial section since there is only one other GC2 build thread in the TLT section and that is Hildy's and these axles I bought from him. I ended up doing the Traxxas rod end mod to the Losi crawler shocks. Not only did it lengthen them, but it made them much more pivot / flex friendly. I also used single hole link mounts instead of double. This has worked very well on my son's GC1, and I think it will work well for the GC2. I am still open to suggestions if someone notices something wrong or knows of a better way of mounting the links and shocks. I know Gatekeeper has some definite suggestions for the GC2 with Axial axles. Progress pictures: 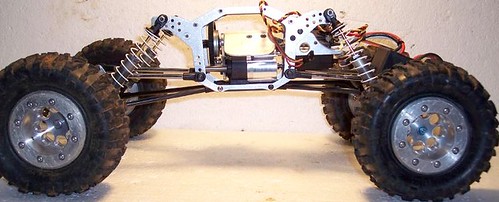 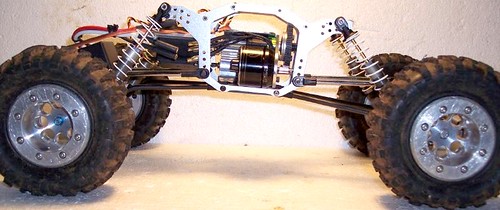 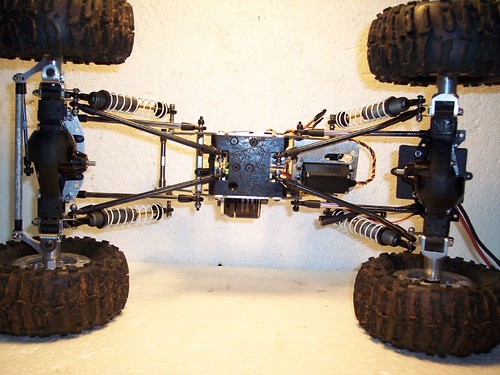 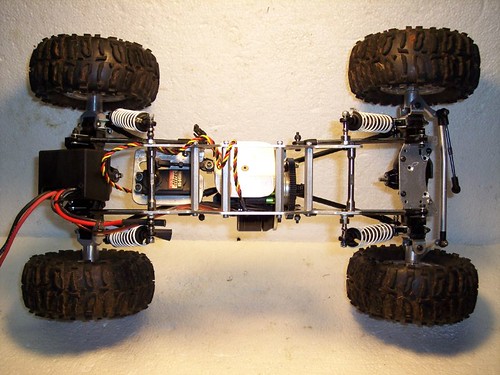 Last edited by Nova's Ark; 09-17-2008 at 02:47 PM. Reason: updated photos |
|
| |
|
08-20-2008, 11:32 PM
| #10 | |
| I wanna be Dave Join Date: Jan 2005 Location: Hueytown, Alabama
Posts: 6,777
| Quote:
You usually want the chassis leaned forward a little.
| |
|
| |
|
08-21-2008, 12:50 AM
| #11 |
| Rock Crawler Join Date: Jan 2008 Location: Jonesboro, Arkansas
Posts: 879
|
Looks great NA, btw how do you like that HH motor?
|
|
| |
|
08-21-2008, 08:31 AM
| #12 | |
| Tire&Foam Extraordinaire Join Date: Jun 2007 Location: C.I. Compound, Tyler, Texas
Posts: 5,601
| Quote:
The black box on the rear axle is a Traxxas Receiver box from a T Maxx that has been modified to hold the Mamba Max. I have not gotten around to mounting the steering servo because I still have a lipo tray to make and I plan to attach it to the front link plate. As for the rear upper links, I was under the impression they should be mounted level with the ground to slightly inverted. If I move them to the upper hole it would angle them upwards. I am wrong in my impression? I do appreciate your feedback and I am not trying to argue with you. I am just trying to learn and understand. Once I get the crawler running, I will be experimenting with different set ups and trying to tune it the best I can. | |
|
| |
|
08-21-2008, 08:51 AM
| #13 | |
| Tire&Foam Extraordinaire Join Date: Jun 2007 Location: C.I. Compound, Tyler, Texas
Posts: 5,601
| Quote:
One thing I really like about brushless is the strong drag brake. With the programming of the Mamba Max or Side Winder set at 100% drag brake, it's like having your dig engaged on the slope of a hill. The crawler will not roll. I really like that. I am also using a DX6 transmitter (stick radio). I had to start using it for my Super, and I found it cheaper and easier to just use it for all my rock crawlers. I have become used to it, and to me, it seems easier for low speed control. I am not certain the crawl master brushless motor will stay in this rig. I have an Axiom 55 Turn I could install if the low speed control is not what I need or want. I tried my best to gear down as well on this crawler. It has a 96 tooth spur gear which is the biggest I could find. I am using a 12 tooth pinion though. I do have a 10 tooth and 9 tooth, but I would have to cut down the pinion shaft to make those fit and I do not want to limit my use of this motor in future crawlers. This is the third brushless out runner I have owned from Holmes Hobbies. I had a small blue label OG revolver, then a chrome cased OG revolver and now I have two of these. By far, I like these two 1000KV Crawl Masters the best. All of them had too much torque and would break parts with ease, but these have been the smoothest. | |
|
| |
|
08-21-2008, 01:30 PM
| #14 | |
| no talent hack Join Date: Feb 2007 Location: Redwood City
Posts: 2,479
| Quote:
im pretty sure rockcrawler was under the impression that the reciever box was your servo at first. i thought the same thing as well until reading your post. ho much higher is the rear of the truck compared to the front? try to shoot for about 1/4 inch. then you should be able to move the rear links up a hole on the chassis. with them mounted up one hole it really helps with full throttle vertical assaults as the front stays planted | |
|
| |
|
08-21-2008, 02:04 PM
| #15 | |
| Tire&Foam Extraordinaire Join Date: Jun 2007 Location: C.I. Compound, Tyler, Texas
Posts: 5,601
| Quote:
I know my rear is higher, but I am not certain by how much. I still have items to add to the crawler so some of this is premature and I am sure things will become more clear once it is finished and running. I had the same thought also about Rockcrawler possibly mistaking the rear receiver box for the front servo. Thank you for your suggestion and I will keep it in mind once I begin testing the crawler. With everyone seemingly running there GC2 with Axial axles, I didn't have much to go on for the TLT's. I know the principles of the GC2 geometry would be the same once I got the mounting points in the general ballpark area. What about the front upper links? Should they be higher also? On the GC1 the upper links were in the upper holes slanted down. Should the GC2 be the same, or do you want them level with the ground? Thank you for your help and suggestions. | |
|
| |
|
08-21-2008, 03:44 PM
| #16 |
| no talent hack Join Date: Feb 2007 Location: Redwood City
Posts: 2,479
|
i would measure from the lower holes for the upper links on the chassis. the front looks to be just about perfect how it sits. in all reality asd the truck sit right now if you move the upper links up one hole you will notice a big difference in climbing ability
|
|
| |
|
08-21-2008, 06:18 PM
| #17 | |
| I wanna be Dave Join Date: Jan 2005 Location: Hueytown, Alabama
Posts: 6,777
| Quote:
Yeah, sorry about that. | |
|
| |
|
08-22-2008, 09:35 AM
| #18 | ||
| Tire&Foam Extraordinaire Join Date: Jun 2007 Location: C.I. Compound, Tyler, Texas
Posts: 5,601
| Quote:
Quote:
. I will move the rear upper links up one hole while it is still easy to access. Once the drive shafts and all the electronics are installed it will be pain. What about the front upper links? Is there any particular setting or info on where to place those? I am also curious about how to best configure the front lower links and shocks. I have read that on a GC2 with Axial axles, Gatekeeper recommends running the shocks inside the lower links. The Axial axle is wider though. On a TLT axle, the only way I could do this would be to run the lower front link to the outside of the link mount (closest to the tire), while still leaving the shock in between the link mount. I currently have it mounted with the lower link outside the link mount but inside the shock (closest to the drive shaft), with shock in between the link mount. This made my wheelbase to long at first but I got creative and fixed that problem. I could switch the lower link to the outside of the link mount (closest to the tire), but I wanted to get some opinions from others with experience first. | ||
|
| |
|
08-22-2008, 08:57 PM
| #19 |
| Rock Crawler Join Date: Jul 2007 Location: central PA
Posts: 679
|
I ran the front lowers in the TLT mounts with the shocks inward of them. It worked great
|
|
| |
|
08-23-2008, 07:57 AM
| #20 | |
| Tire&Foam Extraordinaire Join Date: Jun 2007 Location: C.I. Compound, Tyler, Texas
Posts: 5,601
| Quote:
I saw that you mounted them that way in your build thread The rear upper link hole was unanimous, plus the explanation made sense, so I moved it up one already. Thank you for your help and suggestions though Hildy | |
|
| |
 |
| |


 Linear Mode


