| |
| |||||||
 |
| | LinkBack | Thread Tools | Display Modes |
 09-26-2006, 08:17 PM
| #1 |
| Rock Crawler Join Date: Sep 2004 Location: South Orange County
Posts: 589
|             My Competition Rig Hayward My Bender Sw2 buildup Start with the best -Sw2 chassis and there is no turning back Electronics Rooster With silicon sealing every edge Ballooned Custom mount to chassis braces and velcro Tq3 Rear steer mod from http://www.thecrawlerstore.com/electronics.html Lexan antenna mount Mounted with stock TLT upper deck and Velcro Hitec 645mg servo Dielectrical grease on the circuit boards and wires Ceramic grease on the gears Light oil on the bearings Then sealed the case with silicon Aluminum servo mounts Servo arm shaved to clear the axle Longer screw to go through the servo arm to hold it in place. Integy 55t lathe motor - With hard brushes Freshly cut comm Light oil on the bearings Bearings from a 19 turn motor that I had as a spare Battery packs - Sanyo 2400 with dean connectors Industrial strength Velcro on top of the servo and under the battery pack Also held in place by Velcro straps There is a piece of plastic in the shape of an L that the battery rests on and its fitted to limit how far the battery goes so it doesnt hit the motor or the drive shafts. And a OFNA 1400mah 5 cell receiver hump pack Run times - Sanyo 2400 last around 1:30 - Sanyo 2400 and 1400 RX pack 1:45 Suspension Links 4 links setup 50/50 Traxxas Turnbuckles 105mm for the T-Maxx for the lower links front and rear Upper links are from the lower links on the stock TLT with Traxxas rod ends. Shocks Blue aluminum Durtrax evader rear shocks on all four corners Losi white springs on all four corners Team Associated 40 weight on the front and right rear shock Team Losi 70 weight left rear shock to prevent torque twist Fuel tubing to limit the travel in the shocks so that the tires dont rub on the fenders. I didnt want to hack up the body. Shocks mounted with stock TLT cantilever mounts with o rings added to space it out Drivetrain Stampede Tranny Full Bearings Spur adapter Aluminum idler gear Differential locked with hot glue 84 tooth 48pitch spur gear 12 tooth 48pitch pinion gear Which equals a 7.0 drive ratio Stampede drive shafts The drive shafts stretched with 2 females on the outside and a male driveshaft in the middle with foam inside the driveshaft to space it out correctly below is the link to help you out How to Pede sliders..Drive Shafts Metal yokes with the little nub filed off on the axle end and plastic yokes on the tranny end Axles Axles locked with hot glue Bushing because this rig is in the process of being water proofed and bearings would rust pretty quickly Metal yokes Blackfoot axles with custom spacers to fit And the black foot axles have been filed down to increase steering angle Shimmed the axle Going to drill thought the pinion gear to have a pin go all the way through and hold the metal yoke Wheels Pede fronts on both front and rear Inner lip cut off Wheel weights 2 oz on the fronts inside the rim Wheel weights 2 oz on the rear inside the rim Star pattern in the foam Shallow nuts to get as much thread through the nut coming out of black foot axle shafts Tires 2.2 Swamp Dawg Siped Facing the rear Buggy grip to soften them up a little bit Body Hpi 1973 Ford Bronco Body for T-Maxx/Savage Painted with Tamiya black spray can Body mounts 22gauge sheet metal brackets drilled and filed down then body post attached to that with little square pieces of foam at the top with body clips with zip ties and fuel tubing to make it easier to grab the body clip also carbon fiber little circles cut out with a hole in the middle to put between the body and the body clip Dimensions Wheelbase 12.55 inches Track width 10.55 inches Chassis clearance 3.0 inches Height with body on 11.0 inches weight 5.5 pounds Last edited by iwantoffroad; 01-07-2007 at 03:17 PM. |

|  |
| Sponsored Links | |
| | |
|
09-26-2006, 08:33 PM
| #2 |
| RCC Addict Join Date: Dec 2004 Location: Central NY
Posts: 1,980
|
Looks good. Also looks like a great place to crawl. Edit: I also happened to notice your wheel base is a little long. I's shorten it up so the rear tires sit in the wheelwells. |
|
| |
|
09-26-2006, 08:35 PM
| #3 |
| RCC Addict Join Date: Jul 2005 Location: Provo
Posts: 1,868
|
nice pics and GREAT description |
|
| |
|
09-27-2006, 08:48 PM
| #4 |
| Rock Crawler Join Date: Sep 2004 Location: South Orange County
Posts: 589
| Tell me what you think |
|
| |
|
09-27-2006, 11:31 PM
| #5 |
| I wanna be Dave Join Date: Jun 2005 Location: KENNEWICK, WA
Posts: 2,513
|
looks prety good not sure about the tires though.
|
|
| |
|
09-28-2006, 08:26 AM
| #6 |
| Rock Crawler Join Date: Sep 2005 Location: wyckoff, NJ
Posts: 639
|
that terrain is awsome! thats quite the detailed description too. get some moabs or mashers on there IMO
|
|
| |
|
09-28-2006, 10:24 AM
| #7 |
| I wanna be Dave Join Date: Sep 2005 Location: USA
Posts: 11,196
|
Looking good. I like those Bronco bodies. |
|
| |
|
09-28-2006, 10:24 AM
| #8 | |
| Newbie Join Date: May 2006 Location: Lawrenceburg
Posts: 5
| Quote:
| |
|
| |
|
09-28-2006, 11:48 PM
| #9 |
| Rock Crawler Join Date: Sep 2004 Location: South Orange County
Posts: 589
|
i wrote the long discription so that newbs could be linked to read this and have a good idea on what to buy. i think it would help them a lot brotherbjork the swamp dawgs work well on the roks and terrain around my neigborhood i have cut a pattern in the foam and i have 4oz stick on weights on the fronts and 2oz stick on weights on the rear and front stampede wheels single narrowed and the tires are run facing the rear with buggy grip to soften them up i took some work but i love the look of my rig with the black bronco body and swamp dawgs. im sure that i could buy the moabs run them with out any modifications and they would out perform the swamp dawgs but still. i plan to get the moabs once there is a comp near me. |
|
| |
|
09-30-2006, 04:32 PM
| #10 |
| Rock Crawler Join Date: Sep 2004 Location: South Orange County
Posts: 589
|
are there any comps near sounthern orange county california or anyone with a rig around this neighbor hood
|
|
| |
|
01-04-2007, 09:16 PM
| #11 |
| Rock Crawler Join Date: Sep 2004 Location: South Orange County
Posts: 589
|
i wanna water proof my rig a little better than it stands now it had the reciever with the connections hot glued in place then with electrical tape around most of it then with a ballon and the wires coming out of it with a ziptie on the end to shut it and the opening hot glued. all that inside a pencil sharpener case with the space between the cap and body of pencil sharpener hot glued and the wiring coming out hotglued so there was no way for water to get in i didnt want to fry my electronics my servo was water proof by stuffing dielectrical grease in the circuit board side and stuffing ceramic grease on the side with the gears a ball bearing speed grease on the ballbearings then closed the servo case and put silicon sealent on the egdes and it was water proof my esc was water proof by hotglue all the edges the one touch setup button and were all the wires are coming out motor is fine just check the comm and brushes once in a while and lube the bearings in the motor after every run that has seen some water these mods worked great i was just always worried that i would have to buy new electronics so these mods that i plan on doing will pretty much keep me worry free about water and let me be concentrated on driving i bought a box from traxxas to put the reciever in and it fits perfect all i need to do is hot glue the openings for my esc i bought a small box at radioshack to fit the esc in it and i need is to cut a small opening for the wiring and hot glue that and hot glue the lid on for my servo im going to plastidip the whole thing and i think that i am going to plastidip the esc box and the rx box. here is the mod ^ that i plan on doing http://rcbros.com/forum/forum_posts.asp?TID=1259&PN=1 the how too article then i have a submarine on wheels Last edited by iwantoffroad; 01-04-2007 at 09:19 PM. |
|
| |
|
01-04-2007, 10:08 PM
| #12 |
| Rock Crawler Join Date: Jan 2007 Location: Long Island NY
Posts: 505
|
check out rpm's rc10gt receiver box there small nice rig i would add some bead rings they would really set those tires off  |
|
| |
|
01-04-2007, 10:56 PM
| #13 |
| Rock Crawler Join Date: Sep 2004 Location: South Orange County
Posts: 589
|
thanks i did check that out but i went with a traxxas part number 4294 http://www2.towerhobbies.com/cgi-bin...?&I=LXSP23&P=7 i bought this one and it fits perfect i want to add rockrings once i get different tires im thinking the mashers 2000's or moabs on chrome revolver rims with a black rock ring thanks for the compliments |
|
| |
|
01-05-2007, 02:29 AM
| #14 |
| Rock Stacker Join Date: Jan 2007 Location: parsippany
Posts: 61
|
truck looks great and that place looks awesome!
|
|
| |
|
01-05-2007, 02:37 AM
| #15 |
| Quarry Creeper  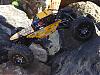 Join Date: Nov 2005 Location: ov'a hea
Posts: 351
|
awsome looking bronco . i like the one on the rock with the rear wheel flex shot. man that place look's like a good place to crawl and hold some comps. i would hate to be caught on the top of that hill (5th pic) when it began to rain.Last edited by goingvertical; 01-05-2007 at 02:40 AM. |
|
| |
|
01-05-2007, 11:18 AM
| #16 |
| Rock Crawler Join Date: Sep 2004 Location: South Orange County
Posts: 589
|
SLIMBO5 thanks for the compliments the place is awsome its 10 min from my house on my mtn bike but its a 2 hour hike to the top from my house because there is no were to park nearby. goingvertical thanks for the compliments its a great place to hold a comp except for the hike to the trail. i like the picture when its flexin too. i have been mtn biking while it rains in that picture and it is pretty bad. im going to the waterproofing mods today. |
|
| |
|
01-05-2007, 11:46 AM
| #17 |
| Rock Crawler Join Date: Jan 2005 Location: Windsor, VA
Posts: 573
|
Looks great. Looks like an awesome place to crawl. |
|
| |
|
01-05-2007, 12:00 PM
| #18 |
| I joined the Band! Join Date: Sep 2006 Location: ...
Posts: 515
|
that looks awesome. i noticed the trail master in the last pic, that thing looks awesome. mmmmmmm me like bronco
|
|
| |
|
01-05-2007, 06:54 PM
| #19 |
| Rock Crawler Join Date: Sep 2004 Location: South Orange County
Posts: 589
|
trailduster79 its a great place to crawl with a 2.2 anything bigger and it wouldnt be challenging enough Bronco it is pretty awsome i got to admit yeah u bought the trail master i while ago that lil guy was awsome till i broke some parts and finding spares were nearly immpossible my bronco is pretty sick too im happy with it |
|
| |
|
01-05-2007, 08:01 PM
| #20 |
| Pebble Pounder Join Date: Jan 2007 Location: Gresham
Posts: 125
|
What abou the motor? How does it get sealed, or does it not matter? Thanks TQ |
|
| |
|
| |


 Linear Mode


