| |
| |||||||
 |
| | LinkBack | Thread Tools | Display Modes |
 03-22-2005, 04:09 PM
| #21 | |
| RCC Addict Join Date: Nov 2004 Location: Redding, CA
Posts: 1,288
| Quote:
function over form..... always | |

|  |
| Sponsored Links | |
| | |
|
03-22-2005, 04:25 PM
| #22 | |
| Quarry Creeper Join Date: Aug 2004
Posts: 347
| Quote:
didn't you read? he is putting vinnie from occ in their! | |
|
| |
|
03-22-2005, 05:08 PM
| #23 | |
| RCC Addict Join Date: Nov 2004 Location: Redding, CA
Posts: 1,288
| Quote:
| |
|
| |
|
03-22-2005, 05:17 PM
| #24 |
| Pebble Pounder Join Date: Mar 2005 Location: Kelowna, B.C., Canada
Posts: 127
|
That cable is for the emaxx tranny. I mount the servo in the gas tank area. I haven't mounted it yet because the body is coming off 20 times a day. So until I bolt the body down I won't mount that servo. Ken and Barbie are way to big to be 1/10 scale. How do I know this. Cause I trip over the darn things every day because of my daughter... OCC figures are at least a decent figure, and they are 1/10 scale so they should fit in with our projects better then most... |
|
| |
|
03-22-2005, 08:29 PM
| #25 |
| Quarry Creeper Join Date: Sep 2004 Location: St.Louis, MO.
Posts: 369
|
Hee hee, TOO COOL! The fabbed up pieces like the seat, floors, firewall etc.......very nice and scale. Neat project indeed!
|
|
| |
|
03-23-2005, 05:08 AM
| #26 |
| Pebble Pounder Join Date: Mar 2005 Location: Kelowna, B.C., Canada
Posts: 127
|
Another quick update. I made and installed the Dash after work. 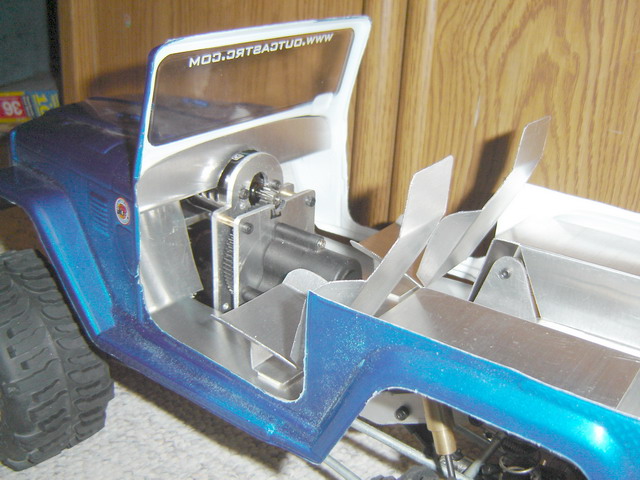  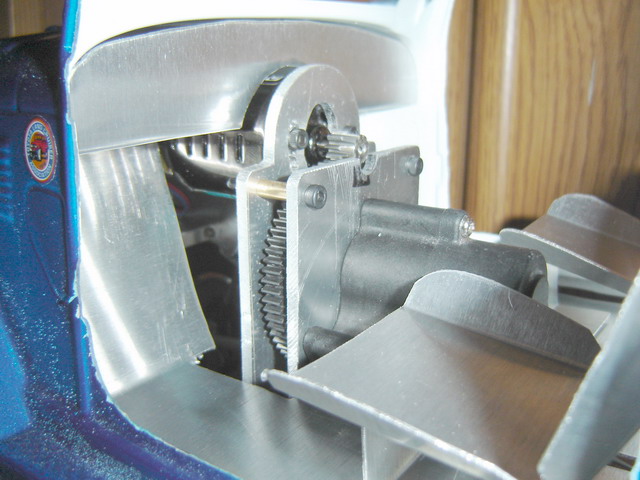 |
|
| |
|
03-25-2005, 10:12 AM
| #27 |
| Pebble Pounder Join Date: Mar 2005 Location: Kelowna, B.C., Canada
Posts: 127
|
Another quick update: I whipped up a dash decal. More to come this weekend. 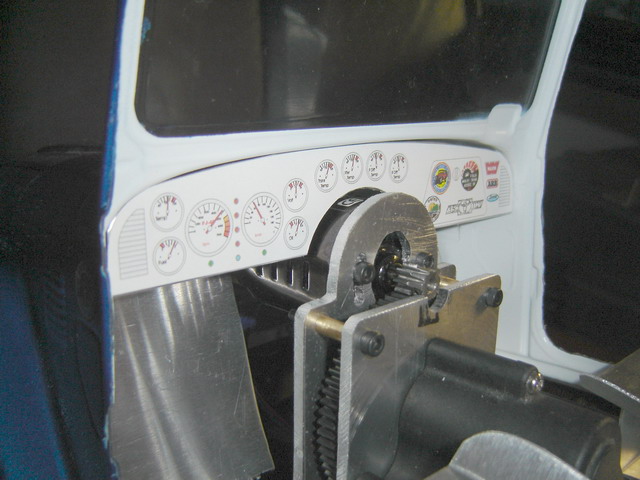 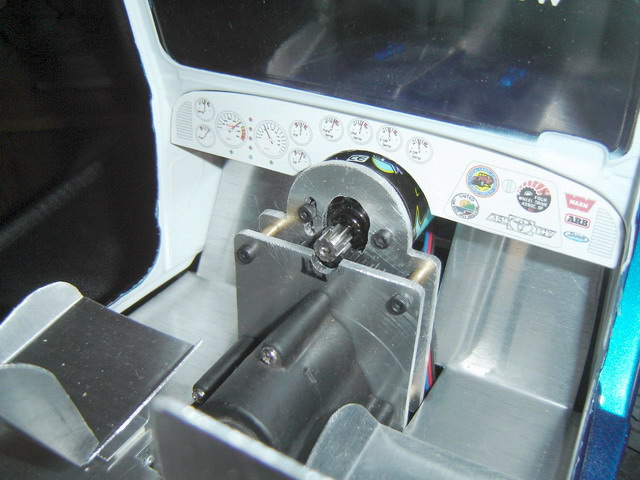 |
|
| |
|
03-25-2005, 10:17 AM
| #28 | |
| Quarry Creeper Join Date: Aug 2004
Posts: 347
| Quote:
and i am just totally surprised and inspired by your level of detail, scale and the fact it should run pretty well i just a bonus! | |
|
| |
|
03-25-2005, 10:28 AM
| #29 |
| Pebble Pounder Join Date: Mar 2005 Location: Kelowna, B.C., Canada
Posts: 127
|
Thanks! I have put a lot of time into making this design work. It was always to be a replacement to my bruiser. Which I will regret to my dying day for selling. But at the same time I am glad is gone because it was a money pit (tho a gorgeous one) I would never drive! This at least I can enjoy.
|
|
| |
|
03-25-2005, 10:48 AM
| #30 |
| Rock Crawler Join Date: Nov 2004 Location: in a basement in Kalispell, MT
Posts: 857
|
Sweet ride. Any plans for seat covers? Had a idea for the steering, a idler arm on the outside of the frame? I think this would give a more horizontal and longer drag link that may improve steering. |
|
| |
|
03-25-2005, 11:21 AM
| #31 |
| Adilynsdad too!   Join Date: May 2004 Location: G ville
Posts: 8,844
|
Where are you going to put the cooler of nice cold adult beverages? Sweet ride, go ahead and make an aluminum body too.
|
|
| |
|
03-25-2005, 04:55 PM
| #32 |
| Pebble Pounder Join Date: Mar 2005 Location: Kelowna, B.C., Canada
Posts: 127
|
Nah, this was enough aluminum work to last me a lifetime. Right now I don't plan on any form of seat covers. I will consider your idea's for the steering if my latest revision falls thru. Which brings me to another update. To stop the front axle from moving at all I made a 3 link for it today. I am glad to say that the axle has ZERO play now. I am throwing in my electronics to give the truck a test drive to see how much it helped the steering play. While I was at it I borrowed Rikpal's coil spring pads and adapted them to fit my specs. Heres also a picture of what I did to move the rear steering components forward. There all body off shots for now, but theres a reason! 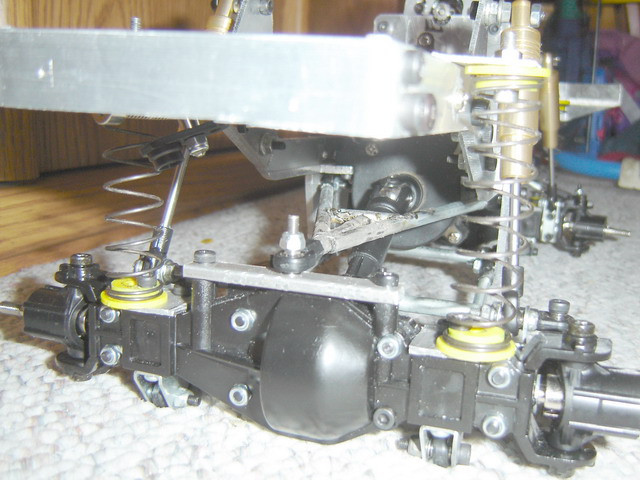  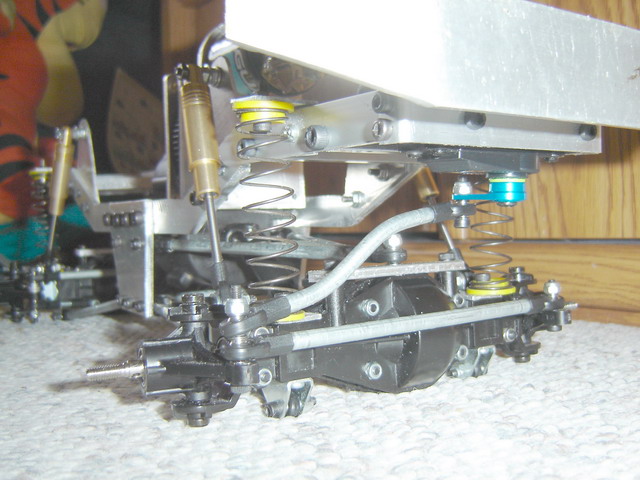 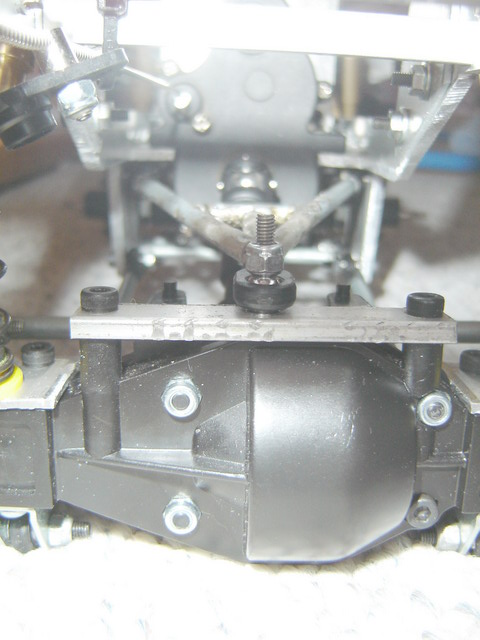 Last edited by outcastrc; 03-25-2005 at 05:06 PM. |
|
| |
|
03-25-2005, 06:09 PM
| #33 |
| Pebble Pounder Join Date: Mar 2005 Location: Kelowna, B.C., Canada
Posts: 127
|
Well I just took it for a burn and WOW!!! Its driving better then ever before. It still raises and lowers the suspension when you try to turn on carpet from a stand still but it throws the tires over at the same time. So its 1000x better then before. I would be willing to live with where its at now, but I think a bit of shimming can get rid of some more. The axles have zero play in them. The coils refuse to pop out even tho theres no retainers. I thought it might be ok since the coils are captured by the caps on both ends and there is a bit of spring tension even at full articulation. A full pack and they didn't budge. It would take something grabbing the spring to remove them. I'll leave it the way it is and see how it fares long term. Separating the coils from the shocks was one of the best things I did! Its the softest, smoothest ride I have seen out of any of my rc's... A million times better then this truck was running the normal style.
|
|
| |
|
03-25-2005, 06:21 PM
| #34 |
| Lifetime Gold Baby!  Join Date: Sep 2004 Location: GA
Posts: 530
|
just an idea...I have aluminum seats in my scratchbuilt 1/8 r/c camaro and I made the seat cushions out of black mousepad....but flip it upside down and glue the top of the pad into the seat leaving the rubber exposed...looks very realistic and you can cut it with a decent pair of scissors. and I made harnesses out of red fabric ribbon...just a thought for you
|
|
| |
|
03-26-2005, 06:21 PM
| #35 |
| Rock Stacker Join Date: Oct 2004
Posts: 92
|
Got any more details on those coil mounts? Those are EXACTLY what I'm looking for for my scale project.
|
|
| |
|
03-26-2005, 08:17 PM
| #36 | |
| Pebble Pounder Join Date: Mar 2005 Location: Kelowna, B.C., Canada
Posts: 127
| Quote:
Just cut off the ball end, then drill a hole down the center to accept the screw of your choice. Theres even room to drill a hole beside the center hole if you need to offset some like I had to. | |
|
| |
|
03-27-2005, 09:15 AM
| #37 | |
| Rock Stacker Join Date: Oct 2004
Posts: 92
| Quote:
Cool I was planning on doing something similiar with parts off of some Associated shocks I have laying around. Good to see you get good flex without the coil wanting to pop out. Also like the A-arms for the 3 link nice work | |
|
| |
|
04-02-2005, 06:39 PM
| #38 |
| Pebble Pounder Join Date: Mar 2005 Location: Kelowna, B.C., Canada
Posts: 127
|
This is just a test rollbar. I figured I would see how far I could go with tubing and the tools I had available to me. Couple more practise bars and I should be at what I want. 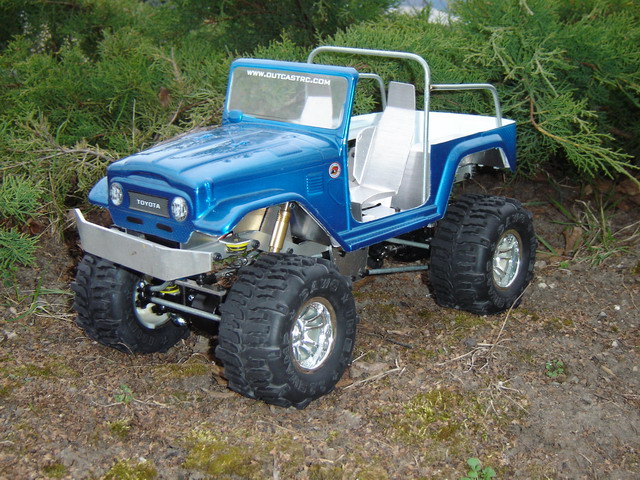 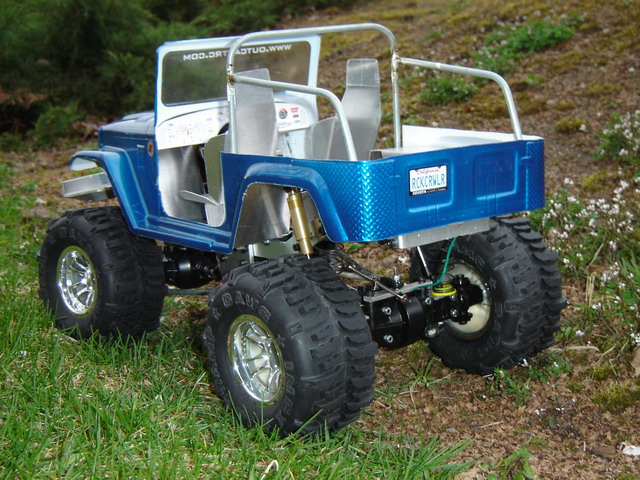 |
|
| |
|
04-02-2005, 06:52 PM
| #39 |
| Quarry Creeper Join Date: Aug 2004
Posts: 347
|
wOw outcast, that is looking great! how does she run??? thanks for sharing. -peter- |
|
| |
|
04-02-2005, 08:27 PM
| #40 | |
| Pebble Pounder Join Date: Mar 2005 Location: Kelowna, B.C., Canada
Posts: 127
| Quote:
| |
|
| |
|
| |


 Linear Mode


