| |
 02-15-2006, 09:41 PM
| #61 |
| Pebble Pounder Join Date: Oct 2005 Location: Ashville, Pa
Posts: 141
|
excellent crawler, makes me want to build my own tranny. I had the same problem with my venom armature with the smashed posts. I cut them down to nubs and soldered the wire to the armature, it worked great. Thanks for the great pics.
|

|  |
| Sponsored Links | |
| | |
|
02-15-2006, 10:31 PM
| #62 |
| Rock Crawler Join Date: Sep 2004 Location: Santa Rosa
Posts: 688
|
Was the thread on here and how many winds did you and up with? Edit: Found the Motor wind thread...I used the search button of all things. Last edited by gone_wheelin; 02-15-2006 at 10:43 PM. |
|
| |
|
02-15-2006, 11:06 PM
| #63 | |
| Quarry Creeper   Join Date: Mar 2005 Location: The Dark Side
Posts: 397
| Quote:
| |
|
| |
|
02-17-2006, 12:15 PM
| #64 |
| Rock Crawler Join Date: Jan 2006 Location: Colorado Springs
Posts: 606
|
Awesome truck man!! This is probably a dumb question, but where did you get the alloy tranny case? BTW, I sent you a PM too. Tom |
|
| |
|
02-17-2006, 12:26 PM
| #65 |
| Rock Crawler Join Date: Sep 2004 Location: Santa Rosa
Posts: 688
|
Isn't that the optional aluminum part from Tamiya?
|
|
| |
|
03-23-2006, 08:48 AM
| #66 |
| Quarry Creeper Join Date: Mar 2005 Location: The Dark Side
Posts: 397
|
After blowing out three axle stubs at once and repairing them I decided there had to be an easier way to drop you axles and open them up. I had to remove the lower links, shocks, link mounts, drive shaft, and upper links just to get the axle off. I made new mounts that hold the upper and lower links and the shocks. I made them removable with two screws each. 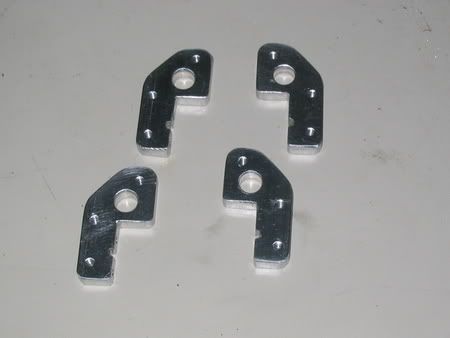 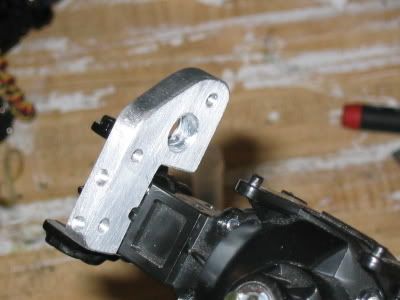 Here's how it looks now. Four 20mm screws, dropping the driveshaft, and unplugging the servo are all it takes. 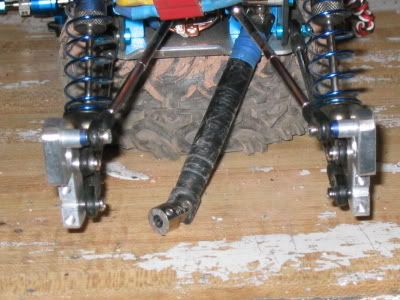 As for the axle case itself I replaced the four remaining screws with 6/32 allen head screws ( ala quick change Clod axles ) and put them in from the front. 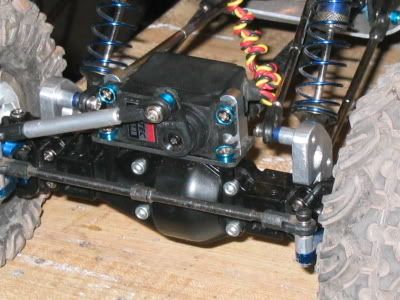 Next up is...Behind the axle steering. |
|
| |
|
03-23-2006, 08:59 AM
| #67 |
| RCC Addict Join Date: Jul 2005 Location: Provo
Posts: 1,868
|
nice! good work i like that |
|
| |
|
03-23-2006, 09:02 AM
| #68 |
| I wanna be Dave Join Date: Aug 2005 Location: G6'N
Posts: 7,391
|
wow that looks great, what a neat idea!
|
|
| |
|
03-23-2006, 09:18 AM
| #69 |
| I wanna be Dave Join Date: Feb 2005 Location: Cleveland, OH
Posts: 8,009
|
Now that's pretty damn slick. Much stronger than the sheetmetal brackets, too.
|
|
| |
|
03-23-2006, 09:46 AM
| #70 |
| Rock Crawler Join Date: Sep 2004 Location: Santa Rosa
Posts: 688
|
Those mounts are ****in sweet. How long did it take to machine those and what did you machine them on?
|
|
| |
|
03-23-2006, 09:56 AM
| #71 | |
| Quarry Creeper Join Date: Dec 2004
Posts: 427
| Quote:
Great idea...What I did for quick-change axle shafts is removed the two inner E-clips that hold each shaft in the case. I left the outer E-clip on to hold the bearing in. Then to prevent the shaft from sliding out I cut a small piece of Nitro fuel tubing and put it in the stub shaft, then the axle dogbone end has some cush to it. To change out the axle shaft remove the two kingpin screws, move the knuckle out of the way and pull the axle right out, slide the new one in. Bolt the kuckle back up to the case. Much quicker than removing the whole axle from the tuck and opening it up. I can change an axle in about 2 minutes. Now the TLT axle is a semi-floater | |
|
| |
|
03-23-2006, 10:56 AM
| #72 | |
| Rock Crawler Join Date: Mar 2004 Location: Where it's wet
Posts: 833
| Quote:
| |
|
| |
|
03-23-2006, 01:55 PM
| #73 | |
| Quarry Creeper Join Date: Mar 2005 Location: The Dark Side
Posts: 397
| Quote:
| |
|
| |
|
03-24-2006, 06:39 PM
| #74 |
| Quarry Creeper Join Date: Mar 2005 Location: The Dark Side
Posts: 397
|
I'm glad everyone digs the link mounts. The stock mounts are way too soft and bend too easily, also there's no room to mod them. I did the link mount mostly to make overall mantainance easier, although sicj has a great idea. I've seen this done before and it makes axle shafts quick and easy. Becareful not to do two at once or you'll drop the diff out of place. Also try a small loose ball bearing instead of the tubing, the tubing can compress and allow the axle to drift out under extreme steering angles ( I think I used a 5/32" or 3/16" ). And now for the behind the axle steering I promised... 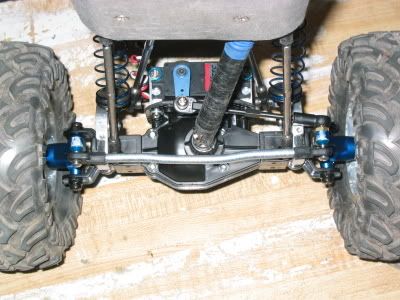 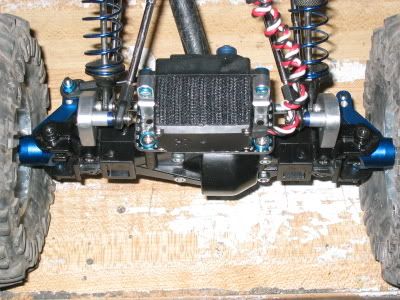 I started with a new servo plate that allowed me to 180 the servo (you can see the stock holes just ahead of the servo mounts). Next I had to make some pockets in the front link mounts to get the knuckle arms to clear . I found that too much steering angle can help break axle nubs and axle stubs. I made them match the stock MaxClimber stops. The lower link is some lightly bent 3/16" brake line. The ball end on the steering link pops off for quicker axle removal. Much better approach clearance. |
|
| |
|
03-24-2006, 06:59 PM
| #75 |
| owner, Holmes Hobbies LLC   Join Date: Nov 2004 Location: Volt up! Gear down!
Posts: 20,290
|
That is one stout TLT! I really like the quick change idea, and how much custom work you have put into this little guy. It makes maintenance quick and easy! Are the link/ shock mounts threaded where they attach to the case, or do they just float around the screws that hold them on the case? Glad to see my motor winding thread helped you out. It really is an easy and fun task once you get the hang of it. I have had no problems using machine wound arms- I just solder the winds directly to the comm. |
|
| |
|
04-19-2006, 11:49 PM
| #76 |
| Quarry Creeper Join Date: Mar 2005 Location: The Dark Side
Posts: 397
|
After serveral test crawls and some mods I've finalized the BTA step-up on Buster. I used a piece of 1/8" G-10 fiberglass chassis stock for the link, 2mm carbon for the servo plate, some random hardware to mount it, and a couple of the stock ball ends to make the link to the servo arm. Here's one I made for Grover, I have to test fit it before I drill the last hole in the link. 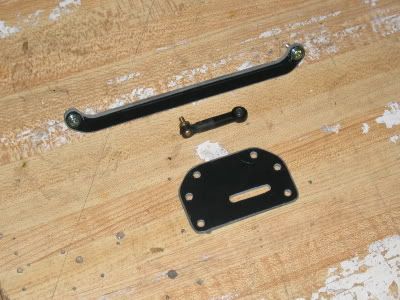 Running it between the upper and lower links is just gravy!! No stagging on the rocks, it's like it's not there. 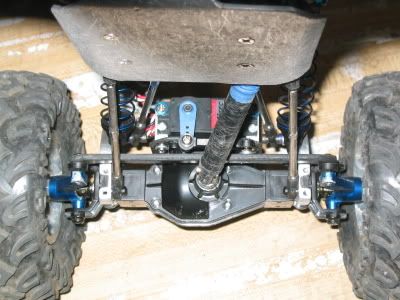 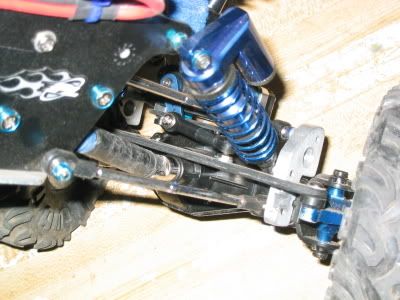 |
|
| |
|
04-20-2006, 12:59 AM
| #77 | |
| Rock Crawler Join Date: Jul 2004 Location: Mt.View CA
Posts: 940
| Quote:
Nice crawler BTW | |
|
| |
|
04-20-2006, 09:19 AM
| #78 |
| Rock Crawler Join Date: Jan 2006 Location: Colorado Springs
Posts: 606
|
So where did you get the aluminum tranny mounts? Rest of the truck is sick, great build! Tom |
|
| |
|
04-20-2006, 09:34 AM
| #79 | |
| Sinking with the ship  Join Date: Mar 2005 Location: El Capitan...sole survivor and sinking fast
Posts: 8,864
| Quote:
| |
|
| |
|
04-21-2006, 02:59 PM
| #80 |
| Rock Crawler Join Date: Jan 2005 Location: Tumwater
Posts: 910
|
Thanks for the steering set up! It is awsome, and was soooo nice to install. Chad- |
|
| |
 |
| |


 Linear Mode


