| |
 04-15-2005, 11:34 PM
| #1 |
| Quarry Creeper   Join Date: Mar 2005 Location: The Dark Side
Posts: 397
|
This thread has been going for awhile, so here's a current pic. Enjoy the history and evolution of "Buster". 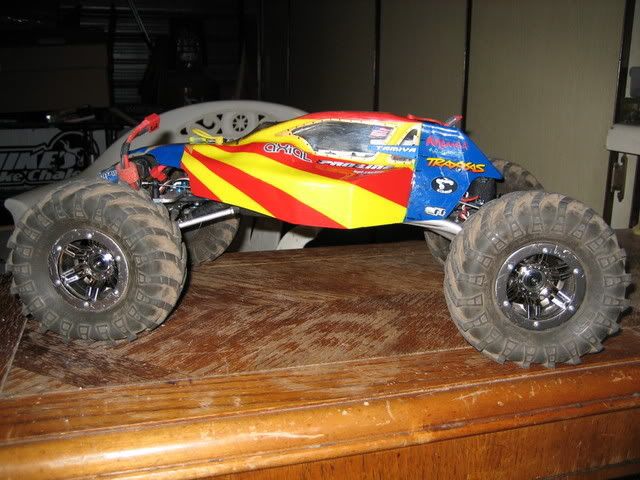 I recently got sent to " Bulu School " at a local crawl when I showed up with a stock tranny in my TLT. The guys who schooled me were kind enough to show me their rigs. Their trucks CG was so low one of them looked like it was upside down!! My trucks axles, wheels, and electronics worked great but the tall chassis and high CG killed me. I'm not one to go with the flow, so no Bula for me. But how do you top a Bulu? It's not easy. First the tranny had to go, or did it. I decided to ditch the belt drive, cut 1 5/8" off the bottom, layed it motor side down, and built counter shafts and a output shaft. 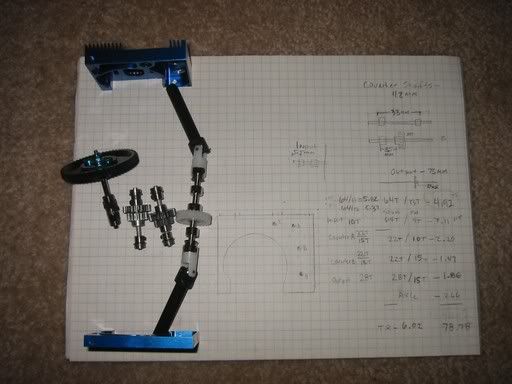 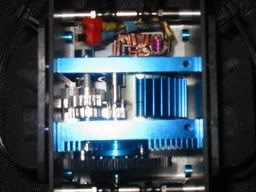 I used 32p pinions. Some 1/8" S.S. rod. A Villian 28t spur and propshaft. Four 1/8" and two 5/32" I.D. flanged bearings from an old set of cantis no longer in service. The chassis was next. I've been building G-10 chassis here lately and went with another one. Add the axles ,tires, and electronics and saddle up the batteries. 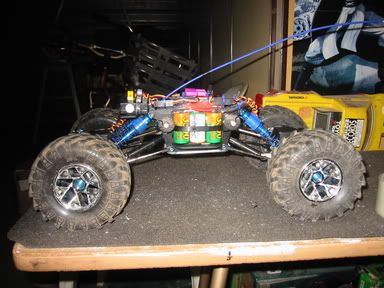 The transmission works perfect and has a 6.0 to 1.0 gear ratio!! It's a little loud but sounds killer, like a saw. I amputated the bed after testing, too much tire rubbing.  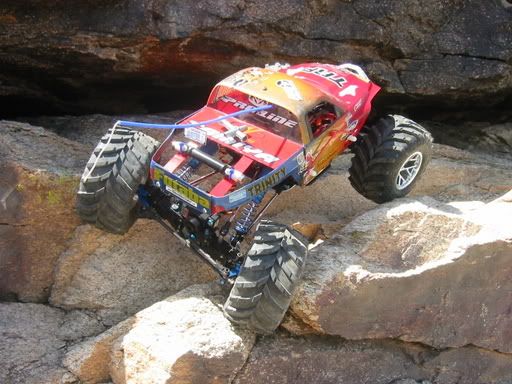 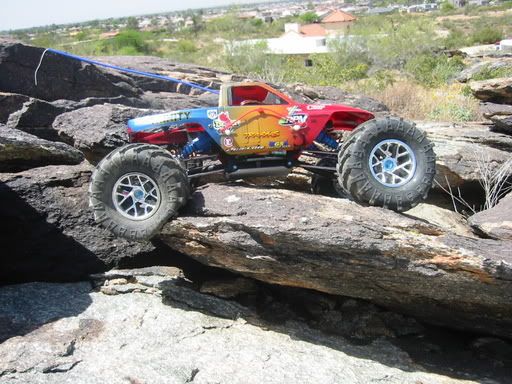 Azvader TLT12L carbon, G-10, and aluminium chassis w/adjust on the fly torsion WB- 12 3/8" Width- 10 " Center clearance- 3 1/4" Height- 5 1/2" TLT axles w/alloy knuckles on clocked TCS C's frt, RC4WD straight axle adapters rr, and RC4WD lockers/pinions frt and rr Full ball bearings Hitec 5955TG for steering, 85MG for dig, and a 645MG for the adjustable torsion Mamba 25 w/TCS BM6 brushless Elite 1500 mah 8-cell 2/3A split packs Comman Sense 5 amp 6v BEC Azvader V.3GT2 transmission/dig Pede Sliders and steel yokes M3 M2K's, M2 2.2 Moabs, or Losi Rock Claws on Axial 2.2 beadlocks and hacked foams X-Factor or B3 buggy body DX6 Last edited by azvader; 02-18-2008 at 11:37 PM. Reason: New Stuff |

|  |
| Sponsored Links | |
| | |
|
04-16-2005, 12:15 AM
| #2 |
| Pebble Pounder Join Date: Sep 2004 Location: Phoenix
Posts: 139
|
Wow, cant wait to see this thing in person. Great idea!
|
|
| |
|
04-16-2005, 12:32 AM
| #3 |
| Rock Crawler Join Date: Nov 2004 Location: Thats a Good question
Posts: 552
|
looks good, i like the trans idea, let us know how it runs agaist the big Bs
|
|
| |
|
04-16-2005, 12:32 AM
| #4 |
| Rock Crawler Join Date: Jan 2005 Location: Tumwater
Posts: 910
|
WOW! The tranny looks great and the cg looks way better. I am stoked to see the 2.2s step'n it up. hope my new gator chassis can hang |
|
| |
|
04-16-2005, 06:40 AM
| #5 |
| Moderator   Join Date: Apr 2004 Location: In my head
Posts: 2,744
|
What body is that? Love the spare driveshaft mounted on the cab. Great looking truck.
|
|
| |
|
04-16-2005, 08:06 AM
| #6 |
| I wanna be Dave Join Date: Aug 2004 Location: san jose
Posts: 2,061
|
that has some go nice clean work done on it sweeeeet. what body is that also
|
|
| |
|
04-16-2005, 08:30 AM
| #7 |
| RCC Addict Join Date: Feb 2005 Location: Crawlifornia Uber Alles
Posts: 1,146
|
great truck! i have a bulu2 and the low cg made a huge difference! i also had to amputate the bed on my truck body as well! it's cool to see a innovative idea and see it followed through! |
|
| |
|
04-16-2005, 08:54 AM
| #8 |
| RCC Addict Join Date: Apr 2004 Location: Cincinnati Ohio
Posts: 1,673
|
That's great! I love to see custom stuff like that! FYI It's "BULU" not "BULA" |
|
| |
|
04-16-2005, 09:32 AM
| #9 |
| Quarry Creeper Join Date: Mar 2005 Location: The Dark Side
Posts: 397
|
Thanks for all the feedback, it's nice to have your hard work appreciated. As for the body it an old HPI Dogde Ram for a T3. I removed the bed and rollbar behind the cab. The drive shaft idea was from rckjeep, saw it in a RC mag.
|
|
| |
|
04-16-2005, 09:34 AM
| #10 | |
| Quarry Creeper Join Date: Mar 2005 Location: The Dark Side
Posts: 397
| Quote:
"Bula or Bulu" what ever they were they crushed me at the comp!!!!! | |
|
| |
|
04-16-2005, 08:26 PM
| #11 |
| Rock Stacker Join Date: Apr 2005 Location: Tucson
Posts: 55
|
YOU ARE MY HERO!! I have been researching how to do this with my transmission and haven't come up with anything yet. I, too layed the chassis down on its side and feel that it is very effective in that my chassis is only a few inches tall with a low CoG. I am just waiting for the belt to go out on my TLT and then it will be back to the drawing board for me. Please, if you could provide more detailed info on this swap it would be greatly appreciated. I too like to try something different instead of going with the crowd. You really just made my day! |
|
| |
|
04-16-2005, 09:54 PM
| #12 | |
| Quarry Creeper Join Date: Mar 2005 Location: The Dark Side
Posts: 397
| Quote:
I built the tranny on the fly, the paper is more notes than plans. I practiced making a gear reduction for my Jugg first. 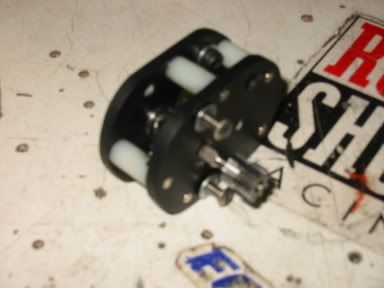 I will post the plans soon, later tonite or tomorrow, but I have to prep some trucks for Sundays crawl. I'll do the best I can on the plans and hope it's enough to get the job done. | |
|
| |
|
04-17-2005, 06:01 AM
| #13 |
| Newbie Join Date: Apr 2005 Location: anchorage
Posts: 27
|
If possible I also would some more info on the trans and the chassis as well. I still have a stock chassis w/longer links and a poor mans slider conversion.
|
|
| |
|
04-18-2005, 01:08 AM
| #14 |
| Quarry Creeper Join Date: Mar 2005 Location: The Dark Side
Posts: 397
|
Well here goes.... You will need the following for the transmission: Stock TLT transmission plates Stock Spur hub and spur shaft Four 5/16"O.D.X 1/8"I.D. flanged bearings Two 5/16"O.D. X 5/32"I.D. flanged bearings One Traxxax Villian 28t spur and propshaft Some 1/8" stainless rod Two 22t 32p pinions Two 15t 32p pinions One 10t 32p pinion Three 5/32" wheel collars Three 1/8" wheel collars A pack of 4mm axle shims and a pack of 1/8" motor shims The chassis requires: Some G-10 chassis stock for the sideplates (maybe your old ones) 2mm aluminium plate for the skidplate 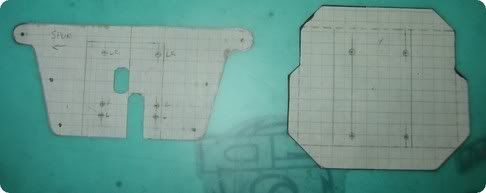 You only cut the windows in the output sideplate. Start by cutting 1 5/8" off the bottom of the trany plates. Lay the motor side down sideways on some graph paper and trace it out. Include the spur shaft hole. This was the fun part, laying out the gears and mark the positions. Start at the spur shaft 10t to a 22t,mark it. Switch to the 22t for a 15t, it's a counter gear, and run it to another 22t, mark that. Make the switch to the 15t again and run it to the 28t, this mark is the output shaft. I tried several positions on paper before finding the right one. The three marks will be the two counter shaft and the output shaft. 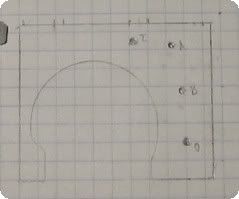 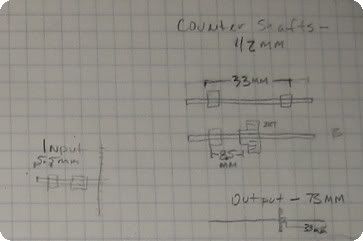 Mark the plates and drill three 5/16"holes in each. I drilled and tapped a new mounting hole on the bottom of each of the plates opposite the original top hole, this is for the skid plate. I than drilled and tapped four, two on each side, to mount the chassis side plates. Next drill the 10t pinion with a 5/32" bit, it's for the spur shaft where the small pulley sat. Use some 4mm shims to space the 10t away from the trany plate. 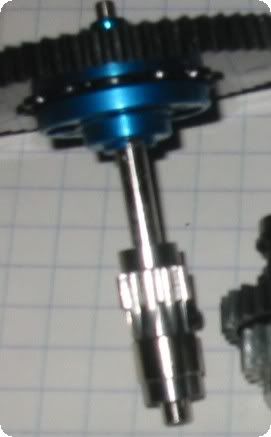 Than assemble the counter shafts. Use the 1/8" rod for the shafts and each get a 22t and a 15t. Dont over tighten them you'll need to adjust their position later.  The output shaft is easy! cut the propshaft to then side on the 28t and 2 of the 5/32" collars, don't over tighten these either. 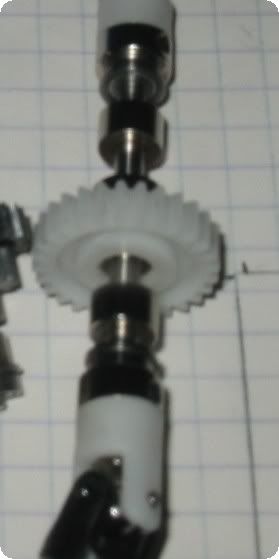 Assemble the trany and mount it to the skidplate. Adjust the gear alignment and add the side plates. 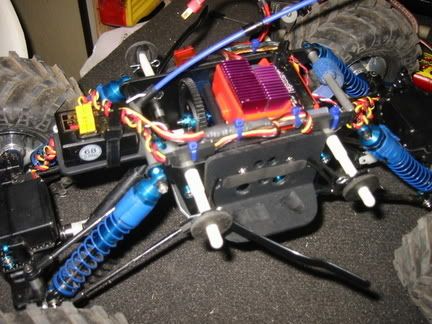 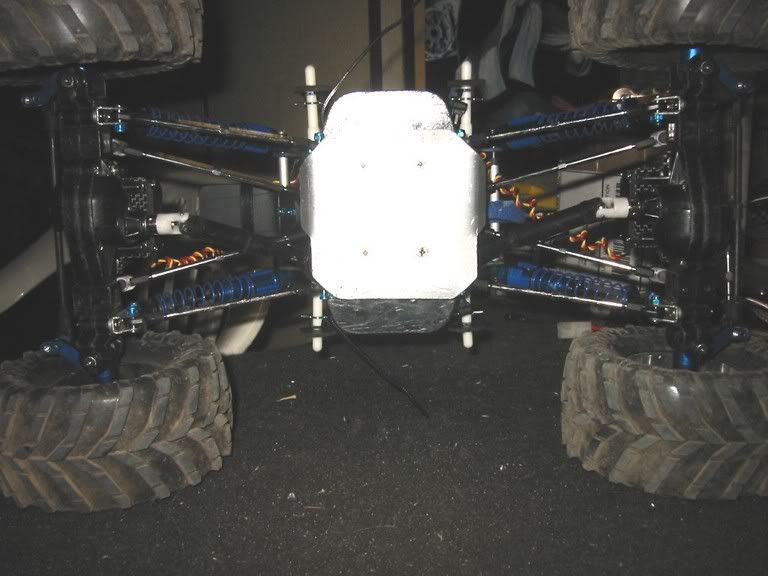 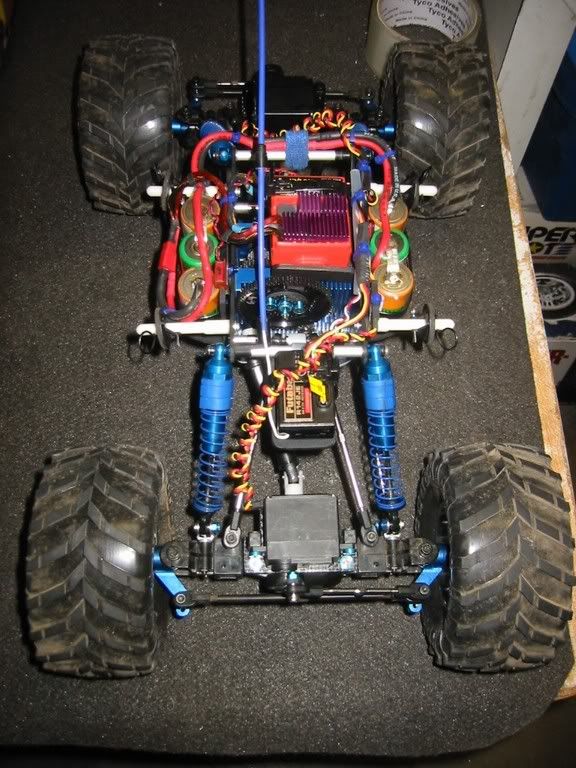 I hope this helps!!! |
|
| |
|
04-18-2005, 08:20 AM
| #15 |
| Rock Stacker Join Date: Apr 2005 Location: Tucson
Posts: 55
|
Thanks for your hard work and sharing of information. I just have one question. It looks like the Villain propshaft and gear will be the hard part to find. Do you know the diameter of the propshaft. I thought maybe I could use SS rod instead and then find a gear that will slip on. Thanks |
|
| |
|
04-18-2005, 08:43 PM
| #16 |
| Quarry Creeper Join Date: Mar 2005 Location: The Dark Side
Posts: 397
|
Here's the Traxxas Villian part numbers you'll need. Any LHS that has a new E/T-MAXX for sale can get you these. #1526 Villian drive gear $3.00 #1528 Villian drive shaft (plus small parts you don't need) $4.00 #1539 U-joints pair $5.00 One of each. Let me know how it goes!! |
|
| |
|
04-20-2005, 08:48 AM
| #17 |
| Rock Stacker Join Date: Apr 2005 Location: Tucson
Posts: 55
|
Our LHS is a little pricey so I will wait a little while until I do this mod. TowerHobbies has everything in stock. I practiced some gearing possibilities yesterday using Legos and created a High/Low gear transmission that I can manually switch. I might try this approach if there is enough room. Thanks for your help.
|
|
| |
|
04-21-2005, 06:59 PM
| #18 | |
| Quarry Creeper Join Date: Mar 2005 Location: The Dark Side
Posts: 397
| Quote:
| |
|
| |
|
04-21-2005, 07:06 PM
| #19 |
| I wanna be Dave Join Date: Jun 2004 Location: Whales
Posts: 2,939
|
That has to be the coolest custom body kit that I've ever seen on a TLT. Great job! Oh the chassis looks great to :-) |
|
| |
|
04-22-2005, 09:48 AM
| #20 |
| Say hello to my dactylion  Join Date: Jun 2004 Location: On the Boat to Whore Island
Posts: 4,470
|
is it just me or are some of your pics tiny? BTW nice job... The pede trany is a little tall and the stock TLT one is crap.
|
|
| |
 |
| |


 Linear Mode


