| |
| |||||||
 |
| | LinkBack | Thread Tools | Display Modes |
 10-16-2007, 09:20 AM
| #1 |
| Quarry Creeper   Join Date: Mar 2005 Location: The Dark Side
Posts: 397
|
Well it's been awhile since I've posted a new build. Buster's been running awesome but I've been dieing to build another 4-link truck. I had all the running gear but no chassis. I was thinking about building my own but....I won a Bender Customs SW3 w/Finish-Line RC delrin links and skidplate in the Nats raffle !!!!! The craftsmanship is flawless. 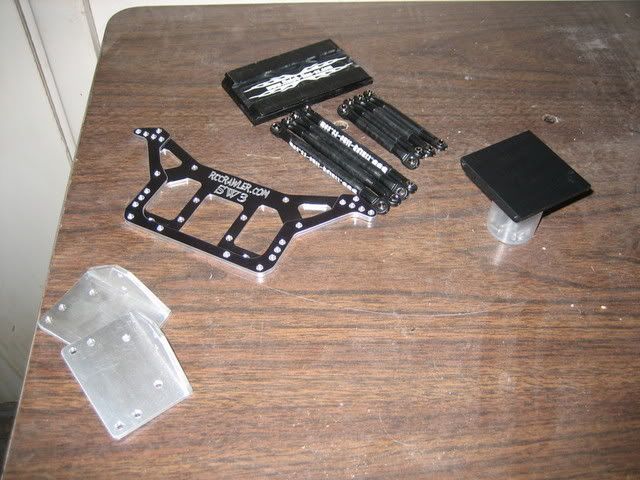 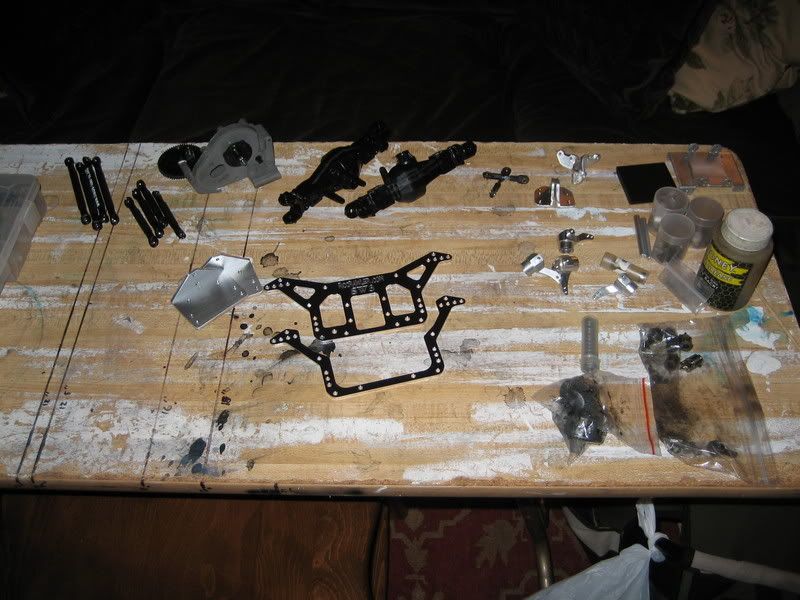 I rough built it, 2 channel, to get the geometry down. I plan on letting other drivers w/o 2.2s borrow it to comp, so a dig device is in the works. I like that little space between the rear of the chassis and the back of the transmission. 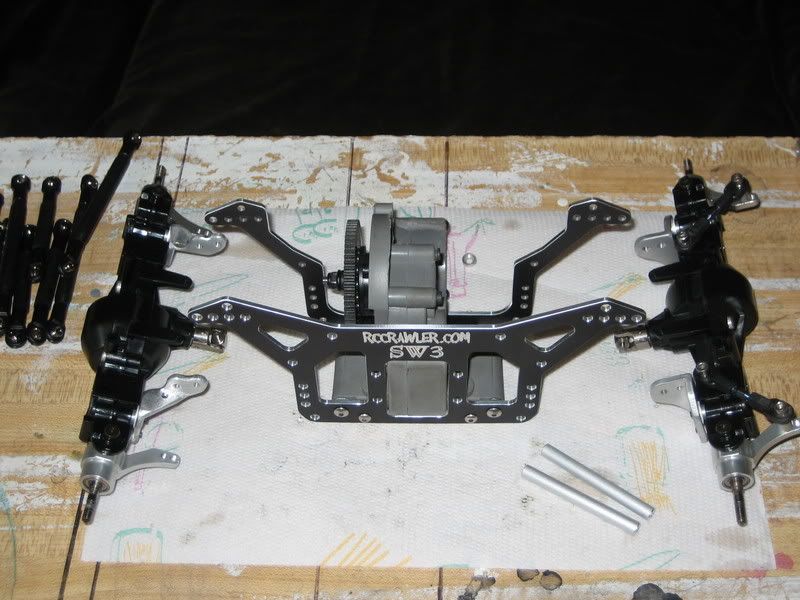 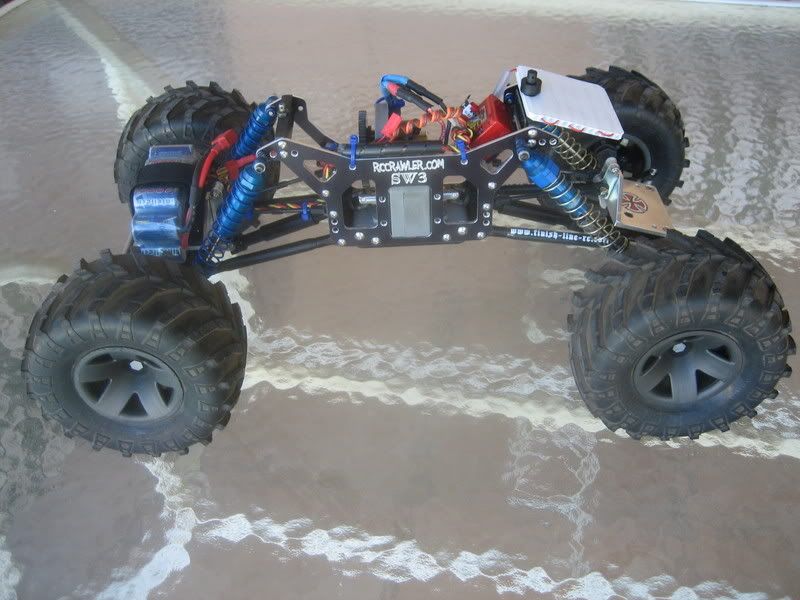 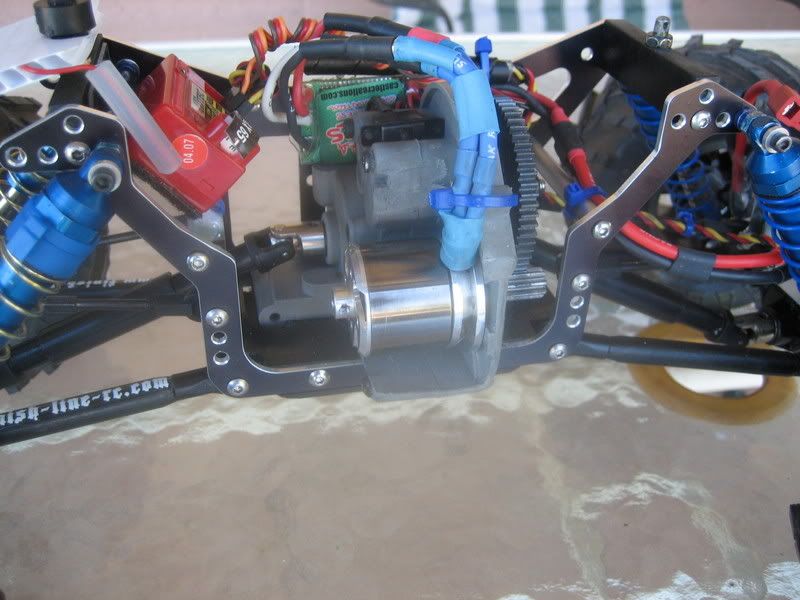 The axles are going to get comped out. TG-10 long axle stubs w/Pede alloy hexes, RC4WD straight-axle adapters ( coming from TCS ) on the rear, alloy knuckles up front, shaved and locked both ( I threw in an extra spider gear to lock the diffs ), links mounts, and bearings. The Pede tranny got comped up too. Diff locked, trimmed, and bearings, it's old skool but still does the job ! 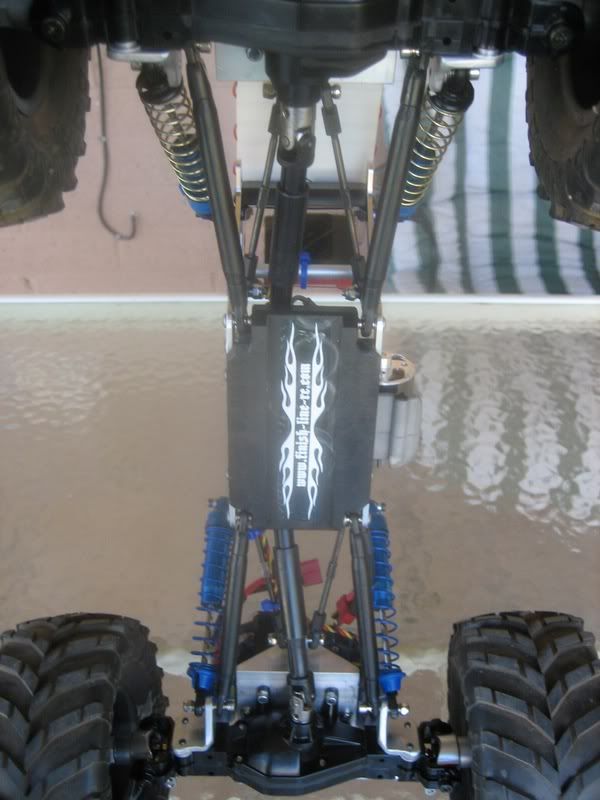 Next Up...The Kill Switch Dig |

|  |
| Sponsored Links | |
| | |
|
10-16-2007, 10:47 AM
| #2 |
| I wanna be Dave Join Date: Sep 2005 Location: Houston, TX
Posts: 16,952
|
Wow...looks good. Did you make those axle link and shock mounts? |
|
| |
|
10-16-2007, 11:10 AM
| #3 | |
| Im Brandon   Join Date: Feb 2005 Location: Colfax, CA
Posts: 8,156
| Quote:
 | |
|
| |
|
10-16-2007, 10:07 PM
| #4 | |
| Quarry Creeper Join Date: Mar 2005 Location: The Dark Side
Posts: 397
| Quote:
  | |
|
| |
|
10-16-2007, 10:17 PM
| #5 |
| MODERHATER   Join Date: Nov 2005 Location: Colorado
Posts: 10,939
|
That looks SharkY!!! Can't wait to see the dig setup! |
|
| |
|
10-16-2007, 10:38 PM
| #6 |
| Pebble Pounder Join Date: Jun 2007 Location: Cyril
Posts: 153
|
Yeah, when is the dig going to be here?
|
|
| |
|
10-16-2007, 11:38 PM
| #7 |
| Quarry Creeper Join Date: Mar 2005 Location: The Dark Side
Posts: 397
|
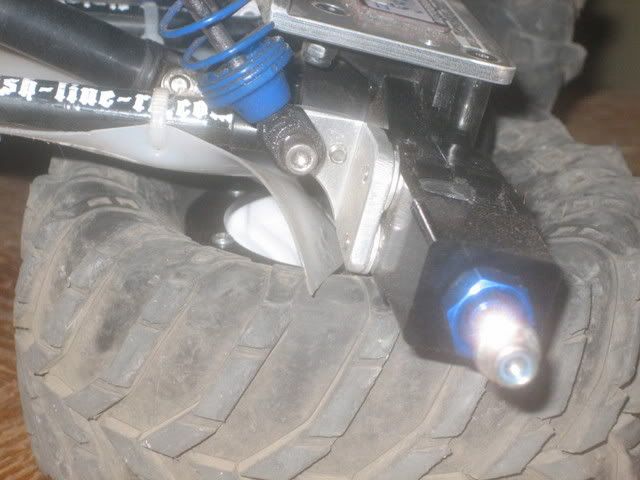
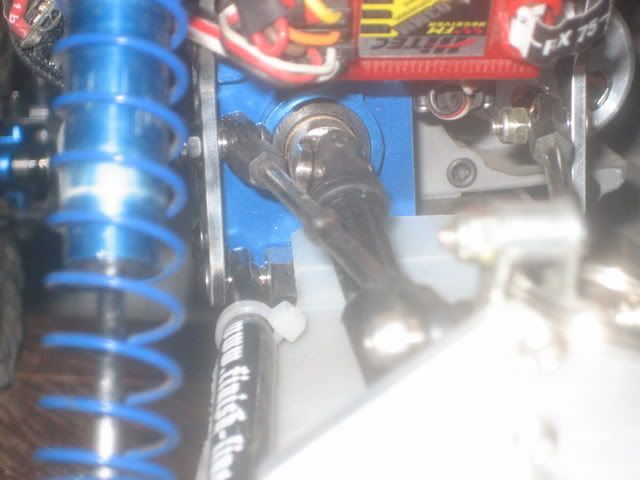
I got a look at several really good dig set-ups at Nats and started designing it in the hotel that weekend ( the sketch is on a hotel notepad ). There isn't much room back there, 32mm to be exact. The servo I planned to use is 40mm. After seeing a R2D up close I tried a similar set-up, engaging right into the back of the trans with the drive shaft sliding on bronze bushings. The dig set-up used on Buster requires much more room. Ingredients: Drive shaft 1- broken TLT inner axle ( 5mm shaft ) 1- worn pinion ( steel TLT drive cup used now ) 1- 3/16" plastic collar 1- old allen wrench ( I can't remember the size !!!) Support/Servo Mount 1/8" aluminum plate 1/4"x1" aluminum scrap 1- HS-85MG servo ( 49 oz @ 6.0v ) 1- piece of a stock TLT style trans 1- bearing cup from HPI Super Star front wheel 1- 11x5mm bronze bushing 1- 8x5mm bronze bushing 1- bike chain link 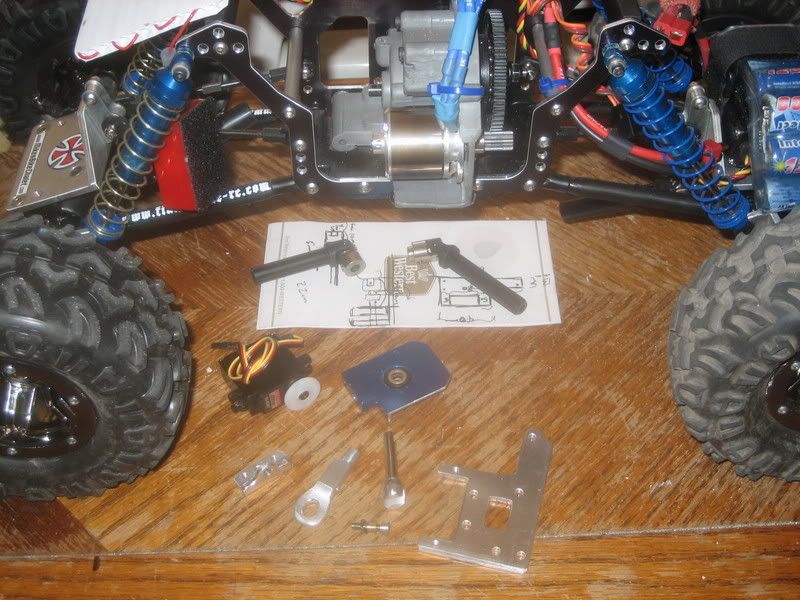 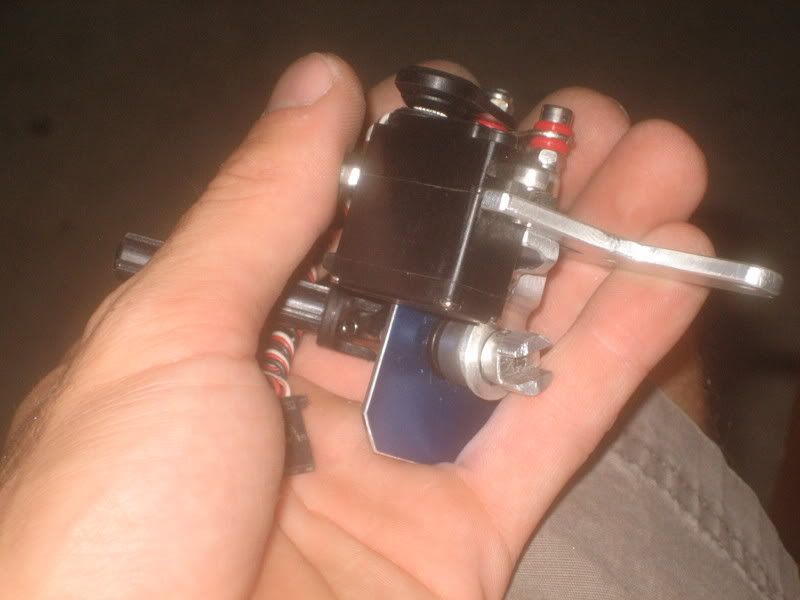 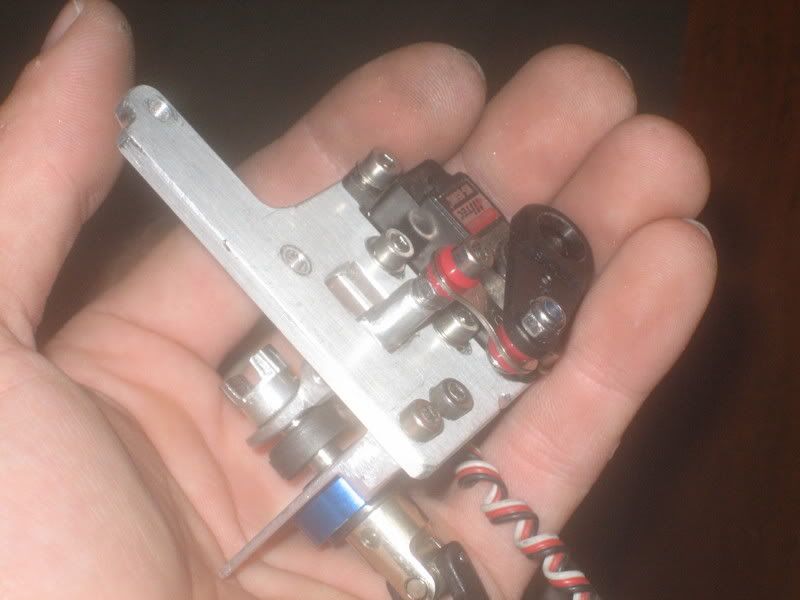 I tried something a little different with how I chose to move the drive cup/shaft assembly. The shift fork gives the servo a 2:1 leverage to engage/disengage. It took on a bit of a light switch look after assembly, hence "Kill Switch". 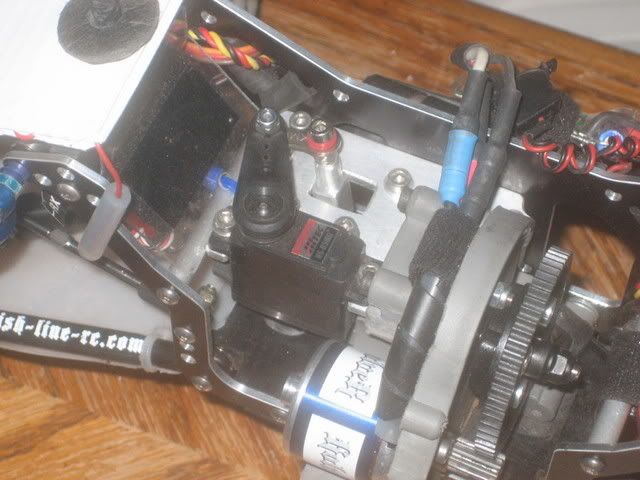 The first drive cup I wittled out of the old pinion gear worked long enough to tune the dig and know that it ( the drive cup ) would not last. After stripping it I went to plan B. I forced a 1/2" piece of an allen wrench into the transmission output stub. Next I made a new drive cup out of a stock TLT axle output cup, it's steel and works great. I had to shorten both ends and widen the opening to fit the larger pin I'm using. Engaged 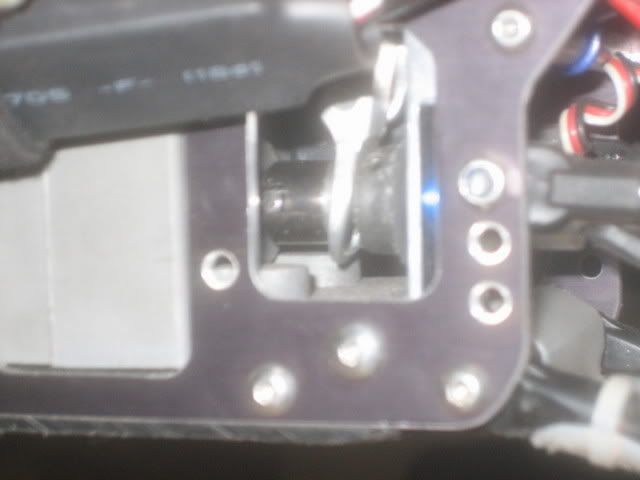 Disengaged 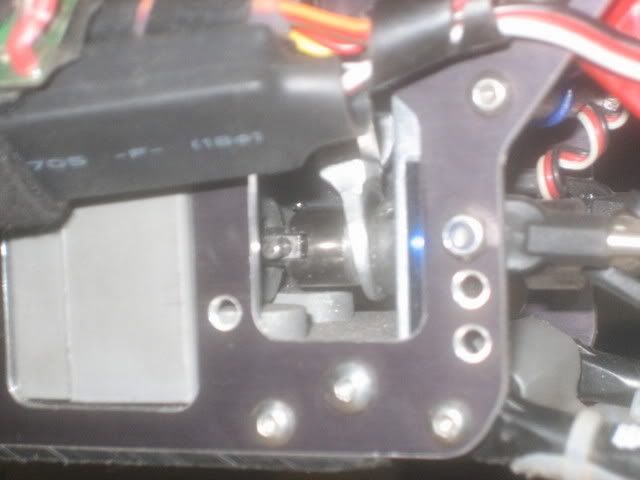 The final position applies pressure against the collar behind the shift fork and the bulkhead. There's a piece of thin rubber glued to the back of the collar that functions as the brake. It's not locked 100% but it ALWAYS comes out of brake and never leaves your rears locked when there's a load on them. I really like how the drive cup engages but the lever-style shift fork uses to much space. It looks cool and does the job assigned, so it stays. A sliding style would leave room for a larger brake. |
|
| |
|
10-16-2007, 11:53 PM
| #8 |
| Quarry Creeper Join Date: Jul 2007 Location: EWA BOUND
Posts: 374
|
Awesome job on your dig set up |
|
| |
|
10-17-2007, 12:17 AM
| #9 | ||
| Quarry Creeper Join Date: Mar 2005 Location: The Dark Side
Posts: 397
| Quote:
Quote:
In all the tech I forgot to mention why I called this build "Sharky". I was going to use my old baja bug body but it was too hacked and looked weird and sat funny. With the crawler budget tight recycling an old shell was my only option. While scanning my row of old RC bodies I found it. An old T3 body I painted flying tiger style years ago. It was even nailed to a frame with some other old bodies and used as a scale "junked car" pile to monster truck over, the PARC guy crawled over it at our D&D Hobbies crawl demo a couple of years ago !!! It works great, rights itself from rolls and has ample tire clearance, and after patching 16 holes it looks great too!!! 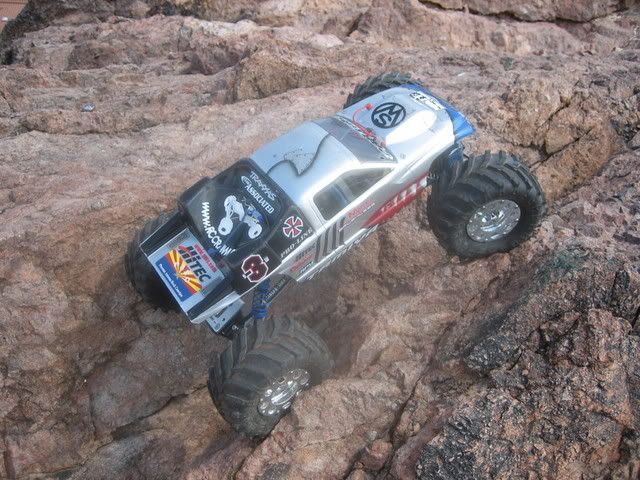 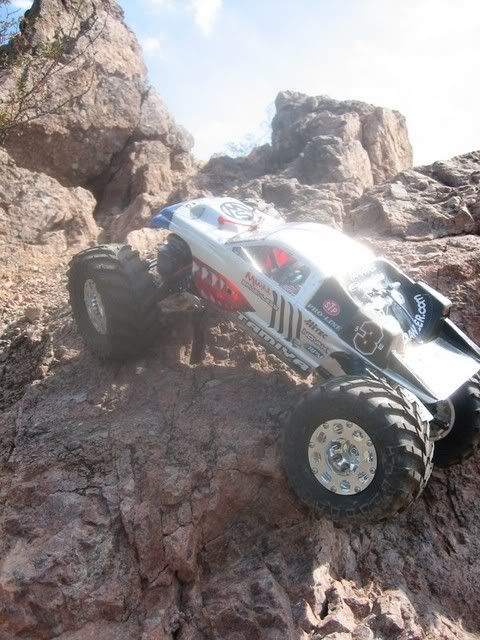 Plus, I was a big fan of the cartoon Freakazoid. | ||
|
| |
|
10-17-2007, 12:29 AM
| #10 |
| RCC Addict  Join Date: Mar 2005 Location: MESA, AZ.
Posts: 1,043
|
As always Mike comes up with a new and better way. His dig setup on this SW3 works great. I saw it run at our last Comp. It kicked into dig and out of dig every time it was used. Overall the truck works very nice. Rick |
|
| |
|
10-17-2007, 01:52 AM
| #11 |
| I wanna be Dave Join Date: Oct 2005 Location: Columbia TN
Posts: 6,154
|
Jees, you have way to much spare time!! Looks killer!
|
|
| |
|
10-17-2007, 11:06 AM
| #12 |
| Rock Crawler Join Date: Mar 2004 Location: Where it's wet
Posts: 833
|
Looks great!
|
|
| |
|
10-18-2007, 09:22 AM
| #13 |
| Keep it real  Join Date: Jun 2006 Location: Yakima,WA
Posts: 6,532
|
Now this is a dig setup that I really like, great job!! |
|
| |
|
10-18-2007, 10:56 AM
| #14 |
| Rock Crawler Join Date: Jan 2005 Location: Tumwater
Posts: 910
|
Nice...Mike!
|
|
| |
|
10-18-2007, 11:31 AM
| #15 | |
| I wanna be Dave  Join Date: Apr 2005 Location: Vegas
Posts: 7,172
| Quote:
| |
|
| |
|
10-18-2007, 11:39 AM
| #16 |
| Rock Crawler Join Date: Mar 2007 Location: Colorado
Posts: 635
|
incredibly well made... truly amazing.
|
|
| |
|
10-18-2007, 01:16 PM
| #17 |
| Rock Crawler Join Date: Jun 2006 Location: Dallas, Oregon
Posts: 567
|
i take it the whole drive line slides back when you disengage it?? or does the metal shaft just move back?? looks great!!
|
|
| |
|
10-18-2007, 03:15 PM
| #18 |
| 2006 2.2 National Champ  Join Date: Dec 2004 Location: Big Bear Lake
Posts: 8,328
|
Sweet looking build, nice work on the dig set-up too. |
|
| |
|
10-19-2007, 09:03 AM
| #19 | |
| Quarry Creeper Join Date: Mar 2005 Location: The Dark Side
Posts: 397
| Quote:
 | |
|
| |
|
10-19-2007, 10:24 AM
| #20 |
| RCC Addict Join Date: Sep 2005 Location: Tempe, AZ
Posts: 1,262
|
Wow...great job!!
|
|
| |
|
| |


 Linear Mode


