| |
| |||||||
 |
| | LinkBack | Thread Tools | Display Modes |
 12-02-2011, 07:45 PM
| #1 |
| RCC Addict   Join Date: May 2011 Location: Utah County
Posts: 1,802
|
hey i'm using a very high powered servo (which might be my problem), but even with the gpm system installed and all screws tight, it will has a ton of play. not sure how to best describe it, but do you who have the gpm kit have any problems? edit: here is the vid on youtube. what do you think i should do? GPM steering on youtube Last edited by heinie_21; 12-08-2011 at 03:03 AM. |

|  |
| Sponsored Links | |
| | |
|
12-02-2011, 08:31 PM
| #2 |
| Quarry Creeper Join Date: Jul 2008 Location: Garden State
Posts: 298
|
Yes there is still alot of play but if you shim it there is none. Check my thread I have the sizes that I used. The shims I used are Tamiya.
|
|
| |
|
12-08-2011, 03:06 AM
| #3 |
| RCC Addict Join Date: May 2011 Location: Utah County
Posts: 1,802
| GPM steering on youtube added a vid to show the play. all screws are VERY tight. the problem is the machined flats in the through rod are not precision enough for the arms to sit flush. i taped the blue tube on to better show the degree of play. |
|
| |
|
12-08-2011, 09:31 AM
| #4 |
| Rock Stacker Join Date: Nov 2011 Location: Santa Cruz, Ca.
Posts: 89
|
I just installed the kit and found the same thing. You're talking about the top of the 'rod' that is notched to fit into the crank. (The part you taped the tube to). I noticed that when I turned it like you are, the screwhead stayed in place and the crank moved. I tightened the screw with some locktite, really tight, and it seems to have held. I agree, the 'keying' idea between the crank and rod should be better. I also don't see how shimming would solve this problem. Mine seems to be functioning for the moment though. Tighten that screw with locktite, let it sit over night, and then see how it does. Cheers, Skottoman |
|
| |
|
12-08-2011, 10:18 AM
| #5 |
| Quarry Creeper Join Date: Jul 2008 Location: Garden State
Posts: 298
|
Shiming solves the slop in the drag link and the belcrank screwed to the chassis. I don't have slop on the servo side. Once the unit is installed without shims you will see a lot of play in the rack. Hope this helps.
|
|
| |
|
12-08-2011, 12:05 PM
| #6 |
| RCC Addict Join Date: May 2011 Location: Utah County
Posts: 1,802
|
i'm thinkin i'm just gonna gorilla glue the entire rod assembly and get rid of that slop once and for all haha.. then hope i never need to take it off for some reason. i would try contacting GPM and asking for a replacement, but i kinda feel like a company that doesn't even supply installation instructions will probably not supply a warranty replacement for a completely horrible product haha the kit is brand new. it's less than 2 weeks old and ive only installed it and used it for 5 minutes.. long enough to see that the steering horribly loses center. if you get into a tough spot and steer one way or the other, the vertical rod just sits still while the servo arm spins on it. this means when you get out of the bind your servo is centered, but your wheels are turned like 30% one way or the other, you have to get back in a bind and turn the opposite way for the it to center again. |
|
| |
|
12-08-2011, 03:31 PM
| #7 |
| Quarry Creeper Join Date: Aug 2004 Location: North Las Vegas
Posts: 371
|
Just make sure you glue it in the spot you want it to be in.
|
|
| |
|
12-08-2011, 08:24 PM
| #8 | |
| Quarry Creeper Join Date: Jul 2008 Location: Garden State
Posts: 298
| Quote:
| |
|
| |
|
12-08-2011, 10:20 PM
| #9 | |
| RCC Addict Join Date: May 2011 Location: Utah County
Posts: 1,802
| Quote:
how can i explain what is going on. okay, imagine you have a hex screw that needs a 2.5mm hex driver, but you use a 2mm hex driver instead. with the driver inserted in the screw you can turn the driver back and forth slightly both ways (play) before the SCREW will turn. this is happening because the hole and the driver are not the same size. there is no snug fit, there is room for it to wiggle, not a precision fit.. i dont know how else to say it. THAT is what is happening with the rod that goes down through the chassis. the ends of it are not perfectly machined to fit perfectly inside the arms at either end of the rod. there is play in each side. they dont FIT perfectly together. no matter how tight i crank down the screws or shim them or whatever, there is still play between the rod and the arms because they dont fit snugly together. it has play. grr words... i dont know if this is even making sense.. i didn't know how to describe it in words so i thought the video would portray exactly what is going on. oh well Last edited by heinie_21; 12-08-2011 at 10:23 PM. | |
|
| |
|
12-08-2011, 10:26 PM
| #10 |
| www.team3sixrc.com Join Date: Mar 2008 Location: Scalerville
Posts: 4,506
|
Im looking at the video again.
|
|
| |
|
12-08-2011, 10:32 PM
| #11 |
| www.team3sixrc.com Join Date: Mar 2008 Location: Scalerville
Posts: 4,506
|
OK, I think I know whats up. The screw that your showing is tightened down as much as it will go, something its keeping it from threading farther. so I will suspect it is the threded rod part or too long of a screw. So either place a washer or shim in the hole and re screw down or use a smaller screw. |
|
| |
|
12-08-2011, 11:53 PM
| #12 |
| RCC Addict Join Date: May 2011 Location: Utah County
Posts: 1,802
|
I've tried 10 different screws of different lengths (because I suspected the same thing you did). It makes no difference. I've done short screws with shims, short screws without shims, long screws with shims, long screws without shims. It makes no difference because the root of the problem is a poor tolerance machining where the rod connects to other components. For those who say you never had this problem it night be because you're running a 100 oz servo whereas I am running a 400 oz servo. Overkill for a cc01, I know but its the only spare I have. Maybe you all have the play that i have but youve never noticed it because your servos aren't strong enough to overcome the screws hold. Anyways as I see now I have 3 options. A: glue the assembly together to overcome the slop. B: use a weaker servo that can't cause slop C: use the stock rod. I'm trying option c at the moment. If I do t like it I'm doing a. Might end up combining a and b. Sent from my ADR6400L using Tapatalk |
|
| |
|
12-09-2011, 01:08 AM
| #13 |
| Quarry Creeper Join Date: Jan 2010 Location: vancouver, canada
Posts: 309
|
i gave up on mine and popped the stock back in. slop, but not as bad as the "upgrade."
|
|
| |
|
12-09-2011, 05:01 AM
| #14 |
| www.team3sixrc.com Join Date: Mar 2008 Location: Scalerville
Posts: 4,506
|
Ill ne honest with you. Your getting upset because a so called (bad machine tolerances) from a Hong Kong company that made a $17.00 piece. And then using a 400oz. Servo to carry it on top of it. Which most likely still wouldn't of caused the movement had your thrown end points been adjusted correctly. Just saying is all. My guess is the rod between both mechanisms has a notch or machined key to fit together. So as no not move & cause slop. But because you put so much damn torque on a piece of 6061T aluminum, maybe over threw your steering. It just wore the key. Gluing it isn't going to do crap. Its like putting a band Aid on a Dolphin. Here is your choice. If the 400oz. Servo is your only option. And the stock steering mechanism. Is of the same length or abouts. Put the stock on and set your epa's for steering. Remove stock set up. Find a setscrew and drillbit small enough to Drill 1 holes on each side of the shaft coming from the arms. Tap the hole, add blue thread locker, done and done. Me personally, I would get a 5645mg servo. And try and make my own mod to the part to make it better if it was for bling factor. If not, its a CC01! The stock part should work fine. Last edited by team3six; 12-09-2011 at 05:05 AM. |
|
| |
|
12-09-2011, 06:48 AM
| #15 |
| Quarry Creeper Join Date: Aug 2004 Location: North Las Vegas
Posts: 371
|
Cough make your own cough. Mine has zero slop.
|
|
| |
|
12-09-2011, 07:40 AM
| #16 |
| Quarry Creeper Join Date: Mar 2011 Location: queen creek az
Posts: 249
|
I had same problem so I made my own down shaft and shimmed it with something very common I will post pictures later it was all easy the shaft was common links to. It now works great I only have slop in my cvds or bearings now.
|
|
| |
|
12-09-2011, 09:27 PM
| #17 | |
| Quarry Creeper Join Date: Jul 2008 Location: Garden State
Posts: 298
| Quote:
| |
|
| |
|
12-11-2011, 11:52 AM
| #18 |
| Quarry Creeper Join Date: Mar 2011 Location: queen creek az
Posts: 249
|
Ok I finally had time this morning to take apart truck and show my trick so here it is. I started by taking the gpm shaft out and removing it completely and noticed the shaft was my main problem so looking in one of my link boxes I found these  These fit perfectly in the downshaft tube with the plastic bushing in place I then noticed the steering linkages before were not level with each other so I made my down shaft 27mm in length and then found the perfect spacer in my transmission box 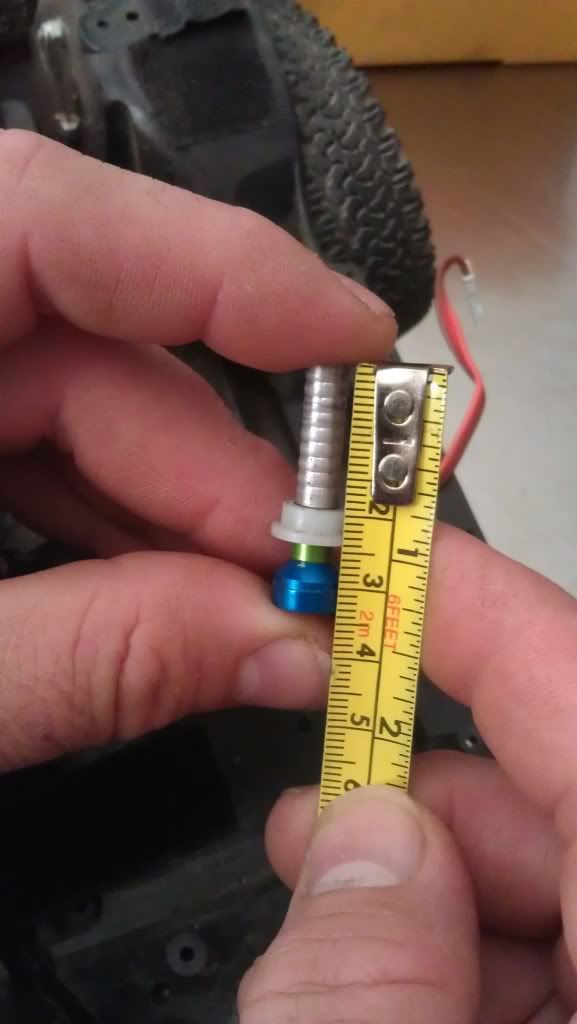 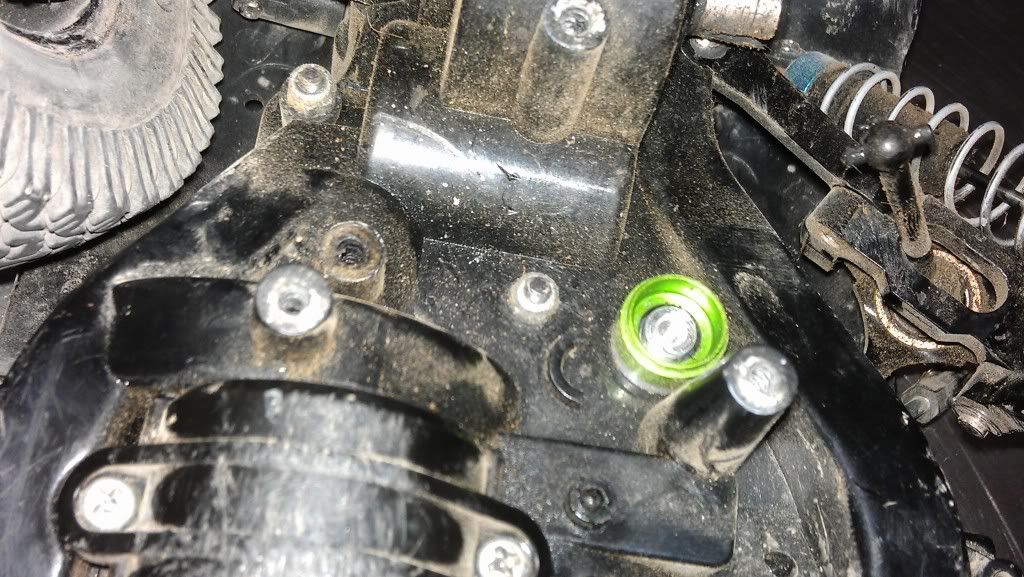 That's right the main transmission spacer fits perfectly into the plastic bushing now just put the steering arm back together and you can aim the upper any way you like make sure you use lock tight on bolts especially with the 400oz servo 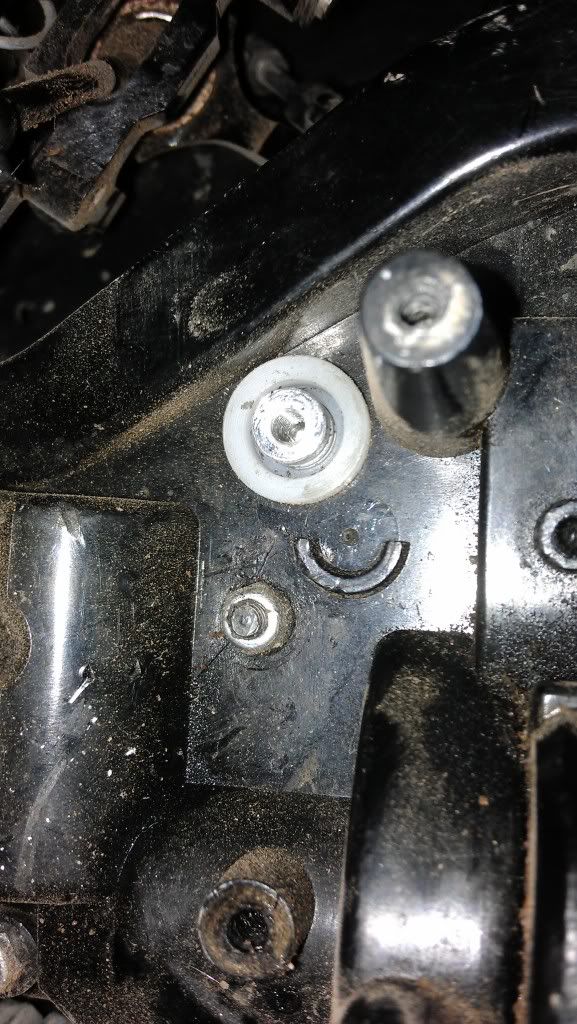 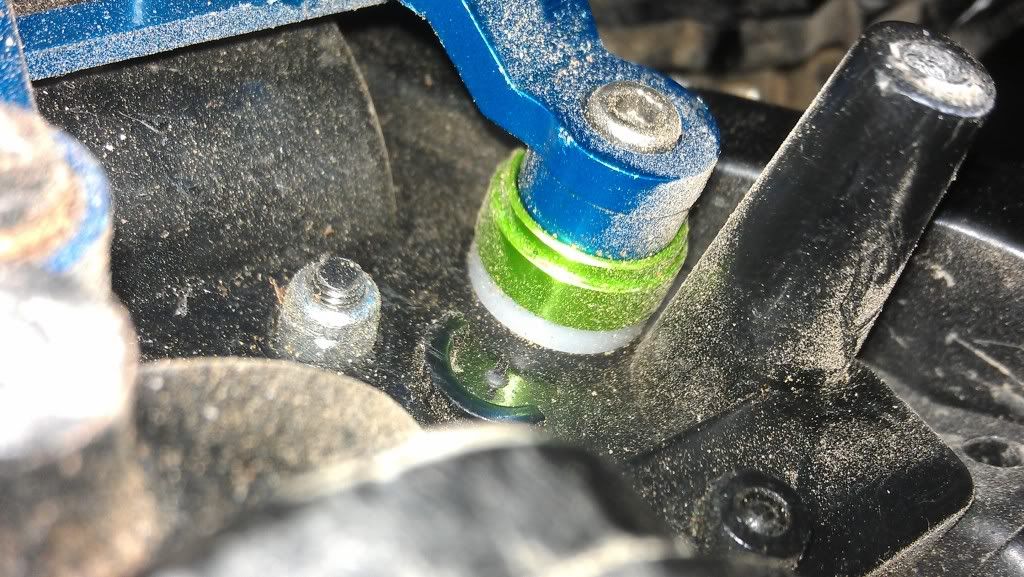 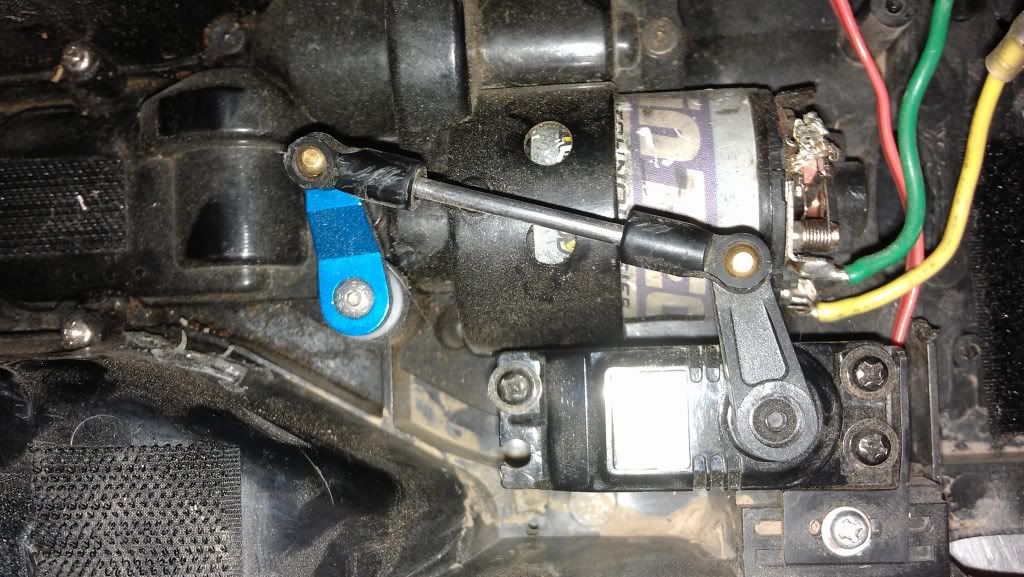 Hopefully this is helpfull to you |
|
| |
|
| |


 Linear Mode


