| |
| |||||||
 |
| | LinkBack | Thread Tools | Display Modes |
 01-16-2009, 07:39 AM
| #1 |
| RCC Addict Join Date: Aug 2005 Location: Akron
Posts: 1,784
| WARNING: I'm not an electrical guru. I did some reading on heating elements and found a solution that worked for me. If you try something like this I suggest you do the same research. I work for a company that does some plastic work and uses some heat bending tables. They had a couple old ones laying around so I decided to try and copy them in a smaller scale for my shop at home. I wanted something removable so it wasn't always in the way. Here's an overall shot. Power is adjusted using an old analog 2000W rheostat (the newer digital ones will not work). There is a piece of Nichrome wire that runs between the two outputs of the rheostat. There are some ceramic insulating posts on each end to cut back on the heat when it gets close to the wire. 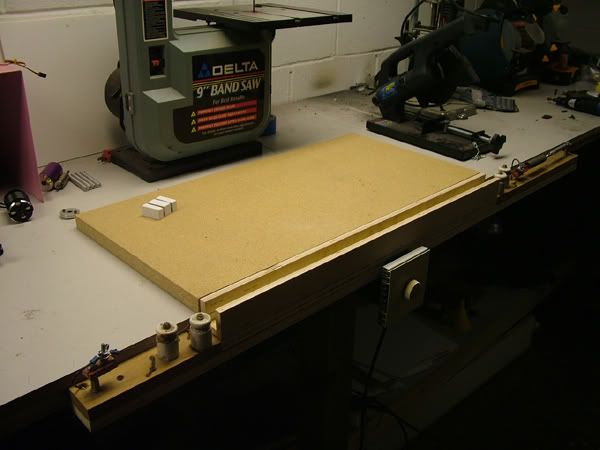 Here's the left side of the heating element. 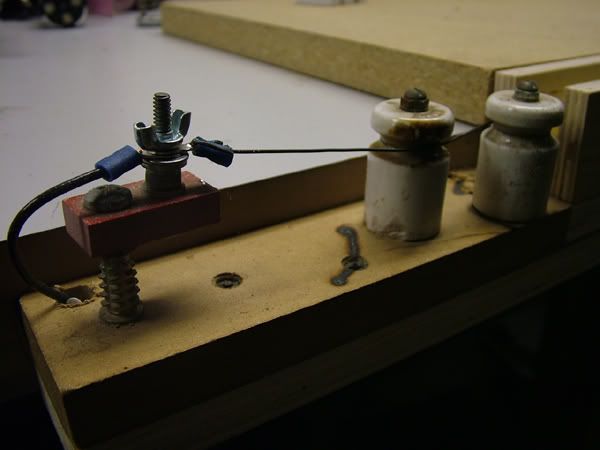 Here is the right side. I used a spring and turnbuckle so that tension is adjustable. This also helps take up slack when the wire heats up because it expands. 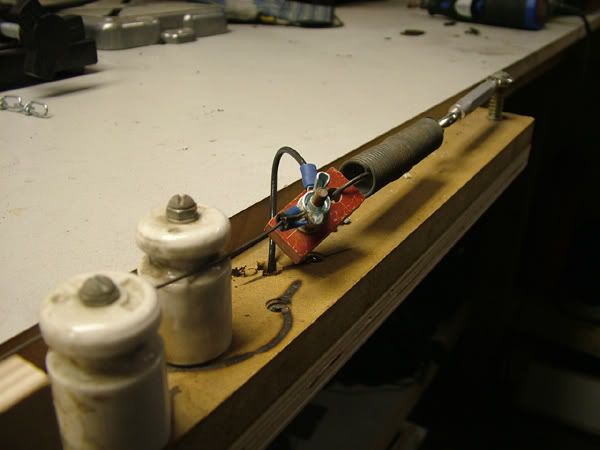 The front portion just simply bolts to the lip on my workbench. It sticks up about 3/4" from the top of the bench so that I can lay down a 3/4" piece of particle board to make a nice flat surface. 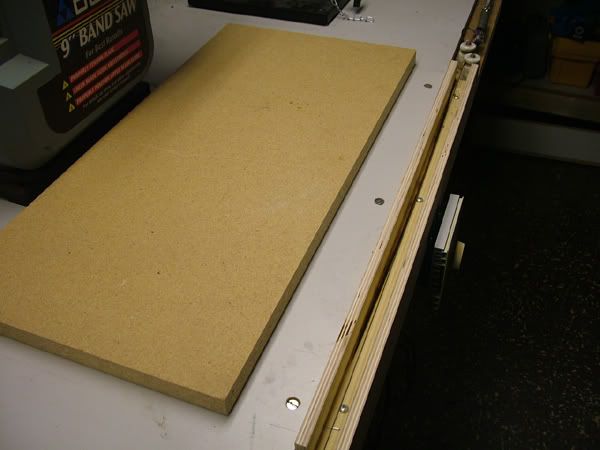 Here you can see the element heated (a little over heated just for clarification) and you can see how it is recessed below the flat surface about 1/2" 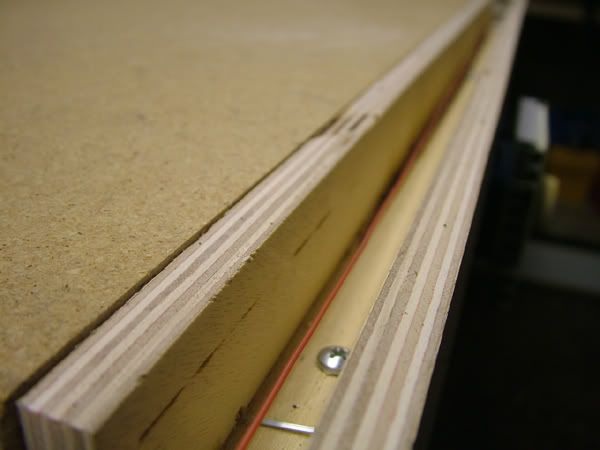 As for bending plastic. All you do is turn the element on, I heat it up just until the wire starts to turn red (over heated a bit in the photo for clarification) then back it down a little bit. Lay the sheet of plastic over it and let it sit there for maybe 10-30 seconds depending on thickness. 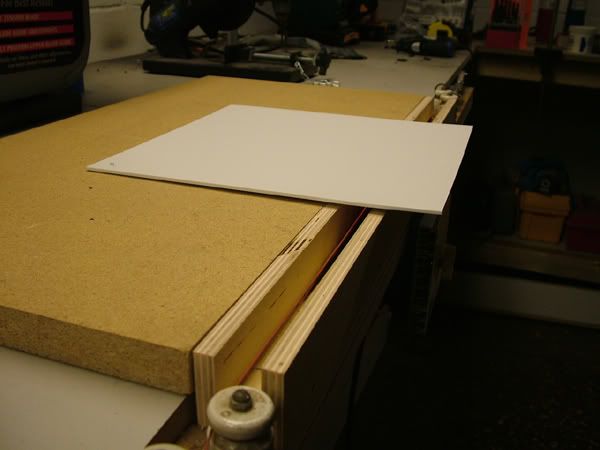 This makes a nice consistent bend area with a tight radius. Really adds rigidity also. 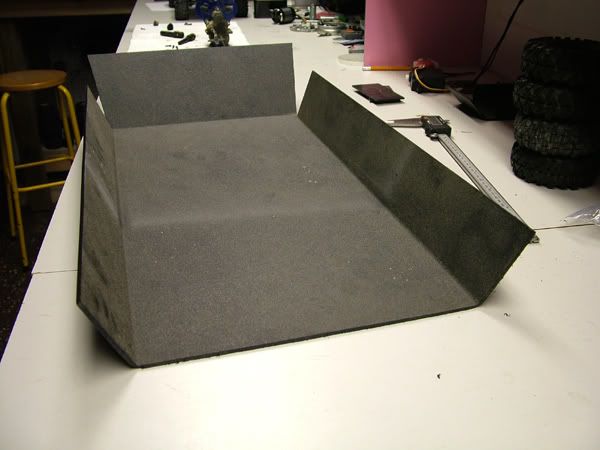 |

|  |
| Sponsored Links | |
| | |
|
01-16-2009, 07:44 AM
| #2 |
| Custom Carbon Fiber   Join Date: Oct 2007 Location: Connecticut :(
Posts: 4,501
|
Looks great, nice idea. I had one like that for bending acrylic back in the pc case modding days. thanks for the sharing.  |
|
| |
|
01-16-2009, 11:04 AM
| #3 |
| Quarry Creeper Join Date: Jan 2008 Location: SW of Cleveland
Posts: 228
|
I've seen drawings, but never an assembled version. Very nice. I'm going to have to keep an eye out for a rheostat. . . I figure an old model train control might fry. Thanks for the inspiration. |
|
| |
|
01-16-2009, 12:02 PM
| #4 |
| RCC Addict Join Date: Jun 2008 Location: Monroe, NC
Posts: 1,547
|
Thats pretty cool. Great job man. Justin |
|
| |
|
01-21-2009, 09:15 PM
| #5 |
| RCC Addict Join Date: Jan 2007 Location: San Jose
Posts: 1,697
|
Wow. That is how you do it. Can you to a write up here on how to build one? I need that for sure. lol. Awesome. |
|
| |
|
01-22-2009, 07:01 AM
| #6 |
| RCC Addict Join Date: Aug 2005 Location: Akron
Posts: 1,784
|
Sorry this is as far detailed as I'll get since I'm not extremely skilled with home electrical. The reason I don't want to get into details or suggest certain products is because this setup basically just shorts out your electrical socket with the nichrome wire. The nichrome wire just takes that and turns it into heat. I think this site has a couple different heating element setups if you search. You just want something in a straight line that you can adjust the heat. http://www.instructables.com/id/Poor...rip-for-penni/ http://www.rcgroups.com/forums/showp...8&postcount=22 http://www.rcgroups.com/forums/showthread.php?t=628704 |
|
| |
|
01-23-2009, 11:24 AM
| #7 |
| RCC Addict Join Date: Jan 2007 Location: San Jose
Posts: 1,697
|
I totally understand Nick. Thanks for trying to help me. I like the first website. Good stuff |
|
| |
|
01-26-2009, 01:22 PM
| #8 |
| Rock Crawler Join Date: Sep 2008 Location: N.E. Mpls
Posts: 854
|
We do alot of bending of plastic at work. Ous are more of a comercial set up however the concept is the same. We use calrods for heat, we also use 2 watercooled tubes to support the plastic. The goal is to have a gap inbetween the 2 cooling rods that is 3x the thickness of the material being bent. we use cooling rods because we run our bender for extended periods of time. The purpose of the cooling is to keep the non bend areas from getting hot. This is very helpfull if bending over 1/8 thick material. For home use I would recomend useing some 1/8 alum strips say about 2 inches wide and al least as long as the area you are bending. A good recomended distance from the heater to plastic is about 3/4 of an inch. I will post some pictures of our set up later when I get home. Here is alink to the company we get our calrods from http://www.chromalox.com/ A simple 120 volt 24 inch calrod isnt that expensive. I cannot quote a specfic controler because they vary with the demands of each rod. I will post more info on iseas for home bending when i get home also.... Example use the 2 pcs of alum to control the heating area and use a hobby heat gun or heavy duty type heat gun... |
|
| |
|
01-26-2009, 01:35 PM
| #9 |
| RCC Addict Join Date: Aug 2005 Location: Akron
Posts: 1,784
|
Great info Lonewolf. Looking forward to you elaborating some.
|
|
| |
|
01-26-2009, 10:49 PM
| #10 |
| I wanna be Dave Join Date: Sep 2008 Location: four o six
Posts: 2,101
|
This is pretty enteresting, can't wait either. I need two things now, a little band saw, and a little heater like this.
|
|
| |
|
01-27-2009, 03:52 PM
| #11 |
| RCC Addict Join Date: Jan 2007 Location: San Jose
Posts: 1,697
|
Thanks lonewolf.......! for sure, pics please. I just found me a toaster......, so I am going to try and build one of these benders. |
|
| |
|
01-27-2009, 04:52 PM
| #12 |
| Rock Crawler Join Date: Sep 2008 Location: N.E. Mpls
Posts: 854
|
For starters our set up runs 240 volts. For a cooling system we have (aprox) 40 in x 40 in by 3o ish deep plastic shipping crate we use for a water tank... We then use a submersable pump to circulate the water thru the cooling rods. We use 3/4 x3/4 square tube that has been welded shut each end and tapped for the water lines. We use a dayton pump (bout 80-100$) I think to pump the water. We get our pumps thru graingers. Below the cooling tubes we have a nother tube of same size that is not water cooled but is used as a spacer/ heat trap to keep the heat concentrated and controlled. For example: you get a breeze or a draft when someone opens a door ,...this will quickly cool the heating element.. Another reeason we use alum tube for the spacer is that alum reflects heat nicely.... Below these 2 tubes we have a pc of 1/4 alum plate that we use as a base for mounting the heating rod to which is held up off the plate by about 3/8 of an inch. We use ceramic spacers to keep the rod up off the base and straight. After reading this, if you have gotten this far I am sure you imagination is running wild lol. There are many ways to convert these ideas for home use. I do highly recomend useing fire retardent materials when building you bending table. Wood has a nasty way of drying out the more it dries the easier it will be to catch fire..(seen it happen). The heater controller are percentage timers. For 1 minute the controler is on xxx% of the time. on 7 seconds off 7 seconds just as an example. Another tip/hint is to have a roll of aluminum tape handy we use this to restrict or shadow areas we dont want heated. We also use the tape at the end of each bend area to help keep the heat in at the end of each bend, the material will tend to be cooler there due to heat escapeing. Well I hope I have helped a bit more with the added info. Next time you are target look at the line bent giftcard holders yep we made them. Heck we have made most of the plastic displays and headr banners at the top of the isle racks and endcaps. We also made the big choxie (chocolat) displays. The list goes on.. We have been makeing point of purchase displays for target for longer than I have been with the company (16+ yrs). Ok here are a few pics I will try and get more to help with the ideas... With the set up we use we are caplable of bending up to 3/8 material. Another hint is to flip you material to aid in a more even heat at the bend... |
|
| |
|
01-29-2009, 04:42 PM
| #13 |
| RCC Addict Join Date: Jan 2007 Location: San Jose
Posts: 1,697
|
Wow Lone! I did not know there was so much involved. Did you read the right up listed below for the bender made using toaster???? Can you read and give opinion if that would be good for home use. I am just going to bend couple skid plates for scaler. thanks Lone! Nice wright up! |
|
| |
|
01-29-2009, 09:36 PM
| #14 |
| Rock Crawler Join Date: Sep 2008 Location: N.E. Mpls
Posts: 854
|
What material is the skid made from. If delrin Im not so dure I have not tried to bend delrin as of yet. When useing the toaster method I would not recomend bending material over 1/8 thick. Delrin, acetal , polyethylene, polypropylene are materials that will take longer to heat. With this in mind thicker material may burn before it gets hot enough thru the thicknbess to get a nice clean bend. I would try to enclose the heating elemnet with some sort of alum. Several layers of alum. foil folded over should be good enough for short term use at home. Try to enclose the heat around the material to be bent but dont touch the element. Another way to do simple bending is to enclose the material in several layers of foil exposeing only the area you want heated and put it on the oven at about 250 degrees and check about every 30-45 seconds. Make sure you have some sort of tray under the plastic to be bent Dont want melted plastic in the oven.. I would expose about 3/8 of an inch of material to be bent. A toaster oven will work for small parts.. The key to this is to get the plastic hot enough to bend fairly easy a small bit of force is ok and actually better and will make a cleaner bend. You will know when its ready. If you can use some alum tape to aid in holding the foil in place and to creat a nice clean bend area. Also keep checking and watch the time... Dont answer the phone,dont walk away pay attn to what you are doing!!!!! screw it up and melt it in the oven and you will not wanna use the oven for food again... Also with the toaster method or any other version pay attention to waht you are doing and keep checking It might take 2 minutes to heat and 2 1/2 to burn all depends on your set up. Most plastics can and will start on fire if left heating too long or get to hot Some significant others may object to you cooking plastic in the oven Be sure to watch the bend after you have made the bend a slight bit of overbend is ok(a few degrees) as the plastic will tend to try and go flat. If you can make a simple jig to hold in place while cooling. Hope this helps....Feel free to ask ????'s or send me a pm for specifics ion your set up ill be glad to help in any wayt I can... |
|
| |
|
02-02-2009, 11:20 AM
| #15 |
| Rock Crawler Join Date: Sep 2008 Location: N.E. Mpls
Posts: 854
|
This weekend the light went on!!!!!!!!!!!!!!!!!!!!!!!!!!!!!!!!!!!!!!!!! A toater oven!!!!!! It contains all of the parts needed to make a small home use bender!!!! The only thing really missing is the cooling rods. Granted the rods are only about a foot long unless to get a bigger version. Anothe option may be an old electric oven,, The rods can be bent straight if done slowly and carefully dont beat on it with a hammer lol.... Ok now that we have the heat its time to keep it from melting the surrounding plastic.. If you are only makeing 1 or 2 bends you would probably be safe without useing some sort of cooling system. In the past I have blown compressed air thru tubes to cool various applications, but it has limited effect. It will not cool nearly as well as water but useing air will help more than nothing... Keep in mind guys/gals!!! this is a 120 volt set up keep those contacts and electrical connections covered. It wont be funny if you or one of your loved ones comes to see what you are doing and the touch a contact and end up doing the 60 hz shuffle!!!!! I also recomend haveing a good pair of leather gloves handy things tend to get hot!!!! Yep that overheated pc of plastic can and WILL stick to you, by the time you get it off the damage has been done!!!!! Hope this helps some!!!!! Toater ovens can be used for a variaty of different applications in the hobby world but be safe !!!! |
|
| |
|
02-03-2009, 09:15 AM
| #16 |
| Rock Crawler Join Date: Sep 2008 Location: N.E. Mpls
Posts: 854
|
Here another added note....For cooling plug the ends of the tubes with a round tube or whatever fits a hose you can attach to a faucet. Not alot of water preasure is need just enought to keep the cooling tubes cool.You dont want them ice cold just cool so a steady stream of water just about a trickle will work fine adjust as needed... Check for leaks before plugging anything in.... water remember 60hz shuffle.... Another terminoly would be the crappie flop... |
|
| |
|
02-04-2009, 12:13 AM
| #17 | |
| RCC Addict Join Date: Jan 2007 Location: San Jose
Posts: 1,697
| Quote:
I am glad you are on board now. Lets get a bender made.....lol. Yea, I looked at the link that was provided below and got me a toaster with ceramic rod and metal coil around it. I have four rods about a foot long each. I will probably only do 2 maybe 3 bends at the most. I will not need a cooling system than....????? thanks for your imput! | |
|
| |
|
02-04-2009, 05:45 AM
| #18 |
| Rock Crawler Join Date: Sep 2008 Location: N.E. Mpls
Posts: 854
|
If only doing a few bends at a time probably not but you will know ... If it is too hot to put your hands onto the area where you are gonna put plastic I would suggest cooling. If the support bars get hot you part may warp...It wont take vey long for them to get hot... try and check the temp about 160degrees you will want to cool the support rods If over that aprox heat the surrounding areas will get soft also... |
|
| |
|
02-04-2009, 07:25 AM
| #19 |
| Newbie Join Date: Jan 2009 Location: Middletown
Posts: 31
|
wow never would of thought of this
|
|
| |
|
02-04-2009, 01:49 PM
| #20 | |
| RCC Addict Join Date: Jan 2007 Location: San Jose
Posts: 1,697
| Quote:
thanks. | |
|
| |
|
| |


 Linear Mode


