| |
| |||||||
 |
| | LinkBack | Thread Tools | Display Modes |
 12-05-2011, 03:40 PM
| #1 |
| Quarry Creeper Join Date: Jul 2008 Location: Garden State
Posts: 298
|
Well I just decided to set myself up with a MAPP torch and all of the stuff to start making my own things. I decided on starting on something simple. So I am attempting to make a canopy for my Unimog. Now this is where I thought I was good at math, but I guess I was wrong. Lol... Anyway I bought a tube bender from harbor freight and I just wanted to start to make the bends for the canopy. I figure I can just bend out one piece to start the frame. I want it 2/34x6in. Anyway I went through almost 1 three foot piece of brake line and still can't get it right!! Can someone please help me on just getting this simple bend right!!! I really don't want to waste money trying to guess this. Just a simple 90 degree bend!!! How far do I need to start the bend in order for it to fit. I gotta laugh, I'm thinking to myself this is going to be a piece of cake! Man was I wrong |

|  |
| Sponsored Links | |
| | |
|
12-05-2011, 04:00 PM
| #2 |
| Yashua   Join Date: Sep 2010 Location: Learn the parable of the fig tree
Posts: 3,661
|
I guess you could start with a little extra on the end, get your bend and then trim the excess.
|
|
| |
|
12-05-2011, 04:04 PM
| #3 |
| Quarry Creeper Join Date: Jul 2008 Location: Garden State
Posts: 298
|
The height i'm not worried about it's the length including the bend.
|
|
| |
|
12-05-2011, 04:08 PM
| #4 |
| Yashua Join Date: Sep 2010 Location: Learn the parable of the fig tree
Posts: 3,661
|
I don't know what kind of bender you have , but this type has markings on it to get differant angles .  |
|
| |
|
12-05-2011, 04:15 PM
| #5 |
| I wanna be Dave Join Date: Dec 2009 Location: San Francisco
Posts: 2,236
|
Check out this link: Pirate4x4.Com Its a very simple way to do 2d tube bends and be very close on dimensions.
Also, note that if you work with different tubing or solid rod you should bend a test piece for every type material. It will take some time you get it down, sometimes you will have to be careful to make sure you bend in a certain order or else you will have problems getting the tubing in the bender. Also, if you are working with a hoop or something that is symmetric it is best to start from the center and bend outward. Good luck! |
|
| |
|
12-05-2011, 05:27 PM
| #6 | |
| Quarry Creeper Join Date: Jul 2008 Location: Garden State
Posts: 298
| Quote:
 For my bend it had a 5/8 gap between the outside to the end of the bend. Got it all sorted. I did however make a template. So much easier. For my bend it had a 5/8 gap between the outside to the end of the bend. Got it all sorted. I did however make a template. So much easier.
| |
|
| |
|
12-05-2011, 05:28 PM
| #7 | |
| Quarry Creeper Join Date: Jul 2008 Location: Garden State
Posts: 298
| Quote:
| |
|
| |
|
12-05-2011, 07:16 PM
| #8 | |
| Suck it up!   Join Date: Mar 2008 Location: Arkansas
Posts: 11,652
| Quote:
Once you bend and mark your test piece, put it back in the bender and transfer the marks onto the tool. I usually mark it with a Sharpie, then hit it with a center punch to make it permanent. | |
|
| |
|
12-05-2011, 07:23 PM
| #9 | |
| No idea what I'm doing Join Date: Oct 2008 Location: Underground, CO
Posts: 4,529
| Quote:
| |
|
| |
|
12-05-2011, 07:25 PM
| #10 | |
| Suck it up! Join Date: Mar 2008 Location: Arkansas
Posts: 11,652
| Quote:
| |
|
| |
|
12-05-2011, 09:28 PM
| #11 | |||
| I wanna be Dave Join Date: Dec 2009 Location: San Francisco
Posts: 2,236
| Quote:
Quote:
Quote:
Even in that link I posted they had to remark their full sized die. As far as benders go, these are the two I have and they are very good. Rigid Bender: Amazon.com: Ridgid 36117 Level Tubing Bender: Home Improvement Imperial 3/16 bender: Amazon.com: SEPTLS389364FH03 - 364-FHA Lever Type Tube Benders: Home Improvement The picture isnt accurate in that one. They are both good, the rigid is super tough and is nice because no matter what the handle doesnt get in the way. The Imperial is nice because the radius is really small, great for things like stingers where you need the small radius. The problem with it is that the handle gets in the way if you dont plan well and sometimes it is unavoidable. Both of these bend much tighter than the standard brake line benders that have been posted so far. Last edited by SMR 510RR; 12-05-2011 at 09:34 PM. | |||
|
| |
|
12-06-2011, 07:44 AM
| #12 | |
| Rock Crawler Join Date: Aug 2010 Location: Socal
Posts: 699
| Quote:
| |
|
| |
|
12-06-2011, 08:19 AM
| #13 |
| I wanna be Dave Join Date: Mar 2008 Location: Wayne county. PA
Posts: 2,507
|
i bet you would go insane with my bender then.... 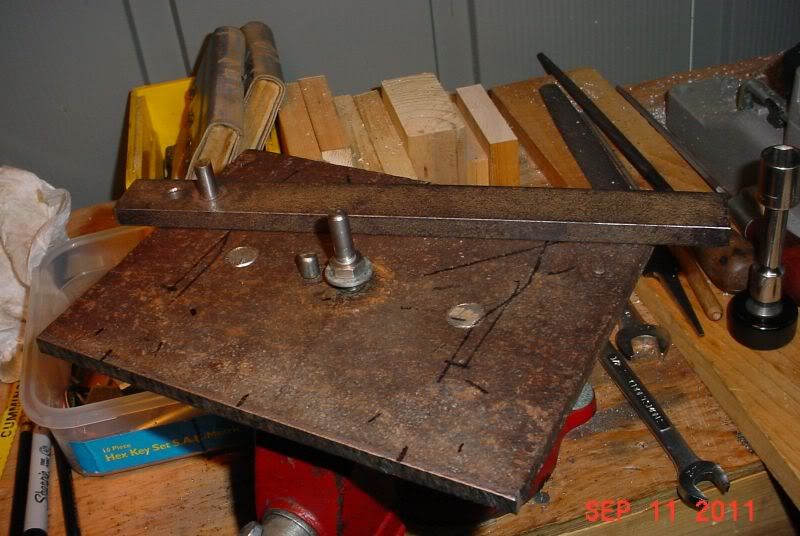 notice the sharpie marks all over the work plate  ....i had many store bought benders that just couldn't get the job i needed to do done....don't know if ya seen "my tube bender" thread and what i built with it like my "tigress" crawler....but here are two roll bar cages i made with this bender for my scaler in my "TT build thread" .... ....i had many store bought benders that just couldn't get the job i needed to do done....don't know if ya seen "my tube bender" thread and what i built with it like my "tigress" crawler....but here are two roll bar cages i made with this bender for my scaler in my "TT build thread" ....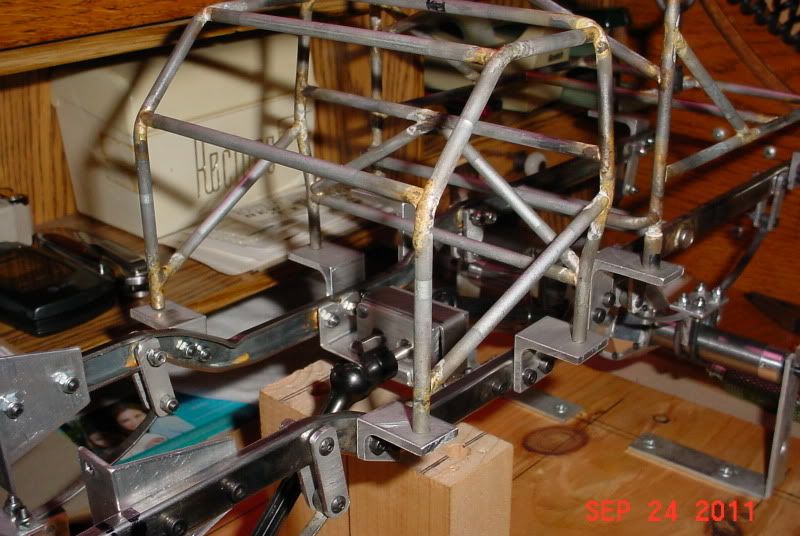 like others have said when making something that needs to be symmetrical like the rear of my cabs roll cage, then you need to work from the middle outwards....my tigress's main tube that runs from front to rear was made out of one piece of tube....i started out with the round nose as the center point and worked backwards till i was done bending....trial and error is the best teacher .........bob.... |
|
| |
|
12-06-2011, 12:49 PM
| #14 |
| Quarry Creeper Join Date: Jul 2008 Location: Garden State
Posts: 298
|
Thanks for all the help guys. After all is said I can sense that a lot of trial and error comes before you can get things right. This site has been a huge inspiration for me to start building. You guys have great skill and your builds are awesome.
|
|
| |
|
12-06-2011, 12:51 PM
| #15 | |
| Quarry Creeper Join Date: Jul 2008 Location: Garden State
Posts: 298
| Quote:
| |
|
| |
|
12-06-2011, 12:56 PM
| #16 |
| Quarry Creeper Join Date: Jul 2008 Location: Garden State
Posts: 298
|
Two more things. Is this a good deal? Stay-Silv 56 Brazing Kit-56KPOP at The Home Depot and what kind of bit do I need to thread the inside of 3/16 brake line? Last edited by liketocrawl; 12-06-2011 at 01:00 PM. |
|
| |
|
12-06-2011, 01:15 PM
| #17 |
| Quarry Creeper Join Date: Jul 2008 Location: Garden State
Posts: 298
|
Is this a good item to have in your work shop? Mini Lathe - 7" x 10" Precision Mini Lathe |
|
| |
|
12-06-2011, 02:28 PM
| #18 | ||
| Suck it up! Join Date: Mar 2008 Location: Arkansas
Posts: 11,652
| Quote:
IIRC its a #8 tap. Quote:
| ||
|
| |
|
12-06-2011, 05:42 PM
| #19 | |
| I wanna be Dave Join Date: Dec 2009 Location: San Francisco
Posts: 2,236
| Quote:
| |
|
| |
|
12-06-2011, 07:01 PM
| #20 |
| I wanna be Dave Join Date: Mar 2008 Location: Wayne county. PA
Posts: 2,507
|
i have threaded 6-32 into 3/16" brake line and when i went to do it again with new brake line the 6-32 screw just slide inside the 3/16" tube....i had to go to 4mm in the newer 3/16" with good bite........bob .... |
|
| |
|
| |


 Linear Mode


