| |
 03-25-2015, 01:27 AM
| #81 |
| Pebble Pounder Join Date: Oct 2007 Location: Star Prairie, WI
Posts: 165
|
Nice clean work, like always.  |

|  |
| Sponsored Links | |
| | |
|
03-29-2015, 07:23 PM
| #82 |
| Web Wheeling   Join Date: Jan 2005 Location: Twin Cities
Posts: 3,004
|
Havent worked on the electronics anymore yet... But the computer swing arm is almost finished. This is about the position I will have it it when I am running the mill. 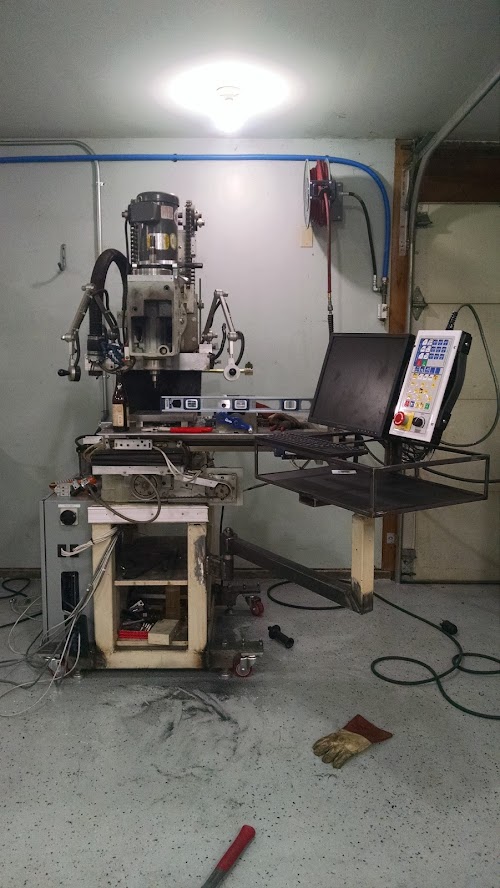 And stored away.  I am testing for clearance with the table at its X- and Y+ limits, and it clears if I position everything just right. Chances of ever needing to clear the table at these limits are slim, I tend to center the table before shutting it down.  Here is a closeup of the pivot, its a trailer axle spindle. I might add some dedents once everything is up and running.  And here is a picture of how I mounted the monitor and control pendant. The pendant has a couple large magnets, so I can hold it will I jog the machine.  I might get back to the wiring this week, now that the computer mount is far enough along that I can use it as is to get things rolling. I am taking my time on the wiring, making sure it is done right before I fire it up. I could easily hook everything up and fire it up. But I know if I were to do that, I would never get around to cleaning it up and doing it right. And I might be taking my welder in for service... Something on the circuit board blew, and now it only works on 110v... Thankfully it is rated up to 3/16" on 110v, but I would feel much better running on 220v. Last edited by Etype R; 03-29-2015 at 07:26 PM. |
|
| |
|
04-05-2015, 11:35 AM
| #83 |
| Web Wheeling Join Date: Jan 2005 Location: Twin Cities
Posts: 3,004
|
Cleaned up the outside of the mill a little more last week. I pulled the wooden shelf out, and finally bolted on cover plate for the head. 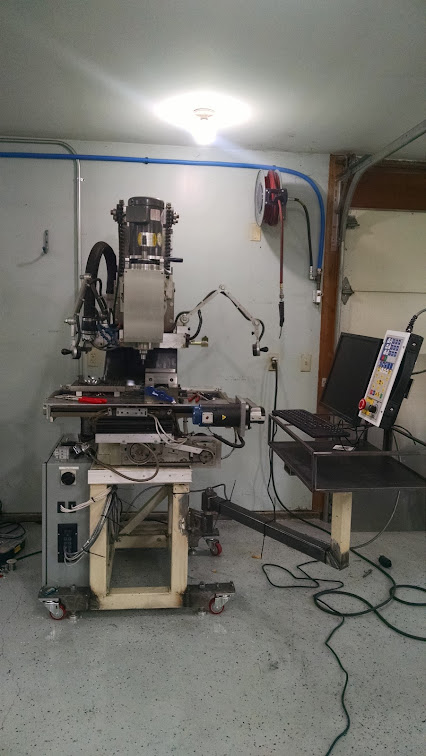 And this weekend I focused on the wiring. I moved the PLC over 1 inch, which helped a lot. Then started hooking up all of the limit switches and servos. Here is what the box looks like now.  One thing I kept putting off, was shortening the servo encoder cables. It wasn't to bad, but took about 1 hour to shorten all 3.  Here is the list of things I still need to do. - Wire up VFD controls - Wire in a 110 outlet for the PC, running conduit around the frame. - Hook up control power to the power switch - Run wires from switch to the VFD and terminal blocks. - Power everything up and test it Once everything seems to be working properly, I will finish covering the PC mount. And finish the counterweight system. |
|
| |
|
04-11-2015, 07:14 PM
| #84 |
| Web Wheeling Join Date: Jan 2005 Location: Twin Cities
Posts: 3,004
|
Finally hooked up the power and fired it up! Took awhile to get the motors and limit switches all sorted out. First problem was on the Z axis. Any movment I gave it, it would run away... I had to stop it with the e stop several times. After I looked things over, I noticed I had my power wires reversed on the Z axis servo motor. Next problem was that all 3 axis were running backwards, simple fix in the centroid settings, just had to reverse their direction. After that I battled with my limit switches for a few hours... Once tripped, I couldn't drive the machine away from the tripped switch. This also meant I could not home the machine, as it would just lock up. I finally figured it out, I had to switch my limit switch signal wires on the PLC, and then in the Centroid settings menu. After all of that, I ran the auto tune on my servos and called it a day.  Tomorrow I am going to tackle the VFD, for the most part I have the wiring figured out. Other then that, I still have a decent amount of cable management to deal with. Also still need to finish the computer console. |
|
| |
|
04-11-2015, 08:49 PM
| #85 |
| Quarry Creeper Join Date: Feb 2011 Location: The underground
Posts: 394
|
Awesome job Mike! I don't understand any of it but can't wait to see it working again. Hopefully tomorrow when we come over to bug you?
|
|
| |
|
04-16-2015, 09:35 PM
| #86 |
| Web Wheeling Join Date: Jan 2005 Location: Twin Cities
Posts: 3,004
|
Just about ready to start making chips again! I was having some issues getting the mill to pass its system configuration test. I had to clock the motors, so that the encoders were not tripping when on the limits. I started working on a truss design in Onshape. I found a solid model of a ax10 axle on grabcad, and imported it. Goal is to have my shocks mounted over the center of the axle, parallel upper links, and the servo mounted up top. The design isn't finished yet, but I am going to see if I can print this version out at work tomorrow to test fitment and layout.  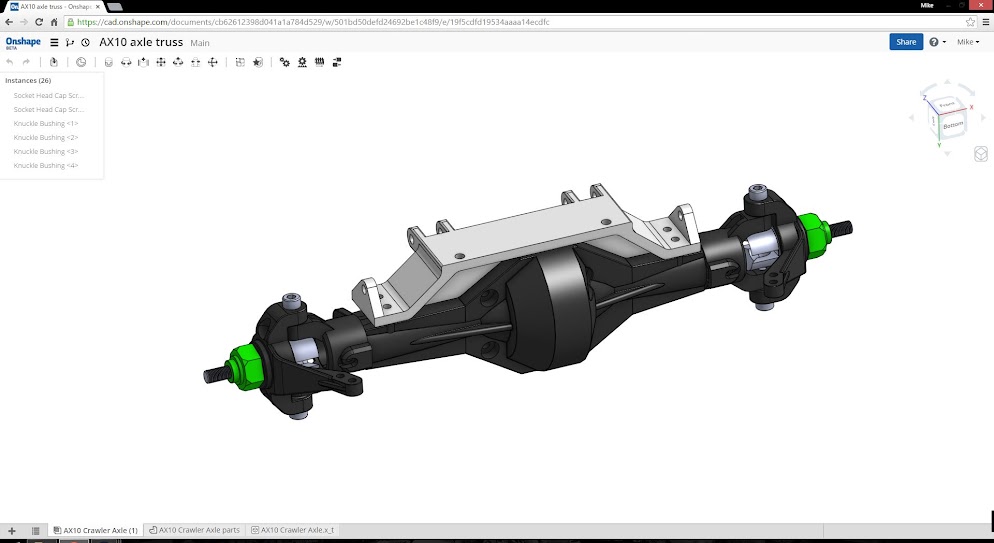 |
|
| |
|
04-16-2015, 09:52 PM
| #87 |
| Suck it up!   Join Date: Mar 2008 Location: Arkansas
Posts: 11,652
|
Fancy!
|
|
| |
|
04-17-2015, 12:13 PM
| #88 |
| Quarry Creeper Join Date: Feb 2011 Location: The underground
Posts: 394
|
I'm looking forward to being a tester!
|
|
| |
|
04-22-2015, 06:32 PM
| #89 |
| Web Wheeling Join Date: Jan 2005 Location: Twin Cities
Posts: 3,004
|
The 3d prototype verified that everything fits the way I want  I spent a good chunk of my weekend, and the past couple nights finishing up the panels for the computer console. The panel fitment is far from perfect, but good enough for now. I will probably redo the black side panels at some point.  All of the small details I wanted to wrap up before cutting parts again are complete. And last night I placed a order with Tormach for some 1/4" solid endmill holders and a superfly cutter. This will free up some of my ER20 tool holders for small drill bits, and more small endmills. I am going to work on a tool database, numbering every size and variation of endmill, drill bit, and other cutters that I think I might use. Something along the lines of T10 1/8 2F short T11 1/8 2f long T12 1/8 2f long 0.010CR T13 1/8 2f ball T14 1/8 4f short T15 1/8 4f long T16 1/8 f4 ball T17 1/8 mill drill T18 1/8 reserved T19 1/8reserved T20 start 3/16 block This way, I know that any tool in block 10 is a 1/8 bit, block 20 3/16, 30 1/4, 40 3/8, 50 1/2. and above that will be drill bits. I will use block 1 for my setup tool, edge finder, flycutter, and drill chucks. I will create the same tool table, with the proper tool holders and tool stickout length into bobcad. |
|
| |
|
04-23-2015, 08:06 PM
| #90 |
| Web Wheeling Join Date: Jan 2005 Location: Twin Cities
Posts: 3,004
|
Loving the superfly after the first test cut! Which also happened to be the first cut since the rebuild.  The finish is awesome, sure beats running a 1/2" endmill back and forth. Though this also made it very apparent that my Y axis is out of tram, you can see the step towards the back.  I also picked up a height gauge, so I can do away with touching off my parts with a tool. So far it seems like this will be more repeatable. 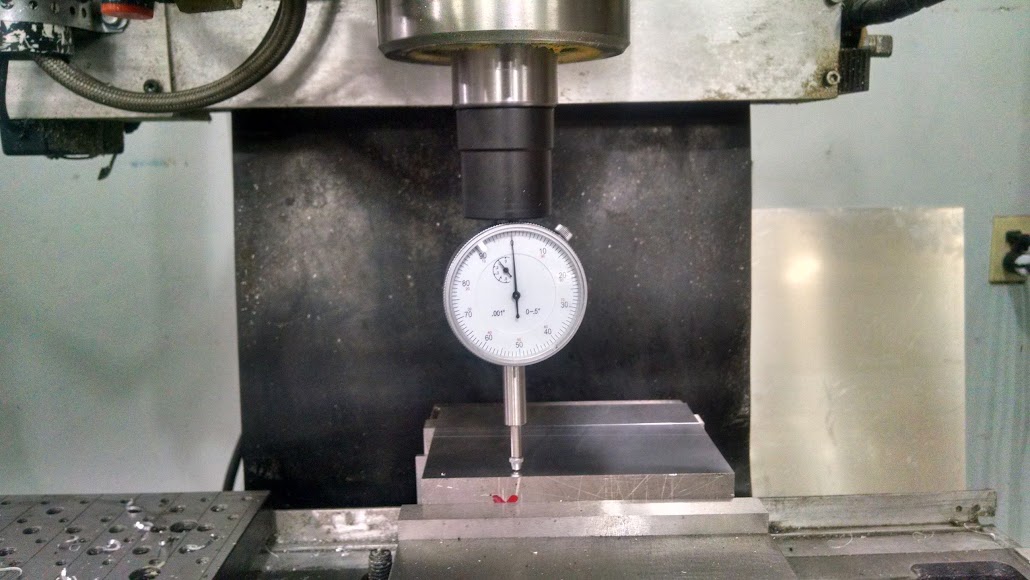 I checked how far off my tram was since the tool was loaded up. I'll definitely have to address this soon, 0.002" in 2 inches is far to much. 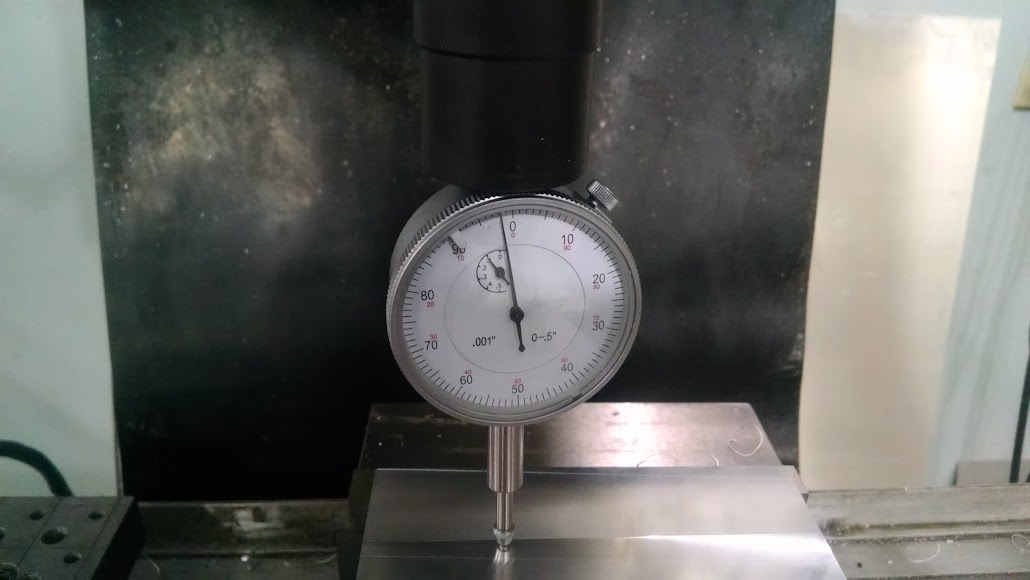 I measured all of my tools that I had loaded up, and entered them into the tool library. Going to start programming the truss tomorrow, and hopefully start machining Saturday. |
|
| |
|
04-23-2015, 08:08 PM
| #91 |
| Suck it up! Join Date: Mar 2008 Location: Arkansas
Posts: 11,652
|
Those superflys are pretty cool, and yeah, they make it pretty obvious when you're out of square. My fly cutter told me that my column leans a bit to the right. |
|
| |
|
04-23-2015, 08:40 PM
| #92 |
| I wanna be Dave Join Date: Oct 2004 Location: QC-AZ
Posts: 2,352
|
Glad you got it all running again! Tram is certainly a four letter word isn't it. Lol x2 on the super fly. I've been using it in place of a 1/2" end mill as well. Even to square stock. How many tool holders do you have? Pretty sure that is going to be my next big purchase. I hate swapping over and picking up length offsets for each job (5 er20's and 2 drill chucks). |
|
| |
|
04-23-2015, 09:03 PM
| #93 |
| Web Wheeling Join Date: Jan 2005 Location: Twin Cities
Posts: 3,004
|
10 er20 holders from China, 2 drill chucks, and 10 solid endmill holders. That should keep me happy for a little while... But I am sure I will want more. I would go insane if I only had 5 holders! At least tts holders are a fraction of the cost of bt40 tool holders like we have at work. |
|
| |
|
04-23-2015, 09:38 PM
| #94 |
| I wanna be Dave Join Date: Oct 2004 Location: QC-AZ
Posts: 2,352
|
Haha. It was a starter set until I figured out what I was doing... still not sure I'm there!
|
|
| |
|
04-24-2015, 08:33 PM
| #95 |
| Web Wheeling Join Date: Jan 2005 Location: Twin Cities
Posts: 3,004
|
I cut the first side of my truss tonight using a single hsm toolpath feature. 3/8 2F carbide endmill with a 0.015" corner radius 5500RPM 50IPM 0.375" Depth of cut 0.100" stepover It ripped through this part pretty quick with those settings and the high speed machining toolpath. I also only spent about 10 minutes in bobcad, setting up my stock, origin for the first two opperations, and rough toolpaths for both sides. I might need to machine a soft jaw to fixture it for the last 3 opperations.  And the first side finished.  |
|
| |
|
04-25-2015, 07:11 AM
| #96 |
| I wanna be Dave Join Date: Oct 2004 Location: QC-AZ
Posts: 2,352
|
Damn, get some! Impressive numbers and nice part. |
|
| |
|
04-25-2015, 09:21 PM
| #97 |
| Web Wheeling Join Date: Jan 2005 Location: Twin Cities
Posts: 3,004
|
Thanks rob It was a long day in the garage today, but I finally have a useable prototype. I also machined 3 sets of blank soft jaws, used one set to machine the part. Had one opps moment, when I went to drill the top side holes I forgot to enter the tool height offset into my tool library.... All of the tools have a default height of 0.000, so it went straight through the truss, and pretty deep into my new soft jaw Here is the prototype part on my trail rig, need to figure out my servo mount tomorrow.  And some bozo put my servo on backwards |
|
| |
|
04-30-2015, 08:01 PM
| #98 |
| Web Wheeling Join Date: Jan 2005 Location: Twin Cities
Posts: 3,004
|
Well I placed a order with Enco last night since they had a 25% off sale. I have some pitbull clamps, and a angle plate on the way. Also ordered a Noga mini-cool setup, should be a step up from the WD40 spray bottle. I am to lazy to build a DIY fogbuster, and to cheap to buy one. So tonight I did a little cad work on how I think I will setup a fixture for drilling and machining the ends. They will be bolted to the fixture plate. I could probably nest them a little closer, and hang some of the fixture plate off the ends of the angle plate as well.  I'll work on a fixture plate design for the other setups soon using the pitbull clamps. |
|
| |
|
04-30-2015, 11:40 PM
| #99 |
| I wanna be Dave Join Date: Oct 2004 Location: QC-AZ
Posts: 2,352
|
Very nice. I almost bit on enco as well. What size pitbulls? I really like the set I got (4-40 knife edge). How do you like on-shape?
|
|
| |
|
05-01-2015, 05:02 AM
| #100 |
| Web Wheeling Join Date: Jan 2005 Location: Twin Cities
Posts: 3,004
|
8-32 blunt edge clamps, the clamping force was much higher over the 4-40 set. And with the heavy cut I am taking, I might need it. There are some things that Onshape does better, and other things were it still feels a bit clunky. They are constantly improving it, and I am sure that the few things that feel clunky to me will change. |
|
| |
 |
 New toy for the shop, CNC Mill - Similar Threads
 | ||||
| Thread | Thread Starter | Forum | Replies | Last Post |
| CNC Router/Mill by Shapeoko | 89redranger | Tools, and Procedures | 15 | 06-30-2013 09:22 AM |
| Anybody have any experience on a minitech cnc mill/2? | klabeaume | Tools, and Procedures | 2 | 07-27-2012 02:27 PM |
| CNC Mill on the Cheap. (colorado) | dezrik | Chit Chat | 0 | 12-06-2008 08:40 AM |
| Pics of my new cnc mill. | BENDER | Tools, and Procedures | 18 | 11-22-2007 12:38 AM |
| Taig CNC mill | bret4 | Tools, and Procedures | 6 | 09-22-2006 01:54 PM |
| |


 Linear Mode


