| |
| |||||||
 |
| | LinkBack | Thread Tools | Display Modes |
 07-30-2005, 08:45 PM
| #1 |
| Colt Python/SR9c  Join Date: Feb 2004 Location: out in the shop, reloading ammo!
Posts: 8,626
|
As we all know,the Emaxx tranny is a very strong transmission. One of the downfalls though is the slop that the shifting gear gives it.While trying to climb obstacles,you will see that when you stop, the truck will roll back a foot.So in this writeup, you will see how simple it is to lock the tranny into 1st gear.There are many ways to do this,but I will just show you the basic idea. Start off by taking 5 screws out that run along the outside of the trans.You can leave the one screw in that is next to the shifting rod. Last edited by TwistedCreations; 07-30-2005 at 09:20 PM. |

|  |
| Sponsored Links | |
| | |
|
07-30-2005, 08:53 PM
| #2 |
| Colt Python/SR9c Join Date: Feb 2004 Location: out in the shop, reloading ammo!
Posts: 8,626
|
Next- Gently take the transmission apart.At the bottom, you will see the output shaft with the 1st and 2nd gear and the shift rod carrier attached to it. Gently take that out of the trans. Pay close attention that there are 2 small washers on that shaft. There is one small washer at each end, on the outside of the gears.Make sure you keep track of those or your gearing will be in a bind when putting back together. Once you get the shaft out, you will see the center carrier has 2 prongs sticking out on each side. Those slide into the grooves into the gears when shifted. With the big slot that the gears have, that is what causes the "slop". (side note) - 1st gear is 36 teeth and 2nd gear is 31. 1st gear is on the right in the pic below |
|
| |
|
07-30-2005, 09:02 PM
| #3 |
| Colt Python/SR9c Join Date: Feb 2004 Location: out in the shop, reloading ammo!
Posts: 8,626
|
Next is to attach the carrier to the 1st gear. There are different ways to do this,but I have yet to have one problem from it this way. I take 2 small button head screws ( 6-32 screws) that have course thread and use those. By using fine thread screws,you run a higher risk of them stripping out.
Last edited by TwistedCreations; 07-30-2005 at 09:23 PM. |
|
| |
|
07-30-2005, 09:04 PM
| #4 |
| Colt Python/SR9c Join Date: Feb 2004 Location: out in the shop, reloading ammo!
Posts: 8,626
|
Next I take the carrier and drill a hole in each prong.I start with the smallest bit I have and finish with a 7/64" drill bit. I then thread the screws in and out of the holes making it easier when installing.
|
|
| |
|
07-30-2005, 09:12 PM
| #5 |
| Colt Python/SR9c Join Date: Feb 2004 Location: out in the shop, reloading ammo!
Posts: 8,626
|
After taking the screws back out,I put the 1st gear onto the carrier. While holding the carrier in your hand,turn the 1st gear clockwise until it stops. You will then see the holes you drilled through 2 of the gaps in the 1st gear. While running your truck forward,that gear is turning clockwise.So by turning the gear that way,it gives the gearing more support than trying to only rely on those screws to hold it. So once it is lined up,screw the small screws down.You will need to push the button heads down as far as you can. If the head of the screw is sticking up at all, your gears will grind inside the trans covers. I then usually run some beads of super glue between the gears ( where they connect) and a few other drops all around to give it the extra insurance. here are 2 pics of the gears screwed together. Pay attention to how the heads of the screws are below the face of the gear. Last edited by TwistedCreations; 07-30-2005 at 09:23 PM. |
|
| |
|
07-30-2005, 09:15 PM
| #6 |
| Colt Python/SR9c Join Date: Feb 2004 Location: out in the shop, reloading ammo!
Posts: 8,626
|
Next thing to do is start putting it back together. Slide the gears back onto the output shaft.* REMEMBER* about those 2 little washers that goes on the outsides of the gears before you put it back together. Now gently slide the whole shaft back into the trans and make sure all the gears are lined up right.
|
|
| |
|
07-30-2005, 09:17 PM
| #7 |
| Colt Python/SR9c Join Date: Feb 2004 Location: out in the shop, reloading ammo!
Posts: 8,626
|
You can take the actual shifting fork and set it aside. Now slide the other half of the trans cover back on and screw it back together.You can now remove that screw that you had left in earlier that was located next to the shifting rod.Now put the trans back into the truck and go crawling. (motor plate is custom made, so it is not the original maxx motor plate) Last edited by TwistedCreations; 07-30-2005 at 09:25 PM. |
|
| |
|
07-30-2005, 09:56 PM
| #8 |
| Quarry Creeper Join Date: Jul 2005 Location: Oran, MO
Posts: 347
|
Very good and informative write up. You could also add a portion on removing the 2nd gear to lower weight and rotational mass.
|
|
| |
|
07-30-2005, 10:22 PM
| #9 |
| Pebble Pounder Join Date: Jun 2005 Location: fort bragg, ca (NOR-CAL)
Posts: 192
|
Good tech artical, i think you should link this thread to the "Building a maxx crawler" thread. colin |
|
| |
|
07-30-2005, 11:04 PM
| #10 | |
| Colt Python/SR9c Join Date: Feb 2004 Location: out in the shop, reloading ammo!
Posts: 8,626
| Quote:
As for the article,I mentioned that there are different ways to do it and that i was just showing the fastest and most simple way. you can take out 2nd gear, but need to make spacers to fill the area where the gears were Last edited by TwistedCreations; 07-31-2005 at 06:08 AM. | |
|
| |
|
07-30-2005, 11:20 PM
| #11 |
| RCC Addict Join Date: Nov 2004 Location: Redding, CA
Posts: 1,288
|
Nice article. |
|
| |
|
02-26-2006, 04:08 PM
| #12 |
| RcBros Hobbies   Join Date: Nov 2005 Location: Oregon
Posts: 4,646
|
i just did this mod but the trany is about the thickness of 2 pieces of paper from closing. Any ideas?
|
|
| |
|
02-26-2006, 05:02 PM
| #13 |
| RCC Addict Join Date: Apr 2004 Location: Cincinnati Ohio
Posts: 1,673
|
You probably have one of the gears in backwards.
|
|
| |
|
02-26-2006, 05:25 PM
| #14 |
| Pebble Pounder 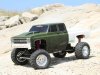 Join Date: Sep 2004 Location: Sideways on a 3/8 mile on clay
Posts: 181
|
thanks for the info on this im going to use to longer screws and make it so i will still use both gears and not have as much play. if someone is making that carbon motor plate plz let me know i like to buy one Last edited by kickback_crawler; 02-26-2006 at 10:31 PM. |
|
| |
|
03-03-2006, 05:35 AM
| #15 |
| Rock Stacker  Join Date: Feb 2006 Location: Grovetown
Posts: 59
|
When you remove the shift fork a quick an easy way to plug the shaft hole is with one of these fuel line plugs..... http://www2.towerhobbies.com/cgi-bi...p?&I=LXG848&P=7 It's a press fit, and just before it bottoms out, put a drop of thin CA on the shaft, and shove it home. Oh yeah......clean the oil out the hole first ... |
|
| |
|
03-03-2006, 05:41 AM
| #16 | |
| Colt Python/SR9c Join Date: Feb 2004 Location: out in the shop, reloading ammo!
Posts: 8,626
| Quote:
Clean out your PM box | |
|
| |
|
12-02-2008, 05:04 PM
| #17 |
| Quarry Creeper Join Date: Aug 2008 Location: Gadsden, Alabama
Posts: 198
|
To remove 2nd gear, could you just grind down the 2nd gears, leaving just enough to act as the spacers you would need to replace the 2nd gears?
|
|
| |
|
05-29-2011, 11:20 PM
| #18 | |
| Quarry Creeper Join Date: Sep 2007 Location: mountains of ca
Posts: 317
| Quote:
Is this something that can be done? And work? Getting ready to do this and curious | |
|
| |
|
| |


 Linear Mode


