| |
| |||||||
 |
| | LinkBack | Thread Tools | Display Modes |
 01-08-2022, 05:15 PM
| #1 |
| Quarry Creeper Join Date: Nov 2020 Location: Greece
Posts: 399
|
Santa brought a nice little package, so about time to get it open and see what's in it  Killerbody Marauder II for TRX-4. Unlicensed open-top Defender, with a roll cage and some scale plastics. Comes with 324mm wheelbase. This body will go on my Camel Trophy chassis, which is 334mm wheelbase, so I will need to make the rear arches a bit larger than the outlined design.  Windscreen and dashboard come on a seperate piece of lexan. Cut everything and the body comes out and around 230gr in weight. Not a bad start since I'm aiming at a low weight build as much as possible.  The roll cage is made of plastic. The quality seems OK although it's only 80gr . It should be able to take a couple of hits and rolls  Did a test fit to see how everything comes together. I like this open top look. Might even cut the rear part of the roll cage to make it more truck-like  At first I was thinking to use magnets to mount the body on the chassis, but after using Bronco's clipless system on my Camel Trophy Defender, I knew I had a winner. It's going to be a challenge to make it work, but I have some ideas about it.  |

|  |
| Sponsored Links | |
| | |
|
01-08-2022, 10:04 PM
| #2 |
| Rock Crawler Join Date: Mar 2016 Location: Zagreb, Croatia
Posts: 747
|
I think shortening the wheelbase on your chassis would be a better idea. Have fun building! |
|
| |
|
01-09-2022, 05:29 AM
| #3 | |
| Quarry Creeper Join Date: Nov 2020 Location: Greece
Posts: 399
| Quote:
That's not an option. I'll put it on the chassis bult for this rig --> TRX-4 Camel Trophy D110 Project so going back and forth everytime will be a nightmare. Extending the wheelbase is easy on this. Just mark and cut the wheel arches more on the rear. | |
|
| |
|
01-09-2022, 05:51 AM
| #4 |
| Rock Crawler Join Date: Mar 2016 Location: Zagreb, Croatia
Posts: 747
|
Yeah, but then you'll have a centimeter of nothing in front of the rear wheels |
|
| |
|
01-09-2022, 08:49 AM
| #5 | |
| Quarry Creeper Join Date: Nov 2020 Location: Greece
Posts: 399
| Quote:
Maybe I'm missing something here, but I don't understand what you mean  | |
|
| |
|
01-10-2022, 05:42 AM
| #6 |
| Quarry Creeper Join Date: Nov 2020 Location: Greece
Posts: 399
|
This body can be fitted in 2 different wheelbases, 312mm and 324mm and it has marked cutlines around the rear arches for both. I used the one made for the 312mm on the front of the arch and made another cut around 10mm to the rear to make the wheelbase 334mm. ^^ It came out like the above picture. Killerbody has included a bunch of plastic goodies with this. Not Traxxas quality plastic, but decent ones. Comes with it's own inner fenders, although I won't be using them, since I will install the clipless system  Hard plastic fender flares. I thought about using those, but the plastic is too hard and don't have any flex in it. I fear it could damage the body against the rocks. So I'll probably use the Traxxas ones that have in my parts box which are made of rubber.  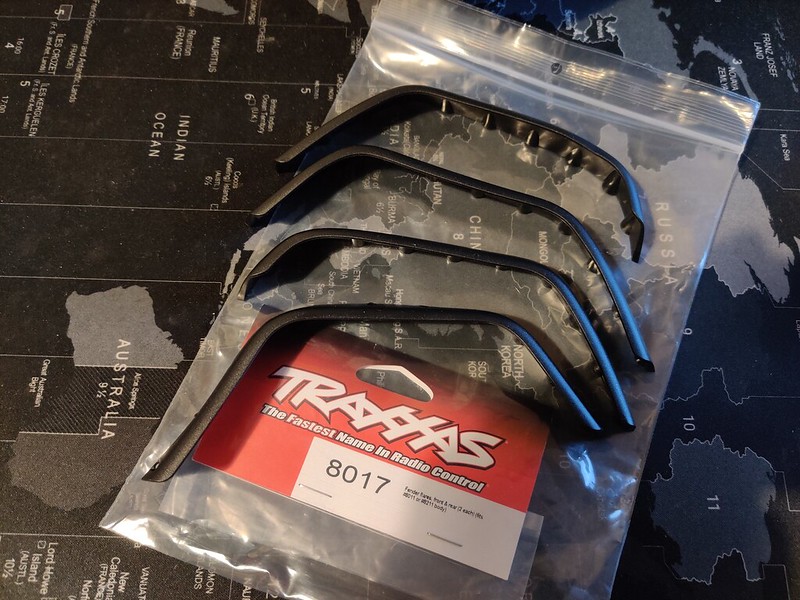 Some more plastic scale parts. Again the mirrors will be an issue against the rocks, so might go the same route as the flares.  At first the plan was to use the whole Bronco body cage, but It's not really needed and will add extra weight. So I'll just keep the parts needed. It has screw holes exactly below the area needed so I'll use them to mount the inner part that the flares will hold. This will provide an extra point for the clips to hold on the body and add strength.     The good thing with these clips, is that since I'm mounting them on the body as well, I will be able to adjust the height of the body with some spacers. |
|
| |
|
02-02-2022, 05:12 PM
| #7 |
| Quarry Creeper Join Date: Nov 2020 Location: Greece
Posts: 399
|
Hadn't realised it's almost a month since I updated this thread. Haven't done any real progress on it. I've been waiting for some parts to get here and have been delays. Hopefully I will have the package tomorrow, so I've started doing some side work on it. I haven't started painting the body yet, because I need a clear view inside to mark the holes for the flares. I did paint the seperate pieces however. Colors of choise for this rig will be Tamiya PS-21 (Park Green), PS-5 (Black) and PS-55 (Flat Clear). The PS-55 will be sprayed on the outside to take the shiny effect off and protect the decals.  I painted the front windshield and then used the inner window masking on the outside as well. I followed the lines of the wipers to cut it. When sprayed with the clear paint, it will leave a clear area to simulate how it looks in 1:1 vehicles.   I'll be using this bumper on this rig.  I don't have plan on using a real winch with it, but thought that it will look much better with one and already had the parts to make a faux one. 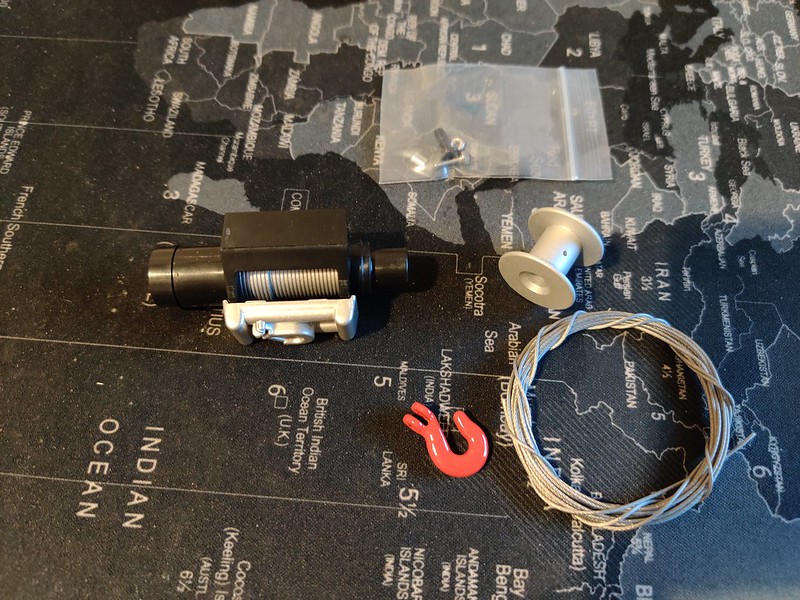 Printed some Warn stickers, clear coated the whole thing and added another fairlead.  Came out pretty nice. Nothing fancy, but makes the bumper look so much better    |
|
| |
|
02-06-2022, 05:35 PM
| #8 |
| Quarry Creeper Join Date: Nov 2020 Location: Greece
Posts: 399
|
Now that the inner fenders finally got here, it's time to get this project going. I picked up the pace the last couple of days, because we'll have some really good weather tomorrow for painting the body, so had to finish all the prep work on it and get it ready. So, 8018 inner fenders. I needed those to mount the Traxxas fenders. I didn't expect them to be so soft. Thought they were going to be like the normal fenders. They were easy to cut even with a kithen knife. Front ones: 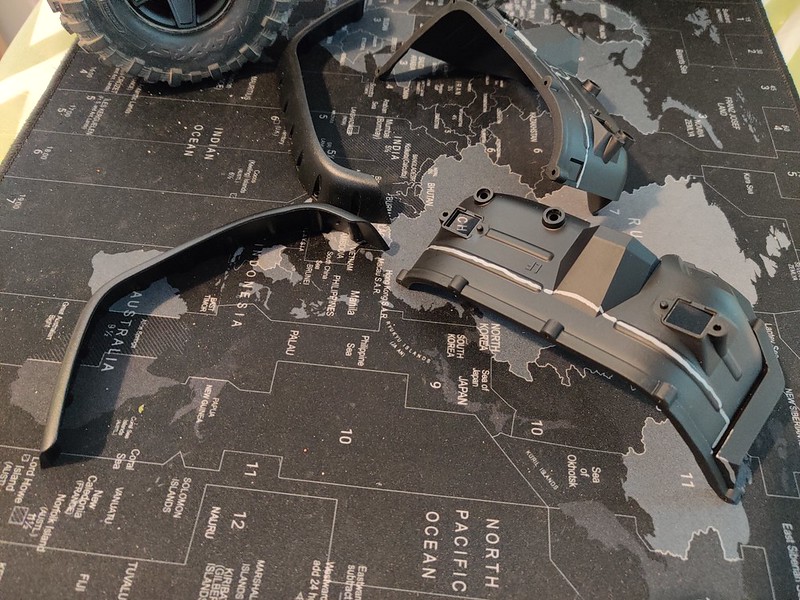  Rear ones:  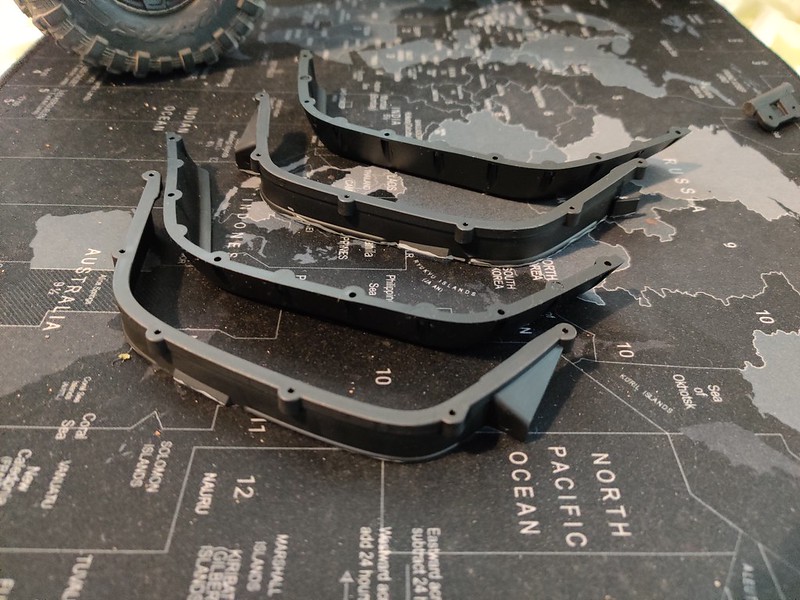 Hole marks made on the body   And some fine trimming on the fender to clear the already installed fenders. The flat piece left on them, is for mounting them on the clipless system as well, for extra strength.  I got Traxxas grille and headlights set for the Defender, to install the Defender lighting system, but they are smaller then the ones that came with this body.  I went ahead and drilled the holes for the lights anyway.  I might be able to get away with the headlights parts, but the grille does look odd.  I might end up using the original grille instead 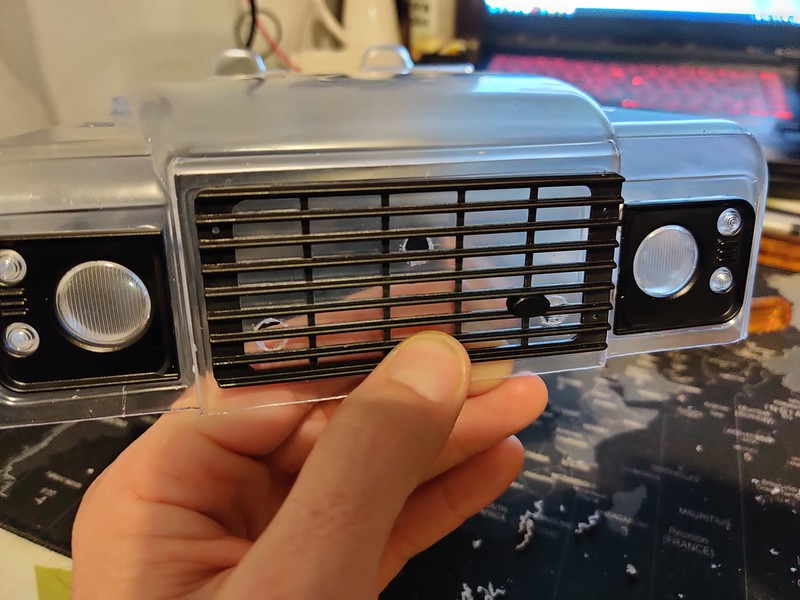 Next was Traxxas mirrors and snorkel set. Again dimensions are a bit off, so some modding was needed.  The snorkel and the right mirror are supposed to mount on the same piece on the inside, but that is not possible with this body. So had to seperate them.   The mirrors were tricky to get there. Because of the way the are mounted, the interior wouldn't allow access to put the screw. I came up with this in the end and drilled a hole on the inside to put the screw. Will probably cover it with something after I paint the body.   The tail lights of this body are different than the Traxxas Defender ones. I made a pattern on paper and marked the holes. Took a while, but finally got there.  So, after a lot of measuring, thinking things over and over again, testing mounting, and a rimming marathon the body is almost ready for painting.    Made me appreciate how easy it is, when the body comes pre-cut and all the holes are drilled from the factory. Tomorrow I'll give it a good wash, get the masking down and hopefully finish painting. |
|
| |
|
02-08-2022, 06:15 PM
| #9 |
| Quarry Creeper Join Date: Nov 2020 Location: Greece
Posts: 399
|
We've got color!     Everytime I have to do a 2 tone design, I really appreciate how good Tamiya masking tape in doing the job right. Check the outline of the truck bed.  Then it was time to highlight some of the deep lines on the car (doors, bonnet etc). Adds a nice touch and a realistic look of depth to them. Some people use sharpies, but I think they come out very exaggerated, so I prefer to use a thick pencil.   I came up with an ingenious solution (🤣🤣) for the smaller headlights problem. I used some vinyl sticker and a marker to cover the area.   The decals were applied around the car and the interior.   Weather permitting, tomorrow I'll clear coat everything and install the mounting system. |
|
| |
|
02-10-2022, 07:51 PM
| #10 |
| Quarry Creeper Join Date: Nov 2020 Location: Greece
Posts: 399
|
I clear coated the body and started assembling the plastic parts. The kit came with bonnet hinges, but didn't really liked how they looked, so installed these ones I had lying around. They are actually working hinges, so it gave me ideas to cut the bonnet and make it open, but maybe on a later time.  The interior looks better clear coated too.  Went with the kit's grille after all. It makes the car look much better.  This engine cover from GRC is supposed to fit the Mercedes G500, but I think it works really well on this body.  Some more plastic bits that came with the kit 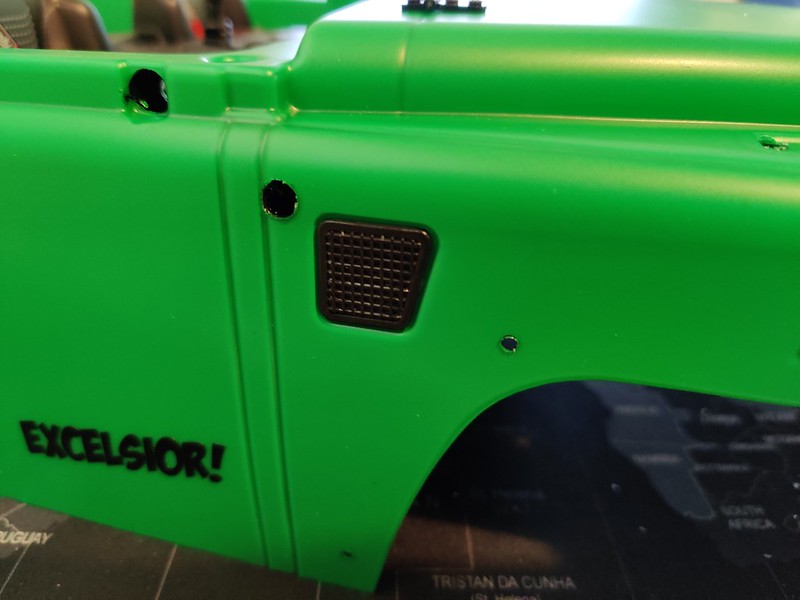  And the Traxxas Defender mirrors. These gave me a hard time to install them. I finally dropped the plastic inner piece and went with flathead screws that go in from the interior. Hopefully they will hold against the rocks.  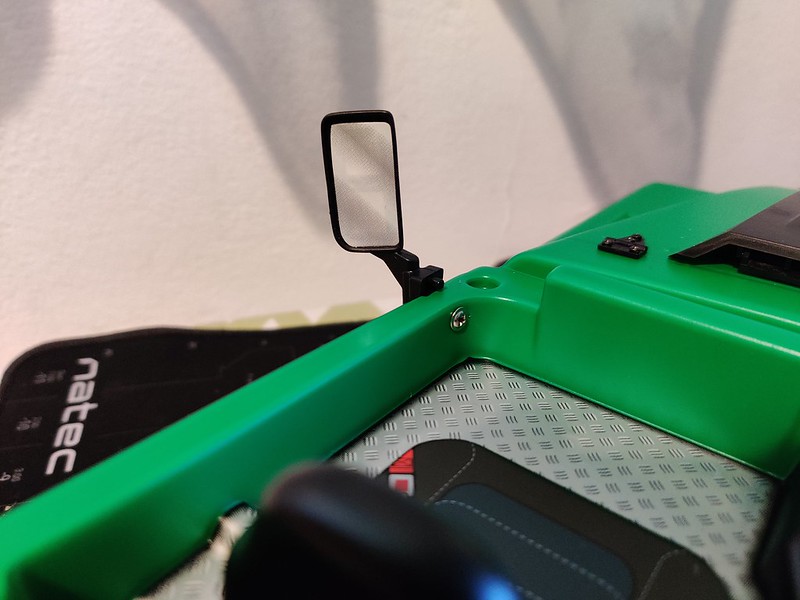 After installing the bits and pieces, it was time for the clipless system. First the fenders and flares   The front one comes out exactly in the engine vents areas. Some spacers were used to give extra support against the body and it was also mounted on the inner fender flares.    Same on the rear. The screws and nuts on the truck bed will be painted black.  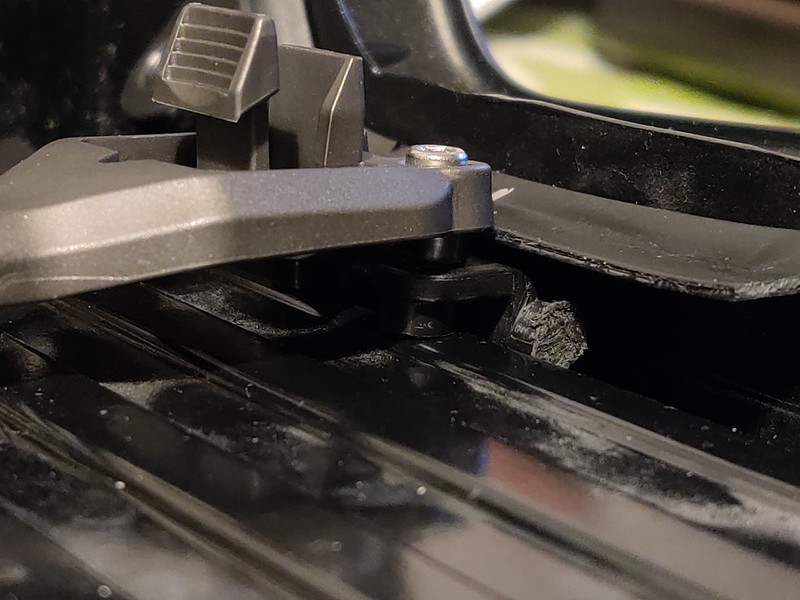  I'm not a great fan of the visible screws style fenders, but in this case they do fit the project   |
|
| |
|
02-11-2022, 06:18 PM
| #11 |
| Quarry Creeper Join Date: Nov 2020 Location: Greece
Posts: 399
|
Managed to get some time to do some more work on this today. Found these engine vents from Team DC, that are perfect for the job. They are elevated enough to hide the nuts that hold the clipless system. Even came with a tool for the tiny screws.  They blended nicely with the rest of the bonnet   This light bar will go on the roof. I tried powering it through a 9V battery and it's super strong. I plan to make a switch for it to be able to turn it on, without having to take the body off. 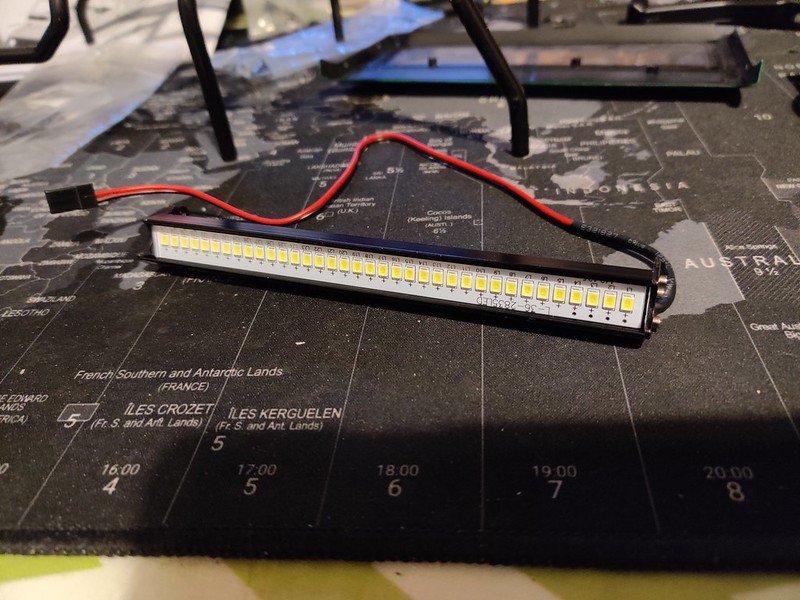 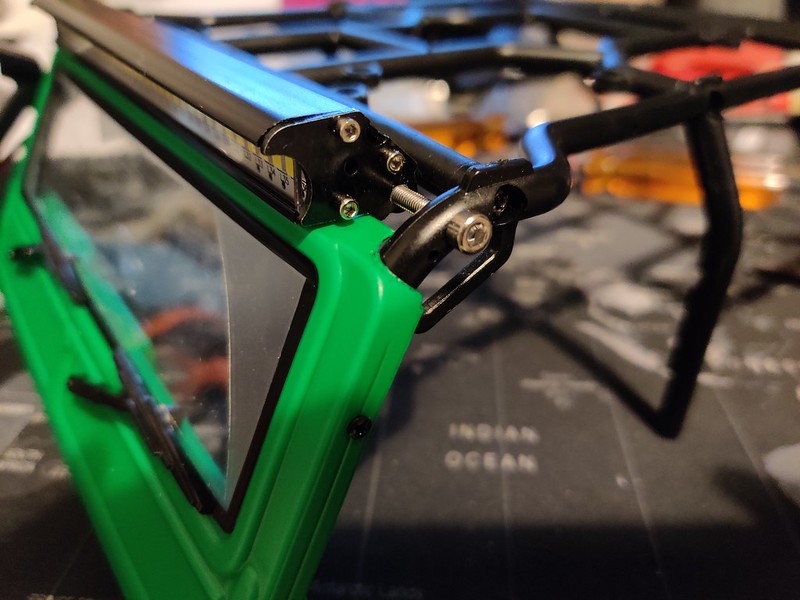 The Traxxas Defender snorkel, had to be trimmed a bit to fit.  Once that was done, the roll cage was ready to be installed on the body.   |
|
| |
|
02-12-2022, 06:30 PM
| #12 |
| Quarry Creeper Join Date: Nov 2020 Location: Greece
Posts: 399
|
Got the switch installed, and without soldering a single wire 🤣🤣 It came with JST plugs, so I just trimmed the side on the male one, and used a servo 1to3 Y splitter plug. Wrapped it in electrical tape, job done!   The switch comes out on the gear decal, so it actually looks like a shifter stick   I painted the Traxxas lights with some Tamiya clear paints. They come with color LEDS but the clear plastic makes them look un-realistic when not lit. 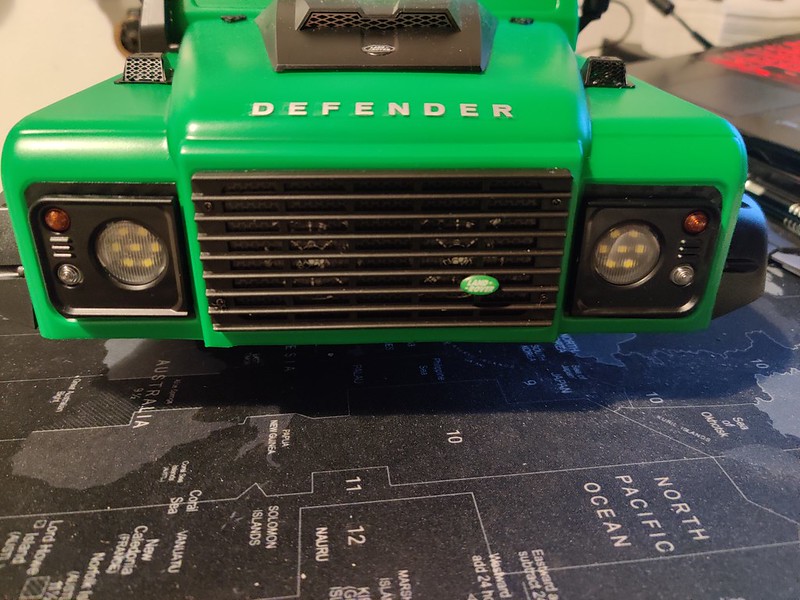    The front came out OK, at the end. For the rear, I decided to use some vinyl tape to make the lights outline. I'm not totally sure I like it, but I'll leave it for now. |
|
| |
|
02-15-2022, 05:50 PM
| #13 |
| Quarry Creeper Join Date: Nov 2020 Location: Greece
Posts: 399
|
I had my eyes on the ProLine Trencher G8 tires for some time now, and this project was the perfect opportunity to try them out. So they are finally here and ready to install.  I'll be using my 1.9 Injora 5 spoke wheels with them, along with some lightly used ProLine dual stage foams.     They fit perfectly on these rims. I'm glad I went with the G8 compound, because even that feels a bit soft for the temperatures we get here. I'm a bit concerned about the clearance at full compression but I might just get away with it. Will have to test them on the trail to know for sure. Looks pretty close, however.  |
|
| |
|
02-19-2022, 03:34 PM
| #14 |
| Quarry Creeper Join Date: Nov 2020 Location: Greece
Posts: 399
|
This build is a tribute build, so about time to get the man of honor into the car.  Stan Lee. The creator of so many comics heroes and basically the reason Marvel is what it is today. The guy created Spider-Man, Thor, Hulk, X-Men and so many more that kept me company on my youth. Passed away on 2018, but his legacy will be with us for a long time. Excelsior! was his signature phrase and moto for life. It's a Latin workd, meaning ''ever upward!''. Thanks for the memories, Stan! I tried to keep this build as clean as possible, so not many scale items on it. Just a couple of these storage boxes will go on the truck bed, to serve a certain purpose.  Stan will be carrying some of the tools of his trade, along with him.  And the first appearance of his favorite character of them all.   Found this elastic luggage net from Injora, that seemed like it belongs right into this.  It fits nicely below the roll cage.   Did a little light test to check everything works OK        Stan looks happy with the setup so far! 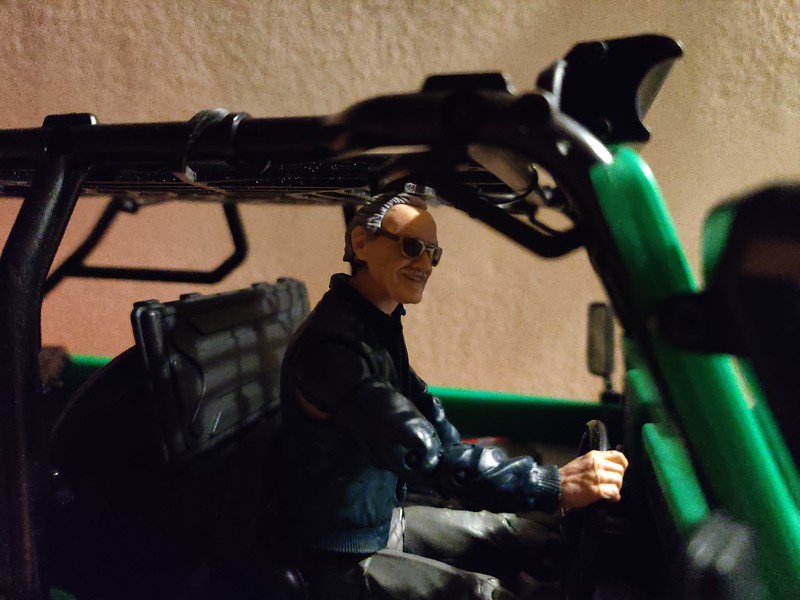 Tomorrow he's going to hit the trail, to see what the car is capable of, and get some proper pictures on the wild. |
|
| |
|
02-23-2022, 01:08 AM
| #15 |
| Quarry Creeper Join Date: Nov 2020 Location: Greece
Posts: 399
|
Finally got it out on the trail. Got some pictures, tested the Trenchers and got the first scratches 😂 I like how the Trenchers perform, and they seem to hold well the weight of the car with the Dual stage foams from Proline. But I have the feeling that they might be too soft, when the weather gets a bit hotter. We'll see. I definetely need to make adjustments to the suspension because it's too bumpy. I think I'll try some 20wt oil and maybe softer springs.        |
|
| |
|
03-25-2022, 06:24 PM
| #16 |
| Quarry Creeper Join Date: Nov 2020 Location: Greece
Posts: 399
|
Been a while since I had a run with this one. Mostly because a friends kid almost destroyed when I made the mistake to give it to him, without putting it to training mode. The result was broken lexan in 3 corners. So had to wait for some E6000 glue to get here to make the repair, along with some Fibatape. Anyway, it's fixed now and almost no visible damage. I guess this is what happens when you pass the remote to a kid that has zero respect for crawlers 😂. Oh well, lesson learnt the hard way. I didn't get any pictures of the repair process. I was eager to finish with it and get it right. Today we took this one and the Slash down a nearby beach area and had some good time there. Not many areas to crawl but some nice trail spots. It was that perfect time of day leaving/night coming when we headed for the car, so had the chance to actually drive it with the lights on. I realized I didn't have the roof light on, only after I saw the photos on the pc 😂 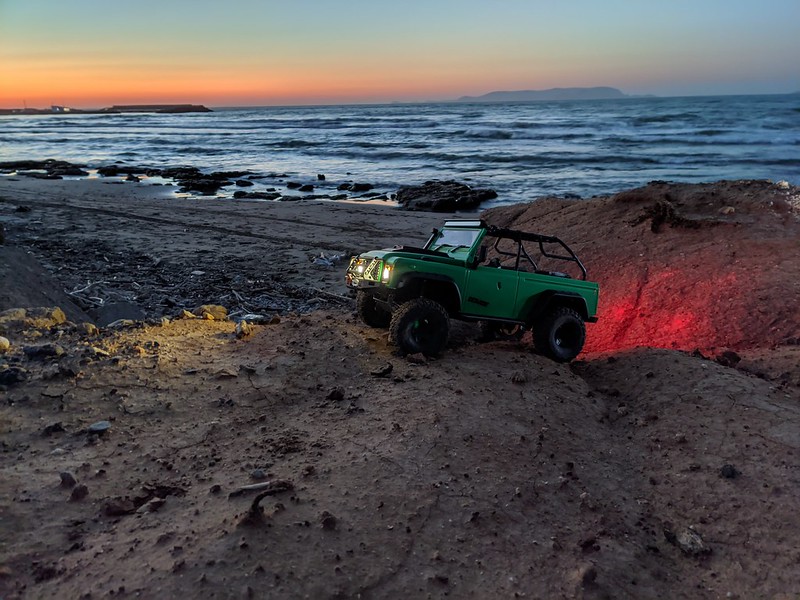  |
|
| |
|
03-28-2022, 04:03 PM
| #17 |
| Quarry Creeper Join Date: Nov 2020 Location: Greece
Posts: 399
|
Stan went fishing today. Had a good catch 😁😁  |
|
| |
|
03-28-2022, 04:22 PM
| #18 | |
| RCC Addict Join Date: Jan 2019 Location: Corvallis, OR
Posts: 1,562
| Quote:
Thats one creepy mofo. Defender looks great out there though Sent from my iPhone using Tapatalk | |
|
| |
|
03-28-2022, 05:24 PM
| #19 | |
| Quarry Creeper Join Date: Nov 2020 Location: Greece
Posts: 399
| Quote:
Scared the hell out of the kids | |
|
| |
|
03-28-2022, 05:44 PM
| #20 |
| Quarry Creeper Join Date: Nov 2020 Location: Greece
Posts: 399
|
Got some footage while at it |
|
| |
|
 Excelsior! Defender Project - Similar Threads
 | ||||
| Thread | Thread Starter | Forum | Replies | Last Post |
| Defender Sawback project | notarex | G-Made Sawback | 22 | 01-20-2016 04:09 PM |
| New project defender 110 | giviko | 1.9 Scale Rigs | 14 | 09-21-2012 10:41 AM |
| new project defender 90 | giviko | 1.9 Scale Rigs | 23 | 08-22-2012 01:19 AM |
| D90 defender project | jmarsh1976 | 1.9 Scale Rigs | 4 | 04-18-2012 08:28 AM |
| Defender 110 project | gegegum | 1.9 Scale Rigs | 112 | 01-16-2010 12:31 PM |
| |


 Linear Mode


