| |
| |||||||
 |
| | LinkBack | Thread Tools | Display Modes |
 11-17-2014, 08:19 AM
| #1 |
| Rock Crawler Join Date: Feb 2007 Location: Crawling Around
Posts: 871
|
Hey, everyone. It's time for a build thread on this truck I'm playing with. I'll try to space it out a bit, as there's a ton already done, and I'd like to put in the details on the thread. First, lets start with a Blazer Kit from Vaterra:  That got some GCM parts added, a 2 speed Twin Hammer Transmission, Dinky R/C Cantilever Kit out back, Dirt Grabber Tires, 90mm front shocks, servo, 35t brushed motor, 3s Lipo, BRXL, HeyOK LED switch, HeyOK Relay Winch controller, 9g Shifter servo, and MIP shafts. Some other stuff I'll talk about later. So, it looks like this now, and it's a full running truck with a 2 speed on 3s. FUN.  |

|  |
| Sponsored Links | |
| | |
|
11-17-2014, 08:20 AM
| #2 |
| Rock Crawler Join Date: Feb 2007 Location: Crawling Around
Posts: 871
|
I'm aiming for a look and feel like this one here:      |
|
| |
|
11-17-2014, 11:41 AM
| #3 |
| Rock Crawler Join Date: Feb 2007 Location: Crawling Around
Posts: 871
|
After the full GCM Ascender Combo went in, there was finally some space in the middle. The full interior I want to use in this truck requires some changes to the setup... so I took after the technical stuff first, so I can build around that. First off, I dropped the stock shocks on the truck, including the rear shock towers.. which are like Cell Phone Towers... The front got some 90mm shocks, and the rear got a canti kit to flatten things out. This required change required some other things to change also.. considering the limitations of the Blazer kit and the stock 109mm shocks front and back.   I used an Axial SCX radio box, bolted beside the steering servo, in the same mount bar. Then added some styrene to cover the spur and pinion (from wires) and then made up a battery holder inside the box.   This worked out very cool, because the whole running gear on the truck, electrics included, are in the nose. ALL OF IT. The 3s battery pops out in a second for a quick change, and the whole electronics is up front beside it, so when it's covered... it's all covered. |
|
| |
|
11-18-2014, 05:28 AM
| #4 |
| Rock Crawler Join Date: Feb 2007 Location: Crawling Around
Posts: 871
|
Slamming the truck this far required a bit of a steering bar drop, so I added a 3mm spacer to the link, under the high-steer arm. It's perfect now. I also added a 3mm spacer TO the steering bar in order to get the proper toe setting and steering deflection on the truck.. which is also perfect now.  The slammed truck means I had some link issues also. The panhard was made to center the axle with a 109mm long shock, so I took 3mm OUT of the panhard length. Done. I also had the front lower links hitting the frame and the panhard rod hitting the servo, so I made a 1 deg bend in those to clear stuff. Done. Then I shortened the front top link 3mm to get a proper castor angle on the front hubs. Done. These are the sorts of things that drove me mad about this kit, but they are easily fixed with some noodle power. The cool thing is now the truck is completely running, steering, shifting, and zooming around, and it doesn't require any other bodywork or interior or any details to run. MEANING... I can build multiple bodies for this truck now, and nothing on the running gear has to change at all! YAY! Plus I got to drive it around. HAHA |
|
| |
|
11-18-2014, 08:51 PM
| #5 |
| Rock Crawler Join Date: Feb 2007 Location: Crawling Around
Posts: 871
|
I got the clear lid notched out a bit around the bumper mount posts on the truck so I can 'fit check' it and have a sort of standard to go by, where it will sit time after time after time, and be in the same place. This works great to keep the thing from flopping around while I'm trying to measure stuff and build stuff... like measuring this chuck of PopCorner Box I used for a template. (please sit down, I'm about to use styrene....) 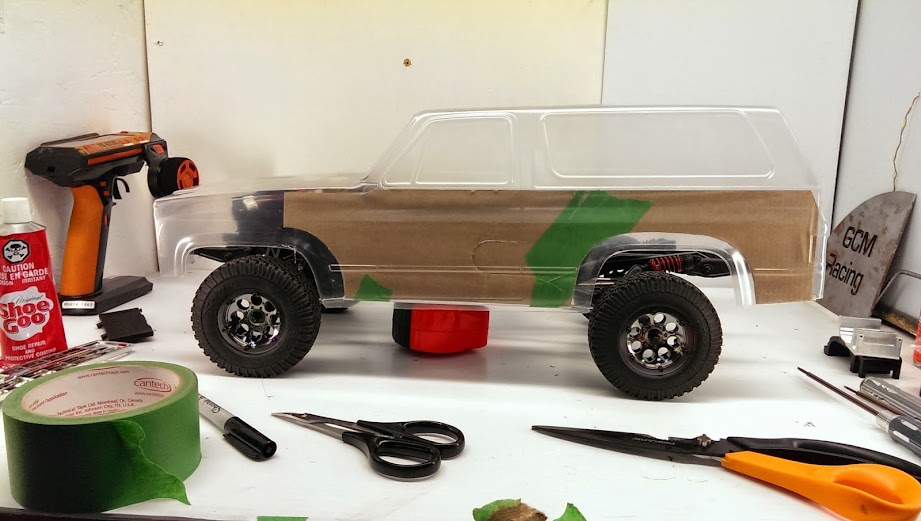 I am over the styrene-fobia now. It's official. For some reason having a bunch of flat sheets didn't make me confident, but as soon as I bought this little 3/8 corner angle, my whole attitude changed! It's like lego to me now. So funny! So.. I dropped on a couple of brackets on the frame, then shooGoo'd some 2.75 x 7 inch long flat plates to the brackets, and they match the factory 'floor' position, according to the door sills on the body etc. Very happy.  After proving the template worked, I cut some flat inside panels, made some angle braces up at the dash and tailgate, mostly as a support only, and likely temporary. The rear bumper bolts also got these temporary brackets so I can slide on and off the body real easy and get it lined up well and fast for this phase of on-off-on-off interior work. It's very handy that the body is clear and I can match interior lines with window lines etc with less guess work. This is why I like lexan somedays.  I needed some inner fenders, so.. I cut some stuff and rolled it and put elastics on it. Then with some heat they eventually stayed that way and turned into some cool half moon shapes so I can use them.  |
|
| |
|
11-18-2014, 08:56 PM
| #6 |
| I wanna be Dave  Join Date: Jul 2009 Location: Rancho Relaxo. California. USA. Earth.
Posts: 3,292
|
Love those blazers! Looking good Mr. GCM.
|
|
| |
|
11-18-2014, 09:00 PM
| #7 |
| I wanna be Dave Join Date: Oct 2007 Location: Castle Rock, WA
Posts: 8,785
|
Nice start and good idea on forming inner fenders. Tires look good on that body setup. |
|
| |
|
11-19-2014, 06:57 AM
| #8 |
| Rock Stacker Join Date: Feb 2011 Location: North of the border.
Posts: 59
|
Great start! I'll definitely be following this.
|
|
| |
|
11-19-2014, 07:06 AM
| #9 |
| Rock Crawler Join Date: Feb 2007 Location: Crawling Around
Posts: 871
|
THanks, guys. After unrolling my inner fenders, I taped them under the wheel arch to get the perfect support on them, because the arch is precut and the unrolled fender just fits right into the edge perfectly. So nice! The tape lines up stuff nicely also.  After dropping some glue to bond the styrene joint, I added a few of these little angle parts around to stiffen up stuff and make me feel better about the seams.  |
|
| |
|
11-19-2014, 07:06 AM
| #10 |
| Rock Crawler Join Date: Feb 2007 Location: Crawling Around
Posts: 871
|
After the inner fenders were ready to play, I cut some INNermost fenders... whatever you call that inside the fender part.. anyway.. that thing. I actually used the same cardboard template for this, but extended it out like a floor brace toward the tailgate, as you can see from the reference pics, the cargo area has a slightly higher floor than the cabin, so this will make that a perfect match once I lay in the floorpan in the back. The cool part is the stock looking inside fender totally covered up the canti suspension out back, and you'd never see it.. and it's a stock representation in the look and size of the fender. Nice. This is one time the narrow rear frames on scale trucks comes in handy, even if it's not 'scale'.  I got thinking that the little support angle bracket I put out back wasn't much of a waste, because it's holding stuff together real nice at the moment, and I'm going to keep it! haha. |
|
| |
|
11-20-2014, 05:48 AM
| #11 |
| Rock Crawler Join Date: Feb 2007 Location: Crawling Around
Posts: 871
|
If the rear fender looks like it's too high, remember this is a 3.75 diameter tire, so I need room to make a larger tire fit, and it's also at full suspension droop. The tire almost makes contact at full twist, and besides the fender is actually at the stock position on the bodywork from the pics I can find. You'll see more of that later. 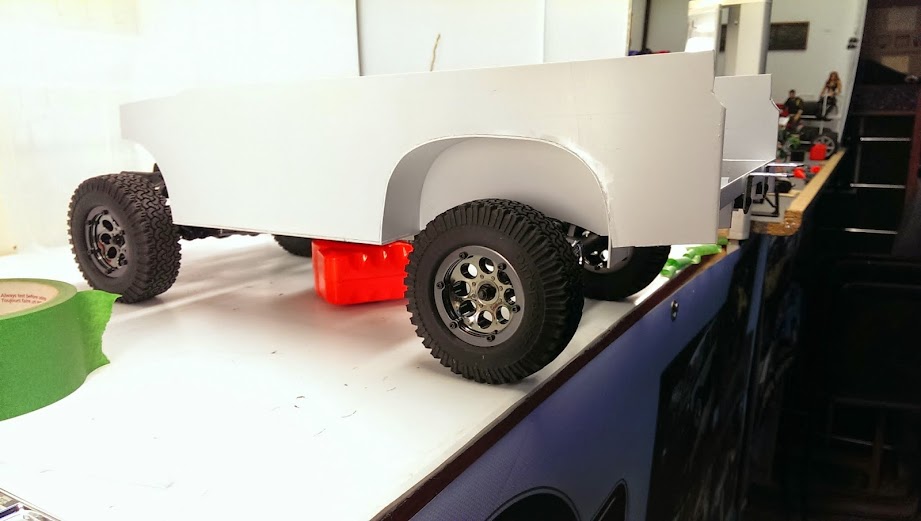 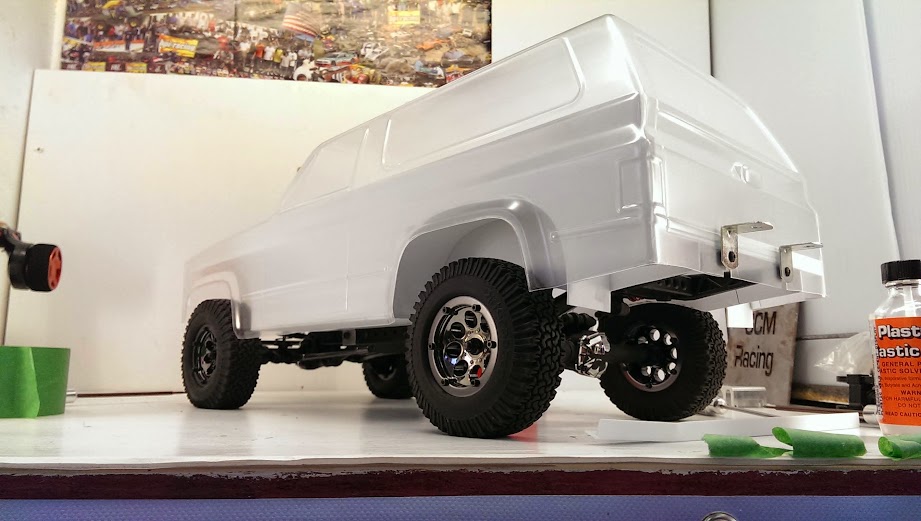 |
|
| |
|
11-20-2014, 05:49 AM
| #12 |
| Rock Crawler Join Date: Feb 2007 Location: Crawling Around
Posts: 871
|
Time to make a tunnel cover. The shift servo sticks out a bit more than the rail on the right side of the truck, so I though of 2 options. I can make the tunnel cover go around the servo, or make the tunnel cover a bit wider all around, and I went with option 2. I also went anti-scale and didn't make a round cornered tunnel, it's just a square corner jobby, and was simple to make. Started with the side rails, which are flat sides, and an angle on top to get a nice large surface for the top plate to glue and be solid.  Oh, yeah.. I added some stamped steel details to the rear floor also.  |
|
| |
|
11-20-2014, 05:50 AM
| #13 |
| Rock Crawler Join Date: Feb 2007 Location: Crawling Around
Posts: 871
|
The top of the tunnel is nice and flat, and makes mounting stuff really easy. In fact, I'm going to make sure the tunnel is easily removable so I can do all the center section driveline maintenance from the TOP instead of tearing off the interior every time I have to fix a set screw or whatever. Anyway, the interior basic looks like this now:  |
|
| |
|
11-20-2014, 06:46 AM
| #14 |
| I wanna be Dave Join Date: Sep 2011 Location: Douglassville, PA
Posts: 4,224
|
Very well done so far! Not sure if it's staying that way, but I love the lowered look with the smaller tires
|
|
| |
|
11-20-2014, 06:58 AM
| #15 | |
| Rock Crawler Join Date: Feb 2007 Location: Crawling Around
Posts: 871
| Quote:
 | |
|
| |
|
11-20-2014, 10:45 AM
| #16 |
| Rock Crawler Join Date: Feb 2007 Location: Crawling Around
Posts: 871
|
Made up some front inner fenders for this truck.   It may look a bit odd, but I wanted it to bolt to the frame and the shock tower, even though it's also welded right to the floor pan, as well as the 'side panel' for the interior.  These were made to fit super tight, so even under severe conditions, barely any dirt will pass by the fender up into the body cavity. It's a nice fit, and the blazer (even though tapered oddly) is pretty easy to work with. I had to make the left one flat inside, but the right side one had to go around the ESC and the radio box, so it was a bit more work. I'm really happy with them though. They bend around right up to the back of the front bumper, so nice protection.   |
|
| |
|
11-20-2014, 10:45 AM
| #17 |
| Rock Crawler Join Date: Feb 2007 Location: Crawling Around
Posts: 871
|
You can see here from the 'back seat' looking forward the inner fenders come right down behind the dash to the floor pan. Really there's tons of room for a driver of any imaginable size here. I'm sure I can get a full figure inside with ease.  This pic below gives you the image of the coverage underneath. All of it. HAHA  |
|
| |
|
11-20-2014, 03:51 PM
| #18 |
| Pebble Pounder Join Date: Nov 2012 Location: madera
Posts: 149
|
Wow that is bad ass man nice job so far.
|
|
| |
|
11-20-2014, 04:25 PM
| #19 | |
| Rock Crawler Join Date: Feb 2007 Location: Crawling Around
Posts: 871
| Quote:
Some more tech here. I managed to locate some of those tiny 1/4 diameter rare earth magnets locally.. so I bought everyone they had... as it's seems to be a 'rare' item HAHA I was looking for some way to attach the center hump without having the screwdriver out. The instructions with these little magnets said to sandwich them in the middle of 2 pieces of steel for maximum effectiveness. So.. I did. They are CA'd to a metal bracket and then they contact the stock frame rail in the center.   I know, we men are said to NOT read the directions for things, but in this case, I'm glad I did.. you can now officially lift up a 5 pound truck with the center hump cover.. thanks to these 4 tiny magnets! HAHAHAHA  | |
|
| |
|
11-21-2014, 07:51 PM
| #20 |
| Rock Crawler Join Date: Feb 2007 Location: Crawling Around
Posts: 871
|
Now the harder stuff. Dash. I realized at this point I have no idea what I'm doing. So, I thought that it may be best to try to build the dash like an airplane. I know how to build airplanes. Yes I do. The idea was to build a foundation, and then make it look nice afterwards. I used the front crossbrace under the windshield for a base, and then added a 1/4x3/8 rectangle on top of that, so the dash could be 'located' over and over again onto the angle, but use the rectangle as the main bar for the dash setup. On that rectangle I started gluing chunks of styrene that were bent, rolled, shaped, heated, cut, etc until I ended up with a 'foundation' that looked like this on the top, and underneath. UGLY.   I started to do the front panel detail next. Basically mapping out where stuff should go based on this reference picture:  My method was to get a finishing face sheet (0.015) and do a basic outline cut on it, then map out the features. I started with the 2 center gauge rings, placing them, and then dusting on black primer to see where to cut out the background. 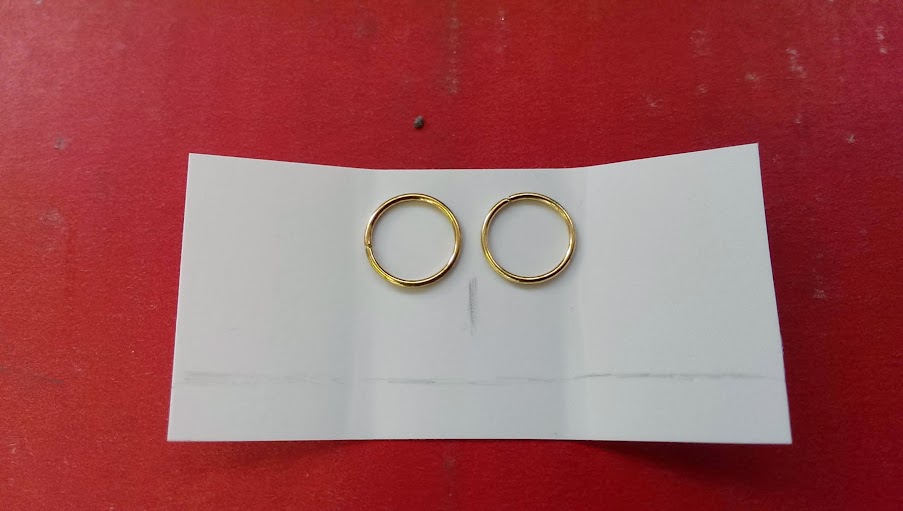   I added the side round rings, and cut out the right side rectangles for those recesses also. Then I actually glued back on the brass rings, as a bezel, and final painted the whole bezel as a finished unit. |
|
| |
|
 GCM's 1986 M1009 Blazer Build - Similar Threads
 | ||||
| Thread | Thread Starter | Forum | Replies | Last Post |
| RCBuzz - Vaterra Ascender (1986 Chevrolet K5 Blazer) | RCBuzz | Vaterra Ascender | 2 | 11-12-2014 09:15 AM |
| Badger's 1986 Chevrolet K-5 Blazer Ascender | badger | Vaterra Ascender | 3 | 09-30-2014 12:16 PM |
| River Ridge #9 - Dana's Blazer and GCM's Hilux Vid | Generis | Scale Videos! | 0 | 09-27-2013 10:06 AM |
| 1986 suzuki samurai build | neightfrog | 1.9 Scale Rigs | 32 | 06-12-2009 02:16 PM |
| |


 Linear Mode


