| |
 01-03-2019, 06:15 AM
| #61 |
| RCC Addict Join Date: Sep 2017 Location: The OC
Posts: 1,615
|
Ah, the axial axles are a lower ratio. IIRC they also come with a 20T pinion and 87T spur. I've been looking over this chart Rich posted some time ago for Vaterra - I think I'll start with 12-88 which gives me 54.87, see how that does. About a 20% gear reduction from stock. My other rig I put a 45T motor in it with stock gearing and I like the way it crawls. I'm going the other way on this one just to see and compare. Nothing like anecdotal experience.  Losi has a compatible 48-pitch spur in 88T, a seller on ebay had them for just a few bucks. I would like to find a 10T pinion - I got a 12 from RPP. Even it is pretty small. 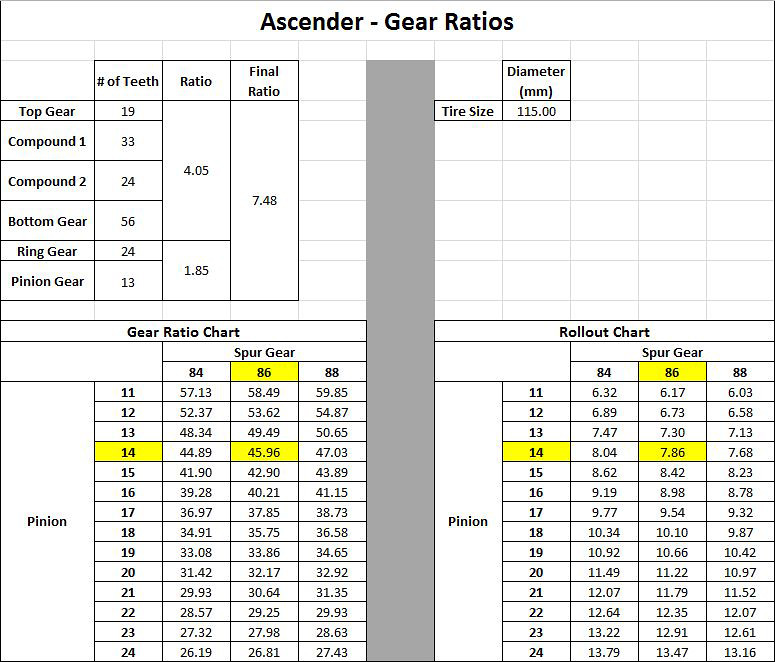 |

|  |
| Sponsored Links | |
| | |
|
01-05-2019, 01:36 PM
| #62 |
| RCC Addict Join Date: Sep 2015 Location: Southern Maine
Posts: 1,024
|
Started on the roll cage. Total eyeball engineered but thats what works for me. Used 3/16 brake line because thats what I had, its easy to work with, and looks scale to me. Fired up the trusty Lincoln mig welder and made some welds to grind down.   Thinking just two bars for the rear angled down right from the top bar. Pinched in a bit to be even(ish) with the frame rails. Could mount a spare tire to it if I wanted to. Ben Sent from my iPhone using Tapatalk |
|
| |
|
01-07-2019, 05:19 AM
| #63 | |
| I wanna be Dave Join Date: Apr 2012 Location: Merrill, WI
Posts: 2,328
| Quote:
Sent from my Vivo XI+ using Tapatalk | |
|
| |
|
01-07-2019, 10:19 AM
| #64 | |
| I wanna be Dave  Join Date: Jan 2006 Location: Corruptifornia
Posts: 12,107
| Quote:
| |
|
| |
|
01-07-2019, 05:14 PM
| #65 |
| RCC Addict Join Date: Sep 2015 Location: Southern Maine
Posts: 1,024
|
Rear tubes done and spare tire mocked up. Kinda want the tire but hate to have that much weight back there. This truck really impressed me when I had it out with just the body but kinda want the full scaler look too so Im not sure just yet. Plus Im cheap and the thought of buying another set of Talley wheels and two tires just to have a spare is a big pill to swallow. I hate the mismatched spare tire look so none of my other wheels and tires will do.    The last picture everything is just sitting there, not mounted up so thats why its as crooked as it is. Its not laser straight, but not that bad either lol Ben Sent from my iPhone using Tapatalk |
|
| |
|
01-08-2019, 06:44 PM
| #66 |
| RCC Addict Join Date: Sep 2017 Location: The OC
Posts: 1,615
|
Personally I like how they did this 1:1 resto job. This is an absolutely cool Blazer. Anyway, I'm kinda done with spare tires. I know they're all the rage, but it seems like they just add weight without much eye-appeal. It seems to be a scale fad to have a spare tire. I was always trying to fit one on just cuz everybody else had one. Besides the saving by not buying all those spares. I end up with way too many wheels to be doing that. [shrug] Nice custom building there. I would put a seat back there with a babe, er, passenger. Or some other cargo.  Last edited by Browneye; 01-08-2019 at 06:47 PM. |
|
| |
|
01-08-2019, 08:23 PM
| #67 |
| RCC Addict Join Date: Sep 2015 Location: Southern Maine
Posts: 1,024
|
Chris, I like your thinking! Im am going to have to find the right figures to ride along in this truck for sure. Ive got a few ideas for a driver but need to find them. I did find a website once that you can get any person made into a doll but lost the site. The guys at SBG had a link once. Anyway, thats a ways down the road for sure. Im thinking the spare tire is out for now, backseat which may serve as a battery box too, maybe a tool box with some recovery tools etc and some ladies! lol. Gotta get working on the interior some more now. Ben |
|
| |
|
01-09-2019, 10:45 AM
| #68 |
| I wanna be Dave Join Date: Jan 2006 Location: Corruptifornia
Posts: 12,107
|
I usually forgo spares for all reasons mentioned, mostly they're heavy and up high. Could use a plastic wheel, could even cut it in half and just use front half of tire/wheel depending on how it's mounted. Or skip the spare and back seat, but a couple milk crates with some spare parts, tool box, hi-lift jack....honey goes in front passenger seat. Don't forget your cat (or dog). |
|
| |
|
01-22-2019, 06:59 PM
| #69 |
| RCC Addict Join Date: Sep 2015 Location: Southern Maine
Posts: 1,024
|
Got a little more work done. Got my 70mm arb shocks mounted up. With the leaf spring pivots freed up, it was very uncle buck like in the rear. Had to get some shocks on there. Took the internal springs out, put some left over shock oil from ascender kit in them and called it good. Welded a bolt to the u-bolt for a lower mount, sorta scale. Was able to drill and tap the stock crossmember and use that for a top mount. This is the most scale position I could go with and still get full suspension travel. Kind of stalled with front half of interior but will get my mojo back. Im bummed out with electronics right now. Found a too good to be deal on eBay for a new brxl with cc bec for about half price. Jumped on it and powered it up only to find a glitch in the throttle curve that I couldnt tune out. Contacted HH and have sent it off to them for diagnosis. I dont think its their fault and they even sent me a paid for shipping label so Im not worried about that, just bummed I got burnt buying electronics second hand. I want the brxl so I can run 4s power. Why? BECAUSE! lol.   Sent from my iPhone using Tapatalk |
|
| |
|
01-23-2019, 10:16 AM
| #70 |
| I wanna be Dave Join Date: Jan 2006 Location: Corruptifornia
Posts: 12,107
|
Looks good, but I've found that the rear will work better (more stable and less flop over prone if the rear shocks are stood up almost vertical. My TF 90mm shocks are mounted at top to last hole just inside the frame rails and travels good too. Really noticeable when sidehilling across a crevice. Sucks when people sell bad electronics without full disclosure, hopefully you get it worked out. |
|
| |
|
06-15-2019, 12:58 PM
| #71 |
| RCC Addict Join Date: Sep 2015 Location: Southern Maine
Posts: 1,024
|
So, its been buggin me that I started this whole build around the axles, and planned on tucking the motor low and inside of the frame rails up front. Life and time got away from me, I had a gcm front motor kit and said, screw it, use that do I can use the truck. Well, I put it in, tested the truck once and havent touched it since. After staring at it and some recent talk about offset axles and low forward motor mounts, I went back to the drawing board and this is what Ive got now...  Howd I get there? Took quite a bit actually. After much fitting and trimming stock motor plate, I realized that I was never going to get the motor low and meet up with the transfer case I had in place. I wasnt willing to move that much because I had already made custom driveline for it and didnt want to change that around. SO.... I mirrored the transmission. If the a@ial boys can do it, so can I! Not quite so easy. Had to machine the rear half trans case to let the motor plate sit flush...  Here are the double mint twins...   Then had to machine a new input shaft because the input gear is offset from center, cant just put shaft in from the other side, (yeah, thats what she said....) By machine, I mean cut two new grooves for the snap rings and drill the hole for the drive pin for the input gear.  Then I needed to see how it fit in the frame and how low could I get everything. Then I made a crude but effective mount. Even went full race mode with weight reducing holes. COG ya know!...   Support bracket...  Everything clears by the hair on my chinny chin chin.    I also had to flip my skid, so I could get the transfer case to be offset to passenger side, and then swap transfer case shafts around to get the input to the passenger side to get the input and front output driveshafts to jive with just enough room for upper front link to clear. The trans to transfer driveshaft is crude, it was the one I made for it in the gcm position but is very smooth and miraculously fit even with all of these changes so I went with it. Just showing another option of low front motor position thats allowed with an offset front axle. Heres my other one from my other custom motor mount...  Oh, and yes, this is running a 550 can motor. Loving the big block power for sure! Ben Sent from my iPhone using Tapatalk |
|
| |
|
06-16-2019, 01:04 PM
| #72 |
| I wanna be Dave   Join Date: Apr 2010 Location: Oakridge
Posts: 3,305
|
Very nice out of the box thinking Ben!!! Angle on the drive shaft from tranny to T-case not going to steep? I can't tell from the photo angles.It is good to see you building again. Ernie Last edited by CODYBOY; 06-16-2019 at 01:06 PM. |
|
| |
|
06-16-2019, 04:22 PM
| #73 |
| RCC Addict Join Date: Sep 2015 Location: Southern Maine
Posts: 1,024
|
Thanks Ernie. I was on vacation this past week. We were going to go out of state for three days but the kids got a nasty cold so we stayed home. It rained most days so I ended up having some bench time to tinker. The driveshaft from transmission to transfer is actually at a much better angle than before with the gcm mount. Heres a side view.  Now Ive just got to get the gumption to finish off the interior and make mounts for the body. Ben Sent from my iPhone using Tapatalk |
|
| |
|
06-16-2019, 05:50 PM
| #74 | |
| I wanna be Dave Join Date: Apr 2010 Location: Oakridge
Posts: 3,305
| Quote:
Oh, much better photo angle. With your T-case upside down won't all your oil drain through the vent whole!! (That was a funny)!!! It looks good.Ernie Last edited by CODYBOY; 06-16-2019 at 10:23 PM. | |
|
| |
|
09-30-2020, 09:41 PM
| #75 |
| RCC Addict Join Date: Sep 2015 Location: Southern Maine
Posts: 1,024
|
Hey this build has finally got some new life and inspiration! Ive had an rc4ws blazer kit sitting since last Christmas and Ive been just drooling over some super scale chassis like a gcm delta or cmax chassis. But Im just not dropping that kind of money on a toy. Plus Ive got this bad ass (Im kind of biased) chassis that Ive lost all inspiration on because I had mental block on building an interior for the Vaterra blazer lexan body. I had initially thought to put this hard body on but I had put so much thought into making it fit the lexan body I didnt want to mess that up. But the other night I had some time and I really looked at things and wouldnt you know!!,,, I literally just took out 4 bolts, slid the rear chassis forward 3 holes and my wheelbase is spot on! The sliders will even line up mint with the spacers taken out to narrow them up. Like everything just fell into place like I built it for this body instead. Not Ive got a detailed hardbody. Decent interior, I am going to get the door panels from shapeways because Id like a little more detail on the interior. But Im totally pumped to get this build going again. Im sure itll take forever to finish but Ive basically got all of my electronics so the chassis is just about done. Then itll be doing up the body how I want with little details here and there. But I wanted to revive this build and post a few pictures of how it sits tonight. Ben    Sent from my iPhone using Tapatalk |
|
| |
|
10-01-2020, 09:16 AM
| #76 |
| I wanna be Dave Join Date: Apr 2010 Location: Oakridge
Posts: 3,305
|
Good to see you are back on this one Ben!!! I'm sure it will look great with some more of your magic!!! Ernie |
|
| |
|
10-01-2020, 05:13 PM
| #77 |
| RCC Addict Join Date: Sep 2015 Location: Southern Maine
Posts: 1,024
|
Thanks Ernie! Itll probably be touch and go but Ive got pretty much everything I need here except wheels and tires so hopefully Ill get it done in a reasonable amount of time. Winter is coming and Ive got to get the house, yard and vehicles ready for snow so no big rush. I did get the sliders adjusted and fit to the body. Got the esc mounted and new hitec servo installed too.   Sent from my iPhone using Tapatalk |
|
| |
|
10-07-2020, 07:38 AM
| #78 |
| I wanna be Dave Join Date: Aug 2004 Location: central VT
Posts: 2,300
|
That has got to be the most custom Vaterra trans mount setup ever! The first pic almost makes it look impossible to fit the trans-transfer shaft in place, but the following pics make it look almost ideal. Must be your magic camera, or expert building skills. How difficult was it to MIG weld the brake line? I can weld sheetmetal alright by stacking tack welds, but isn't that brake line super thin walled? I'm worried I'd just blow right through it with my .035" wire. What size wire are you using? |
|
| |
|
10-07-2020, 02:15 PM
| #79 | |
| RCC Addict Join Date: Sep 2015 Location: Southern Maine
Posts: 1,024
| Quote:
Ben | |
|
| |
|
12-31-2020, 08:24 PM
| #80 |
| RCC Addict Join Date: Sep 2015 Location: Southern Maine
Posts: 1,024
|
Got a chance to get out with a friend and crawl the rocks at the beach. Ive been there many times but wanted to change things up by running a new rig. So I just put the body on my fresh chassis. I got a new set of gearhead slot wheels and rc4wd rock stompers which were very sticky and had nice foams with them. Heres a few pictures out on the rocks. I was very happy with the performance of this rig. Its super heavy but very stable and predictable on the rocks. Im going to hopefully be able to finish the body with all the scale details I want and have a finished truck soon...(ish). Hope everyone has a happy new year and another year of enjoying our beloved ascenders!!! Ben  Sent from my iPhone using Tapatalk |
|
| |
 |
 Topless Jimmy - Similar Threads
 | ||||
| Thread | Thread Starter | Forum | Replies | Last Post |
| My little Jimmy... lol | Itali83 | Vaterra Ascender | 120 | 09-14-2020 01:39 PM |
| Don't Touch My Jimmy: GMC Jimmy build by CFM | CarterFab | Vaterra Ascender | 31 | 11-01-2015 12:33 AM |
| Jimmy-Yeti | jrkilburn | Axial Yeti | 2 | 08-29-2014 06:36 PM |
| Jimmy Fallon | hotrodsonoma | Chit Chat | 1 | 06-10-2014 10:56 AM |
| can Jimmy do it THIS time? | emaxxjeremy | Chit Chat | 3 | 11-18-2006 12:28 PM |
| Thread Tools | |
| Display Modes | |
| |


 Linear Mode


