| |
 01-17-2011, 01:26 PM
| #1 |
| Quarry Creeper Join Date: Jan 2011 Location: Romania
Posts: 270
|
Hello guys ! Well, first of all, i am one unlucky person Well, i recently bought a Creeper, with a factory flaw (the screw from the pinion on the motor's ax was not tighteen enough and did some damage to my transmission gearbox). Well, while i wait for the replacement items, i thought what can i do.. I read a lot of posts around here on how to tune the Creeper for optimal performance, and i have some questions though: 1) I want to increase the ground clearance....what are my options ? 2) Regarding this picture  could someone make a drawing 1:1 scale of the rear-plate and post it ? Not particular interested with that plate, any plate that respects the principle would do just fine. If there are such drawings, and i overlooked, i apologize. I almost forgot. As i read the posts, someone (well, many guys) suggested that for good performance and avoiding trouble, changing the "swing shafts" with stuff designed for AX 10. I did buy 3Racing Swing Shaft for AX scorpion, but they wont fit. Sugestions ? Regards, Chris. PS. Soon i'll post some pictures with the out-of-the box Creeper and his company - an AX10 Scorpion and a SCX10 Honcho. |

|  |
| Sponsored Links | |
| | |
|
01-17-2011, 04:46 PM
| #2 |
| Newbie Join Date: Jul 2010 Location: Kennesaw
Posts: 28
|
the axle shafts need to be reduced in length. there is a thread where someone described how to do this. i believe ti is in the 'tips and tricks' section. on mine i used the integy hd shafts and i had to cut the fronts down about a 1/2' and the rears a little over 3/4". doing this is kinda tedious, but that goes with any time you have to custom fit something. hope this helps
|
|
| |
|
01-17-2011, 08:25 PM
| #3 |
| I wanna be Dave Join Date: Jan 2006 Location: ...the burning end of the rope.
Posts: 5,013
|
just use the stock servo plate on the front axle to make a template for your rear axle plate...pay special attention to the plate though,,if you look at it mounted on the axle youll notice its offset on the axle center...but you can see the center of the plate if you line it up in regards to the Drive shaft yoke on the front axle..just mark the plate. Better yet get a Paradox Creeper Link plate,,anyone with one will tell you they work...and increase performance. Ground clearance is increased or decreased in a few ways...link geometry and shocks/springs are the most common way to control this. Look at the early pages of my build thread and youll see how I mounted the shocks to the axle and the chassis. The main thing to do for performance is to raise and seperate the rear upper links to reduce torque twist. every other mod I would suggest is in my build thread and the RMDW tips thread. |
|
| |
|
01-18-2011, 02:22 AM
| #4 |
| Quarry Creeper Join Date: Jan 2011 Location: Romania
Posts: 270
|
Thanks guys for your input. @hexonox - it's not necesary a problem of axle shaft length, that would be the easy part i'd say, the problem is that the bering from the inside of the knuckle is too small (part #10120). Anyway, it's not such a big problem, as those shafts would fit just fine on my AX10, and i can order something else from here (i dont recall precisely the thread were i saw this problem mentioned, but i'll find it). @rmdesignworks - i noticed the offset, i even tried to make my own plate, but it's kind of difficult to measure, cut materials and drill holes with my "talejt". That's why i thought a 1:1 scale drawing would help me and make my job easier. I cut and drilled 2 plates, but the holes i drilled for the rear upper links are not in correct position (about 1mm from the imaginary line that is parallel with the rear axle) and it seems to mee that the rig looks kind of strange and not very simmetrical - if i may say so. As for shocks, i use HPI CK Aluminium upgrade, with some HR internal springs (medium), no shock oil at all, and Axial Gray Springs on the outside (medium i think, i dont remember). Anyhow, the ground clearance is 5cm+ (2'' top). For smooth surface, what would be enough (i guess), but i use to abuse the rig on more extreme terrains (my videos on YT can prove that). Normally, i would not be in a hurry, but in a month there will be in my country the first RC Rock crawling contest ever and i dont want to miss it. Not going there for winning, but i want to give the best of me and my rigs (i'll be in with scx10 and the ax10 or venom...havent decided yet). Regards, Chris. LE: @rmdesignworks - i saw the way your shocks are mounted, i mounted mine the same way, yet, the ground clearance is only 2''. My goal is 3 - 3.5'' inches. I ordered last week from HK 2 saddle packs (5700mAh), for mounting on the front and rear axle. I trimmed the foam inside the tyres. So, anyone wheeling to share some drawings ? Last edited by jimmyshor; 01-18-2011 at 02:43 AM. |
|
| |
|
01-18-2011, 03:17 PM
| #5 |
| Pebble Pounder Join Date: Jan 2010 Location: brooklyn
Posts: 161
|
Its from one of the earlier threads !! |
|
| |
|
01-18-2011, 07:31 PM
| #6 | ||
| I wanna be Dave Join Date: Jan 2006 Location: ...the burning end of the rope.
Posts: 5,013
| Quote:
Quote:
The following directions are really the best I can do.. | ||
|
| |
|
01-19-2011, 01:21 AM
| #7 |
| Quarry Creeper Join Date: Jan 2011 Location: Romania
Posts: 270
|
Thanks man. As soon as i have some spare time, i'll give it a shot.
|
|
| |
|
01-20-2011, 02:17 AM
| #8 |
| Quarry Creeper Join Date: Jan 2011 Location: Romania
Posts: 270
|
Ordered these 1)  2)  3) 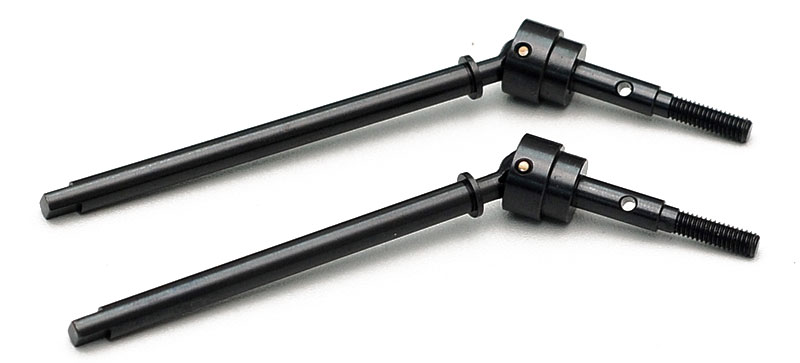 4)  Last edited by jimmyshor; 01-20-2011 at 03:19 AM. |
|
| |
|
01-20-2011, 01:18 PM
| #9 |
| Quarry Creeper Join Date: Jan 2011 Location: Romania
Posts: 270
|
Well, i came from work with my mind set on the Creeper. I bought an digital calliper (i hope i'm not making any mistake, my English is weak), a metal rule, something to scratch (metalic pen i presume it's called), an 2mm thick aluminium plate, 1m long and 3cm wide (the largest i could find). That's all i could find in 4 hypermarkets who sell construction materials. Damn.. Now...starting from RmDesignWorks, i made a plate, 8cm long, 3cm wide. here is the pic:  The screw on the plate (the left one) does not enter the corespoding hole as it should, somehow i managed to "destroy" it - make it a little bit larger. Is there a fix for that ? A M4 screw will do ? Some plastic melted in there ? Solutions ? Regarding this pic, the two gray bars (or spacers, how you like it) are 2cm long, coming from Axial Honcho upgrade kit. As you may notice, the right is lower that the left, maybe because the front is not set-up as the rear....could be anything else ? Ground clearance...aiming for 3 inches now. When the front part will be ready, i think i'll be 3'' - 3.2'' top. That should be enough i guess (though i wanted 3.5'').  The anti-roll bar in the next pic is actually a 8cm link ( a 6cm and 2 cm combined from Axial Dingo Upgrade Kit). Here you can see better that the left part is higher (not by much) than the right one. The front flex is about 6 inches...good or bad ?  The rear flex is about 7 inches....good or bad ? (the picture does not reflect reality, as it was difficult to measure and take photos at the same time). 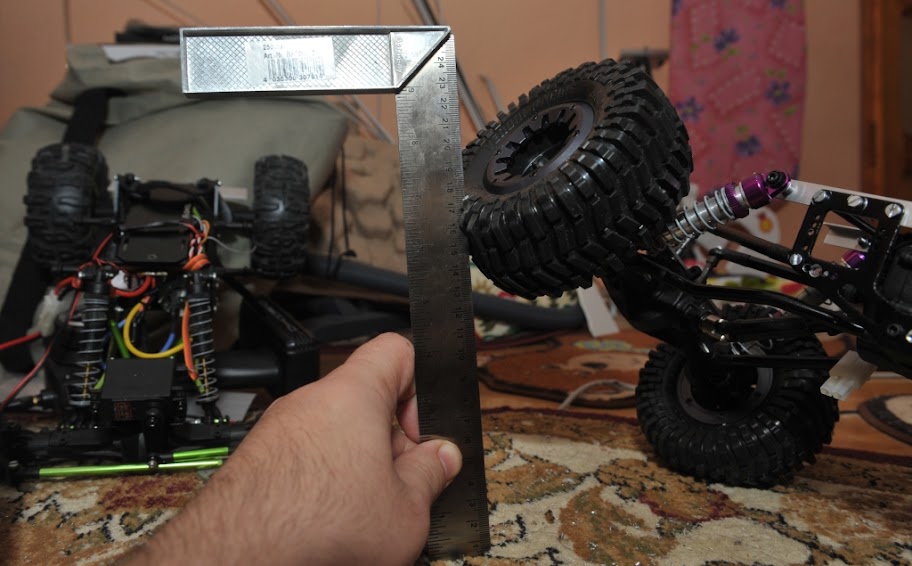 Here you can see it's still stable (i read somewhere that this test must be passed in order to compete). The batteries are not mounted ( they did not arive yet from Hong Kong. In fact, it's a saddle pack of 5.700mAh, and i am thinking to mount one on the front axle and one on the read. Suggestions ?)  I changed the rear and front shafts. I wanted to use JunFac shafts, but i managed to do that only for the front part. For the rear part, i used Diff Hardned Steel Yokes and 1 Truck Long Half Shaft (from Traxxas). I had to cut some of it, but finally it turned out well.... 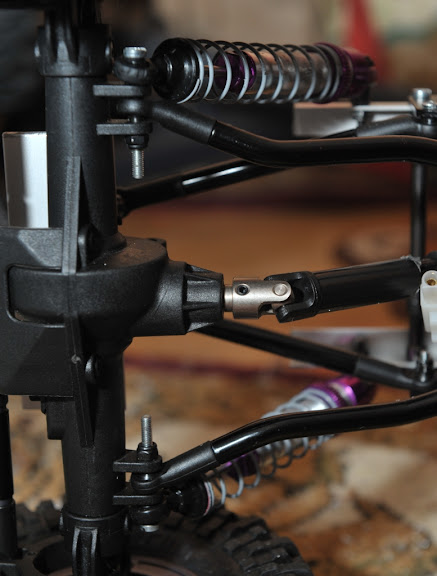 So far, that's the best i could do. Lack of skills, lack of tools, no space and almost no time at all - everything missing is filled with passion. That's the best i can. I never tried this rig to see how it performs on the field (you can see the tires, they are brand new), all i did is based on what i read here and the clips i saw on the net. I hope i am going the right way. Also, keep in mind in Romania the first crawling competition ever will be in a month (i wonder how it would be), and it's a fact that the difficulty level wont be even close to what you guys are used to. And, unfortunatelly, i think that;s the way it will be. I wanted and still want something higher than stock version, but sometimes i wonder why .... well, the Lord's path and human mind are very difficult to understand. Chris Last edited by jimmyshor; 01-20-2011 at 02:14 PM. |
|
| |
|
01-21-2011, 02:24 PM
| #10 |
| Quarry Creeper Join Date: Jan 2011 Location: Romania
Posts: 270
|
Hey guys ! I continued today the work i started yesterday. Partial results: 1) The ground clearance is 3.25 inches. Just perfect (i presume) 2) The HPI WK shocks do have some problems, as they dont compress and decompress equally..somehow they should be replaced, but let's see how they handle in the real world I want to move the servo on the left (or the right) and make a plate for the battery pack. I am confused though about the length of the arm between the servo horn and the left (or right) knuckle...any sugestions ? I also want to use larger tyres, somthing like Proline Chisels G8, but when max-turning left (or right) they hit the shocks. I thought some wideners might help, any opinions ? (Ommit the HR for Scorpion, as i own those and they dont fit). Here are some pictures:    |
|
| |
|
01-27-2011, 03:31 AM
| #11 |
| Quarry Creeper Join Date: Jan 2011 Location: Romania
Posts: 270
|
I saw a picture, here it is:  any advantage of linking the lower end of the shocks directly on the lower links ? Advantages and disadvantages ? |
|
| |
|
01-27-2011, 08:07 AM
| #12 |
| Quarry Creeper Join Date: Jan 2011 Location: Romania
Posts: 270
|
I ordered HR rear lock-outs....are there any adjustments to make in order to install those?
|
|
| |
|
01-27-2011, 10:01 AM
| #13 | |
| Rock Stacker Join Date: Dec 2010 Location: Roanoke
Posts: 55
| Quote:
you will use the small bearing on the inside of the lockout Thomas has a diagram of how they go on (in case you need to shim, I didn't) just search lockout and you will find it | |
|
| |
|
01-27-2011, 10:43 AM
| #14 | |
| RCC Addict Join Date: Apr 2010 Location: Ringwood
Posts: 1,233
| Quote:
for a 22 you dont need to do that | |
|
| |
|
01-27-2011, 01:05 PM
| #15 | |
| RCC Addict Join Date: Sep 2010 Location: Malta, NY
Posts: 1,340
| Quote:
| |
|
| |
|
01-27-2011, 01:32 PM
| #16 |
| Quarry Creeper Join Date: Jan 2011 Location: Romania
Posts: 270
|
Well...today i had an interesting day. My saddle packs arrived finally, so did my aluminium knuckels and rear lockouts. With the rear lockouts i had no problem at all, but there was a pain in the ass to change the knuckels from the rear. Literally, i had to cut one using my Dremel to pop-out the shaft and the bearings. Incredible !!! Now, the saddle packs are quite big (5700mAh - i like big playtimes, that's me). I managed to install one on the plate in the back, but in the front part i cant figure a place to put it. The only chance is to move the servo to the left or to the right. Can someone help me with a drawing ? Regards, Chris ! PS1. Pictures...to come ! PS2. The original creeper body arrived also, ain't painted, yet it looks kind of green though...maybe from the protective film. I'll think about the colour. |
|
| |
|
01-27-2011, 05:06 PM
| #17 |
| Newbie Join Date: Jul 2010 Location: Kennesaw
Posts: 28
|
you can use a plate similar to the one you made for the rear axle and then transfer the servo holes from the stock servo plate to which ever side you prefer. when you do this you will have to re-configure you steering link from the servo to the steering knuckle. did your creeper come with the red motor mount? looking good so far! Last edited by hexonox; 01-27-2011 at 05:08 PM. |
|
| |
|
01-27-2011, 10:33 PM
| #18 |
| Quarry Creeper Join Date: Jan 2011 Location: Romania
Posts: 270
|
Yeap, my Creeper came with the red motor mount. I tought the priciple would be the same as for the rear plate, with relocating the servo position, but dont have enough material for making testing plates, until i find an optimal servo position. The only reason i am asking for dimensions/drawings is because i dont have skills or tools to do testing work, not to mention that i live in an apartment and the noise would bother the neighbours (as my job starts at 7.30 in the morning and ends aroud 7.00 in the evening). For the moment, that would be the situation. I'll post some pictures when some progress is visible. |
|
| |
|
01-29-2011, 09:44 AM
| #19 |
| Quarry Creeper Join Date: Jan 2011 Location: Romania
Posts: 270
|
The Creeper died. Permanently. The tranny messed up again, for an unknown reason, and, for an unknow reason too, when i tried to fill the shocks with oil, the bottom suport from the front axle got broke. Tired of it, sorry for all the money spent with it, i'll stick to Axial. Way better, more durable. So, this is my last post here, i thank you guys for all the information you shared, and most of all.....have fun with your rigs. Regards, Chris. |
|
| |
|
01-29-2011, 02:33 PM
| #20 | |
| RCC Addict Join Date: Apr 2010 Location: Ringwood
Posts: 1,233
| Quote:
its an exceed maxstone | |
|
| |
 |
| |


 Linear Mode


