     
|
Locking your diffs Out of the box, your stock truck runs open' diffs just like your average full scale car. The diff centre allows the wheels to turn at slightly different rates for cornering but this only works when both wheels are in contact with the road'. Once you get a tyre off the ground, as you do when you go crawling, all the torque is allowed to go to the tyre with the least traction meaning no motive force goes to the tyre with traction. If you get two wheels in the air (one front and one rear) all your torque goes to the two wheels in the air and none to the ones on the ground. The end result is that you go nowhere
Locking your diffs is something simple that you can do to prevent this from happening. By making the diff centre solid' you effectively lock the left and right wheels of each axle together forcing them to turn at the same rate regardless of which one had traction and which one doesn't. You can lock the diff with many different products such as two part epoxy or you can provide a LSD (limited slip diff) effect by using a softer material. You can lock the front, the rear or both with different effects on handling so we suggest you experiment with one locked diff either front or rear and see which you prefer. If you're like us and just use your truck for crawling, lock em both, you won't regret it.
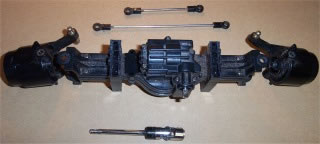 |
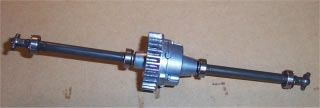
Here's a rundown on how you would do it for your Juggernaut but this theory can be applied to any diff. First you have to remove your axle from the truck and disassemble it. |
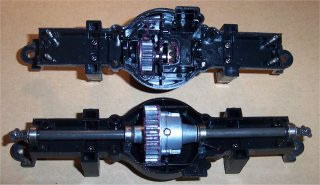  |
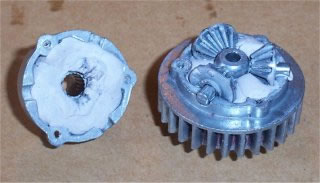
The axle shafts and diff centre are easily removed once the axle is apart and the shafts simply pull out of the diff centre. |
 |
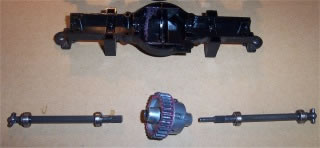
The next step is to disassemble the diff centre itself and thoroughly clean all the components. This will help the adhesion of the locking compound to the components. |
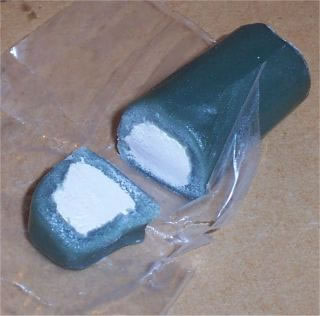 |
Once your diff casing, spider gears and bevel gears are clean it's time to prepare your locking compound ready to lock that sucker up. We like to use JB Weld or CIG Epoxy putty as they give great, lasting results and a truly positive lock. Some people have used Araldite, Solder, Silicone, Hot Glue, Silastic and many others with great success. The silicone and Silastic options give you a limited slip effect because it gradually gets chewed up by the diff gears and provides resistance rather than prevention of the gears moving. This can be good if you run your truck on concrete or asphalt at all as a positively locked diff reduces turning radius and puts undue stress on your driveline components on surfaces with high traction. |
 |
Once you have prepared you locking compound for use (in our case, cutting and kneeding) you need to work quickly but do not rush, it is important that you take your time and so it properly. Place one of the bevel gears back into the diff casing remembering to replace any shims that were in there when you pulled it apart. Fill the diff centre with your locking compound enough to completely fill all the gaps but not too much so that you can't get your spider gear assembly back in. A bit of grease will help keep the locking compound off anything you need to, and a bit of blue tac will stop the liquid forms from leaking out through your shaft housing. Press your spider gear assembly into place ensuring that your gears have meshed properly. If you use a putty compound you will need to press firmly if you have put enough in there. Remove any locking compound from the centre hole and axle shaft housings. This is very important. Replace the bevel gear and any shims into the other half of your diff housing and fill this side with locking compound in the same manner as the first half. Ensure that there is no compound in the centre hole or axle shaft housing and proceed to push the two halves together. Again, if you have filled the two halves properly you will need to press quite firmly and should see some compound squish' out the sides. Ensure that the centre hole and both axle shaft housings are free from locking compound then gently push the two axle shafts into place. It's a good idea to pull them back out and clean it again if you feel any resistance. Leave the axle shafts in place for curing (as per instructions) or you can even reassemble the diff while it dries. Make sure you re-grease all your gears with ceramic grease before you put the axle case back together and don't forget your bearings. Put it all back together and back on your truck, leave it to cure (overnight to be sure) and go have some Rockcrawling fun. You'll notice the difference immediately. Hope that has helped. |
 |
This article was written by Matt and Adam from Monster Truck Parts of Australia. Please show them your support. |
|
|