| |
 02-12-2009, 09:12 AM
| #181 |
| RCC Addict Join Date: Nov 2005 Location: Utah
Posts: 1,530
|
Applause!
|

|  |
| Sponsored Links | |
| | |
|
02-12-2009, 10:00 AM
| #182 |
| Rock Crawler Join Date: Sep 2007 Location: Colorado Springs
Posts: 960
|
Great looking work Jon!!! But you still have some issues I wouldn't turn your back on that Cato guy, I think he has a man crush on you |
|
| |
|
02-12-2009, 10:10 AM
| #183 |
| I wanna be Dave Join Date: Aug 2005 Location: NE Ohio
Posts: 8,817
|
WOW This thing is turning out amazing! You have way more patience than I do.. |
|
| |
|
02-12-2009, 10:25 AM
| #184 |
| Rock Crawler Join Date: Jan 2006 Location: SUPERMOTO heaven
Posts: 695
| If you need me to hot-glue it up I can. I'm getting the itch to do some "Mad Max" modifications to my pajero, wanna go for a trail run?? J/k, awesome work Jon. Your patience astounds me |
|
| |
|
02-12-2009, 03:22 PM
| #185 | |
| RCC Addict Join Date: Feb 2008 Location: Hiatus..sutiaH
Posts: 1,620
|
Thanks for all the props guys. I am really trying to make this thing to the best of my abilities. Quote:
I am going to cut the hardtop in half tonight and lower the angles a bit. It sits too high for my tastes. That is when I will need the hot glue!!! | |
|
| |
|
02-19-2009, 10:16 AM
| #186 |
| Rock Crawler Join Date: Sep 2007 Location: Colorado Springs
Posts: 960
|
Been a week already, Is it done yet |
|
| |
|
02-19-2009, 04:47 PM
| #187 |
| RCC Addict Join Date: Feb 2008 Location: Hiatus..sutiaH
Posts: 1,620
|
Nope, spent the week rebuilding the hardtop for the 4th time and I also stripped the bumper to fix some spots I disliked. Tonight I am forcing myself to get some of the chassis finished. I need to get this damn thing rolling! Been 7 months and all I have focused on is the body and armor. I am setting that all aside for a while. Coil/shock mounts, axle adapters, and maybe a t-case fitting will be completed tonight. I am sick of this build and want it done!!! |
|
| |
|
02-19-2009, 05:00 PM
| #188 |
| RCC Addict Join Date: Nov 2006 Location: southaven
Posts: 1,934
|
ya you need to bring a roller to omaha  he11 with the comp i just want to see this thig in person. |
|
| |
|
02-19-2009, 08:04 PM
| #189 |
| [HOONIGAN] 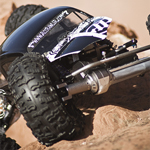 Join Date: Nov 2005 Location: Grand Junction
Posts: 4,269
|
Dang, this thing is turning out so awesome! I can't wait to see it all mocked together with some paint on it. ...and that hardtop is ridiculous! |
|
| |
|
02-19-2009, 09:33 PM
| #190 |
| RCC Addict  Join Date: Jan 2004 Location: Gunbarrel
Posts: 1,167
|
Amazing work! I look forward to the day that I get to see this thing in person. Keep up the great work Jon! |
|
| |
|
02-20-2009, 07:00 PM
| #191 |
| I wanna be Dave Join Date: Feb 2009 Location: Detroit
Posts: 2,075
|
flares should be black as bumper and stick with the yellow. looks and detail are great! wow your talented..... |
|
| |
|
02-22-2009, 10:26 PM
| #192 |
| RCC Addict Join Date: Feb 2008 Location: Hiatus..sutiaH
Posts: 1,620
|
Ok, she is coming along. After my last pics I realized that the hardtop was all wrong. It looked great, but the angles were to severe and it sat to high. The window frames on the doors were not parallel to the bottom of the door sills. That and the window frame on the doors had too sharp of a curve. It needs to be a really wide curve. So I cut it up for the 3rd time.     I don't have any new pics of the redesign but will soon. I dropped the top for a bit as I want to finish the damn chassis and make this a roller. So I moved onto the transfer case and skid issue. The issue is that I am mounting all the links inboard like the 1:1. Well, the scale aspect is not working right. I cannot simply mount the transfer case to the bottom of the skid as the link mounts won't allow it to sit. So, I had to improvise and make some mounts to elevate it to clear the links.      Bolted up.   Looks like a skull, lol.  Parallel to the crossmember of course.  I will have to post up the finished skid with all 8 link mounts as I didn't take a pic yet. But, here are the cut mounts. If anyone ever needs to make these, just order them and cut em up. Much easier than making your own.  |
|
| |
|
02-22-2009, 10:34 PM
| #193 |
| RCC Addict Join Date: Feb 2008 Location: Hiatus..sutiaH
Posts: 1,620
|
Now, I have been toying with the suspension for months. Again I want a real scale version of the Rubicon Express 5.5" Extreme Duty Lift. But, their design includes a single arm for the front arms that splits into a dual mount. Way too tricky and time consuming to replicate in scale. I know it has been done but I want it to work without issue. So, axle supports with link mounts were the idea. But, I still need spring perches on the axles. So I came up with this.         But of course I brazed the mounts in backwards. They need to point away from the diff, lol. Damn beer influenced brazing. So I re-did them.   Here is the exactly what I was after.  I will make spring clamps to mount to the two screws - easy and secure.  On the axles.     |
|
| |
|
02-22-2009, 10:41 PM
| #194 |
| RCC Addict Join Date: Feb 2008 Location: Hiatus..sutiaH
Posts: 1,620
|
I know it is crooked, but that is cause I was trying to hold in 4 links with one hand. You get the idea.   Obviously mockup links. But you can see that the links will all be inboard the frame rails. Mission accomplished.  So, now on to the hardest part of the build for me. This is the part I have designed and drawn 20 times over the months of building. I need to make a single piece that hold the shocks and the coil buckets to fit to the front of the frame, and that will support both pieces.  So I just decided I would go with what I felt would work after looking at a pic last night. To make them accurate I need to make two at the same time.     The reason it was so hard is the piece has to match the contour of the frame rails. So I will have to make another backplate for these. They are not fitted to the frame yet as I need to braze in the shock mounts before I continue. I also have noticed that the RC4WD 90mm shocks are going to be to short for the front suspension. I will need to order some 100's Bot it will work. So, I have a couple of new issues like motor/transmission mounting with all this junk up front. That and the servo is gonna be cramped as well. But I am sure I can figure it out. Ok, lot of typing, hope you all like. My goal is to be a roller by Tuesday as I am off from work. Thank you cable guy!! Later, Jon Last edited by O.C.D.; 02-22-2009 at 10:48 PM. |
|
| |
|
02-22-2009, 10:44 PM
| #195 |
| Rock Crawler Join Date: Jul 2006 Location: Kelowna BC Canada
Posts: 691
|
nice job... |
|
| |
|
02-22-2009, 10:52 PM
| #196 |
| RCC Addict Join Date: Nov 2006 Location: southaven
Posts: 1,934
|
i think the top will look mutch better, the rest looks great also. |
|
| |
|
02-22-2009, 11:04 PM
| #197 |
| I wanna be Dave Join Date: May 2006 Location: FOUR 8 OH
Posts: 4,913
|
The rear of a TJ has coil springs contacting the frame... although you probably knew that and are just using a rear axle for front mock up? Overall your work is looking amazing!!! |
|
| |
|
02-22-2009, 11:06 PM
| #198 |
| Gettin back on the horse Join Date: Feb 2006 Location: Hoonsville
Posts: 6,671
|
Damn buddy you are going fab crazy! Looks awesome so far. How long out until she is done?
|
|
| |
|
02-22-2009, 11:18 PM
| #199 |
| RCC Addict Join Date: Feb 2008 Location: Hiatus..sutiaH
Posts: 1,620
|
Top looks 100% better. Yup, rear axle for mockup. Doesn't move as much. Rear coil buckets will be a breeze, lol. Ty, how was your ink session today? lol. Got a Vag on ya too?! I am cruising so it will be hopefully finished for Omaha next month?! |
|
| |
|
02-23-2009, 07:02 AM
| #200 |
| RCC Addict Join Date: Jun 2008 Location: Monroe, NC
Posts: 1,547
|
OC Doc is back. Justin |
|
| |
 |
| |


 Linear Mode


